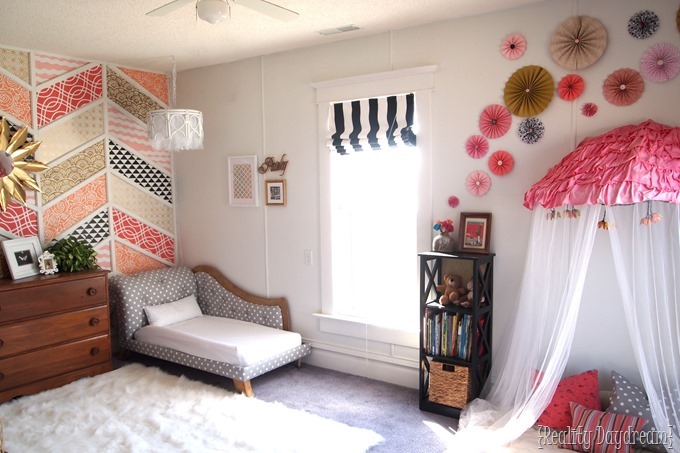
With all this unexpected time on my hands, I was cruising my own blog the other day, looking for a certain project I was referencing from The Twins’ Big Girl Room, when I realized that despite sharing dozens of tutorials that make up their room makeover, I never did an actual room reveal… with project links and sources all in one place! So since I’m a little under the weather and don’t have a new project to share today, I’ll do a proper ‘room reveal’
 *This post contains affiliate links*
It all started when I set my mind to building the twins actual fainting couch toddler beds. It was a big undertaking, but I design and built these babies mostly by myself (Nick helped with the upholstery when I needed an extra set of hands). This was my first big building project that I tackled… AND my first big tufting/upholstery project, come to think of it. To say I’m proud of these would be an understatement.

Phase 1 of these beds explains my thought process behind the design, as well as building the ‘carcass’. And Phase 2 is the upholstery and tufting. I was careful to share each step-by-step process in these tutorials, and several readers have followed the instructions and build their own DARLING fainting couches.
I’m not typically one to gravitate toward symmetry. But with two mirror-image fainting couch and a giant blank wall… well let’s just say it was screaming to be an accent wall. I thought it would be so fun to do a ‘pattern within a pattern’, and that’s how the Patchwork Herringbone Stencilled Accent Wall was born. This took me a lot of hours, but they were fun hours. Tutorial here, and reveal here.

The craigslist dresser came next, and naturally it needed a DIY Starburst Mirror above it. Can you believe it’s made out of cardboard and gold spray paint?!

Because of the placement of windows, panel curtains wouldn’t be able to hang nicely… so I decided to make some Roman Shades using our existing mini blinds! It was easier than I thought it would be, and I loved that I could customize and use any fabric I wanted! I ended up choosing this black/white bold stripe. (and I lined the back with blackout curtain liner which was the BEST decision evah.


We finished off THIS side of the room with some DIY Chandelier Pendant Lights using tulle and twinkle lights, and I sewed up some super soft comforters to finish of those darling fainting couch toddler beds! The little gallery wall each girl has on the wall beside her bed. The girls did the pattern paintings with finger paint, the zentangle letters were done by the girls’ Grandma, and the names cut out of wood were done by me!


Moving along to the other side of the room!
I cut an old Papasan Chair frame in half with a reciprocating saw, and affixed it upside down with L-brackets to make this dreamy Canopy / Reading Nook! And the papasan cushion is perfect for the floor of the canopy for ultimate coziness.


I made some Scrapbook Paper Pinwheels in various sizes to add a little whimsical interest to the wall around the canopy. I love that it pulls together the colors from the Herringbone Patchwork Accent Wall on the other side of the room!


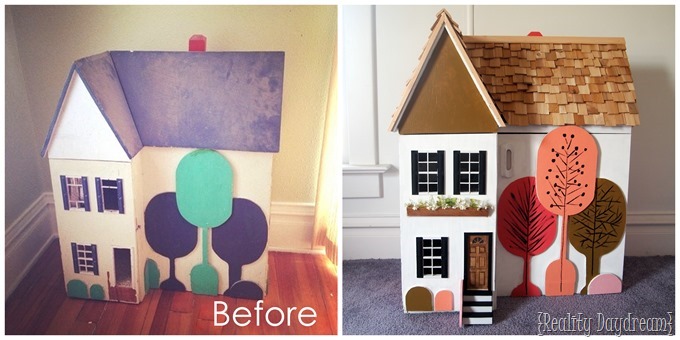
My parents saved my childhood dollhouse that my Grandfather built for me when I was a little girl. It needed some work, but I love how it turned and that it’s a sentimental piece that I’m passing down to my girls!

And I had SO MUCH FUN making over the inside (maybe too much fun).


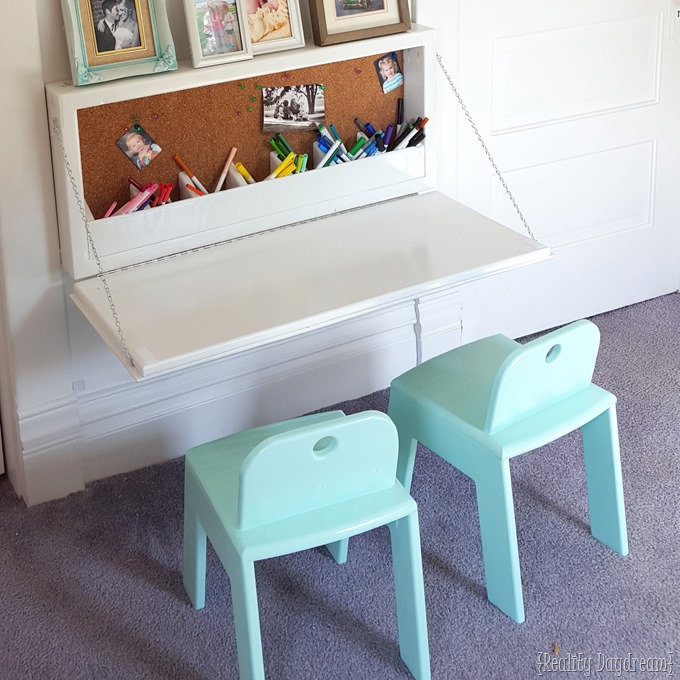
In the corner by the closet, there’s a bit of wall that needed something, but I wasn’t sure what. Since the door swings open toward this wall, having any furniture there was out of the question. So I decided to build a ‘Children’s Secretary Desk’ so that it would fold up against the wall when it isn’t in use! It’s like a Murphy Bed… only a desk! I love that it has a chalkboard when it’s in the ‘up’ position. And the floating shelves above are just 2×4’s painted white with pocket holes to affix them to the wall!


We built the kid chairs (a Land of Nod knock-off) and I made the butterfly clock using my scroll saw. There are tutorials for both!

This room has been an amazing labor of love, and I absolutely LOVE how it turned out! The girls love it too.

And now I’m trying to figure out how to change things up now that the girls are growing out of their toddler beds. Any headboard ideas for a full size bed that wouldn’t compete with the busyness of the patchwork wall behind it??
~Bethany
~~~~~~~~~~~~~
Thanks for pinning!!


I LOVE THIS ROOM! Especially the wall!
THIS. IS. AWESOME!!!!!!!!!!!!!!
http://www.wanderlustingbydesign.com
That room is great but those beds are amazing!!
Thanks Julie! <3 <3
I love their room, it’s so happy.
Thanks Girl! 🙂