Welcome to our 116-year-old home on 5 grassy acres in the middle-of-nowhere Iowa! I love the character of old homes, while my husband gets a real kick out of the fact that THERE ARE NO RIGHT ANGLES. Click here to read the story about us finding our dream home.

It seems only natural to start our home tour at our doorstep. We put in this giant rounded patio and pergola a few summers ago, and absolutely LOVE it. We’ve added a firepit and picnic table and spend many a’summers night out here soaking up the good life. (disregard that pile of rubble. It’s long gone)

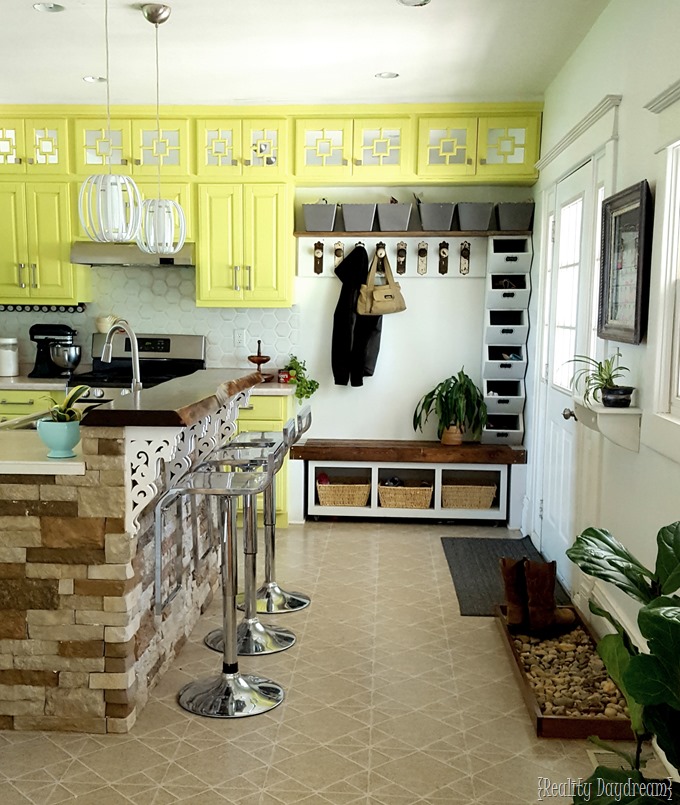
As with many old farmhouses, the actual front door rarely gets used. Everyone enters right into the kitchen through this door. The Wooden Doormat, Geometric planters, and Kilim House Number Art were all DIY projects! We also recently updated our front door to this gorgeous shade of aqua.

Our kitchen was the first thing I fell in love with when we found this house. It just felt GRAND. We painted the walls dark teal with a glossy swirl accent wall, and painted the backsplash to look like tile. It transformed the whole room and made it feel unique and ME!

This served us well for several years… BUT (I know you felt that but coming!), I started to be bored with it and needed change. It all started one day when I impulsively decided to take a reciprocating saw to the kitchen island to start modifying it to be a breakfast bar while Nick was at work. That was the beginning of a series of ambitions projects that I tackled all by my lonesome! After finishing the breakfast bar, I decided to tackle the ‘mudroom corner’ by adding a built-in bench, a rolling bench underneath, and cubbies for hats/mittens/etc. OH! And you guessed it, we painted over the dark teal. We’ve recently extended the cabinets up to the ceiling and across the mudroom area… and painted them a citron-y chartreuse color. We also stenciled the backsplash with a shimmery iridescent white, and added some interest to the pendant lights with embroidery hoops.
Check out the full REVEAL of our Kitchen here.
Next is our dining room! I love that our house has the original 116-year-old hardwood floors… but that’s about the only thing that stayed the same in this room. Would you believe it had turquoise sponge-painting with beige painted trim when we moved in? I like to think it’s at least improved since then.

The walls got painted a pale gray (SW Site White) and we popped up some crown moulding. The following are tutorials for the lined curtains, vintage-esque starburst clock, and modifying bamboo shades to fit your windows.
The dining set was passed down to me from my Grandmother. It was in rough shape, so I did my wood stain art technique on the top, and the chairs got painted and reupholstered.

One of my favorite pieces in our whole house is this credenza. You’ll just have to read the post.
![Credenza-Overhaul-Transformation-Saw[1]](https://realitydaydream.com/wp-content/uploads/2015/05/Credenza-Overhaul-Transformation-Saw1.jpg "Credenza-Overhaul-Transformation-Saw[1]")
Just off the dining room is our downstairs bathroom / laundry room. This room has been a work in progress for over a year, and is JUST NOW feeling semi-finished. We redid the flooring, built the vanity from scratch, installed the backsplash and added the dangly edison lights.

On the other side of the room, Nick did all the wiring and plumbing to move the washer and dryer. He also built all those shaker cabinets. Doesn’t this just make you want to blast some Meghan Trainor and fold some laundry?

I realized that the toilet isn’t in any of these shots, but it’s there… I can assure you. And if I’m going to leave anything out, the toilet seems like the perfect choice. You can read through this whole room transformation post by post here. We still plan to install under-cabinet lighting, but for now we’re checking this room off our list. Phew!
Moving along!

Our living room used to be closed off from the dining room by A WALL. Nick and his dad tore it out one weekend, and Nick framed in the arches. We had to have the giant column to house the duct work.

The following are tutorials for the board and batten, stencil job above the board and batten, and crown moulding. I also stripped and stained the front door!

This secretary desk is where I’m sitting right at this very moment, and is another one of my favorite of all our furniture transformations! I whitewashed/glazed the exterior and added a bunch of hardware so it looks like an apothecary cabinet, and I painted the inside white and did my own layered stencil treatment.

There’s a small room off the living room that’s technically a bedroom because it has a closet. But it doesn’t practically work for us as a bedroom… so we call it the studio to sound fancy. It’s slowly turning into my ‘creative space’ (because craft room is super kitchy), but it has a looooong way to go.

The one little corner of this room that actually feels DONE is this mid-century hutch that houses all the girls’ creative/crafty things. I added removable wallpaper to the backboard of the hutch for a little added interest while maintaining the integrity of the genuine mid-century-ness. The paint dipped paintbrush clock was a super fun DIY. You should totally make your own!

Let’s head upstairs now, shall we?

The first room you come to upstairs is the bathroom. There’s still a lot we want to do in this bathroom, but we have enough other things on our radar right now that this room is on the back burner. It’s come a long way though! We extended the vanity and added the sink, built a butcherblock counter, and installed our own DIY Mason Jar Mosaic Backsplash. Best idea EVER.

I’m not even going to show you the rest of the room. Because NO.
Next room? Our ‘master’ bedroom! I put ‘master’ in parentheses because in houses this old, there is no such thing as a master room. All the rooms are the same size: TINY. But we make the best of these situations.

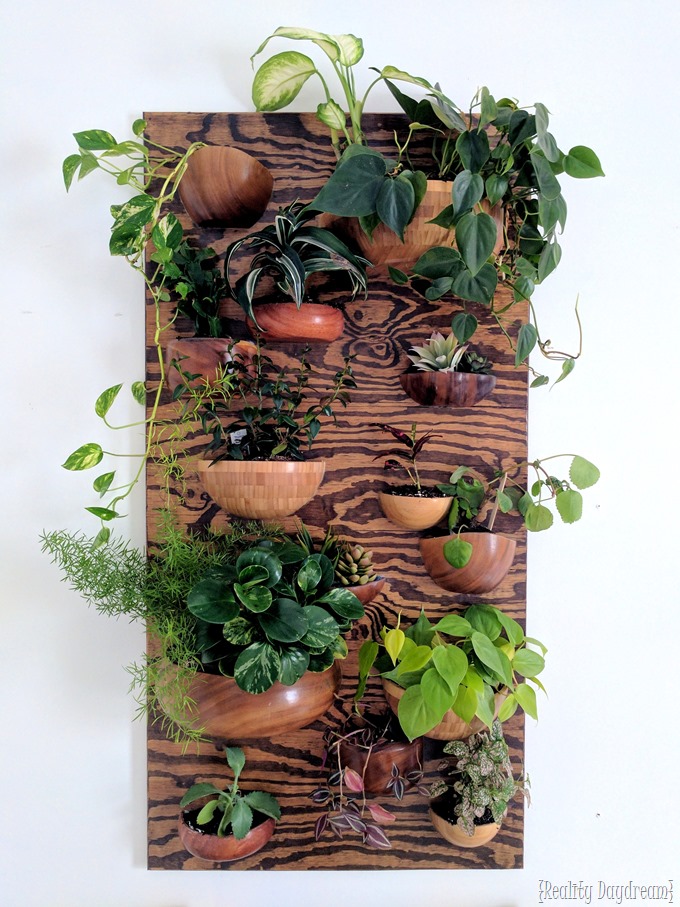
We went with a boho feel in this bedroom, and absolutely LOVE IT.

We even made this ‘Living Wall Vertical Garden’ using repurposed wooden bowls. This is my favorite feature of the whole room!
The next room down the hall is the nursery. We completely DIYed everything in this room when I was pregnant with the twins. We still love it and have left most of it the same even after our new baby girl is now living here.

I painted the walls, made the curtains, the tissue paper pom pom mobile, painted the crib, made the crib skirt, and bumper pad… and Nick built the floating shelves and book ledge. Holy run-on-sentence! Gasping for air now.

My favorite element of this room is the changing table. This is an old cabinet that we pulled out of my Grandfather’s barn. It was in ROUGH SHAPE. We fixed it up and gave it a new lease on life. You’ve got to see the whole story (including before pics) here! I love that the damask I painted is a perfect match to the pattern on the curtains.

For a full reveal and cost breakdown for the nursery, click here! I’m pretty proud that we completely furnished and decorated that nursery for under $400.
And FINALLYYYY… last but certainly not least. The twins’ room:

UGH where do I even start with this room. I just love it SO MUCH.

I can’t decide between the DIY Fainting Couch Toddler Beds or the Stenciled Herringbone Patchwork Wall for first place as my favorite thing in this room. Or the Papasan Chair turned Canopy Reading Nook? I can’t. I just can’t choose. Don’t make me choose.
Soooo many fun projects in this room. I’m just going to list them below in the form of images since I already have these made up. Click each image below to be taken to that particular tutorial!
 |
 |
") |
") |
 |
 |
") |
 |
This concludes our home tour! Do you feel like we’re fully BFF’s now? You’ll be relieved to know that my house usually looks like this. Thanks for hanging in there through this excessively long post! With all those projects and links I needed to go hunt down, I’m actually impressed with myself that it’s only taken me 4 hours to write this! Phew!
If you decide to try (or have already tried!) any of our projects, please send us pics! We love seeing what you guys come up with… and knowing that we inspired someone is THE BEST FEELING EVA.

Let’s stay in touch via social media!
- Facebook: @RealityDaydream
- Instagram: @RealityDaydream
- Pinsterest: @Reality Daydream