If you don’t already, you should subscribe to our blog so you get an email every time we publish a new blog post (not more than 2 times a week… TOPS)! You can also follow us on Facebook and Instagram so you don’t miss ANY of this madness!
~~~~~~~~~~~~~~~~~~~~
We’re not knocking out furniture projects like we used to… I’m sorry what was that? You’re wondering WHY NOT?
Have you ever been in a commercial airliner with a screaming toddler for any amount of time? Now close your eyes and imagine that same noise… multiplied by TWO, for a duration of infinity. It’s exhausting. Physically and emotionally draining.
Moving along!
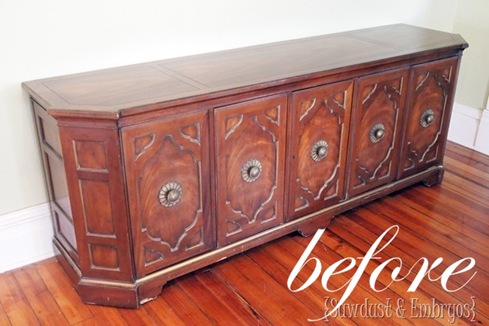
We call it …the credenza…
But truth be told, I have no idea what the difference is between credenza, buffet, sideboard, and bureau. If you are secretly hiding this knowledge, PLEASE educate the rest of us in the comment section.
In order to keep you from convulsing, let’s just call it a credenza (cause that’s what it was advertised as on Craigslist).
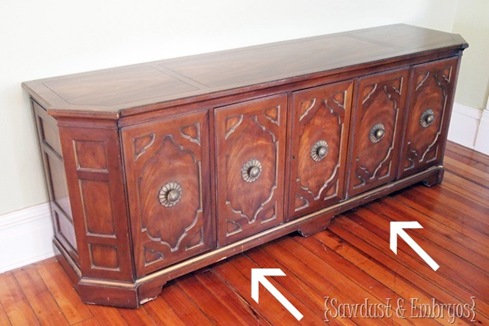
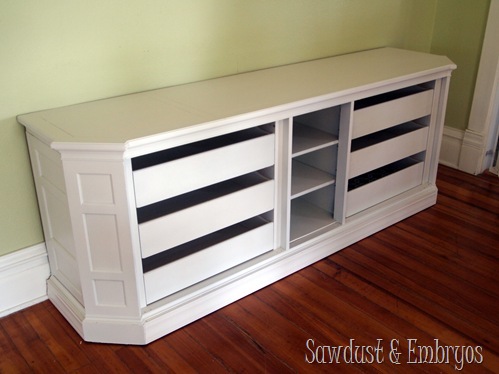
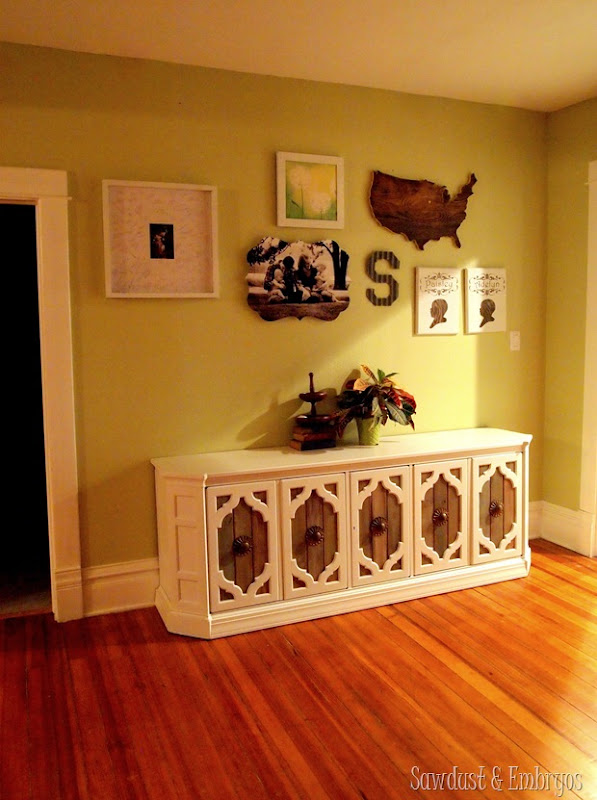
The credenza is a part of our dining room. I love it’s character and the fact that we scored it for a few dollars. I knew that I eventually wanted to ‘do”’ something to it, but wanted to wait for inspiration to strike before we pulled the trigger. It’s been living as-is in our dining room for almost a year… and while the wood finish didn’t bother me much, it drove me NUTS that the girls’ cars, balls, toys would roll under there into the Credenza Bermuda Triangle. ALL THE TIME.
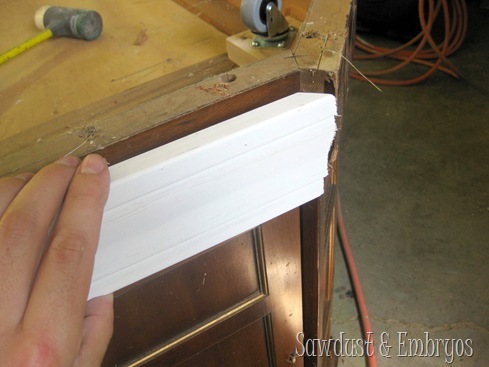
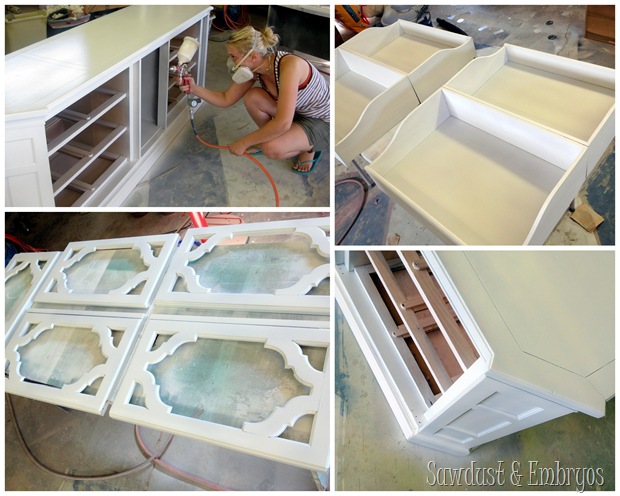
So it became an urgent priority to have a piece of trim slapped on the front of there. Using our RYOBI Miter Saw for the perfect angle, Nick cut some pre-primed basic trim to cover that front area.
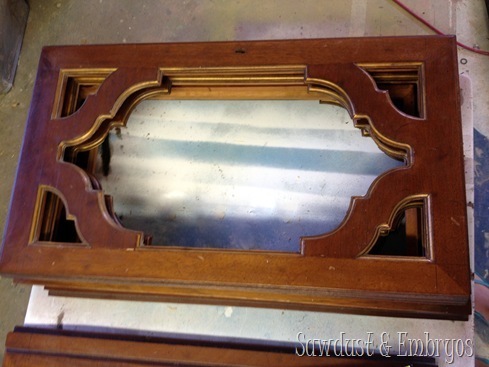
Then, while he removed the backing on the doors (which was a lot harder than it sounds, but is such a specific situation that I’m not going to go into detail)…
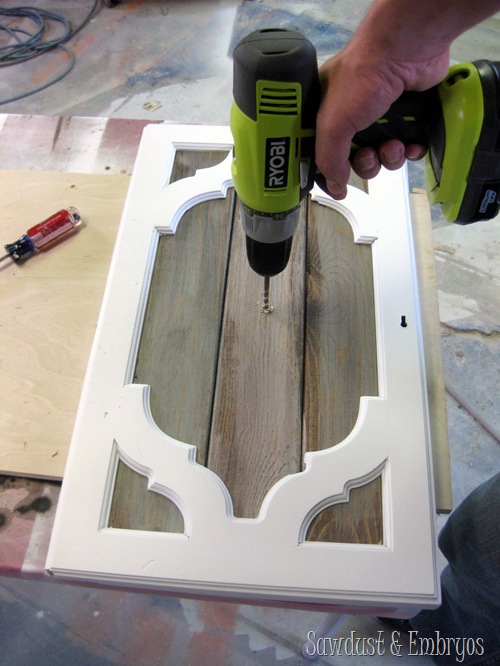
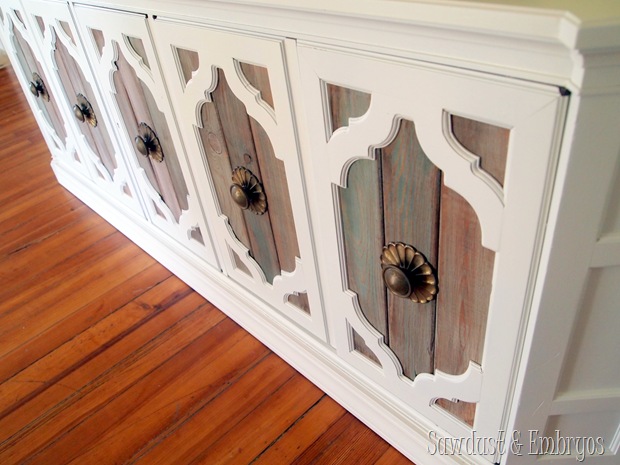
…I painted some 1×4 pine boards using the same techniques from my ‘Barnboard’ Tutorial using mint, gray, and a splash of turquoise (GASP!). Do you know where I’m going with this???
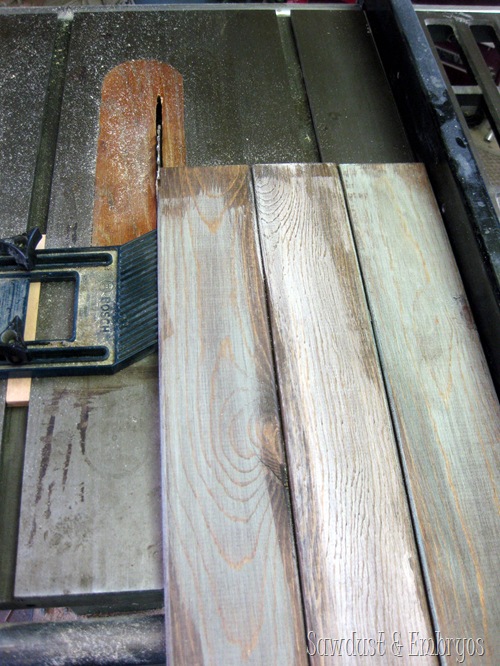
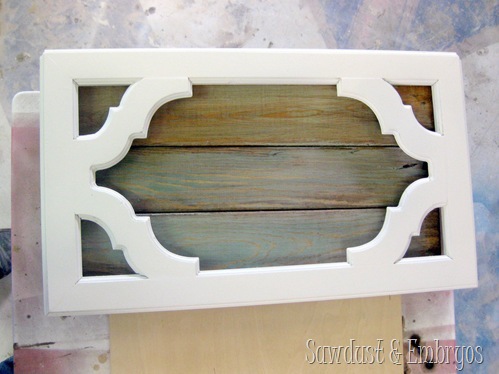
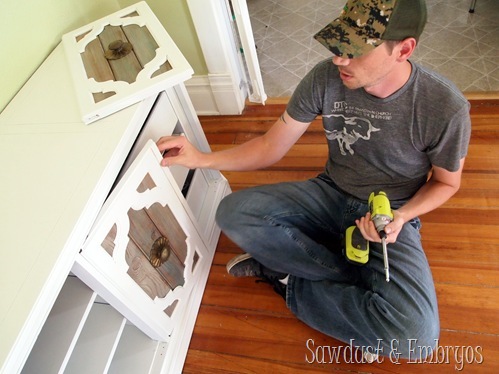
Next, Nick glued my ‘barn boards’ together in sets of 3, and shaved down the sides with the table saw until it was a perfect fit for the doors.
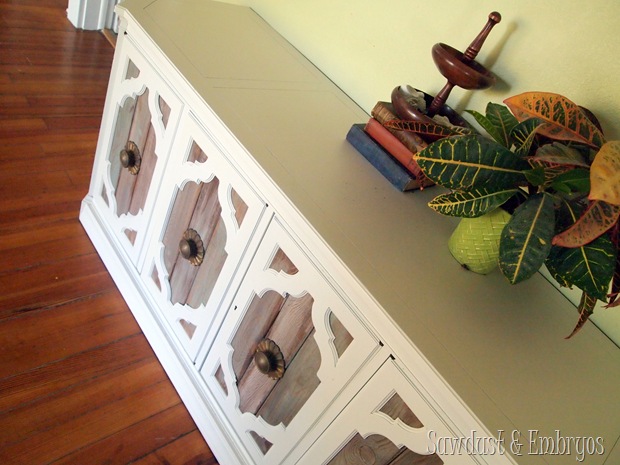
He used a nail gun to secure the backs of the doors into the frame (sorry no pic of that), and then drilled a hole for hardware! I love the original hardware. You just can’t beat the real thing!
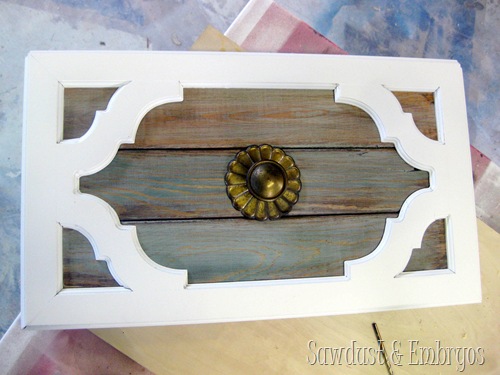
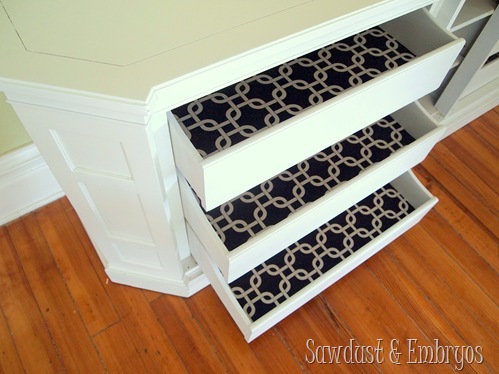
All we have left is to slap on those hinges! But not before adding some designer fabric to those drawers!
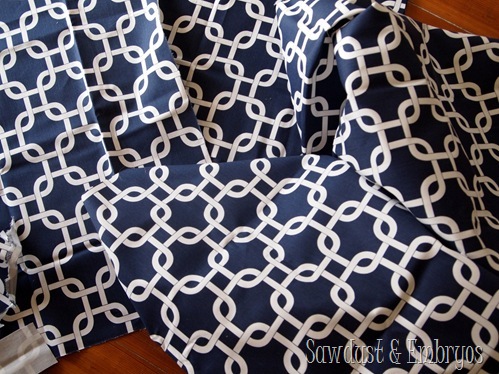
While at Haven blogging conference, some of the amazing vendors hooked us up with ‘swag’… and my favorite item was this amazing navy/white fabric given to us from the Online Fabric Store. It’s gorgeous.
And it so happens that there was the PERFECT amount to line the 6 drawers in the credenza. If Nick hadn’t gone to the conference with me and gotten his own ‘swag bag’, we’d have been up a creek without a paddle! There’s just something so fresh and clean about fabric-lined drawers. It was time to get to work!
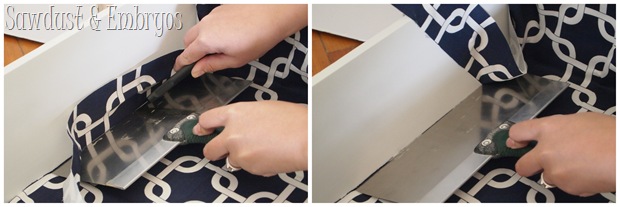
I cut the fabric to size with a little to spare on all sides, and then using a hefty putty knife to secure the fabric, I sliced it with a very sharp razor blade so my fabric would be the perfect fit!
Then using a craft/fabric adhesive spray , I lightly misted the back side of each fabric square (one at a time), and carefully lined it up in the drawer, and pressed down… smoothing all the wrinkles out. This whole process was SO EASY! Why haven’t I been doing this on all our pieces?
Now all we have left is to slap those doors on! Can you stand the anticipation?
This transformation was one that we worked on here and there, between other projects… so this all happened over the course of a month or so; during which time we effectively lost one of the hinges.
I mean… you reach a point with a piece of furniture where you’re super DONE! And soooo ready to stand back and take a gander at your handiwork. So having to search for a hinge in the 9th hour was unpleasant. But we FINALLY found it! I don’t even remember where, except that it was obscure.
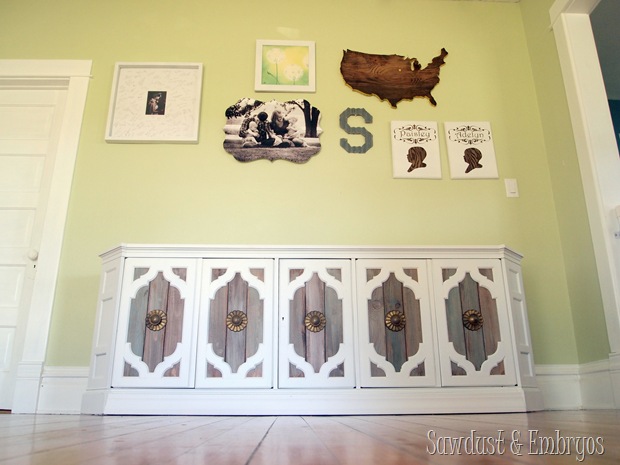
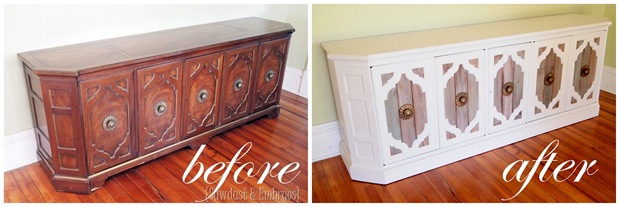
Now this is my kinda math equation:
Doesn’t that trim piece on the bottom just make it feel more crisp and… finished? And no more vanishing toys!
Here she is at night. 🙂
The beauty of this piece is that I can change out those ‘barn wood’ slabs for something else when I get sick of them! A funky geometric fabric would be fun, or a painted pattern or stain treatment… or a sparkly red fabric around Christmas time! I can already see Nick rolling his eyes.
This is one of my favorite pieces we’ve done! I love the character it adds to our dining room! Be sure to check out our furniture gallery for tons of techniques and inspiration!
And if you don’t already, you should subscribe to our blog so you get an email every time we publish a new blog post (not more than 2 times a week… TOPS)! You can also follow us on Facebook and Instagram so you don’t miss ANY of this madness!





Here’s what I found about the differences: https://unruhfurniture.com/blog/whats-the-difference-between-credenza-sideboard-buffet/
I love this! I am curious about the doors and the hinges. I feel like you can’t see the hinges at all from the outside. How is this even possible? Are they some type of magical hinge?
Great job! I think that the whole credenza, sideboard and buffet issue is a regional (think soda/pop/coke) thing. But a bureau, to me, is a bedroom dresser. Of course, I could be wrong. My grandfather and greatgrandfather would repurpose old pianos into furniture – I have a sideboard that they made, just shelves, no doors or drawers, but the top is curved and its mahagony.
Perfect! Great job ?
I love the makeover, but hate the multiple pages.
Hehe! THANKS Christine! We love your inner voice. 🙂
That's a GREAT suggestion Ashley! Thanks!
Thanks a great idea Karen! Thanks for the suggestion!
To quote my oh-so-eloquent now-ex-dh, "OMG That's butt-effin'-ugly!"
My inner voice said, "I can't WAIT to see what she does with it."
I read. I paged. and read and paged.
Coming to the doors photo, my inner voice escaped loudly and yelled, "OMG That's absolutely the coolest makeover yet."
Brilliant.
O.M.WOW! This "credenza" is gorgeous!
So cool. I am new to this blog but I really enjoyed reading through the project. It turned out beautiful! Great job!
I like the multi step posts and the faster loading of your homepage was a plus. Wonderful piece of furniture and very jealous you have time to do all that with the girls. Our b/g twins are giving us little time to do stuff but they are younger. So much screaming to look forward to, eh? Thought the teething and separation anxiety at the same time times two was alot!!! Ha ha. Love your website and look forward to many more of your projects.
I like the format, it was kind of like Christmas. I just kept clicking and there was more! I feel like you are never going to make everyone happy. I personally don't mind truncated posts since it makes it easier to gloss over the ones I am not interested in. This was the same for me, if I hadn't wanted to see the final piece I would have stopped clicking. Maybe offer all the steps at the bottom so that people can see where they are going (step 2 -barn wood, step 3 -fabric lined drawers, step 4- big reveal) so they can choose their own adventure…
I've never had trouble with loading your site. The multi page post felt like trying to get extra page views, being you asked. That said, I'd still read anyway!
Love your site. Love your work. Love your girls. I don't have problems with your site loading at all. I did 'not' like flipping to next page, next page, next page, etc. Sorry.
Er… you refinish furniture, paint a million backsplashes, do up your beautful home and look after 2 little people – not boring!! 🙂
I never would have thought to redo the credenza that way but I love it.
Suggestion: For lining drawers, I use preglued vinyl wallpaper. Cut it to size, dip it in water, and "wallpaper" the drawer. It will wipe clean and when you get tired of it, it comes out really easy. You can purchase discontinued rolls for a very reasonable cost!
Thanks for the encouragement and feedback Lindy!
Thanks Kristin! I'm feeling super twilight-zone-ish because I'm talking to you on the phone RIGHT NOW! 🙂 HA!!!
Ok about the fabric… we happened to get the same print! In fact, I wasn't sure if everyone got the same one, or if there was a variety floating around. Since you and Micheal got two different ones, you should make some fluffy throw pillows!!
Hehe! Thanks for the constructive criticism Angela! Be sure to send pictures when you finish up your credenza/dresser! 🙂
Gorgeous! Now I need to kick my butt in gear and redo our buffet/credenza/sideboard (which is really just a dresser)!
Hope this is constructive, but I really really hate the multiple page tutorial. It honestly kinda made me feel like you were gaming for extra page views – which I know isn't the intent, but it was a major turnoff.
Hope you all get to rest up soon, I love your monthly posts to the girls and seeing how much they've changed since I first started reading!
oh wow, what a project! First of all, I love the word credenza and have no idea how it is different from a buffet, etc. But hoping someone else enlightened you above. Second, I really was on pins and needles and needed to click through to the end (genious, my friend). Third, did Nick swap his fabric to get matching to yours? We got 2 different–which I love and have no idea what I will do with them.
This is absolutely AMAZING! I want one in my house!!!! I can never find awesome pieces like that on Craigslist! I'm so jealous! 🙂
The multiple steps was OK…..I was originally reading in email so I had to pop over to the blog but it was great once I popped over. I would rather have steps than taking forever to load.
Awww thanks Brittany! I always like to try out a new idea or technique with each piece of furniture… it's a disease!
You're so sweet Lauren! Thanks for loving it… and taking the time to comment! 🙂
Wow what a complement! THANKS!! 🙂
Becca, that's good to know! Because the whole point is definitely to make loading time faster… we'll take this into consideration! This was just a trial-run 🙂
Thanks for your honesty! This was definitely just a trial run… so we're taking all the feedback to heart. If we do this again in the future, it will only be for lengthy step-by-step tutorials.
I AGREE! There's just something about original hardware. There was a day when I would try to mess with the finish… but I always regret it. Embracing that brassy-ness never fails! 🙂
Thanks for all the positive words Renee! You're so encouraging! Thanks for being one of our loyal followers. I always look forward to your comments… <3
You are SO SWEET Mary! And you know? …I'd totally 'let' you babysit the sisters. I wish you lived closer too! HA! 🙂
Thanks Andi!
Beth! So glad you love the credenza!! And thanks for the feedback on the multiple-page format. I know it's inconvenient to come back to the first post to comment. At the end of the last post, I left a link to the first post to hopefully make it easier. But I might not have made that link obvious enough. Thanks for making the extra effort to comment! 🙂
Thanks Jennifer, we love it too! Thanks for taking the time to comment!
Thank you Sharon! You should you SHOULD!
Definitly one of my FAVORITE pieces you have remade. Seriously, instead of JUST painting, you went above and beyond. It is so gorgeous I cant stand it!
Sometimes I am just in awe of what you come up with. I would have never thought of the barndoor look but it totally works with the stark white. And I like the navy fabric in the drawers 🙂
You did a turquoise glazed vanity a while back that I love- I'm picturing something like that for the paint with copper. They make the peel and stick copper and stainless for appliances… that might work. Cheaper than a real sheet.
I can picture stainless steel with the white paint. Or mirror. Would be a nice clean look. But the slightly rustic and funky wins my heart…
Absolutely LOVE it, probably one of my favorites pieces you guys have refinished!!
Love the credenza make-over, but hate the new format! Too many links to click that I know I'll give up when my computer connection is slow!
Love the credenza and probably won't click past the first page in multi-step blog posts. Since it's not teaching me how to do something in steps, I would rather just see it on one page. If I'm following along to create the same object, however, I would maybe appreciate every step on a separate screen.
Wow! Need I say more. My favorite part is the original hardware…so stunning!
Beth: The orange hutch is my favorite but this credenza certainly makes a bid for #1! It is absolutely amazing! The navy and white are such contrasting colors that it makes the piece so sharp and clean looking. Very, very striking! As far as the new format, I loved it. I looked forward to each new page with much anticipation! You guys are amazing!
Loved the credenza, loved the tutorial, love you guys. Don't ever stop, I've learned a boatload from you. Wish we lived closer, I'd babysit the sisters. Or you could move to Florida.
This. Is. Incredible.
-andi
Best idea yet!
I am seriously dying, I LOVE that finished piece, and can't believe it's the same credenza!
Good job, and the pages did load a lot faster since you split them up, but then I just had to click the back button a couple of times to get back to the first place to comment. Is there an easier way to do it?
I wish we lived closer so that you could do some furniture pieces for me, I seriously love your style!
Haha… THANKS Diane! 🙂
That's a great idea!!!!
I would go with sideboard. Just my opinion. LOVE IT regardless of what you call it!
Oh wow! What a STUNNING transformation! I love it!
Wishing you a lovely day.
xoxo
Absolutely gorgeous!!! Makes me want to find one to do!!!
Wow Christy! This is such a great complement! Thanks for taking the time to comment!
Thanks Jesse! I just emailed you. 🙂
Hehe… you're so sweet Mary. 🙂
Thanks for letting us know how you feel!
Im in awe. Seriously…in awe. I looked at each page in anticipation, and when I saw the final result, my jaw fell to the floor. It is absolutely one of the most beautiful transformations I have ever seen. This is a job VERY WELL DONE.
My opinion on the multi step thingy? I liked it!
The credenza came out great! I never know what to call them either. This comes just as I'm searching for something for our kitchen too (getting rid of that hutch) and have been doing 4 separate keyword searches on craigers. ha! The barnwood is really really pretty, great job.
The multi-step: I didn't mind it at all, but I feel like a lot of readers will. Remember the reactions to truncating? I never had issue with your site loading slow, always came up fast for me. Were others saying it did?
Looking good either way! 😀
I like it. I like it a lot.
Well thank you! I agree… I think that little piece of trip really MADE this piece. 🙂
Wow Ali, now that's commitment! You wouldn't believe how boring our life really is… but when you start writing stuff down, it actually makes me realize that I do more than wander around the house with a cup of coffee and no pants all day. Thanks for following along!
HEHE! Christina you know us so well!
Very good point about those who follow in their readers. Thanks for your input! And I'm glad you love the 'credenza'!
WOW the credenza is beautiful and the trim piece really does finish it off nicely. Love the new format. Can hardly wait for the next post. 🙂
I ADORE this!! I think it's probably one of my favourite pieces ever from you guys… think I might try do something similar now!
Also, I have spent the last week or 2 reading your entire blog – you are truly amazing people and I thoroughly enjoyed getting to know you a tiny wee bit.
http://www.inflictionblog.blogspot.com
Preeeeety much obsessed 🙂
And it's funny because I noticed the new background and thought, "ohhhhh I hope that is a project…that looks like something they would do" and I am even more excited to see the whole shebang.
My idea is to give a summary with the before and after picture included. Then have a link to click on the tutorial. If they want to read how to do it.
Wowzers! What a beautiful, unique piece! It's one of those creative ideas that makes me want to find something in my home that I can try it on!
As far as the new format, I read most of my blogs in a reader so that means I only click over to the site if I'm interested in what I see there (title, first paragraph, picture, etc.) or if it's a blog I know that I consistently love. For this project there was no way I would have NOT clicked over. When I first clicked the "next" button I thought that it would just be a part 2 of 2, which I was okay with. Having 4 different parts makes it a bit longer, and honestly if it was a project I wasn't as excited about, I might give up in the middle. I LOVE your blog and your projects (and your adorable littles), but I just wanted to give honest feedback. Again, beautiful credenza-buffet-whatever.
Very nice, don't mind clicking as my computer is SLOW. What ever makes you happy, it's your blog. Mary in NY
I love the credenza, especially that you can swap the door pieces! I do NOT love the new tutorial format, however. I prefer to have everything loaded at once!
Thanks for your honesty about the posting format. If we do this again, it will definitely only be for very long tutorial-type posts.
I too hope I get a nap today! Or at least a moment to sit in silence and stare blankly at the wall. 🙂
Thanks Rachel!
Yes EXACTLY… so you know what I mean!
Good to know! Thanks Tina!
You're too kind! The orange hutch is at the top of my list too. 🙂 How are you feeling?
Stephanie, it's good to know that the site doesn't load slowly for you. I always wonder how quickly it loads for others. I just don't want to waste people's time! 🙂
Awww Mallory… thanks for being a regular! And it says a lot when you say this is one of your favorite pieces!
I understand what you're saying about wanting the option to just scroll. 🙂 If we end up doing this again, it will ONLY be for super long tutorials. And it will keep us from leaving you hanging with separate posts on separate days! GOOD POINT! 🙂
LOVE the idea of a copper in place of the wood! Or even some sort of hammered or galvanized steel… now you've got my wheels turning! hehe!
Diane! Thanks for the explanation o furniture-types! So would you call this a sideboard then? It IS on wheels… so maybe it is indeed a buffet? I'm thinking it's definitely not a credenza… OOPS!
Don't be sorry Colleen! We WANT to know how people feel about it. Honestly we're not even sure how WE feel about it yet. 🙂
I'm glad you like the credenza transformation!
Super cute project! Isn't it great when it's finally done and you can stand back, admire your hard work and FINALLY feel like it was worth it? THE best feeling!!!
As far as the multiple steps, I'm sorry, but I really don't like it. Really, really, don't like it. I realize that it may increase initial load time, but the steps (especially when there's 4 of them) take much more time in my opinion. I'd rather wait a tad longer for the 1st page to load than to have to go through multiple steps. I feel I would only take the time to click through if it were a project that I am really, really interested in. Otherwise, I'd just skip it. Sorry! But true….
Loving the look of the credenza! Totally up my alley! Although I would have changed the hardware color….still love the shape, but think the bronzey patina doesn't quite flow with the crispness of the piece (in my opinion). Here's the answer to your question:
"The credenza is basically a center shelf section with side, shelved cupboards. Most buffets from the 1800s and 1900s were simply sets of shelves on wheels used to serve food. Most simple sideboards contained three to four drawers across the upper part of the table base. There were two or three sets of drawers on each side. Many were made with open knee-hole openings in the front center, so they resembled desks."
Also, not to fond of clicking through to see the finished piece. Two posts is good, four is a little long. Never have had a problem with your site loading slow….I must have fast internet!
Can't wait for more furniture updates! Sorry for the book.
Ooooh.. gotta find a credenza, paint sprayer, handy man, shop space to work on it. 🙂
I love how the doors turned out. I've had a thing for hammered copper for a while–picturing it instead of the barnwood, maybe with more colorful paint…
Torn on the division of the article.
I absolutely love it! I go to the blog almost every day hoping for a new update. I love the posts about the girls but can't wait for a new furniture post! This may be on of my favorite pieces. I secretly dream someday I'll have a space to do some of the great things you make!
I didn't mind the multiple steps, but it wasn't my favorite. When the posts are too long, I often find myself scrolling to the end just to see the end product. The shorter posts made it easier to read and then look forward to the next page. If you are going to make a longer post, please don't drag it across a few days, I don't want to wait!
The credenza = BEAUTIFUL! The website is very slow and glitchy. I did not like clicking through to the next step at all and definitely didn't like having to click back to the first page to leave a comment. Thanks for asking our opinion! I hope you get a chance to take a lil nap today! Toddlers are exhausting, but you are doing an excellent job! Love following you on Instagram!!
I like the buttons to click for the next page a lot!
Aww thanks Ann Marie! And thanks for your honesty about the post format. We're just trying it out and seeing if it truly makes a difference with load time…. and do see how annoying it is for our readers. 🙂
Lisa… it was just a box-cutter, brand new out of the packaging. Don't cut yourself! 🙂
Yay! Really? I've never seen anyone else with one like mine either! Our husbands must have similar (stunning) taste in jewelry! 🙂
Hehe… thanks for your honesty!!
AWESOME. So, where did you get your super sharp razor blades? I spent 15 minutes deciding what to get at the hardware store for an upholstery project (also cutting fabric) – and I knew it needed to be super sharp! Any tips?
🙂 So awesome.
What a great piece!! I love the way it turned out. Didn't especially love clicking through then coming back to the first post to leave a comment. It's a little cumbersome I think.
I love how it turned out– really refreshing and pretty!!
I never had trouble with your site loading, but I don't mind the new format. Might be easier to comment on the last post though instead of the first?
Loved the credenza!! Amazing!? But really hated the multiple step posting.
I love how it turned out! I love the colored wood behind it. Absolutely beautiful! Also, really like the way you did the post. It was actually kind of fun to be "anticipating" the next step.
🙂 One more thing (and this is totally random and probably a tad weird), but I saw your wedding ring in one of your posts not long ago, and it is just like mine. I have never seen another one like that and I LOVE mine…so I love yours too 🙂
That is absolutely beautiful!! The post in multiple steps was a little annoying. But it was nice how quick everything loaded. I think if it were two or three instead of 4, it would have been much less annoying. Not that it's going to keep me from drooling over every.thing yall do!
This is BEAUTIFUL. I think this is my new favorite piece of furniture you've done. For awhile there it was the orange hutch, but move over Tangerine, there's a new winner! This is SO stunning! The trim really does add class to it, and the doors are simply AMAZING. Such good taste!
I love it! The changes give it so much more dimension. I totally agree with adding the trim to the bottom. I don't have children yet but I do have two cats who love to lose toys under furniture. There is probably one or two hiding under the stove right now.