With the weather warming up slowly but surely, our mind-wheels have been turning with plans for our veggie garden, tuning up the lawnmower, and thinking about some small landscaping projects. BUT… the ground is still frozen. And the wind has been INSANE. Like blow-you-over-insane.
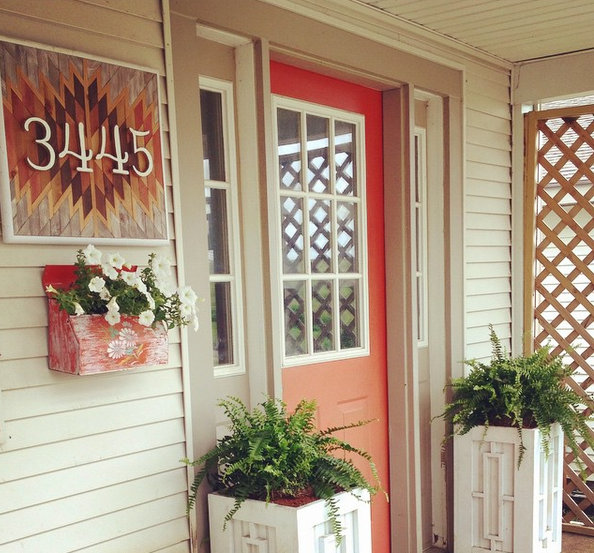
So I’ve been thinking a little more logically about making some small changes right around our actual front door. Don’t worry, you won’t be seeing a tutorial for a Peeps Wreath anytime soon. The thing is… I realized that we don’t have any house numbers on our house (just on the mailbox across the street).

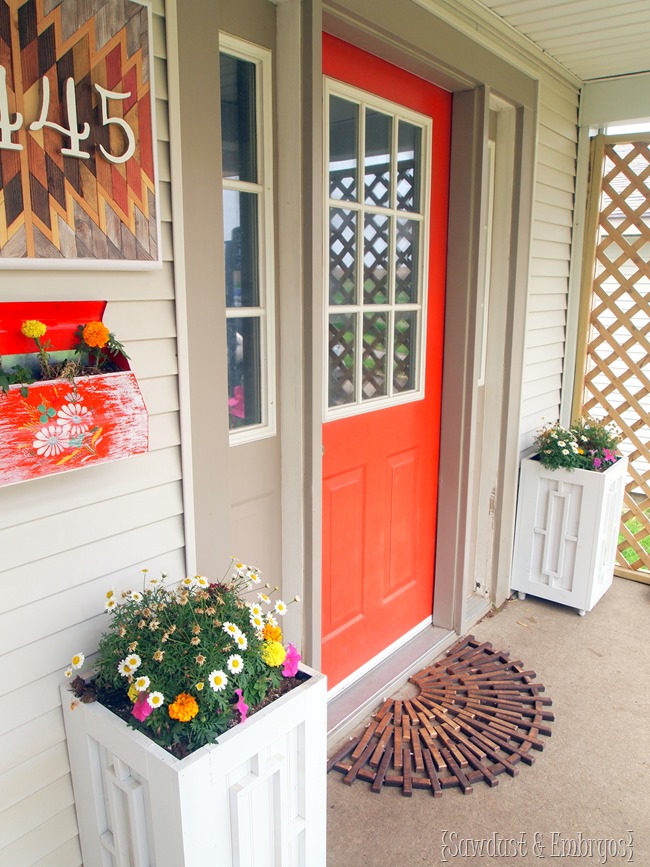
I’m wanting to make this all feel a little more inviting… perhaps a DIY welcome mat of some kind, building a couple wooden planters to flank the front door, maybe repainting the door, and of course HOUSE NUMBERS.
So when Lowe’s challenged us to create some sort of ‘outdoor art’, a little light-bulb went off in our heads.
BAM!

Our original plan was to use paint sticks for this project, but we ended up ripping down a 2×4 into 1/4” slabs instead. Just because we had it lying around.

This Native American pattern is going to look a lot more complicated than it really is, so if you follow me… you can totally do this!
You’ll need 8 large trapezoids, 8 medium trapezoids, and 110 small parallelograms. I literally just Googled ‘shape names’ so that I could sound smart. But here’s a visual for the rest of us that don’t remember the things we learned in 3rd grade.


These angles are perfect 45 degree angles, so if you have a Miter Saw, this will be cake! If not, you could use a Carpenters Protractor… which are inexpensive, simple to use, and available at any home improvement store.

You do want to be pretty anal about getting the angles just right… but everything else you can totally cut corners on (PUN!). We didn’t even sand these bad boys after cutting! And we didn’t worry about flaws in the wood or knots or anything at all. We wanted it to feel rough and natural. It’s going outdoors!
So now that you have your meeeellions of pieces, you’ll want to divide them into the following groups (STAY WITH ME!!):

Once you have your 6 groups of shapes, paint or stain each group a different shade! You can make this completely custom to your liking. Nobody’s will look the same! Our center two shapes we left unfinished. The other stains are Rustoleum Light Walnut, Kona, Golden Oak, and Cabernet.

For those 80 remaining small shapes, I used my ‘Distressed Barnboard Technique. I painted them white (this stuff), sanded them just until the grain showed through, and then stained with Rustoleum Kona. I love how it almost looks gray-washed!

Now You get to start laying out your pattern… this is the FUN PART! Cut a ‘backboard’ to size (21” x 18”). This can be any scrap of 1/4” or 1/2” plywood. It’s easiest just to glue them in place as you go!

Nick insisted on adding this little border of wood along the design to separate it from the outer pieces. This part is totally optional, but if you decide to go for it, it’s just cut at the same 45 degree angles and cut to fit each length of area.

Now that the main part of your design is in place, you can just start gluing down your ‘gray-washed-looking pieces!

When you’re done, the outside edges will be jagged… but just go ahead and cut them to be flush with your backboard. You could use just about ANY saw for this.

Isn’t it crazy to think that this piece of art was a 2×4 board a couple days ago?

We made the edges look a little more ‘finished’ by routing a piece of quarter-round to have a small lip and fit right over the edges. And I cut out our house numbers from a piece of pine on my Scroll Saw.

You could totally just buy some house numbers though. And even paint them whatever color you want! It took me less time to cut out my own than it would have to drive to town and buy some.
I’m totally obsessed with my outdoor art. How amazing would this be on a larger scale as a table-top of some sort? Somebody please do that asap and send me pictures.

We hung it using this heavy duty picture hanger. AND… I will go ahead and say that I already have another little project in the works that will contribute to the ‘welcoming’ factor of our porchy area. Are you on pins and needles?!

I hope you guys won’t feel like this tutorial is too complicated. I tried to lay it out as simply as possible! I hope you guys do something awesomely creative this weekend… go forth and DIY!
UPDATE! Check out the other updates we’ve done to our porchy area since doing this wooden artwork!. The Half Circle Wooden Doormat tutorial is HERE, and the mailbox planter idea is HERE, and those box planters flanking the door? There’s a tutorial for that too! (HERE)
Feel free to click around!
") |
") |
 |
 |
 |
 |

Thanks for pinning!

Disclosure! we’re SUPER HONORED to have been chosen as a “Lowes Creator”, and were provided with a Lowes gift card to help with the cost of supplies… but as always, all ideas, thoughts and opinions are 100% our own. Because that’s how we roll yo.
Related:
-

We're in the dog days of summer, and it seems like my kids are always…
-

I have a fun and easy building project for you! And while I do end…
-

Nick and I have dabbled in epoxy here and there, but we've never done anything…
Es admirable su obra, mi mas sincera enhorabuena!!, un cordial abrazo.
FYI the largest 8 pieces are 7.5 inches not 7. No big deal because it’s only 8 pieces but you may want to fix it.
Thank you! I’ll get that fixed!
I love this how do you come up with the measurements? I’m using 60deg 1 3/16 blocks.
This is so amazing! Your talent is beyond words! The end product is definitely a jaw dropper! Love it and the colors!
You’re too kind! <3
Hi Bethany and Nick thank you for this awesome project! I luv your blog, your projects are inspiring, your tutorials make it a breeze and have me smiling!
I live is South Africa so it’s a bit challenging when we source wood as we use the metric system and sometimes needs a bit of tweaking; nor do we have the great department stores you have.
I’m so excited to try this project – Sonett Coetser
Hey Sonett! Thanks for commenting! I can see how that would be frustrating to live where there aren’t the same resources. As far as the metric system, do some googling and see if there’s a website that might convert dimensions easily to the metric system!
What is the width of the center piece and accent pieces around main design?
The center piece and boarder pieces are 1/2″ thick!
You folks are completely insane! Your big piece is amazing and it reminded me of techniques I hadn’t thought of in years. At least 20 years ago the old Carol Duval show featured a wood and stain project that I had great fun with. Don’t remember what kind of wooden piece they worked with but I sure remember the rest. They traced out an angular design, no curves, then cut grooves in the wood on the pattern. It wasn’t huge so they painted on stain and wiped off the little bit of excess. The groves stopped the stain, like gutta would with silk painting, and made it really easy to stain. Color variation showed the pattern and it was impressive. I did some side tables and such and got hooked. Quilt patterns fascinated me, the way structured patterns of light, medium, and dark fabric could turn a simple design into a complex pattern. Also, I switched to an Exact-o knife for pieces with veneer or small things. One of the Exact-o blades cut beautiful curves and broadened my options for play. This was way before stain came in pens. I’m going to watch all your wood and stain videos and then start to work on an unfinished tray that’s been waiting for attention. I’m now a one legged woman so power tools are mostly out. I’ll probably go back to the old grooved line technique and have some fun. All the old pieces are long gone to friends who wanted them. Could I be getting my groove back??? Sorry, bad pun but too good to resist…..
You’re so sweet! And I love your ‘groove’ pun. 😉
I love everything, especially how beautifully you tied everything together. You nailed it!
Thanks Ivory! Several years later, and this wooden wall art still looks amazing!! 😉 You should make one! <3
THANK YOU SO MUCH! LOVE THE SOUTHWEST DESIGNS. PLANNING ON GIVING IT A TRY.
Did you draw the pattern yourself? Or can you share where to get some?(patterns)
You are a very creative couple and produce some great projects. Thanks for sharing your ideas.
I did draw this pattern myself! It was inspired by the pattern from an area rug that I have.
You can also find lots of similar inspiration for these types of patterns by doing a search for ‘Wooden Kilim’ on Google and clicking ‘images’. Or here’s the link: https://www.google.com/search?q=kilim+wall+art&source=lnms&tbm=isch&sa=X&ved=0ahUKEwjjy5S93YXTAhWh6oMKHa4vD80Q_AUICSgC&biw=1366&bih=638#q=wooden+kilim&tbm=isch&tbs=rimg:CTQ8kr9UZGoxIjhHl0lTQRTTpiDzTNsCDWp2xAvRFrAnkyWv1p3-JSOWRazhlM6LsjeEuJVg0Kjw5_1FM57aBhbo56SoSCUeXSVNBFNOmEXdWW37Od1qNKhIJIPNM2wINanYRftKupRMiy-cqEgnEC9EWsCeTJREfv7OtVN53jioSCa_1Wnf4lI5ZFEUAHaXkpcOWzKhIJrOGUzouyN4QRptCiuG7LAEkqEgm4lWDQqPDn8REM_1f4GZXMObSoSCUzntoGFujnpEe4m87S0iiIz&*
Hi Beth! Is there a particular brand of glue that you used? Thanks, Bridget
Hey Bridget! The brand of wood glue we is is called Titebond, and I think you can get it at just about any home improvement store (at least here in the US) 🙂 HOpe this helps!
Hey Tina! I think that must be a typo because I’m remembering the thickness to be closer to 1/4″… so sorry! This post is several years old, so it’s hard for me to remember for sure! I do remember that we only used ONE 2×4, however not sure what the length was… so that’s not very helpful either. LOL! So sorry I’m not more help!
We ripped down the 2×4 to make the wood the thickness that we wanted. Maybe I’m not understanding the question?
Ok guys! I finally added a sketch of the actual dimensions into the post. Sorry it’s so unprofessional! I’m loving all of your versions of this Wooden Kilim Wall Art! KEEP THEM COMING! Email me at Beth@RealityDaydream.com
we’re building an earthbag house out in arizona this upcoming winter….the living room will have vaulted ceilings….but the kitchen will not….your house number project has inspired me GREATLY!!!…i think i’m going to do this but on a larger scale….just havent decided if i want to do this for the ceiling in the kitchen…or inlaid as part of the kitchen floor as a faux “rug” on the kitchen floor…….
That sounds AMAZING! Pleeeeease send me pics when you’re done!
What are the dimensions on this? I am absolutely obsessed but think I want something bigger so I need to know proportions… time to play engineer!
I’m sending you an email now!!
CAN YOU SEND TO ME TOO?
Is it possible to get the proportional dimesnions also? Thank you so much.
I’m going to email you a sketch!
Hey Beth! I’ve gone over this post probably 50 times, and tonight i finally have everything I need to get started! It’s meant to be a Christmas gift so I’m down to the wire to get this completed. So, I’ve gone through the comments again and picked up on a few discrepancies noticed by others, and I’m wondering if you could send me the absolute dimensions needed to make this correctly? I would really appreciate it, because I can’t afford too much trial and error lol
VERY NICE AND INSPIRING!!!
BRAVO AND TY!!
Thank you Carol!! <3
I could be off here but looking at the photo of when you were ripping the 2×4, I always thought you wanted the small cut to be on the other side of the blade. That way the wood is always touching the fence safely. It looks the way you were doing it the pieces are going to bind and kick back, especially at the end of the cut.
Good Observation! We had an adequate out feed system and consistent pressure at the fence. In addition we stand to the side of the board being cut in case something does happen… That being said; You do make a valuable point. It would have been better to have the majority of the board thickness against the fence. Thanks for the comment.
-Nick
love this! You guys seriously, so cool!
-Shonee
http://www.hawthorneandmain.com
The work!!!! Good thing you are young and have lots of energy!!!!
Great job.
But the painter who did the front of my place didn’t have what it took to paint around the stuck on house numbers so I (dumb) told him to pull them off. Despite my good intentions, still no house numbers. Good thing no one can find my place without the secret coded map and a compass. HOuse numbers would not help anyone not so equipped. Might just not bother….. To return to the issue at hand….beautiful conception, planning, coloring, and completion. And way too much patience involved for someone not doing brain surgery…but that’s just an old crone’s POV. Still…well done…
Haha I love that story. Who needs house numbers anyway?! As long as you’re getting your mail, right?!?! 🙂
very nice job, can’t wait to start my own!
Unbelievable. Seriously amazing. Awesome. Stupendous. Incredible.
Need I go on?!
I really like this piece and want to make one. What size are the pieces? Huge fan of your work btw!!!!
Jay,
The medium trapezoid is 2″ by 1 1/4″ the large Trapezoid is 4 1/2″ x 1 1/4″ and the parallelogram is 2 1/2″ x 1 1/4″. I hope this helps. It helped me to draw it out on the backboard prior to cutting the pieces. It will give you a more accurate means to measure and visualize.
We love receiving readers projects so be sure to send us pictures of the finished product.
Thanks,
So beautiful! What are the dimensions of the finished piece? I want to try and do something like this for the dinette table in our bus conversion but not sure if it will fit. BTW your story resonates with me. Thank you for sharing it. I also have endometriosis and am trying to get pregnant. We also recently lost our home in a fire and are now building a bus into a tiny home (my blog is http://www.howcanwesleephowcanwedance.wordpress.com if you want to read about it) I’m so happy I found your blog with all these creative solutions and projects! Your story is an inspiration as well. Blessings!
HOT DAMN! Who just whips up something like that? Only you and Nick, that’s who. It’s stunning. You would cry if you saw our house numbers. It’s so so pathetic. In fact, last fourth of July a rouge firework hit one of the numbers, and it’s hanging a little crooked and I’ve never fixed it! haha… oh boy. Yikes. As always, you’ve left me feeling inspired to make me some house numbas!
Super cool way to give something that is usually pretty run of the mill boring – house numbers – a very snazzy look! Kind of like quilting with wood!
Maybe I’m just being dumb, but it doesn’t seem like the numbers in the text (for pieces needed) match the numbers above the shapes in the photo, nor match the right shape. Sorry not trying to be critical…LOVE the finished look on the outside of your house and can’t wait to see it in person, but thought if I wasn’t being dumb and misunderstanding the image, you might want to adjust for people who are looking to make one of their own! 🙂
Crapola! You’re right! I definitely had my numbers switched on those two shapes. OOPS! Thanks for letting me know! I’m changing it right now! 🙂
This is absolutely gorgeous! Around these parts, barn quilts are huge. I’m thinking this technique would make a beautiful barn quilt as well.
Amazing piece!
How cool is that?!?!?!? I’m amazed by your creativity! Love how simple and yet completely complicated that looks. Such big impact on a very small budget. Thanks for sharing!
this came out awesome– you have such patience! 🙂
Stunning! I love geometrics right now, and this native american pattern is totally geometric. This is AWESOME! I want one.
That looks so cool! I love it!
Really cool Beth and Nick. As I saw this going together I was envisioning it as a floor mat your could lay at the entrance. You could even inlay the house numbers or a last name into it. Not sure how well it would standup to the elements and traffic. but Hey it was just a thought.
You two are very artistic and talented.
Thanks Dad,
It is a neat idea. you would have to put thin plexi-glass or something over top of it. I can’t imagine the wear and tear otherwise.
Thanks,
This is beautiful.