• Home
  • About
  • Tutorials
  • Recipes
  • Furniture
  • Contact
    • Contact
    • Infertility
    • Disclosure
    • Privacy Policy
  • Shop
    • Facebook
    • Instagram
    • Pinterest

Reality Daydream

The Dream is Free, The Hustle Sold Separately

  • Home
  • About
  • Tutorials
  • Recipes
  • Furniture
  • Contact
    • Contact
    • Infertility
    • Disclosure
    • Privacy Policy
  • Shop

Herringbone Patchwork Accent Wall {REVEAL!}

November 15, 2013 by Bethany Sy

So sorry to leave you hanging yesterday. We had some last minute finishing touches to take care of before ‘after’ pictures were ready. But I was bound and determined to at least get a start on that blog post! So I’ll start right where we left off! A pattern within a pattern:

We’ve used stencils from Royal Design Studio before (and love how durable their stencils are), so we were thrilled when they agreed to let us have our choice of stencils for our ‘patchwork wall’. We chose Small Spanish Lace, Small Margarita Lace, Teardrop Trellis, Rockin Rose Damask, and Step Up Triangles.

I used a basic stencil brush that you can get at any home improvement or craft store, and just blotted away! Some people prefer using a small foam roller for stencil application, but I prefer the brush and feel that it provides a crisper line. (sorry about the following crappy nighttime iphone pic)

Creating a Patchwork Stenciled Accent Wall {Sawdust and Embryos}

Each ‘cell’ took me about 10 minutes. I just jammed out to Pentatonix and time flew by! Someday when I grow up, I want to be in an acapella group. That would aca-mazing. I’m totally not kidding either.

For the pale pink color paint, I used FrogTape’s wavy painters tape to create an abstract wavy pattern to mix things up.

Patchwork Accent Wall {Sawdust and Embryos}

And then we pulled ALL the tape off (including the green tape in the Herringbone pattern).

Stenciled Patchwork Herringbone Accent Wall {Sawdust and Embryos}

Next, Nick ripped 1×4’s in half (so they were 1×2’s), and routed them using the Bead and Cove router bit. And I spent an ungodly amount of time priming them with a silly paint brush instead of breaking out the paint sprayer (which I DEFINITELY used to paint them the next day).

Rip, Route, Paint! {Sawdust and Embryos}

Essentially, we’re making ‘trim’ pieces to frame each cell of our herringbone pattern for a more 3-D architectural effect. You could just buy trim pieces instead of making your own, but this way is cheaper and we’re penny-pinchers.

We started by first nailing up the vertical pieces using our RYOBI Brad Nailer. (in the pic below, the ‘cell’ in the lower middle that looks un-stenciled is painted with the metallic gold… the light is hitting it just so)

Accent Wall- Herringbone Patchwork Stenciled! {Sawdust and Embryos}

Then we used our Miter Saw to cut the angled sections with the setting at 30 degrees (angle found using an angle finder (NO MATH NECESSARY!). These angle pieces also had to be routed on the backside edges as well so that they would fit together snuggly with the vertical routed trim pieces. Comprende?

Cutting Angled trim pieces for patchwork accent wall herringbone pattern {Sawdust and Embryos}

Nick slapped those bad boys up in record time. Hit 4-5 nails in each board, and move on to the next one!

Installing trim boards for Herringbone pattern accent wall {Sawdust and Embryos}Herringbone Pattern Stenciled Patchwork Accent Wall... now that's a mouthful! {Sawdust and Embryos}

Up close, my stencil job isn’t perfect. Especially the Brown Sugar color ones. But I punched my perfectionist self in the face and decided that the wall is busy enough that you can’t really even notice unless you poke your nose right up against the wall. And I won’t be doing that often.

We filled the seams and nail holes with white latex caulk (the same stuff we used on our crown moulding tutorial) and did some minor white paint touch-ups. And voila!

Herringbone Stenciled Accent Wall {Sawdust and Embryos}Stenciled Herringbone Patchwork Accent Wall {Sawdust and Embryos}

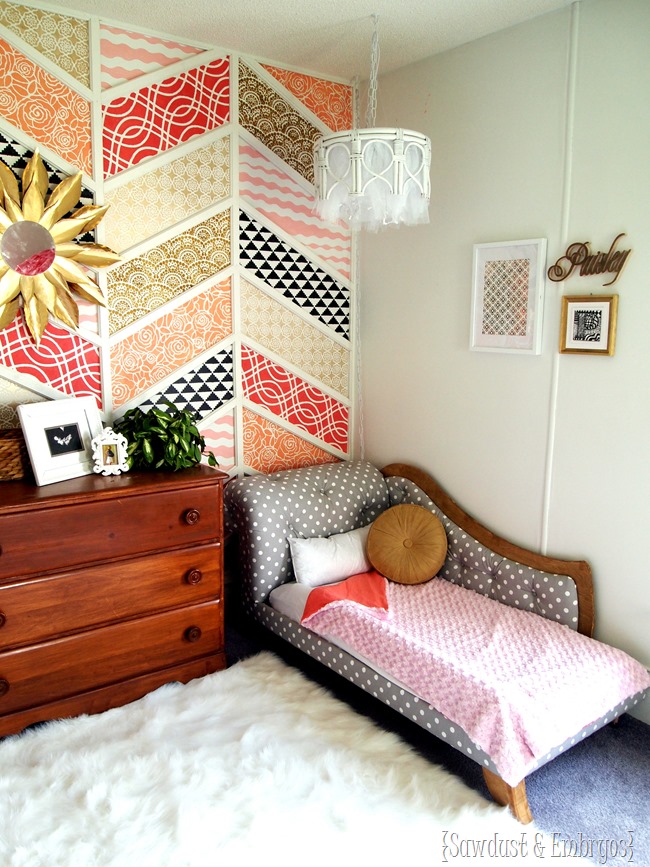
And here we have the toddler beds in place!

Patchwork Herringbone Accent Wall {Sawdust and Embryos}Patchwork Stenciled Accent Wall and DIY Fainting Couch Toddler Beds! {Sawdust and Embryos}

It has not escaped me that the existing carpet isn’t very pleasing to the eye, but the tightwad in me cannot justify replacing it. I’m planning to get a fluffy white area rug to go between their beds, and find some sort of small dresser or end table to put centered on that wall. And I’ve got ideas swirling around in my head for a DIY pendant light hanging over each of their beds. And then there’s bedding and window treatments to think about… so many ideas! So little time! AND MONEY!

~~~~~~~~~~~~~~~~~~

UPDATE! This room is done!!!!!!!!


Adorable-toddler-room-transformation-Sawdust-and-Embryos_thumb

And be sure to check out all the other projects we did to make this room just perfect for our twins!

Stenciled Herringbone Accent Wall {Sawdust and Embryos} DIY Roman Shades {Sawdust and Embryos}
DIY Tufted Fainting Couch Toddler Bed TUTORIAL (Sawdust and Embryos) DIY Vintage-esque Starburst Mirror Tutorial (Sawdust & Embryos)
End Table Tulle Chandeliers {Sawdust and Embryos} Heirloom Dollhouse Transformation {Sawdust and Embryos}
Papasan Chair turned into Dreamy Reading-Nook Canopy for kids room! (Sawdust & Embryos) DIY Pinwheels using scrapbooking paper and vintage buttons {Sawdust and Embryos}

Sawdust and Embryos


*this post contains affiliate links

Related:

  • How to fix a hole in the wall!

    Got a hole in your wall that you wish wasn't there? We do! When we…

  • Kids Closet Storage Ideas

    When the twins moved into what used to be the guest bedroom, I knew I…

  • Split / Shared Room for Siblings

    I love the idea of my girls sharing a room; whispering and giggling into the…

About Bethany Sy

Nick and Bethany Sy are the creative free-spirits behind DIY/Lifestyle blog, Reality Daydream. They recently purchased a historic mansion and have been documenting the ups and downs of renovation and making this home their own... all while sharing tips and tutorials along the way! When they found themselves in the trenches of infertility, they started a journey that would prove to be their most important DIY project ever, and have 3 beautiful girls to show for it. <3

« Herringbone Patchwork Accent Wall {Part 1}
Three years ago… »

Comments

  1. 76

    Kathy Gritton says

    March 7, 2016 at 12:48 pm

    I wish I had an appropriate wall in my house for this. It’as great!

    Reply
  2. 77

    Kaela Wyles says

    February 10, 2015 at 10:55 am

    Man this is amazing. You are so awesome!

    Reply
  3. 78

    Bethany Eckert Mingin says

    January 25, 2015 at 10:05 pm

    Love the wall. So original and creative. Love your name !

    Reply
    • 79

      Beth @ Sawdust and Embryos says

      January 27, 2015 at 6:58 am

      I love YOUR name too! 😉

      Reply
  4. 80

    January says

    January 22, 2015 at 5:49 am

    This is so beautiful! Amazing job…. 🙂

    Reply
  5. 81

    TL says

    December 22, 2014 at 12:49 pm

    Wow! That wall is gorgeous! I wish I had the time… and ambition… instead I will just stare at yours. Love your work!

    Reply
  6. 82

    Astral Riles says

    August 12, 2014 at 2:14 pm

    I am so crushing on your work right now! Again, amazing job.

    Reply
  7. 83

    Asra says

    May 8, 2014 at 2:58 pm

    I am amazed. This is beautiful. I want it for MY bedroom! My one question… how the heck do you have the time to do this with twins?? I am simply amazed! Great work! 🙂

    Reply
    • 84

      Bethany @ Sawdust and Embryos says

      May 8, 2014 at 3:00 pm

      Hi Asra! The twins love to ‘help’ with our many projects. 🙂 and they’re still really good sleepers, so it leaves us lots of time to DIY uninterrupted. Hehe!

      Reply
  8. 85

    ashlie says

    March 21, 2014 at 1:09 pm

    How to measure out the spaces to start the herrigbone?? I want to do something similar but just different paint colors but I don’t even know where to start. LOL

    Reply
    • 86

      Bethany @ Sawdust and Embryos says

      March 21, 2014 at 1:30 pm

      Ashlie, we shared all the details of laying out the herringbone pattern on the previous (part 1) post. Here’s the link for that!
      https://realitydaydream.com/2013/11/herringbone-patchwork-accent-wall-part-1.html

      Reply
  9. 87

    Stayc @ Lacy & Crew says

    February 26, 2014 at 1:24 am

    This is just so amazing it is ridiculous. When I first saw it I thought, “What cute fabric prints” Then I read the tutorial. Of COURSE you painted it. Absolutely beautiful and incredible.

    Reply
  10. 88

    McKenzie @ Girl Loves Glam says

    February 24, 2014 at 1:26 am

    I literally just died and went to heaven over this wall! This is totally worth the pain and time that went into it. It is mind blowing!

    Reply
  11. 89

    Alyssa says

    December 30, 2013 at 9:07 am

    This is the most beautiful paint job I have ever seen. I LOVE it!!!!

    Reply
  12. 90

    Ksuhak says

    December 5, 2013 at 4:04 am

    Wow, you guys do have so much patience 🙂 Love, love with what you guys have done 🙂

    Reply
  13. 91

    Katherine says

    November 29, 2013 at 1:39 am

    It’s beautiful! These may be silly questions and if you’ve covered them somewhere else I apologize. How did you measure the wall for taping? How did you chose pattern repeat placement?

    Reply
  14. 92

    Rachel says

    November 21, 2013 at 5:01 pm

    Does it flatter you or make you mad when people copy/redo your designs?

    I absolutely LOVE this wall and want to recreate it in my son’s room, obviously in different colors/designs. But I don’t want to feel like I’m ripping you off!

    Reply
    • 93

      Bethany @ Sawdust and Embryos says

      November 21, 2013 at 6:23 pm

      No way! We wouldn’t give detailed tutorials if we didn’t LOVE seeing people recreate our ideas. Just BE SURE to send us pictures! We can’t wait to see how yours turns out!

      Reply
  15. 94

    Mindy says

    November 19, 2013 at 6:53 am

    One of the best DIY projects I have seen. GREAT.

    Reply
  16. 95

    Joy says

    November 18, 2013 at 10:11 am

    This is absolutely amazing! I wish I were as creative and talented ( and could talk my husband into doing anything like this ). However, our current home is not planned to be our “forever” home, so we may hold out on some of our ideas.

    Reply
  17. 96

    Jessica says

    November 18, 2013 at 12:39 am

    I am in awwww at your creativity…and a tad bit jealous! This is amazing!

    Reply
  18. 97

    Linda Leyble says

    November 17, 2013 at 5:22 pm

    Wow! Great job. What a lot of work! I probably would have had to stop after the herringbone and stenciling. I can’t always get my husband to do the millworker – although he has mad skills. Maybe I have to tell him that more often…it might get him to do more around our house!

    You even made the toddler beds as fainting couches? You guys are really showing off now! Fantastic job all around!

    Linda

    Reply
  19. 98

    Maria B. says

    November 16, 2013 at 7:27 pm

    That is the most beautiful and creative design I have ever seen! The wall and the wonderful beds are just enchanting. I seldom comment since I usually agree with the comments of your great work but this is so outstanding I had to take the time to add my .02 and most importantly, Thank You for sharing your ideas with us! Keep it coming. -Maria B,

    Reply
    • 99

      Bethany @ Sawdust and Embryos says

      November 17, 2013 at 5:30 pm

      You’re so sweet Maria! Thx for taking the time to comment!

      Reply
  20. 100

    Katie @ On the Banks of Squaw Creek says

    November 16, 2013 at 10:33 am

    oh. my. gosh. AMAZING! I never would have thought to choose those colors/patterns together, but it looks SO GOOD!

    Reply
  21. 101

    Stephanie @ Sandpaper and Glue says

    November 16, 2013 at 7:49 am

    this is incredible- and the raised trim really gives it a great finishing touch!!! (PS- we got our state ornament yesterday! thanks again!)

    Reply
    • 102

      Bethany @ Sawdust and Embryos says

      November 16, 2013 at 8:57 am

      Yayayay, I’m glad you like it!

      Reply
  22. 103

    Debra says

    November 16, 2013 at 6:43 am

    Girl. I commend you for your patience. looks beautiful!

    Reply
  23. 104

    Nad says

    November 16, 2013 at 4:04 am

    Hi

    I was curious.. Wouldn’t you be using the Toddler beds the other way around? I meant switching the two. I was under the impression that the “arm” of the toddler bed would be towards the center of the room and it would provide as a barricade to prevent the girls from falling down. The other side would be the wall of course. The way you have placed the two toddler beds shows that there is no protection for the girls from falling down since the arm of both the beds is towards the wall.
    I hope I am making sense.

    Reply
    • 105

      Nad says

      November 16, 2013 at 4:06 am

      My question is not meant to be critical, I am genuinely curious.

      Reply
    • 106

      Bethany @ Sawdust and Embryos says

      November 16, 2013 at 9:00 am

      Debra, thanks for your concern! These beds are less than a foot from the ground, and we’re not too worried about it. We plan on putting a pool noodle under the fitted sheet along the edge of the mattress to provide a ‘lip’ of sorts. But if they fall out… they fall out! We’re pretty chill like that around here. If it was something where they could legitimately hurt themselves, we would be making some MAJOR changes!

      Reply
  24. 107

    Kenz @ Interiors by Kenz says

    November 15, 2013 at 11:50 pm

    What a brilliantly creative idea! I love the quilted look. I bet the girls just stare at it in delight and awe. It’s so perfect. And the molding really seals the deal. This is perfection!!

    Reply
  25. 108

    Alysia Webster says

    November 15, 2013 at 10:56 pm

    Your creativity seriously blows my mind! Wow! You killed it!! Lucky girls to have such a rad room!!

    Reply
  26. 109

    Candace says

    November 15, 2013 at 9:23 pm

    Abso-Freaka-Lutely-Awesome!!!! That wall… Those beds… it’s all to die for=) I LOVE it!!

    Reply
  27. 110

    Megan says

    November 15, 2013 at 6:20 pm

    That is absolutely amazing! It is beautiful!
    I have been a Lurker for a while and that gorgeous wall brought me out of hiding 🙂

    Reply
    • 111

      Bethany @ Sawdust and Embryos says

      November 15, 2013 at 8:54 pm

      Haha… what a complement Megan! Thanks for coming out of hiding!

      Reply
  28. 112

    Lori says

    November 15, 2013 at 5:00 pm

    I think the carpet looks fine..plus you have TWO toddlers, new carpet and toddlers don’t mix well, ha!! The room looks fabulous! You’re my super hero!

    Reply
    • 113

      Bethany @ Sawdust and Embryos says

      November 15, 2013 at 5:04 pm

      THAT… is a very good point… Thanks for talking me down!

      Reply
  29. 114

    Jessica says

    November 15, 2013 at 4:53 pm

    I just want to stare at that wall all day!

    Reply
  30. 115

    Renee says

    November 15, 2013 at 4:31 pm

    Beautiful Beth! For the life of me, I can’t figure how you get your projects done with two toddlers running around! They must be very well behaved! Your mind must just race at at night figuring out what new and exciting project you are going to come up with next. That wall is unbelievable! You and Nick have really outdone yourselves this time. Thanks so much for the inspiration!

    Reply
    • 116

      Bethany @ Sawdust and Embryos says

      November 15, 2013 at 5:03 pm

      We’re lucky that our girls are VERY good sleepers! They go to sleep at 6:30 each night, and we get busy! We’re so glad you’re inspired. 🙂

      Reply
  31. 117

    Jesse says

    November 15, 2013 at 2:56 pm

    WHOAH! Holly SH*T you guys!!!!! Sorry for the profanity, but I think it was called for. This is AMAZING… I thought it was beautiful once you removed the tape but adding that trim was really the icing on the cake. Talk about details! You guys nailed it once again. And I meant that pun!

    Reply
    • 118

      Bethany @ Sawdust and Embryos says

      November 15, 2013 at 5:01 pm

      Thanks Jesse! And I love the PUN! 🙂

      Reply
  32. 119

    Tasha @ Designer Trapped in a Lawyer's Body says

    November 15, 2013 at 2:51 pm

    Gah! This is GORGEOUS! I absolutely love it. And I have already told you how much I love the toddler beds! I can’t wait to see this room when it is done! I am in the process of designing my twin girls’ “big girl” room with twin beds and am sure I will be drawing some inspiration from you!

    Reply
    • 120

      Bethany @ Sawdust and Embryos says

      November 15, 2013 at 5:06 pm

      Yay for twin girls! How old are yours?

      Reply
      • 121

        Tasha @ Designer Trapped in a Lawyer's Body says

        November 15, 2013 at 10:27 pm

        Ours will turn 3 at the end of December. They are IVF twins, too 🙂 Absolutely my dreams come true. I saw you mention in another comment that your girls are good sleepers, which enables you to get a lot done. SAME HERE! Our girls used to go to bed at 6:30. Now it’s 7:15ish, but they still nap for 2-3 hours a day, so we kick it into gear at night and during nap time on the weekends. I love your blog! You have so many inspirational ideas and it’s nice to read posts from someone I relate to on a few different levels. Have a great weekend!

        Reply
  33. 122

    Laney says

    November 15, 2013 at 2:25 pm

    Whoaaaaa. That is INCREDIBLE!!

    Question on the beds – are you going to swap them so there’s a tiny toddler wall keeping them from rolling out of bed in the middle of the night?? Or are you going to build an equally awesome railing?

    Reply
    • 123

      Bethany @ Sawdust and Embryos says

      November 15, 2013 at 4:54 pm

      Laney we’re planning to put foam pool noodles under their fitted sheets to act as a ‘lip’ on the edges of the mattress. Honestly, we’re not too worried about it, because the beds are already very low to the ground, so if they fall out they shouldn’t really get hurt. 🙂

      Reply
      • 124

        Laney says

        November 15, 2013 at 6:15 pm

        Pool noodles! Genius!

        Reply
  34. 125

    Lindsay says

    November 15, 2013 at 1:24 pm

    Kinda sorta obsessed with this! You are so creative. All your ideas are so outside the box and I love them all! Can’t wait to see the whole room come together!

    Reply
    • 126

      Bethany @ Sawdust and Embryos says

      November 15, 2013 at 4:51 pm

      Thanks Lindsay! We love thinking outside the box!

      Reply
  35. 127

    Lisa Imerman says

    November 15, 2013 at 1:19 pm

    I love that wall. I don’t think my hubby and I are handy enough or have the tools, but I love it. Did you come up with a pattern (of which stencil and color to put where) beforehand or did you just wing it. The perfectionist in me wonders, as I can see myself hating the pattern if I just started it and just did it as I went.

    I think this would be neat for my teenage daughters room when we switch her into a different bedroom soon. The color pattern would be different (as she loves purple) but I love this!

    Reply
    • 128

      Bethany @ Sawdust and Embryos says

      November 15, 2013 at 4:50 pm

      Lisa, I just painted a few ‘cells’ and then stood back and looked at it, and decided which color I felt needed to go next. My only goal was to not have any of the same color side-by-side anywhere and that didn’t seem to be a problem!

      You should totally do this in your teenager’s room in shades of purple!

      Reply
  36. 129

    Angela says

    November 15, 2013 at 12:35 pm

    This is so absolutely adorable!!! Makes me reallllly wish I didn’t live in an apartment that I can’t paint and whatnot!!!

    Reply
  37. 130

    Carrie says

    November 15, 2013 at 12:22 pm

    You guys had me at your staircase landing stencil/fabric accent wall…which is super fantastic. But I think this has topped it. “So little time! AND MONEY!” = very well said. Thanks so much for sharing all of your budget friendly/beautiful projects!

    Reply
  38. 131

    Nikita says

    November 15, 2013 at 12:06 pm

    Can you adopt me?

    This is simply..stunning! Your girls are very very blessed to have a mom like you.

    Reply
  39. 132

    carrie eastman says

    November 15, 2013 at 12:02 pm

    OMG!!!! Best accent wall EVER!!!!!!!!!!!!!!!!!!

    Reply
  40. 133

    Jeni Flaa says

    November 15, 2013 at 12:01 pm

    That looks really beautiful. I can’t even imagine what it would look like if my husband and I tried to make it;)

    Reply
  41. 134

    Ann-Marie says

    November 15, 2013 at 11:42 am

    I would have a hard time covering any part of that beautiful wall with a dresser!!! Excited to see all of it come together though!! Awesome!!!!

    Reply
    • 135

      Bethany @ Sawdust and Embryos says

      November 15, 2013 at 4:47 pm

      Thanks Ann Marie! I’m definitely looking for something small(ish)… I don’t want to cover it up either!!

      Reply

Trackbacks

  1. Cara Murah untuk mengubah Rumah Menjadi Indah dan Nyaman says:
    April 4, 2019 at 3:36 pm

    […] dinding berwarna cerah, jangan takut untuk mencoba solusi yang berani dan beragam cetakan. Klik tautan ini untuk menemukan petunjuk terperinci tentang cara membuat keindahan seperti […]

    Reply
  2. 20 Stenciled Wall Transformations to Inspire You - Designers Sweet Spot says:
    March 16, 2018 at 5:20 pm

    […] At first glance, would you believe this wall was completely stenciled? I didn’t believe it myself until I read the full article over on Reality Daydream. […]

    Reply
  3. 14 Low-Cost Ways to Turn Your Home Into a Nest of Comfort – 5 Fun Facts says:
    December 6, 2017 at 9:44 am

    […] colored walls, don’t be afraid to try daring solutions and diverse prints. Click on this link to find detailed instructions on how to create such […]

    Reply
  4. 14 Inexpensive Ways to Turn Your Home into a Comfortable Haven - Relationship Goals says:
    August 24, 2017 at 7:12 pm

    […] Check out the instructions! […]

    Reply
  5. 20 Stunning Statement Walls For Every Room In Your Home - Addicted 2 DIY says:
    July 19, 2016 at 3:15 pm

    […] Herringbone Patchwork Accent Wall – Reality Daydream […]

    Reply
  6. Fold-down Murphy Desk w/ Storage Inside - Sawdust and Embryos says:
    October 9, 2015 at 7:31 am

    […] that we overhauled the twins room and DIY’d pretty much everything in the room (including that stenciled wall and those fainting couch […]

    Reply
  7. 15 Quick and Easy DIY Home Decor Tips - Canvas Factory says:
    August 29, 2015 at 11:07 am

    […] By Sawdust & Embryos […]

    Reply
  8. A Tour of our Homestead! - Sawdust and Embryos says:
    May 29, 2015 at 7:20 am

    […] can’t decide between the DIY Fainting Couch Toddler Beds or the Stenciled Herringbone Patchwork Wall for first place as my favorite thing in this room. Or the Papasan Chair turned Canopy Reading Nook? […]

    Reply
  9. Toddler Bed / Fainting Couch {Tufting & Upholstery} - Sawdust and Embryos says:
    April 23, 2015 at 6:04 pm

    […] Pingback: Herringbone Patchwork Accent Wall {REVEAL!}() […]

    Reply
  10. Patchwork Accent Wall - The Sawdust Diaries says:
    September 28, 2014 at 5:20 am

    […] This tutorial from Sawdust & Embryos shows us how to create an accent wall […]

    Reply
  11. Rockin' a Space with the Rockin' Roses Damask Stencil | Paint + Pattern says:
    July 30, 2014 at 2:28 pm

    […] Beth and Nick are the dynamic and creative force behind Sawdust & Embryos. They envisioned a unique and wonderful stenciled patchwork wall for their girls’ room and one of the stencils used was the Rockin’ Roses Damask stenciled in a cheerful orange color.  The other stencil patterns used were the Small Spanish Lace Furniture Stencil, the Small Margarita Lace Furniture Stencil, the Teardrop Trellis Bari J. Stencil, and also the Small Step Up Triangles Stencil.  Click over to their blog to see their fab stencil how-to. […]

    Reply
  12. Pinwheel Collage {using scrapbook paper} - Sawdust and Embryos says:
    March 25, 2014 at 12:33 pm

    […] easy… and they added the whimsy and pattern that I wanted to balance from the boldness of the stenciled herringbone accent wall. Don’t worry, the girls’ artwork (and some other sentimental art) has a special place in the […]

    Reply
  13. The Dollhouse {Part 1} - Sawdust and Embryos says:
    March 21, 2014 at 8:37 am

    […] time visualizing how I was going to paint the exterior. I knew I wanted to use the colors from the Stenciled Herringbone Accent Wall, but wasn’t exactly sure how it all was going down. And whenever that happens, I paint white so I […]

    Reply
  14. Toddler Artwork Painting {using vinyl as stencil} - Sawdust and Embryos says:
    March 12, 2014 at 10:54 am

    […] the littles get their paint on! We gathered the same sample pots of paint that we used to paint the Herringbone Stencil Patchwork Wall. True, they’re not edible finger-paints, but our girls are past the stage of putting things in […]

    Reply
  15. shout out sundays - A girl and a glue gun says:
    February 23, 2014 at 3:34 pm

    […] sawdust and embryos […]

    Reply
  16. DIY Vintage-esque Starburst Mirror says:
    February 15, 2014 at 8:31 am

    […] far, we’ve built and upholstered their mini fainting couch / toddler beds, stenciled the Herringbone Accent Wall, made simple DIY Roman Shades, and repurposed an end table into two sparkly/soft pendant […]

    Reply
  17. At long last… THE CHANDELIERS! says:
    January 29, 2014 at 9:44 am

    […] all that’s going on in the nursery with the bold roman shades, mini-fainting couches, and the herringbone patchwork stenciled wall, I knew the chandeliers would need to be white… and not too gaudy. As much DIY as we’ve […]

    Reply
  18. How to make Roman Shades using Mini-Blinds says:
    January 24, 2014 at 8:29 am

    […] we’ve built and upholstered the mini-fainting couch / toddler beds, stenciled and trimmed-out the herringbone patchwork accent wall, acquired the perfect dresser, and fashioned a vintage-esque starburst mirror. Phew! That run-on […]

    Reply
  19. A little addition to the big-girl room! says:
    December 29, 2013 at 9:24 pm

    […] for that space (just not THAT SMALL) because we didn’t want it to cover up all that work I did stenciling the herringbone wall, and our upholstery skillz on the Toddler Bed / Fainting Couches. Plus, I just wanted the dresser […]

    Reply
  20. Herringbone Patchwork Accent Wall {Part 1} says:
    December 26, 2013 at 10:47 am

    […] to be as random as possible with placement of the colors/patterns. You guys, it looks SO AMAZING! Click here to see phase 2 and the big […]

    Reply
  21. Broken House Divided & Wall Art says:
    November 17, 2013 at 10:36 pm

    […] free to hop on over to my blog Sawdust and Embryos for more fun projects! We just finished a a fun ‘Herringbone Patchwork Accent Wall’ in our twins’ big-girl room… you gotta see […]

    Reply

Leave a Reply to Joy Cancel reply

Your email address will not be published. Required fields are marked *

Recipe Rating


  • Facebook
  • Instagram
  • Pinterest
  • RSS
  • YouTube
We are Nick and Bethany! Welcome to our blog, Reality Daydream where we share our DIY adventures!
Click here for lots of art projects using only wood stain on furniture!!
Please feel free to share or pin my posts! You're welcome to use ONE of my images (no collages or pinnables) with a link back to the corresponding post. Please do not edit or crop that single image in any way. Improper use of my photos, ideas or words is a violation of copyright. Thank you!

Categories

Attention: Almost any do-it-yourself project involves risk of some sort. Your tools, materials, and skills will vary, as will the conditions at your project site. Reality Daydream has made every effort to be complete and accurate in the instructions of the plans on this website. Reality Daydream will not assume any responsibility or liability for damages or losses sustained or incurred in the course of your project or in the use of the item you create. Always follow the manufacturer’s operating instructions in the use of tools, check and follow your local building codes, and observe all commonly accepted safety precautions.


Copyright © 2025 · Modern Blogger Pro On Genesis Framework · Customizations by Sweet Theory Designs · Privacy Policy · Log in