• Home
  • About
  • Tutorials
  • Recipes
  • Furniture
  • Contact
    • Contact
    • Infertility
    • Disclosure
    • Privacy Policy
  • Shop
    • Facebook
    • Instagram
    • Pinterest

Reality Daydream

The Dream is Free, The Hustle Sold Separately

  • Home
  • About
  • Tutorials
  • Recipes
  • Furniture
  • Contact
    • Contact
    • Infertility
    • Disclosure
    • Privacy Policy
  • Shop

Kids Closet Storage Ideas

March 15, 2021 by Bethany Sy

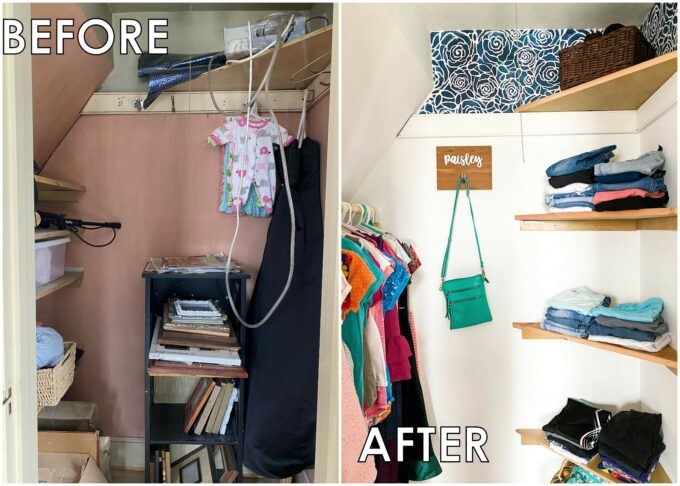
When the twins moved into what used to be the guest bedroom, I knew I had to deal with the closet situation. Even if it wasn’t filled with random photography equipment, old prom dresses from 20 years ago, and boxes of memories, this closet still isn’t suitable to be a kids closet with all the storage needs that they have.
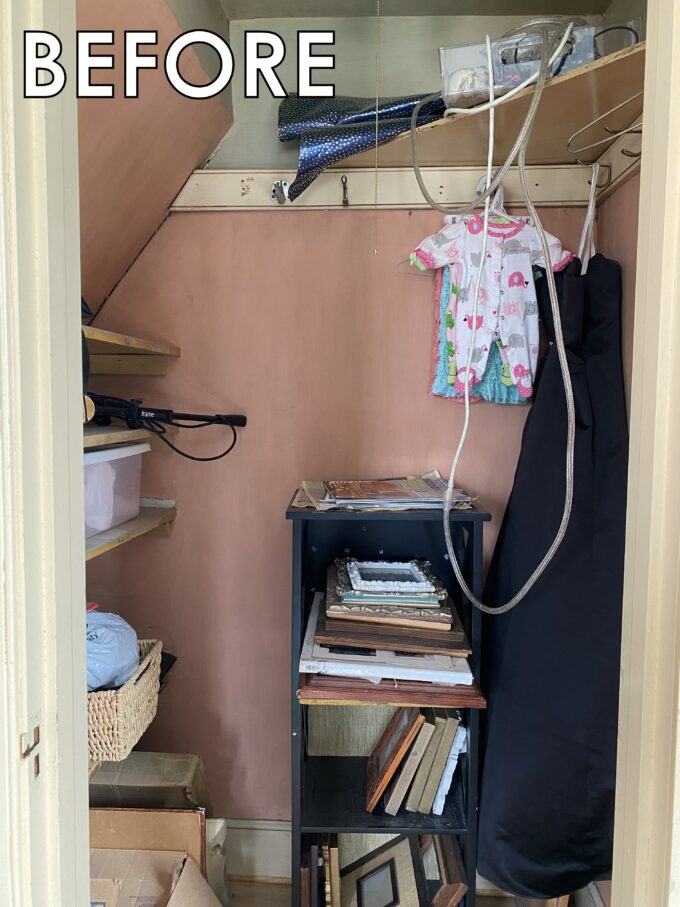
Cringey, right?

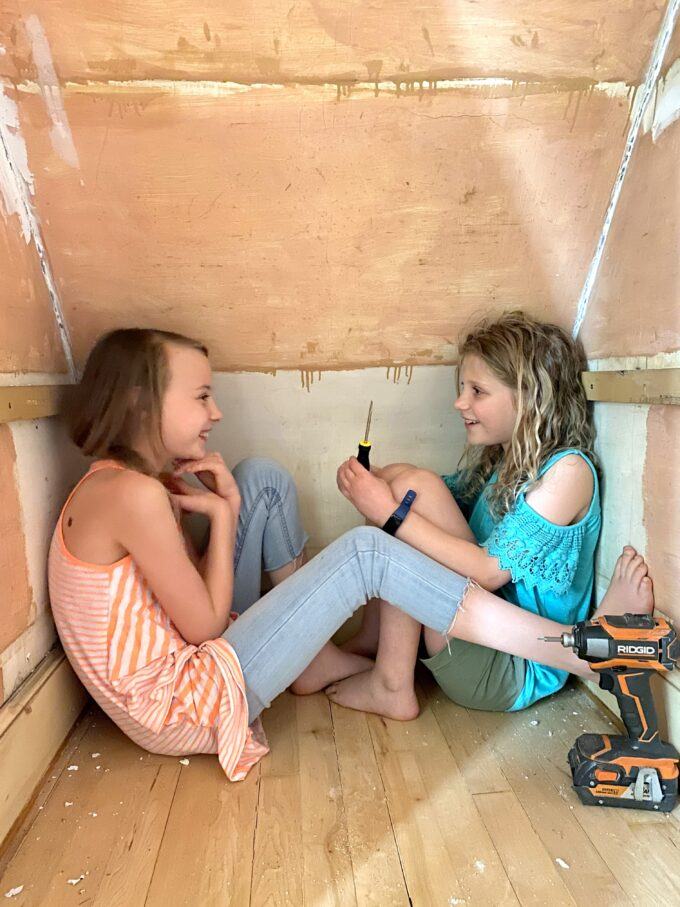
Se started out by removing all the shelves on the left side. Doing this project with the twins was so much fun. What a bonding experience!

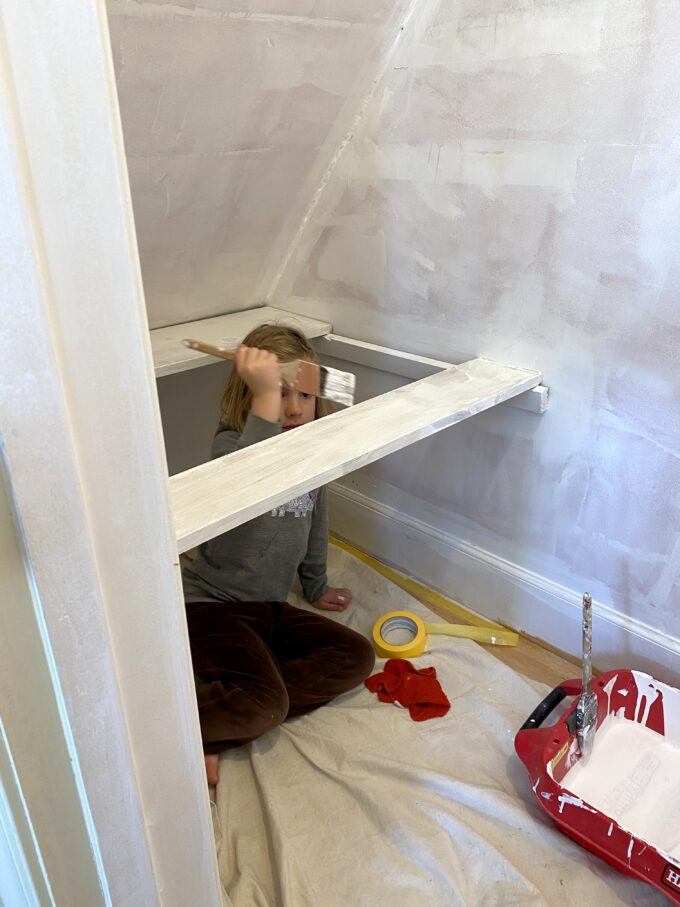
Everything got a coat of white paint (which ended up needing FOUR coats of white paint. I think that having a nice white kids closet really brightens things up and makes a true blank slate for all those colorful clothes kids tend to have. We even got little sister involved!

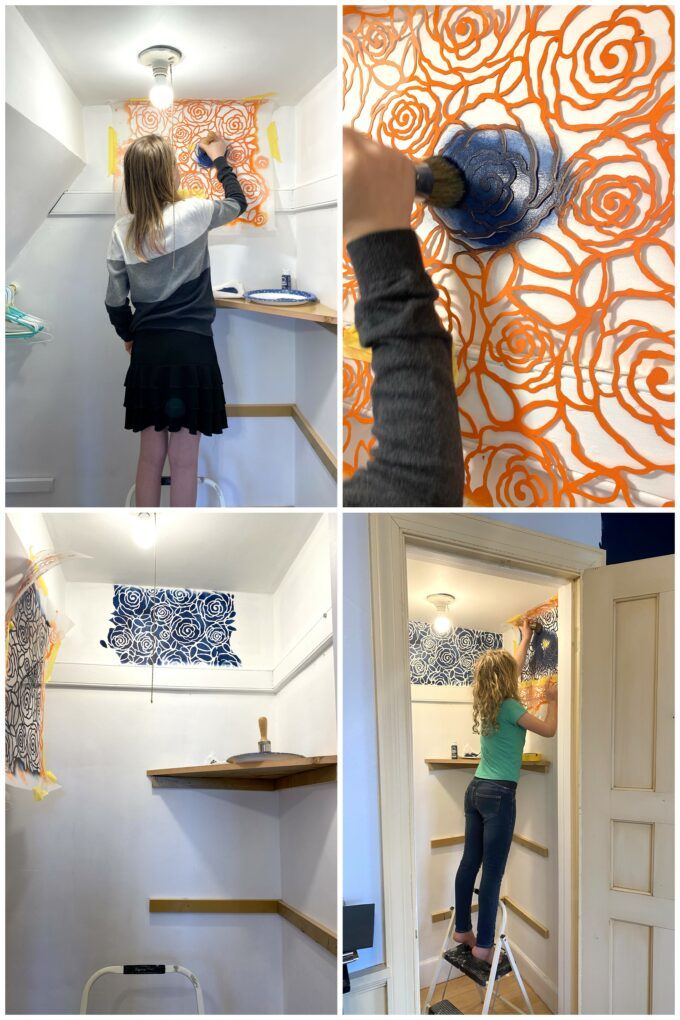
The twins got it in their mind that they wanted to add a little texture and interest to the space by stenciling above the trim. They picked out the stencil AND the color! And I really think they nailed it. You can purchase this same stencil HERE)

We added a clothing bar on the left, which was the only expense we had for this entire makeover! Just a dowel and some brackets!

Since that wall with the clothing rod is at a slant due to the attic stairs, we were able to tuck the clothing rod in and out of the way, and still have room to ‘walk in’ to the closet.

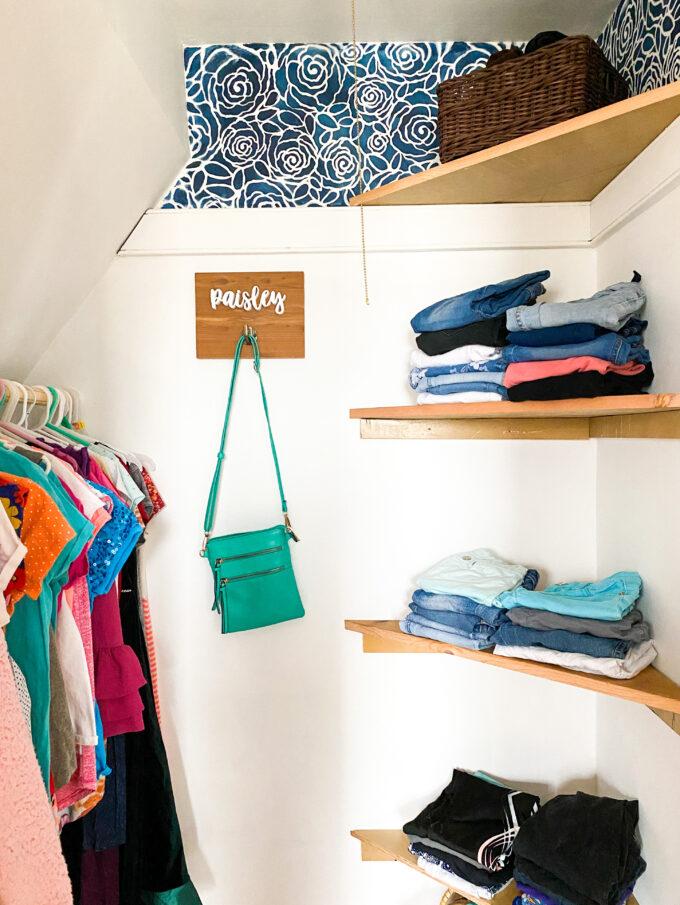
As you can see, we also had room to add some corner closet shelves using the wood from the shelves that we removed on the opposite side of the closet. I love FREE!

(also worth noting, I am V proud that I used the miter saw at an angle for the first time, as well as using my track saw without help from the hubs!)

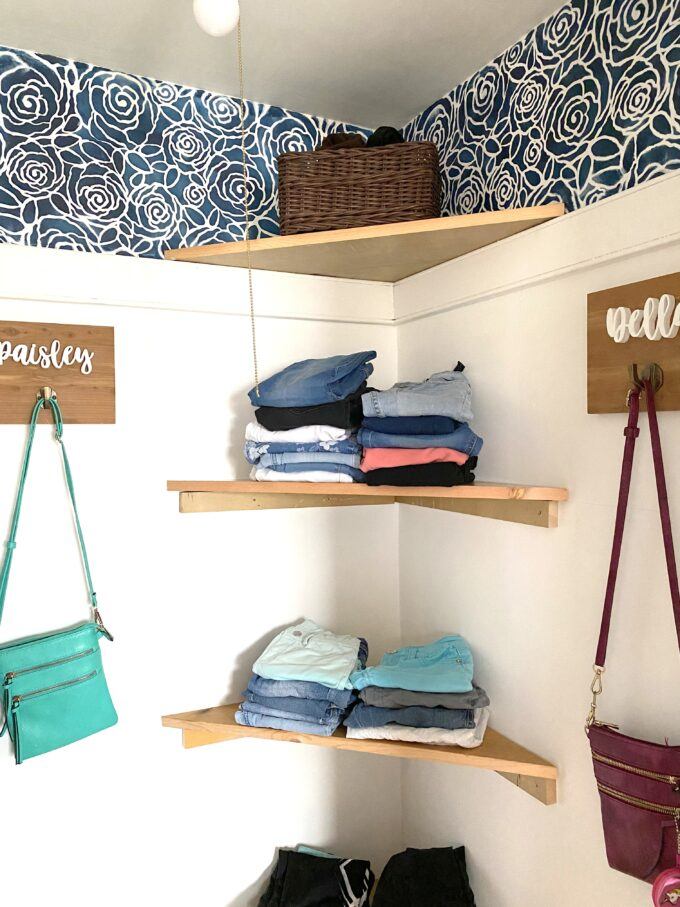
If you’re wondering about those cute name hooks, I shared a tutorial HERE so you can make your own! Wouldn’t they be cute for backpacks in a mudroom?

This weekend closet makeover I pulled off with y girls was SO FUN! And now they have a functional (and gorgeous) kids closet with lots of storage and organization!

This makes me want to maximize the space in the rest of the closets in our house. Why is there so much wasted space in closets? I need all the storage I can get!

Which reminds me, this closet makeover post from our old house still gets SO MUCH TRAFFIC. Apparently I’m not the only one that wants to make the most of the space in my closets!

And here’s the tutorial for the twins closet makeover in the last house.

And if you have a baby (or one on the way), I’m still pretty proud of our nursery closet organization from when the twins were teeny tiny.

Thanks for following along on this kids closet makeover! If you’re inspired and decide to try any of our ideas, please tag us on social media! (we’re @RealityDaydream on both Instgram and Facebook). Or email me pics at beth@realitydaydreamcom!

~Bethany

~~~~~~~~~~~~~~~~~~~~~~

Thanks for pinning!

Related:

  • Kids' Tiny Closet Makeover

    Our daughter has been living with a very small closet that isn't conducive to her…

  • Kids Travel Activity Clipboard Box

    I got a brilliant idea to make my girls a little something for Christmas (totally…

  • Squashing Kids' Nighttime Fears

    For about 6 months now, our youngest (Cypress - 7) has been struggling with overwhelming…

About Bethany Sy

Nick and Bethany Sy are the creative free-spirits behind DIY/Lifestyle blog, Reality Daydream. They recently purchased a historic mansion and have been documenting the ups and downs of renovation and making this home their own... all while sharing tips and tutorials along the way! When they found themselves in the trenches of infertility, they started a journey that would prove to be their most important DIY project ever, and have 3 beautiful girls to show for it. <3

« Ocean Resin Art
Coffee Table / Lego Table »

Comments

  1. 9

    Lyndsey says

    March 17, 2021 at 9:09 pm

    The stencil is awesome! I wouldn’t have picked it, thinking it would be too much, but it looks so great as an accent. I would like to find a place to use it now!

    Reply
  2. 10

    Swan says

    March 16, 2021 at 7:37 pm

    Girl power! Great job, ladies! I love the pretty, personal touches that make the closet a happier, cozier place to be. Makes me want to tackle my own closet, and I don’t think I’ve ever mentioned that out loud before. Keep up the great work, and thanks for sharing with us!

    Reply
  3. 11

    Becky says

    March 16, 2021 at 6:03 pm

    Gorgeous! That stencil…!!! Great job, girls!

    Reply
  4. 12

    Maureen says

    March 16, 2021 at 5:56 pm

    Bethany,

    So now the girls are separated, how does Cypress feel about having her own room? What solution did you come up with for the beds? I would love to see the rooms after you finish with them.

    Maureen

    Reply
    • 13

      Bethany Sy says

      March 16, 2021 at 6:47 pm

      We’ll definitely be sharing the process of making over their rooms now that we’ve been playing musical rooms. Cypress does not mind having her own room, and now has the full size bed in her room! She feels like a queen. 😉

      Reply
  5. 14

    Renee’ says

    March 16, 2021 at 4:50 pm

    Cute stencil! Really makes the space fun!

    Reply
  6. 15

    Myrtle says

    March 16, 2021 at 4:24 pm

    Love love love the stencil! It really does make the space!

    Reply
  7. 16

    lyn says

    March 16, 2021 at 4:20 pm

    Love the stencil and the idea to put an intense color at the top. Where can we buy the stencil? It is lovely!

    Reply
    • 17

      Bethany Sy says

      March 16, 2021 at 6:50 pm

      Here’s a link to the stencil! I’ll add it to the post too, in case anyone else is interested.
      https://amzn.to/2P0DE4N

      Reply

Leave a Reply Cancel reply

Your email address will not be published. Required fields are marked *

  • Facebook
  • Instagram
  • Pinterest
  • RSS
  • YouTube
We are Nick and Bethany! Welcome to our blog, Reality Daydream where we share our DIY adventures!

realitydaydream

Still can’t get over these shelves. 😍 These Still can’t get over these shelves. 😍

These Aksel Radius Floating Shelves by @shelfology are the perfect finishing touch to this wall in our kitchen. 🙌

#gifted #shelfology #radshelfie #floatingshelf #akselradius
I needed an instant-gratification project today fo I needed an instant-gratification project today for my well-being, and this little wooden stand was so fun and fast!

Details and links to everything in this pic in Stories!
If ya just need a slab of wood, grab a cutting boa If ya just need a slab of wood, grab a cutting board when you’re at Target or Walmart! They’re made of hard wood!

I used this cutting board to experiment and make some prototypes for a large-scale piece of art I’m doing for our church. It’s got me EXCITED!

Follow along for that project- happening soooon!

@dapproducts @dremel @jet.woodworking
You’ve all seen the video, but here’s some sti You’ve all seen the video, but here’s some still shots of the kitchen wall in all its glory!! 

The Aksel Radius Floating Shelves by @shelfology were the perfect finishing touch! 

Should I do a house tour of our main floor this week?!?! 🙌🌿

#sponsored #floatingshelf #radshelfie
Load More Follow on Instagram
View of our entryway of our historic mansion that we're slowly renovating and making our own.
Click here for lots of art projects using only wood stain on furniture!!
Please feel free to share or pin my posts! You're welcome to use ONE of my images (no collages or pinnables) with a link back to the corresponding post. Please do not edit or crop that single image in any way. Improper use of my photos, ideas or words is a violation of copyright. Thank you!

Categories

Attention: Almost any do-it-yourself project involves risk of some sort. Your tools, materials, and skills will vary, as will the conditions at your project site. Reality Daydream has made every effort to be complete and accurate in the instructions of the plans on this website. Reality Daydream will not assume any responsibility or liability for damages or losses sustained or incurred in the course of your project or in the use of the item you create. Always follow the manufacturer’s operating instructions in the use of tools, check and follow your local building codes, and observe all commonly accepted safety precautions.


Copyright © 2023 · Modern Blogger Pro On Genesis Framework · Customizations by Sweet Theory Designs · Privacy Policy · Log in