• Home
  • About
  • Tutorials
  • Recipes
  • Furniture
  • Contact
    • Contact
    • Infertility
    • Disclosure
    • Privacy Policy
  • Shop
    • Facebook
    • Instagram
    • Pinterest

Reality Daydream

The Dream is Free, The Hustle Sold Separately

  • Home
  • About
  • Tutorials
  • Recipes
  • Furniture
  • Contact
    • Contact
    • Infertility
    • Disclosure
    • Privacy Policy
  • Shop

Wooden Nativity Set using a Scroll Saw!

December 6, 2017 by Bethany Sy

You can’t make me stop using my scroll saw! I’M OBSESSED! I’m gonna show you how to make this Wooden Nativity Set, mkay?!

Learn how to make this DIY Wooden Nativity as a puzzle or holiday decor using your scroll saw! #Christmas {Reality Daydream}*This post contains affiliate links*

When I was a little girl we had a Wooden Nativity Puzzle for kids (similar to this) that I have so many memories of playing with! My dad made one for my girls a couple years ago, and it’s so fun to carry on that tradition with my own babes. I’ve been itching to make a nativity with my scroll saw, but I wanted it to be different. While I was in Prague, one of the shops had a little handmade nativity scene made from wood. It gave me the nudge I needed, and I decided to use that as inspiration to make my own using my scroll saw! (see my other Scroll Saw Projects HERE!)

Supplies for Handmade Wooden Nativity Set

  • Slab of wood with a 1” thickness (I cut mine down to the dimensions of a piece of printer paper)
  • Painters Tape
  • Elmer’s Glue
  • Nativity Scroll Saw Template
  • Cheap-o paint brush
  • Xacto Knife
  • Scroll Saw (this is the one I have AND LOVE, but this one is also amazing and more affordable)
  • 220 grit Sandpaper
Sand your board down until good and smooth, and wipe it clean with a dry cloth. Begin covering your board with painters tape, one strip at a time! Be sure to overlap each strip a bit.

How to make a wooden nativity puzzle with a scroll saw for christmas or the holidays {Reality Daydream}

Once your board is completely covered, flip it over and cut off the excess with an Xacto knife.
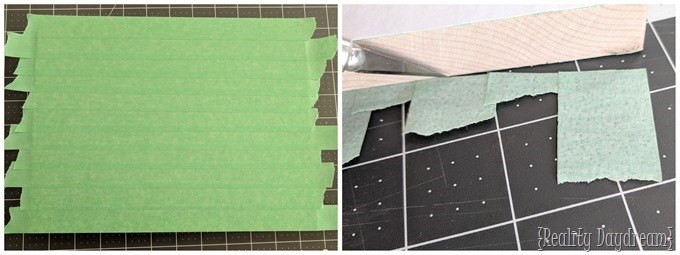
wooden nativity puzzle

Apply some Elmer’s Glue and spread around with a paint brush until the whole surface is glossy. You don’t need a lot of glue, but just make sure it’s enough that the whole surface is coated after you’ve spread it around.

How to attach a scroll saw pattern for this wooden nativity puzzle for Christmas! {Reality Daydream}

wooden nativity puzzle1

Print out my Nativity Scroll Saw Pattern and carefully place it over the wet glue, spreading it out with your hands to make sure it’s smooth and without any bubbles.
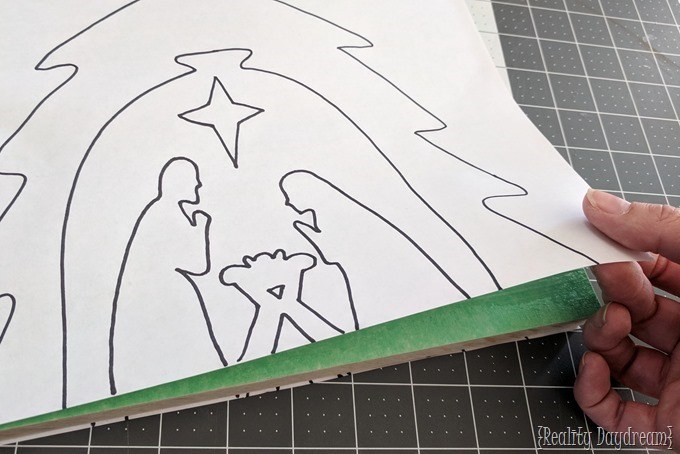
Wooden Nativity Scroll Saw Pattern {Reality Daydream}

I let the glue dry for about an hour before I went at it with the scroll saw! It doesn’t matter what order you cut the pieces out, so just start cutting! Take you’re time with this, and make sure your blade is leveled before starting.

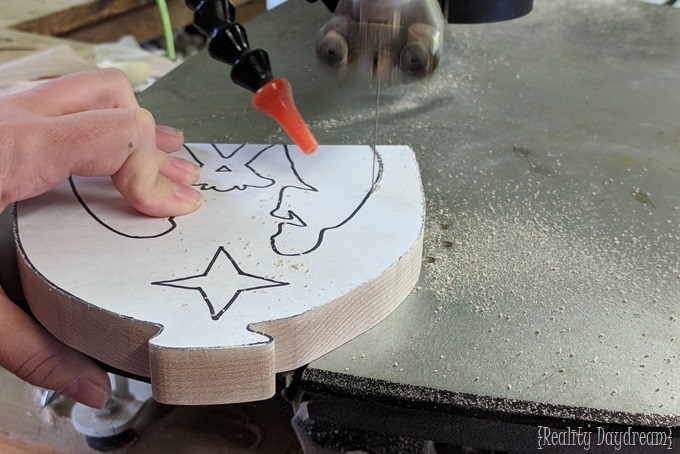
Scroll Saw pattern for wooden Christmas Nativity Puzzle {Reality Daydream}

Make this wooden Christmas Nativity Puzzle with scroll saw pattern {Reality Daydream}

Scroll saw nativity puzzle made from wood - free pattern! {Reality Daydream}

Mine came out pretty clean, but I still hit it with 220 grit sandpaper to soften the edges a bit. And that’s IT! I love the unfinished look, but you could paint or stain yours if you want! Customize it to your liking!

DIY Wooden Christmas Nativity Puzzle Decor using this free scroll saw pattern! {Reality Daydream}

Be sure to check out our master list of DIY Handmade Gift Ideas!

Also! Check out these other Christmas-related tutorials from our archives!

]diy-industrial-christmas-tree-ornament-reality-daydream these-woodworking-gadgets-and-tools-make-perfect-stocking-stuffers-for-the-carpenter-in-your-lif
]diy-christmas-card-wreath-using-clothespins-so-simple-sawdust-embryos recipe-for-the-most-perfect-sugar-cookie-cut-outs-sawdust-and-embryos_thumb
]winter-wonderland-snowflake-christmas-mantel-for-vignette-reality-daydream cute-non-battery-powered-gift-ideas-for-1-year-olds-reality-daydream_thumb

Related:

  • Centerpiece Tray Tutorial
    Wooden Centerpiece Tray Tutorial

    I have a fun and easy building project for you! And while I do end…

  • DIY Scroll Saw Family Silhouette Sign

    Hello hello friends! Things have been wild as we've been navigating the holiday season, schedules,…

  • Wooden Circle & Test Tube Propagation Art

    We're in the dog days of summer, and it seems like my kids are always…

About Bethany Sy

Nick and Bethany Sy are the creative free-spirits behind DIY/Lifestyle blog, Reality Daydream. They recently purchased a historic mansion and have been documenting the ups and downs of renovation and making this home their own... all while sharing tips and tutorials along the way! When they found themselves in the trenches of infertility, they started a journey that would prove to be their most important DIY project ever, and have 3 beautiful girls to show for it. <3

« Wooden Herringbone Table with Tapered Legs
Gingerbread Cake »

Comments

  1. 24

    Amy says

    October 17, 2022 at 3:08 am

    I see the pattern to make this, but was wondering if you sell a commercial license for the pattern, if I wanted to sell them.

    Reply
  2. 25

    Jon says

    December 10, 2019 at 2:07 am

    Love this project! In fact, I tried it today but am having a tough time with smooth corners, esp. where it appears I need to pivot in one spot. I’m not sure if choosing cedar rather of pine is my problem (harder wood). My blades are small and tight in the saw, but they aren’t the reversed type. Might that be it? I’d love to make these for Christmas, but yours looks much better! Thanks again for sharing. … Jon

    Reply
    • 26

      Bethany Sy says

      December 17, 2019 at 6:36 pm

      I’ve never scrolled on cedar, so I can’t speak to that. But a regular one was blade should be fine. When I get to a corner where I need to pivot, I just carefully/slowly turn it in-place until I’m ready to start going straight again. It takes some practice, but you can do it!

      Reply
  3. 27

    Heidi says

    September 30, 2019 at 11:39 pm

    What is the size of your finished nativity. When I download and print out the pattern it seems distorted and off. Am I missing something?

    Reply
    • 28

      Bethany Sy says

      October 1, 2019 at 12:14 pm

      Oh no… that’s so weird! I’m going to look into why that might be happening. I’m so sorry!

      Reply
  4. 29

    Michael gordon says

    July 23, 2019 at 2:36 am

    Do you have the template for the Nativity Scene?
    I can’t find it.

    Reply
    • 30

      Bethany Sy says

      July 26, 2019 at 1:32 pm

      There’s a link for the PDF right in this post!

      Reply
  5. 31

    tee dee says

    February 3, 2019 at 5:06 am

    Hi, great tutorial.Thanks for sharing. Can you please advise what type of wood this is and where to get it from.
    Thanks

    Reply
    • 32

      Bethany Sy says

      February 3, 2019 at 12:05 pm

      It’s just plain pine! I got mine at my local home improvement store!

      Reply
  6. 33

    Jon Robbins says

    December 12, 2018 at 2:42 am

    Looking forward to cut for my grand children.

    Reply
  7. 34

    Christa says

    January 22, 2018 at 9:40 pm

    What size blade would you recommend for this project, I’m new to using a scroll saw so still learning. Thanks! Love your blog!

    Reply
    • 35

      Bethany Sy says

      January 25, 2018 at 1:31 am

      We use Olsen brand PGT with the double tooth reverse blade. Here a link!
      (affiliate) >> http://amzn.to/2rCZu20

      Reply
  8. 36

    Boberan says

    January 22, 2018 at 5:49 pm

    Very nice, my Girls made these for gifts for conformation leaders and mentors. THANKS for posting! Tip: using a spray adhesive like 3M’s super 77. Spray the back of the paper and let sit for 20 to 30 minutes. I have even let them sit overnight. Then apply the paper to the wood. It will peal off when done or use a bit of mineral spirits to wet the paper and loosen the glue (I always rub down with mineral spirits when done to remove any left over glue). Then you do not have to use tape and white glue. Also I tilted the table to the right a few degrees, play with the tilt so the wedge stop about in the middle of the wood. Since I tilted to the right I have to cut RIGHT to LEFT to have the wedge move towards the front.

    Reply
    • 37

      Bethany Sy says

      January 24, 2018 at 2:41 pm

      That’s a great tip! There re lots of ways to affix the pattern to the wood, and I wanted to use one that was non-toxic as possible since I was doing it indoors with my toddler. Haha! I love your idea of tilting the table so the wood will wedge into itself. Brilliant!

      Reply
  9. 38

    Art Seifert says

    December 24, 2017 at 3:08 am

    Thanks so much for this tutorial. I just got my scroll saw and never used one before. I was looking around on line and found your site. I tried this pattern and my wife loved it. I decided to make one for all 3 of our adult kids too. They will be receiving this as a Christmas present on the 25th.
    Now I will be moving on to more patterns.

    Reply
    • 39

      Bethany Sy says

      December 30, 2017 at 1:44 am

      That’s so exciting! I’ve got lots of scroll saw projects on my blog, so feel free to snoop around!
      https://realitydaydream.com/12-creative-projects-using-your-scroll-saw/

      Reply
  10. 40

    Ivory says

    December 8, 2017 at 11:39 pm

    This is absolutely a fabulous idea. I would love this as a gift giving or receiving. Beautiful job! Happy Holidays.

    Reply
  11. 41

    Norma says

    December 8, 2017 at 1:32 am

    Awww so adorable

    Reply
  12. 42

    Penny says

    August 13, 2023 at 4:45 pm

    How do I get the free pattern for the nativity set? I can ‘t find it to print.

    Reply
  13. 43

    Bethany Sy says

    August 21, 2023 at 12:39 pm

    Hey Penny! The printable PDF for the nativity template is linked a couple times in the post. I would look on the “supply list”… it’s linked there for sure!

    Reply

Trackbacks

  1. Kleine Krippe mit der Dekupiersäge – Websammelkiste's Weblog says:
    August 24, 2021 at 7:35 am

    […] Wooden Nativity Set using a Scroll Saw! […]

    Reply
  2. 9 Free Christmas And Holiday Scroll Saw Patterns to Print | SawsHub says:
    December 2, 2019 at 9:07 pm

    […] https://realitydaydream.com/ […]

    Reply
  3. Wood Carving Nativity Plans – TonyWoodsArt says:
    September 18, 2019 at 11:53 pm

    […] Download Plan More @ realitydaydream.com […]

    Reply
  4. Wood Nativity Plans Free – Woodworking says:
    August 22, 2019 at 9:35 am

    […] Download Plan More @ realitydaydream.com […]

    Reply
  5. 40 Creative Scroll Saw Projects for Newbies and Pros + Free Patterns says:
    July 14, 2019 at 3:42 pm

    […] See guide | Download Pattern | Photo: realitydaydream.com […]

    Reply
  6. Nativity on the Scroll Saw – FreeWoodworkingPlan.com says:
    April 12, 2018 at 11:55 am

    […] free projectAt the link you will find the free template as well as full instructions to create this Christmas nativity on your scroll […]

    Reply

Leave a Reply Cancel reply

Your email address will not be published. Required fields are marked *

Recipe Rating


  • Facebook
  • Instagram
  • Pinterest
  • RSS
  • YouTube
We are Nick and Bethany! Welcome to our blog, Reality Daydream where we share our DIY adventures!
Click here for lots of art projects using only wood stain on furniture!!
Please feel free to share or pin my posts! You're welcome to use ONE of my images (no collages or pinnables) with a link back to the corresponding post. Please do not edit or crop that single image in any way. Improper use of my photos, ideas or words is a violation of copyright. Thank you!

Categories

Attention: Almost any do-it-yourself project involves risk of some sort. Your tools, materials, and skills will vary, as will the conditions at your project site. Reality Daydream has made every effort to be complete and accurate in the instructions of the plans on this website. Reality Daydream will not assume any responsibility or liability for damages or losses sustained or incurred in the course of your project or in the use of the item you create. Always follow the manufacturer’s operating instructions in the use of tools, check and follow your local building codes, and observe all commonly accepted safety precautions.


Copyright © 2025 · Modern Blogger Pro On Genesis Framework · Customizations by Sweet Theory Designs · Privacy Policy · Log in