Raise your hand if you don’t have a fireplace in your house! I’m raising my hand too.
Besides the obvious benefits of having a fireplace, it’s just sad not having that picture perfect place to hang the kids’ stockings at Christmas time and hanging stockings without a fireplace mantel. I’ve half-considered the idea of building a ‘faux fireplace mantel’ like many of my DIY friends have done, but truthfully I don’t want to give up that much wall space. In my dreams I have a giant elaborate fireplace, and an open-concept kitchen, and a banister with garland (like this one… DREAMY), but until then…
When The Home Depot asked us to make some stocking hangers and ‘make it our own’, I knew I had some problem-solving to do.
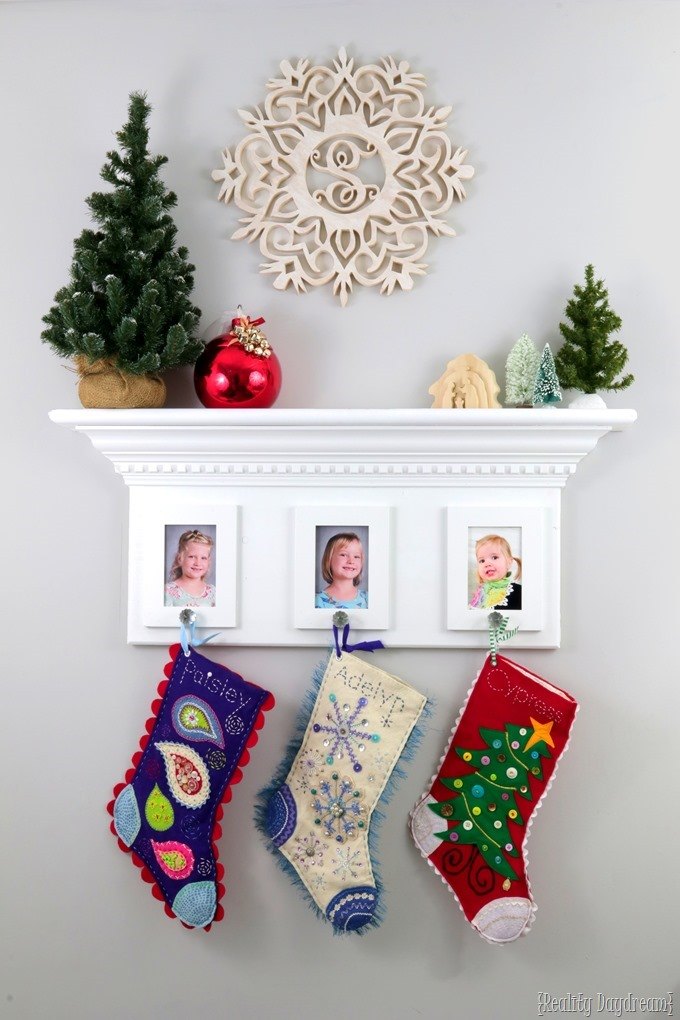
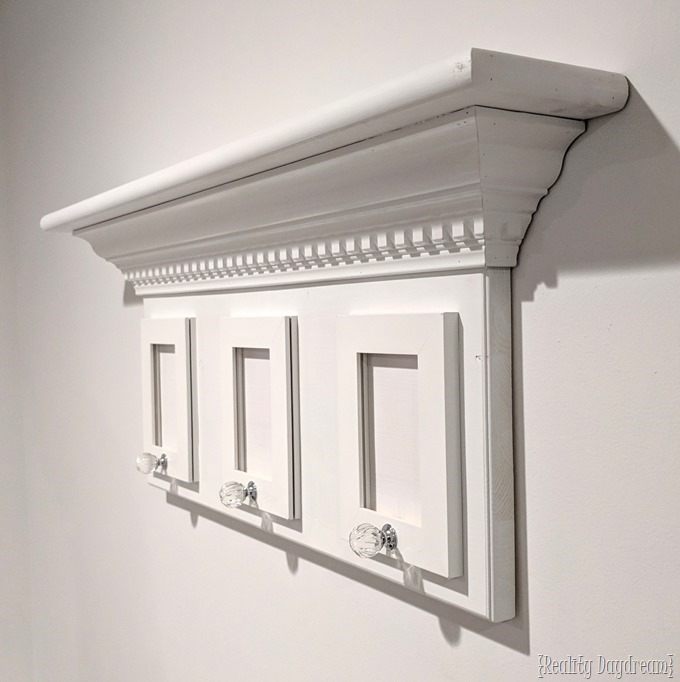
I designed a wall shelf that’s inspired by the look of a fireplace mantel! It turned out AMAZING, and I think it’s the perfect fix to the lack’o’fireplace conundrum.

*This post is sponsored by The Home Depot. Thanks for supporting the fabulous brands that make Reality Daydream possible! This post contains affiliate links*
Brilliant, right?!
I’ma show you how to make one too!
Fireplace Mantel Inspired Stocking Hanger Shelf
The dimensions of this can be modified to fit more or less stockings, depending on how many kids you have!
- Chunky crown moulding – 4 ft (you can have them cut it down to size in the store like we did!)
- Shelf board ‘stair tread – 1” thick
- Edge glued board
- Crystal drawer knobs
- Picture frames (ours fit a 4×6 picture)
- White spray paint
Start out with your edge-glued (largest) board and lay out your picture frames spaced out the way you want them. Mark the length (not the width yet) and cut it to size with the table saw.

Now you have the framework ready to start wrapping the crown moulding around! There are lots of amazing YouTube tutorials on cutting crown moulding, so rather than reinvent the wheel, I’ll just let you go find one of those!

It will be easy to set your crown moulding on the board with the picture frames and determine exactly how tall your back board needs to be. Mark it and cut! Before affixing the crown to the board with our 23 gauge pin nailer, we first put some pocket holes in the back to attach the top shelf on.


We’re ready to add that top shelf. The board we bought already had a rounded edge, but we still had to round off the sides with a 1/2” roundover bit. We ended up using the ‘breadboard’ technique so that we wouldn’t have to deal with fuzzy end grain. But you definitely don’t have to do that if you don’t want to take the time. I just have a perfectionist woodworker assistant-husband.
Affix the shelf to the pocket-holed backer board, and then put on the crown moulding over the pocket holes with a little glue, and pop some pin nails in.

Since the plan is to permanently affix the frames to the back board, we needed and alternate way to put pictures in because the back won’t be accessible. So we ran them vertically through the table saw, a slit to slide pictures in and out!

We found the center and drilled a hole for the knobs.

In an effort to keep the bolt from turning and constantly getting loose, we slopped some epoxy into the back to keep ‘er snug!

We measured out and marked the perfect spacing for the frames, put some glue on the backs, and put them in place. When you’re affixing these with the pin nailer, DON’T FORGET not too put any pins through the sides that have the slit opening for pictures. Skip that side of each frame!

Time for paint!

I put some painters tape around the knob threads to protect them from globby paint, and sprayed the rest with white paint/primer in-one. Two coats 10 minutes apart was perfect!

We routed two keyholes in the back for hanging (so it would hang flush against the wall) but you could also use a french cleat too!

I had SO much fun putting pictures in and adding some pretty Christmas décor! Isn’t this a genius idea for those that don’t have a fireplace mantel?

My Mom made the darling stockings, and I made the monogram snowflake out of plywood with a scroll saw.

Now TELL ME that doesn’t resemble a fireplace mantel

Ima be honest with you… we haven’t found the perfect wall for this in our house yet since the living room has board and batten on the walls. We literally have this hanging on the wall IN OUR BATHROOM because it’s a nice white wall with no pattern or distractions.
You could also make the Home Depot’s DIH Workshop version that’s a Stocking Hanger Box with hooks for stockings that’s meant to hang on an actual fireplace mantel. Here’s the link to register for their free workshops that are happening at your local Home Depot on November 16th, 2017! They supply all the supplies AND power tools, so it’s an awesome way to learn some building skills and bring home something tangible to show for your effort!

I love that The Home Depot offers workshops at all of their locations for do-it-yourselfers of all ages and experience levels! They offer 3 types of workshops: Do it Yourself, Do it Herself, and kids! You get to learn how to build home décor, as well as how to make easy home repairs and operate power tools through demonstration and step-by-step instruction. There’s nothing intimidating about it!
My favorite part of this whole #DIYworkshop challenge is seeing what these other creative bloggers come up with when they put their ‘own spin’ on the same project. It’s amazing how brilliant these women are! Which one is your favorite?
Thanks for pinning!


What a fantastic idea! Love it!
This is genius (and adorable). But my favorite thing is your girls’ stockings. AMAZING.
Thank you Lyndsey! Are the stockings darling? My mom made them!
So fancy with that moulding and love the picture frames, your girls are adorable.
Now that is so adorable!! Thank you for sharing
Bethany,
We currently have a fireplace but lived for years without one. At Christmas time I used stocking holders on our piano to “hang our stockings” for Santa.
Love the snowflake you made and where did the nativity come from? Did you make that as well? You could design the snowflakes and sell a pdf pattern for people that are crafty but suck (like me) at drawing and designing.
Maureen
P.S. Love the blog and read nearly everyday!
Awww, I love the idea of hanging the stockings on the piano. Your question about the nativity… I made it! I’m planning to share a tutorial here soon. Stay tuned! 🙂
Bethany,
Thanks for the reply! Another question for you – The stockings your Mom made – were they a kit or did she design and make them herself? If she did all the work herself, I know a lot of people would be interested in those details. She is so talented! You and your girls are very fortunate to have her.
Maureen
My mom made them out of her own creative brain! She used to have an Etsy shop, but now she just makes them when people reach out to her. Do you want me to share her info?
yes, yes, yes….i have a mantle so don’t need your adorable idea, but those stockings. oh my goodness!! I guess if I had a creative mind, I could do it, but do you mind sharing your mom’s info, please?