We’re no strangers to stenciling ‘round these parts, and I thought it would be awesome to polish up and re-share this post from our archives on how to make your own stencil! It’s simple, fun and most importantly FAR CHEAPER than buying them online or at a store! We even have tons of inspiring stencil art, stencil designs and step-by-step tutorials to get your stenciling wheels turning! Check it:
Stencils are such an easy way to incorporate pattern and texture into your décor… whether it’s a piece of furniture, an accent wall, or your backsplash in your kitchen! And even the most novice DIYer can pull this off!
So let’s get to chatting about how to make your own stencil so you can get to the fun painting part!

*This post contains affiliate links*
Supplies for Making your own Stencil
- pattern/design of your choice
- transparency
- Xacto knife
- Piece of thick cardboard or cutting mat
First things first… go online and do a search for ‘repeat patterns’ and select ‘images’ (or just click here where I did it for ya!). This is the pattern I chose.
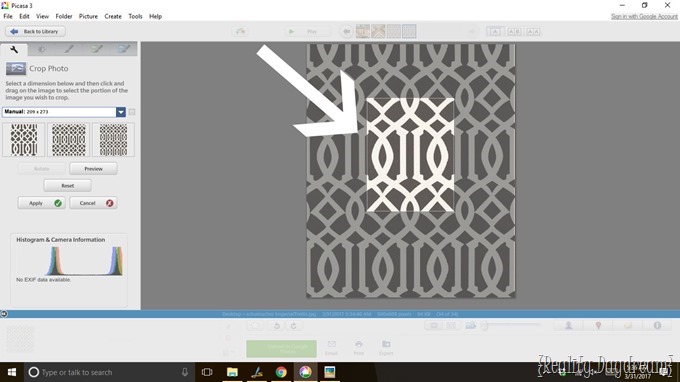
Save and open your image in a photo editing software. You want to crop to the edges of the repeating pattern, leaving a little extra around the edges so that you’ll be able to line it up easier with each pass of your stencil job.


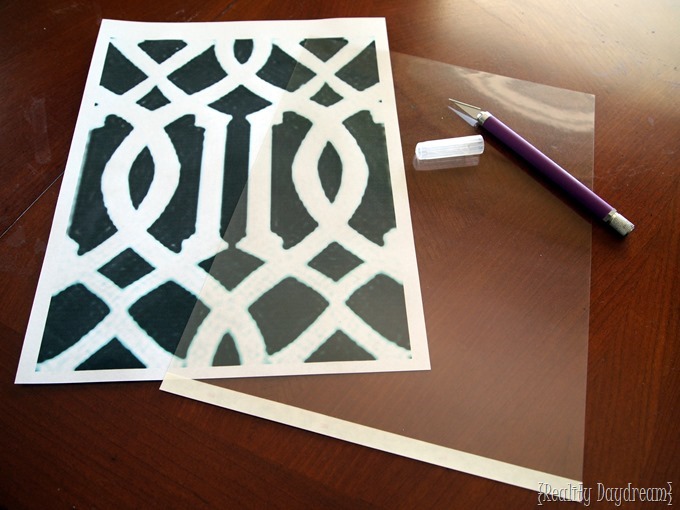
Tape your printed copy onto the cutting surface, and tape the transparency down on top of it on the corners. Take your Xacto knife (with a brand new blade) and carefully start slicing away along your lines. No need to push very hard. It’s such a smooth easy process… and it goes surprisingly FAST!!

Keep working your way around the stencil!

When you’re finished, peal up your paper and pull off all the pieces!

BOOM! This stencil cost you .89 cents and about 20 minutes of your time!

Now get to stenciling my friend!


How incredibly EASY?!? Right? Sure, there will be some touching up… but you’ll have that no matter what when there’s paint involved.
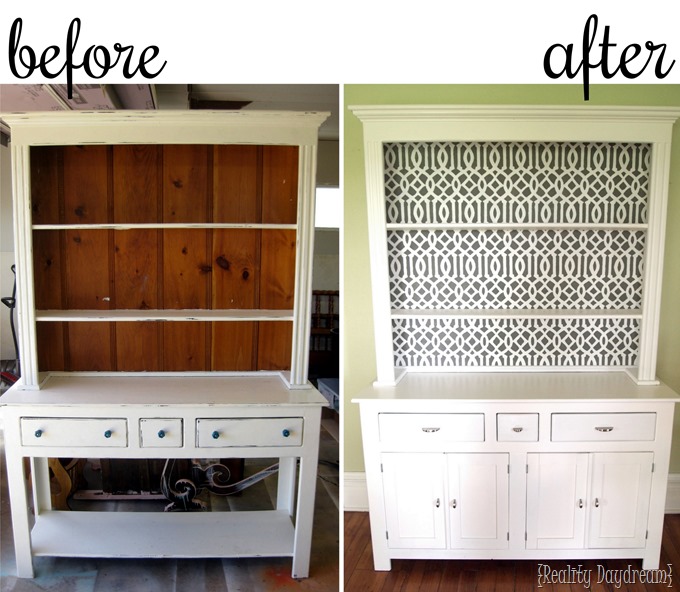
On this before/after pic below, we just took that paneling off, stenciled the back side, and put it back on backwards! SUCH A DIFFERENCE right?! (of course we changed the hardware and added doors, but that’s not the point LOL)

Please make a stencil at your earliest convenience! It’s so rewarding, and turns out amazing! Infusing a little pattern or texture into a room brings so much personality and makes such a dramatically beautiful difference. And it’s CUSTOM! (so fancy)
Go forth and STENCIL something! We’d love to see what you come out with! Our handles on Facebook and Instagram are both @RealityDaydream!
~Bethany
Thanks for pinning!


This post is so informative! I love how you broke down the process of making a DIY stencil step by step. I can’t wait to try it out for my next craft project! Thank you for sharing your tips!
You have NOOO idea how long I’ve tried looking for a way to make my own stencils! I don’t know why I’ve never thought of using transparency sheets before. Thanks a bunch!
YAY! I’m so glad I could help! <3
I have also seen where if you have a laminator and a Silhouette or Cricut machine you can do this. You run a laminating pouch into the laminator and melt it together. Then you put it on your Silhouette or Cricut machine and it cuts it out for you. I haven’t tried it out yet but it might be good for more intricate designs. Otherwise, I will do it this way. Thanks for all the great tutorials.
YES I’ve thought about that too! I might have to figure out how to do that on my Silhouette!
Beth,
If you accidentally cut your stencil in the wrong spot – the blade slips or something – or tears, it can be repaired by taping with clear tape on both sides and then trimming with the exacto knife. you know so many cool tips but never mentioned this one. Love the blog and enjoy reading all about you and your family.
Maureen
That’s so true! Thanks for the tip!
I’ve had a package of printable transparencies for about 20 years – nice to finally have a use for them!
Lol… NICE!
Nice, I’ve done my own stenciling with an exacto knife but now I want to get a stencil cutter for about 10 bucks to make more detailed stencils. Can’t wait to try your technique for a stately look in a living room.
Thank you so much ! I looked for this tutorial about 2 weeks and i found yours thank you again
Yay I’m glad! Please send pics when you’re done stenciling!!
Love the simplicity of this method. It’s a whole lot cheaper than store-bought stencils. I wonder is the stencil reusable?
I am wanting to stencil for a dress I am making, any extra tips I may need to know or do I do almost the same thing as shown?
Just make sure you use paint that’s specific for fabric, and a stencil brush! (don’t use a foam brush!) The actual making of the stencil should be the same for fabric stenciling. 🙂 Hope this helps!
what material is that “backboard” made of?
Jessie, it’s just a 1/4″ sheet of plywood!
You rock! Thanks for the reply! I want to give this a try in my hutch – in the dining room. I tried doing this in the built-ins in my family room, but I quickly lost steam… {whomp, whomp} specifically around the edges – I HAVE to finish that before I am “allowed” [by hubby] to move on to any other projects at home. Thanks again! 1/4″ plywood – CHECK!
Wooohoo! Send us pics when you’re done!!
Loving this page. Thanks for sharing.
I love your work! You have the patience of a saint! Can you please tell me the color of paint you used? I would like to use the same color combination. Thank you so much!
Tammy
Thank you so much for sharing it helped me a lot on my new project thanks so much! Also i thought the stencil was so cute! And Keep me Posted! 🙂 😀
Thank you so much for sharing it helped me a lot on my new project thanks so much! Also i thought the stencil was so cute1
Thank you so much for sharing it helped me a lot on my new project thanks so much!
I want to do this, but on a much larger scale. Is there transparent paper or stencil plastic that is BIG? I want to do a large graphic on a sideboard.
No, but my bloggy-friend Brooke recently did a tutorial on a large scale stencil. Here’s the link!
http://www.allthingsthrifty.com/2013/07/how-to-make-a-huge-stencil-for-under-15.html
Hi! This looks great. I was hoping to do mine on the ceiling – do you think spray adhesive would work? Also were you at all concerned about paint getting behind the stencil (transparency)? I won’t have a repeating pattern but just a single item to put in many places. And I don’t want to get paint on the ceiling in any place but for my stencil. Thanks!
Hi Vanessa! Ok, since your stencil is going to get a lot of use, I would glue two transparencies together with some sore of spray adhesive before you cut the stencil. This will just make it extra durable and less floppy.
As far as using spray adhesive to stick the stencil to the ceiling, I cannot offer any advice! I’ve never had good luck with using spray adhesive, and usually just end up taping on the edges. But for a ceiling, you would almost HAVE to. Sorry I can’t offer any suggestions on that front.
I WOULD like to say that I would use a stencil brush instead of a foam brush like I used in this tutorial. I’ve since learned that stencil brushes make a much cleaner line, and there’s less paint seeping under the edges. You’re still going to have touch-ups, no matter what. But this way it will be less.
Hope this helps! Send pics when you’re done!!
ok, i’m trying this…on a whole wall! so please wish me luck!
btw, loooove your blog and all your projects. you guys are great.
congrats on the work and on the babies.
Yay! Good for you! It’s a LOT of work but so worth it! I recommend starting up by the ceiling, and going all the way across that top row first, and then make your way down. You’d be surprised how easy it is to get a ‘little bit’ OFF and it compounds on itself and becomes a disaster. 🙂 Not to scare you!
Send us pics when you’re done!
This is FANTASTIC!!! Thanks for sharing!!
Hey there! Saw your guest post over at All Things Thrifty and followed the link back over here. I love this article! Thanks for the inspiration! I have a few spaces and furniture that I will be stenciling and it is good to know I will be doing it with my own stencil. 🙂
Serena
Thrift Diving
I just want to take a second to say, even if you don’t see this post, that I find you absolutely amazing, and you are a role model for all of us lazy crafter. Even with those twins and the problems you have endured, you have made some amazing work happen! I am inspired by all of your projects, and I cannot wait to get into my new home (first ownership) and make it happen for me too! I have been sharing your tips and tricks, and I’m currently shopping for a cheap but decent projector as well as an easy way to make transparencies. The house I’m looking at has a shop with electricity, and during my mommy time, I plan to drink much less than I do now while so idle and sad. I think this will be the perfect cure to my depression. Thank you for relighting my crafty candle!!!
eh ! hi! thanks for a beautiful post and i tried ur idea on my wall and it came very good 🙂 keep sharing ur art work 🙂 thank you much 🙂
it turned out awesome! I am also wondering where a good online place to find stencil designs are. Is is really easy to find them or do I need to do some digging?
Thanks
Thanks for encouraging me to make my own stencil. I have been wanting to stencil my kitchen, which is basically just the space between the upper and lower cabinets, so not a big deal and not really worth shelling out the big bucks for a “real” stencil. I’m hoping to have a flat or eggshell base and a high gloss design in the same color. 🙂
Thak you so much!
Great tutorial, I am curious where to find stencils online. I googled it but did not come up any suitable sites.
If you have a laser printer, you could print the stencil directly to the transparency paper. Might save some time 🙂 (But ink jet printers definitely wont work)
Thank you so much! I have a “pintrest” project that I need to finish and was hung up on making a stencil. I think I will finish another project this weekend!
Hi Canna! Here’s the link to my mom’s living room wall treatment!
https://realitydaydream.com/2011/12/moms-lr.html
Great job, like always you are so talented. Also, I was trying to find the post of the accent wall you did at your mom’s house. If you could tell me the name of it or give me a date or link that would be awesome. Thanks, Canna.
Great job and I think I have a book shelf that this technique would look awesome on. Thanks for sharing
I just discovered you and I am hooked! I have wall papered book case backs for the same effect and am considering a stencil on my next project. I wanted to add a suggestion of getting giant sheets of mylar from art stores. I have a bunch that are like 24×36 which makes a much larger and thus faster stencil. I would offer suggestions for where to buy but I live in Canada so thats not helpful for most. But I got mine at art supply stores not big craft stores like Michales but smaller artist stores.
Hi Erin Hall,
For those of us in Canada, you may want to mention the smaller artist stores where you got your mylar. I’ll be there are others who live near you who may be interested!