Let me start by saying… one of our blog followers (hi Gina!) gave us an entire bedroom set that she wasn’t using and was just taking up room in her basement. We don’t have plans for the whole set yet, but I do know I don’t want them to go together. I think a bedroom should look like it’s acquired over time, not bought all together at once. Comprende?
Well anyhow, I decided to play around with the end table yesterday and try out some new things… are you excited?! Of COURSE you are!

this post contains affiliate links.
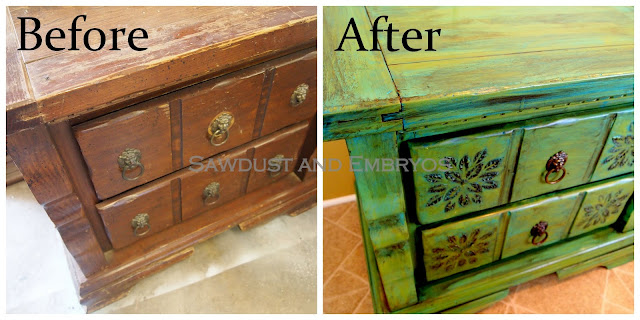
Because this piece is so chunky and plain, I took it upon myself to add some visual interest that would POP after glazing. I started by sanding everything down and filling the hardware holes with wood putty (this is the stuff we use)


Then, using my ‘Make Your Own Stencil‘ techniques, I created my own stencil in about 30 minutes! I used a design borrowed from Brooke’s blog All Things Thrifty. If you follow us on facebook, you knew I had something up my sleeve with this design!


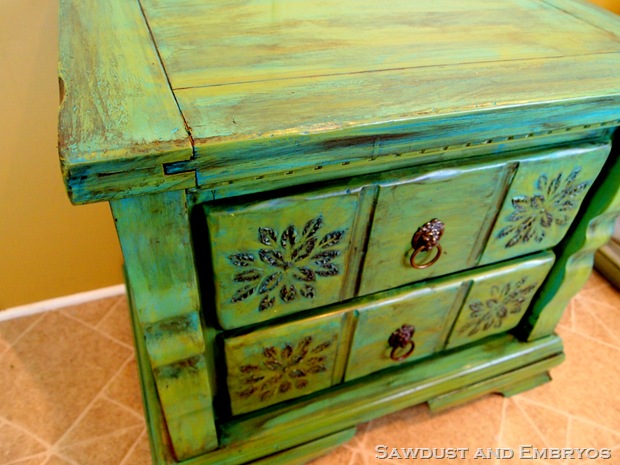
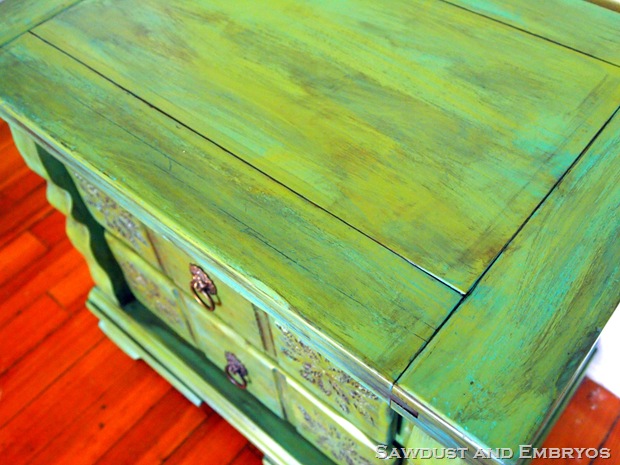
Although you may think of painting with a stencil, but I had other plans! I decided to use joint compound (basic spackle) and blot it onto the stencil using my little round stenciling foam brush. I did this because I want this area to appear raised after I’m done painting and glazing! I’ve seen this technique done before, so it’s not an original idea… but it’s a first for me!


And it totally worked! Next I primed everything with Kilz.

In the next few weeks, we have a commissioned piece for a client who looooooves the finish used in the photo below (from Johnny In a Dress), and so I decided to take this opportunity to ‘practice’ and make sure it will turn out just right for said client.
 |
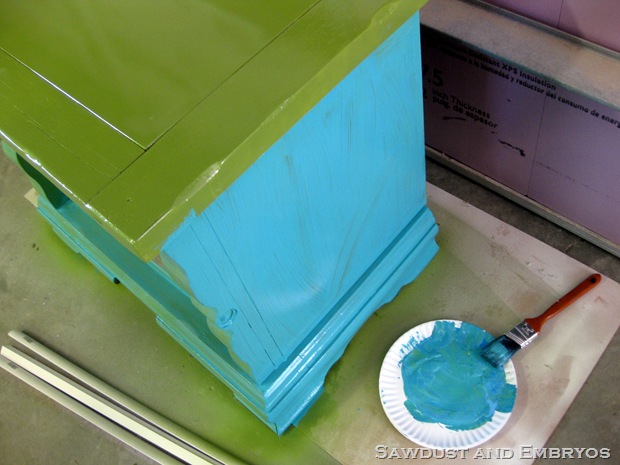
Little buddy got painted using Rustoleum Gloss Fern.

Then, using a few different colors of acrylic paints, I globbed together a mixture on a paper plate, and brushed it onto the end table, immediately wiping it off with a dry cloth.


This was where I was supposed to stop (based on the inspiration photo) but I felt like it needed some dimension and rugged brown-ish-ness. So I whipped out my brown glaze and smeared it on here and there, making sure to get all the cracks and crevices, again… wiping away the bulk of the glaze with a dry cloth (using the same techniques from my glazing tutorial).
I’m loving it very much.
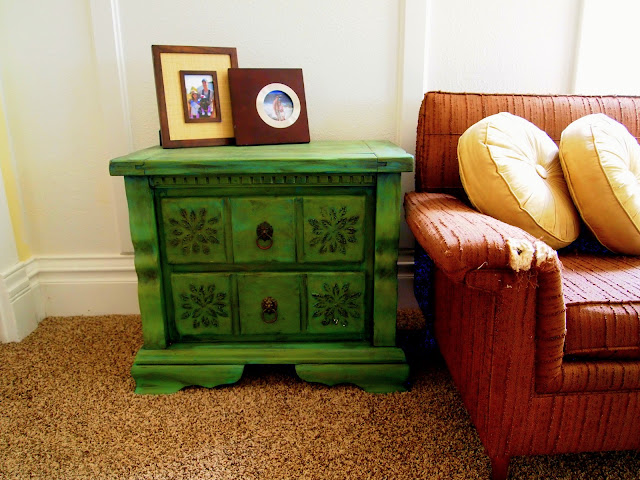
We haven’t decided if we’re selling this little chunky gem yet. I’ve grown very fond if it! 🙂 What do you think about this technique?!
~Bethany
Be sure to check out all the other unique furniture makeovers we’ve done!
Related:
-

We've been needing to update our coffee table situation in the living room for awhile…
Love this project! It looks like you distressed it towards the end. Did you sand it?
Nope no sanding! Just glaze and poly!
This gave inspiration to give some new life to an old WW2 military trunk. Thank you!
Sweet! Be sure to send us pictures when you’re done!
Would you try this technique with red paint base, turquoise & glaze? Thinking if this for a coffee table : )
It will be bright and funky, and I say go for it! You be sure to send pics when you’re done. 🙂
i am completely AMAZED! i love it! will be using if for my new room!
Got it! :O)
Glaze = Effect
Poly = Finish!
Thank you so much for getting back to me- and yes – that helps a lot! I always think the poly looks better too…bare wood looks so vulnerable- all that hard work subject to ruin!!
Thanks again – can’t wait to see your latest endeavor (s). :o)
This comment has been removed by the author.
So the ‘glaze’ effect is what you’re speaking of with the brown in all the cracks and crevices. When we seal a piece, it’s called poly. And we do this with ALL of our furniture to make it super durable. Lots of people don’t do this, but it’s important to us to knock out quality stuff! You could just put it on the top surface of a piece of furniture, since that’s the part that will get the most wear and tear. Hope this helps!
You’ve inspired me to gear up my hobby-you and your hubby make beautiful furniture, and gorgeous babies together!!!
OK, my question is:
What makes you decide whether or not to glaze the piece (the clear /poly “finishing” process often done at the end…) Lovin’ my use of clearly infinite furniture stripin’ slang??
I’m using the word glaze in two different ways….(out of ignorance) the “glaze process” you use with rubbing the brown for affect, and then, the glazing (?) process that is frequently used to seal wooden pieces when all done…OMG< I can’t shut UP!
** Lastly, did you “glaze” THIS piece, when you were done, or leave it “naked”?
Sorry for the book!!!
Wonderful technique. Thank you. (Colours are 1967 all over again, and I’d rather skip that, but you kids enjoy!)
Oh, this looks fantastic! Raise flower pattern is gorgeous. You were so right on with the brown glaze–it gives needed dimension and brings all the colors together. Lovely!!
Yay! I am so glad you were able to use this piece. It looks awesome! I can’t wait to show my husband what you were able to do with it. (and to think I almost forgot to send it as part of the set!)
– Gina
Great idea and great job, love it. I dont’ know where you find the time! Mary in NY
You’re nothing short of a miracle worker, Beth! 🙂 Sooooo cute! You are one talented momma!
makes me think “Spanish” …love, love, love it!
with the first couple pictures I thought it was ugly.. but I love it!! I would take it for my bedroom!!
Love love love!!!!
very cool idea!! Turned out great!
Personally, I like it better than the inspiration photo.
Looks awesome! Love the idea of having a raised pattern under the paint.
You are a genius.
Love it!! SUCH a cool piece! I’d love it for my living room! 😉
I LOVE the raised flower idea, so cool!