• Home
  • About
  • Tutorials
  • Recipes
  • Furniture
  • Contact
    • Contact
    • Infertility
    • Disclosure
    • Privacy Policy
  • Shop
    • Facebook
    • Instagram
    • Pinterest

Reality Daydream

The Dream is Free, The Hustle Sold Separately

  • Home
  • About
  • Tutorials
  • Recipes
  • Furniture
  • Contact
    • Contact
    • Infertility
    • Disclosure
    • Privacy Policy
  • Shop

Picture Plaque for Grandparents

January 5, 2020 by Bethany Sy

This idea came straight outta my noggin, and I’m not even sure what to call it or how to title this post! It can totally be used for anyone… not just grandparents. You could make one for your own family and use your last name as the letters instead of ‘grandparents’.

*This post is sponsored by DAP. Thank you for supporting the fabulous brands that make Reality Daydream possible! This post contains affiliate links.*

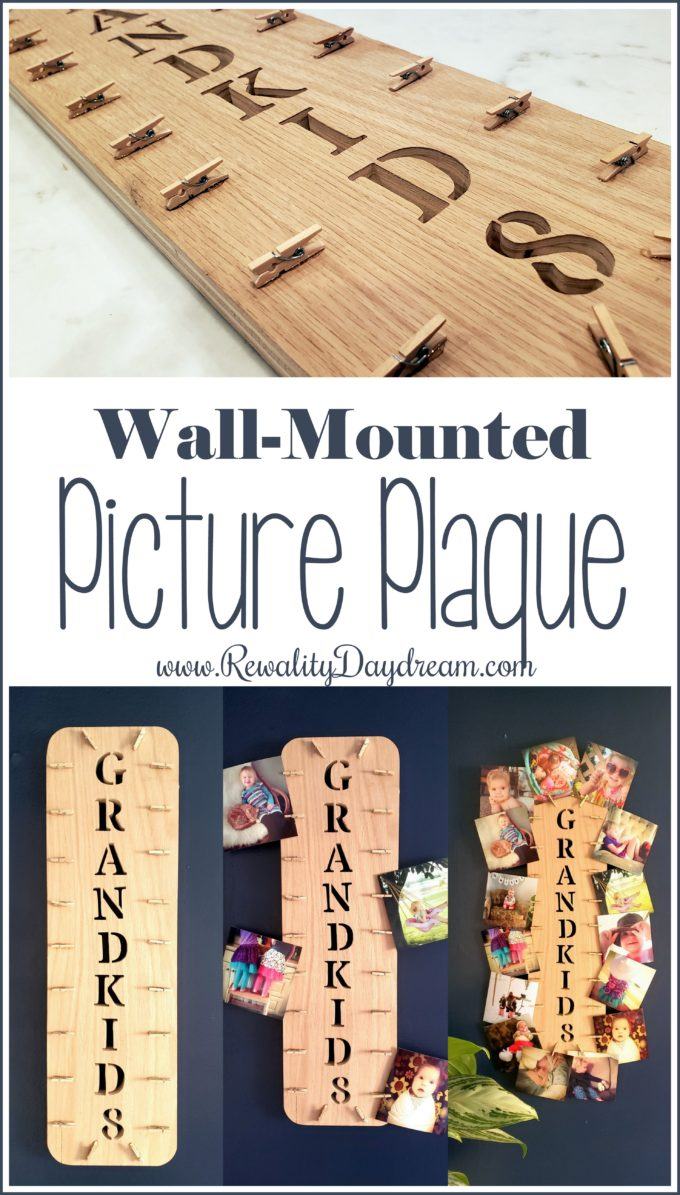
I love the idea of using clothespins for DIY photo holders, and even used full-size ones for our Christmas Card Holder I made way back in the day! That might even be what inspired this idea, since we had it out for Christmas (obvi).

DIY Wall-Mounted Picture Plaque

Supplies

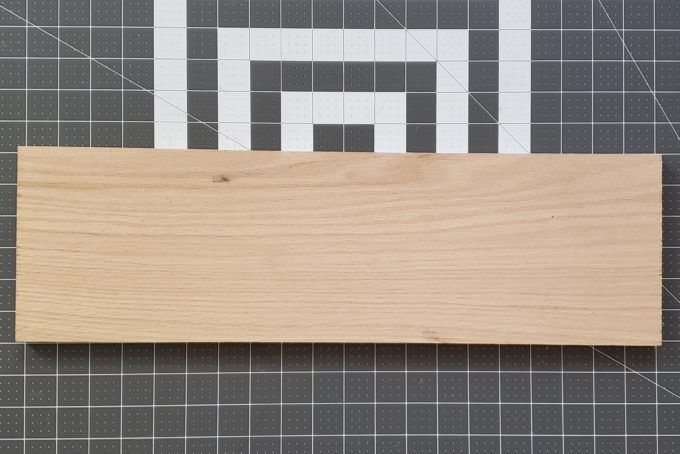
  • Slab of good quality plywood (cut down to 20″x 6″)
  • These alphabet stencils
  • Drill
  • Scroll saw (this is the one I have)
  • Tiny clothespins
  • DAP RapidFuse super glue
  • Sawtooth Hook

Here’s my slab of plywood. I picked which side has the nicest woodgrain.

I grabbed my package of alphabet monogram stencils, and cut around the smaller version of each letter. Then I laid them out so they were evenly spaced and looked pretty centered. If you’re an engineer-type, you can indulge in measuring and making things perfect. (weirdo)

Make sure to save room for that second ‘D’!

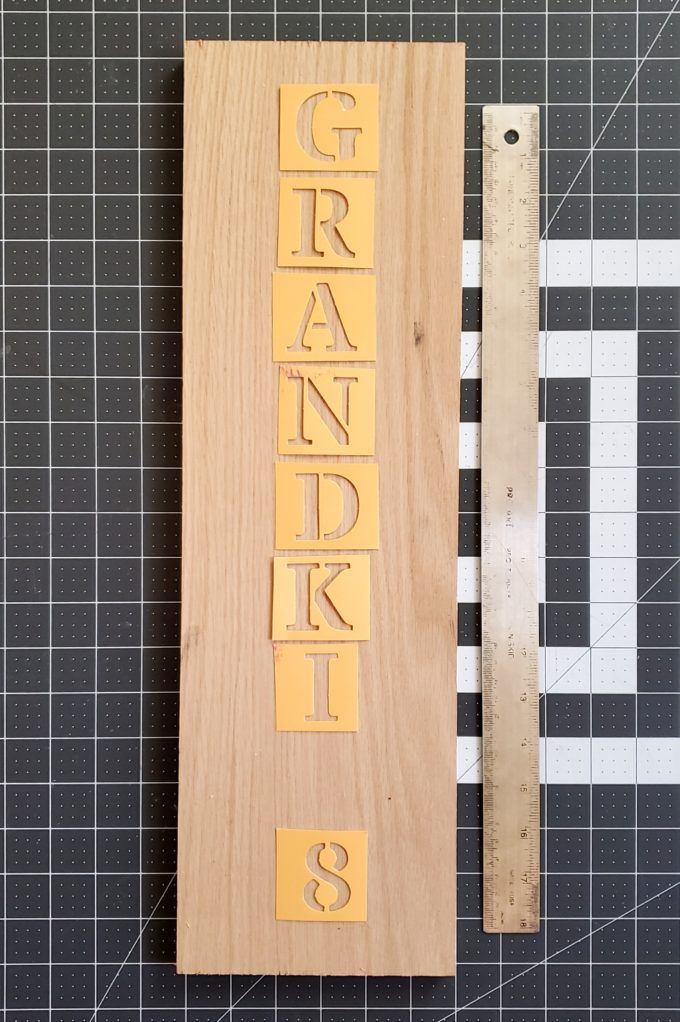
My Instagram friends were kind enough to notify me that I definitely used an ‘8’ stencil instead of a ‘S’, and now I can’t unsee it. But it’s too late and I’m just gonna embrace it. And you should too.

Using a pencil, trace your letters!

Time to cut out these letters! In order to get your scroll saw blade through, we need to drill a hole in each section of each letter.

This is the fun part! If you’re lucky enough to have a nice scroll saw like I do, this part won’t be too tedious because your arm on your scroll saw should raise up so you don’t have to take off the blade and re-attach it after scrolling each little part.

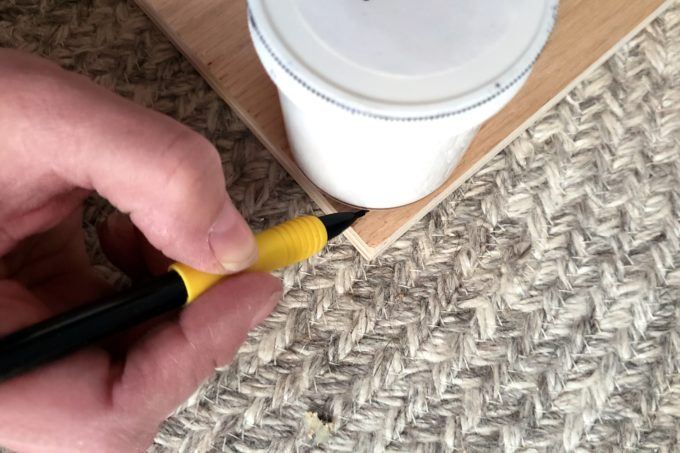
I used a little pot of paint as a template to trace on rounded corners, just to soften things up a bit.

Then sand! You can use an orbital sander to make this go super fast. But if you don’t, hand-sanding won’t take you too long either.

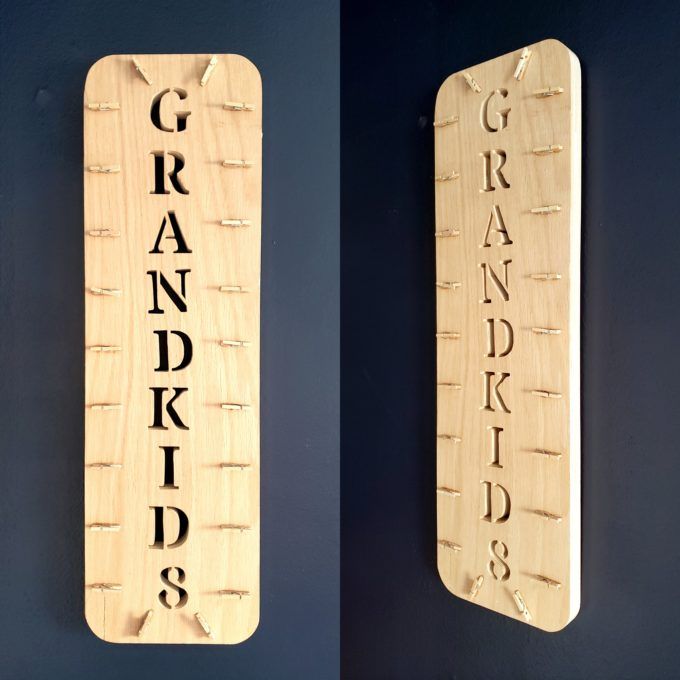
Before you go any further, this is the best time to go ahead and add your ‘sawtooth hook‘ to the back. Trust me, it’ll be easier now than if you wait! 😉

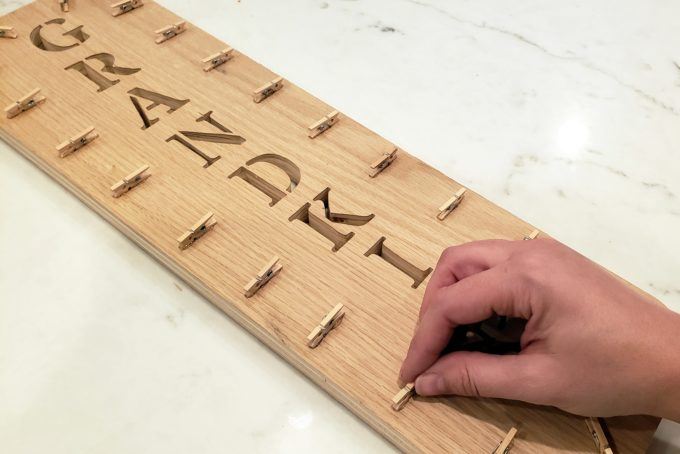
And now it’s time for adding the mini clothespins! If I was using any other glue, I would worry about how well this would hold up. But this Rapid Fuse business is AMAZING, and has built my trust over many years of use. It bonds just about anything, and holds sooooo strong!

Apply a super tiny line of glue onto your super tiny clothespin!

I placed clothespins parallel with each letter to help me space them out as I went around. Then I added two at an angle on the top and bottom.

AND YOU’RE DONE! Hang that sucker up!

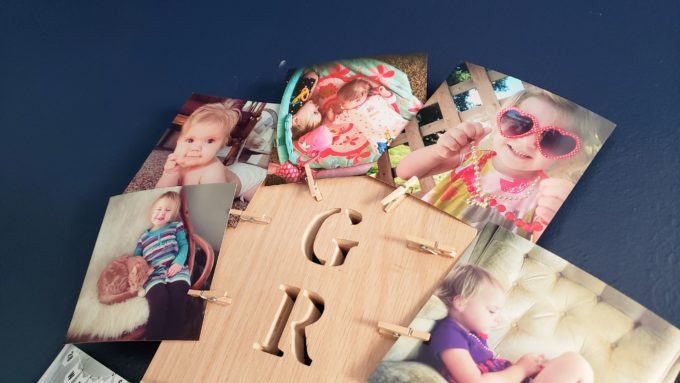
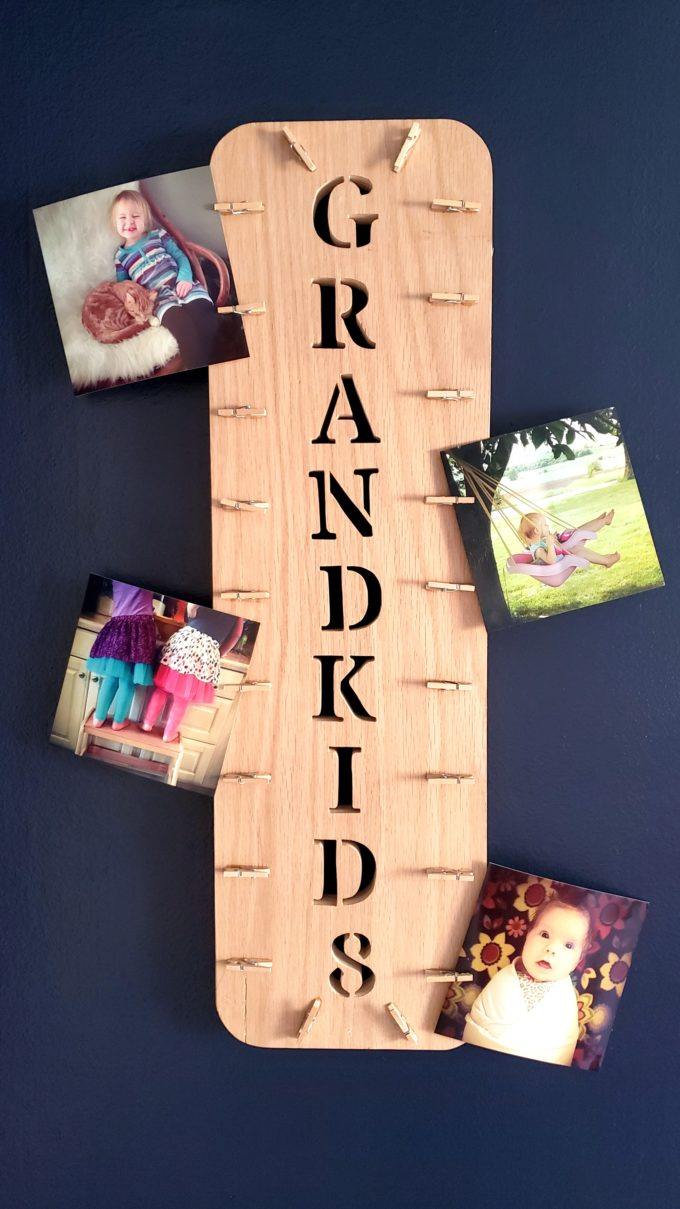
I snagged some pictures from the girls’ photo album to show what it looks like with pics!

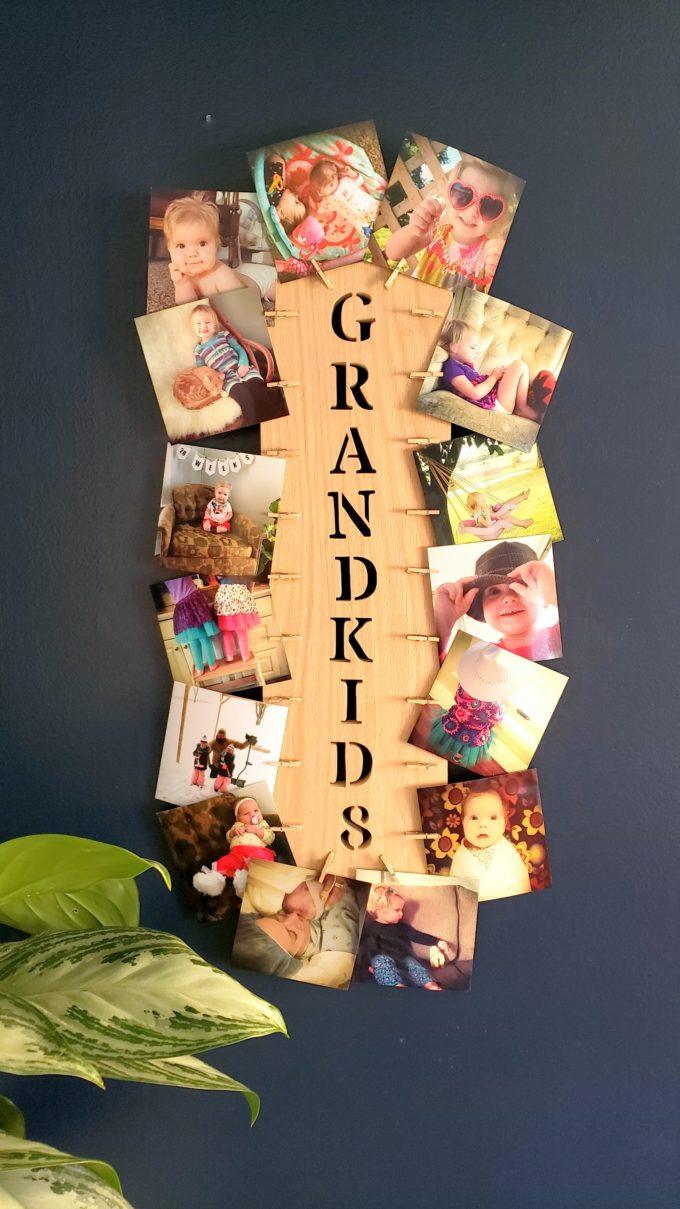
And then I couldn’t stop. 😉

Easy peasy, right? I hope you’re inspired to make one of these! And if you do, please tag us in your pics on social media! We’re @RealityDaydream on both Instagram and Facebook!

~Bethany

~~~~~~~~~~~~~~~~~~~~~~~~~~

Thanks for pinning!

2f32f03bd7d3ca1c352a153338a4c22be0a517b42bf6bc8e9e

Related:

  • DIY Scroll Saw Family Silhouette Sign

    Hello hello friends! Things have been wild as we've been navigating the holiday season, schedules,…

  • Coffee Table / Lego Table

    We've been needing to update our coffee table situation in the living room for awhile…

  • Wooden Centerpiece Tray Tutorial

    I have a fun and easy building project for you! And while I do end…

About Bethany Sy

Nick and Bethany Sy are the creative free-spirits behind DIY/Lifestyle blog, Reality Daydream. They recently purchased a historic mansion and have been documenting the ups and downs of renovation and making this home their own... all while sharing tips and tutorials along the way! When they found themselves in the trenches of infertility, they started a journey that would prove to be their most important DIY project ever, and have 3 beautiful girls to show for it. <3

« DIY Collapsible Dollhouse for 18″ Dolls
Looking back at 2019 »

Comments

  1. 1

    Guerrina says

    January 7, 2020 at 11:43 pm

    Love it!

    Reply

Leave a Reply Cancel reply

Your email address will not be published. Required fields are marked *

  • Facebook
  • Instagram
  • Pinterest
  • RSS
  • YouTube
We are Nick and Bethany! Welcome to our blog, Reality Daydream where we share our DIY adventures!

realitydaydream

Still can’t get over these shelves. 😍 These Still can’t get over these shelves. 😍

These Aksel Radius Floating Shelves by @shelfology are the perfect finishing touch to this wall in our kitchen. 🙌

#gifted #shelfology #radshelfie #floatingshelf #akselradius
I needed an instant-gratification project today fo I needed an instant-gratification project today for my well-being, and this little wooden stand was so fun and fast!

Details and links to everything in this pic in Stories!
If ya just need a slab of wood, grab a cutting boa If ya just need a slab of wood, grab a cutting board when you’re at Target or Walmart! They’re made of hard wood!

I used this cutting board to experiment and make some prototypes for a large-scale piece of art I’m doing for our church. It’s got me EXCITED!

Follow along for that project- happening soooon!

@dapproducts @dremel @jet.woodworking
You’ve all seen the video, but here’s some sti You’ve all seen the video, but here’s some still shots of the kitchen wall in all its glory!! 

The Aksel Radius Floating Shelves by @shelfology were the perfect finishing touch! 

Should I do a house tour of our main floor this week?!?! 🙌🌿

#sponsored #floatingshelf #radshelfie
Load More Follow on Instagram
View of our entryway of our historic mansion that we're slowly renovating and making our own.
Click here for lots of art projects using only wood stain on furniture!!
Please feel free to share or pin my posts! You're welcome to use ONE of my images (no collages or pinnables) with a link back to the corresponding post. Please do not edit or crop that single image in any way. Improper use of my photos, ideas or words is a violation of copyright. Thank you!

Categories

Attention: Almost any do-it-yourself project involves risk of some sort. Your tools, materials, and skills will vary, as will the conditions at your project site. Reality Daydream has made every effort to be complete and accurate in the instructions of the plans on this website. Reality Daydream will not assume any responsibility or liability for damages or losses sustained or incurred in the course of your project or in the use of the item you create. Always follow the manufacturer’s operating instructions in the use of tools, check and follow your local building codes, and observe all commonly accepted safety precautions.


Copyright © 2023 ¡ Modern Blogger Pro On Genesis Framework ¡ Customizations by Sweet Theory Designs ¡ Privacy Policy ¡ Log in