One of my favorite blogs to read is A Beautiful Mess. There’s always so much inspiration, DIY projects, recipes, and phenomenal photography to be had. Awhile back, I saw this amazing Wooden Spoon Clock and fell in love. It’s so bright and cheerful and creative!

This post contains affiliate links.
I really wanted to recreate something like this… but I’m no Martha Stewart in the kitchen, so the wooden spoons didn’t really feel like it fit with the theme of my life. And that’s when I decided to use PAINT BRUSHES (these 2″ chip brushes), and add my own spin to this idea. Don’t you love it when you’re inspired by a project and it snowballs into something even better?!

Supplies for Dipped Paintbrush Starburst Clock
- 1/2” Plywood
- Chip Brushes
- Scroll Saw (or a Jigsaw)
- Various colors of paint (can be oil based or water based… doesn’t matter!)
- 1/4” painters tape
- Lock Tite super glue
- Clock kit
Since chip brushes are significantly smaller than your average wooden spoon, I knew I would need to scale things down a bit. I decided on the size I wanted for the face of my clock, and scrounged around in my kitchen till I found something about that size. I give you the kiddie plate.

After tracing the plate onto some half inch plywood, Paisley and I cut the circle out on the scroll saw. (DISCLAIMER! Our girls have grown up around power tools and have been taught all the safety expectations. We know them and trust them. Please don’t put your children in close contact with power tools unless they know the rules and you trust them)

I traced another circle the same size, folded it in half, and drew a line straight down the center of my wooden circle. Then I folded it in half again and drew a line across. Finally, I folded the last quarter into thirds to divide my circle evenly into twelfths.

I grabbed one of the girls’ drinking glasses (are you sensing a theme?!) and used it as a template for making some curved edges between each quadrant… like so!

Then, using 1/4″painters tape, I taped off two quadrants at a time. The same tape from our backsplash painting days, but regular 1” tape is just fine. I painted each section a different bright color, removing the tape before the paint is fully dry.

And after each color, I would sop up the leftover paint blob with a 2” chip brush, and hung it up to dry! SO FUN!


Nick had this handy little hook thing that’s meant for a pegboard. I used it to let my paintbrushes dry. You could just as easily press nails into a cardboard box too. Just make sure you lay newspaper down below to catch the drips! I let them dry overnight.

I used Lock Tight adhesive to glue the handles of the paint brushes on the back sides of the wooden disk, making sure the each color corresponded (and lined up) with the color on the other side.


I purchased a clock kit for a couple dollars at our local home improvement store (but there are also tons of options here on Amazon). Based on the size of the shaft, I used a 5/16th drill bit and drilled a hole directly in the center of my disc.

Then I just followed the simple instructions on the clock kit. Each one is a little different. If you’re feeling insecure about this part, you can consult this post we wrote awhile back.

I should mention that before I installed the kit, I spray painted the hands white. The gold was ok, but it didn’t really POP on my colorful clock.
 {Sawdust and Embryos}")
I might be excessively overjoyed about how this project turned out… and how simple and FUN it was! AND, I have the perfect spot for this in my craft studio… but a have something else to finish before I can display it in it’s new spot. Patience my people!
 Tutorial {Sawdust and Embryos}")
 using paint-dipped paint brushes! {Sawdust and Embryos}")
Seriously… the hardest part of this project is just gathering the supplies… and really, not that many. Wouldn’t this be a fun project to do with your kids?
 {Sawdust and Embryos}")
And here she is in her final resting place… in our craft room! This is the kiddie corner. Isn’t it cheerful?!
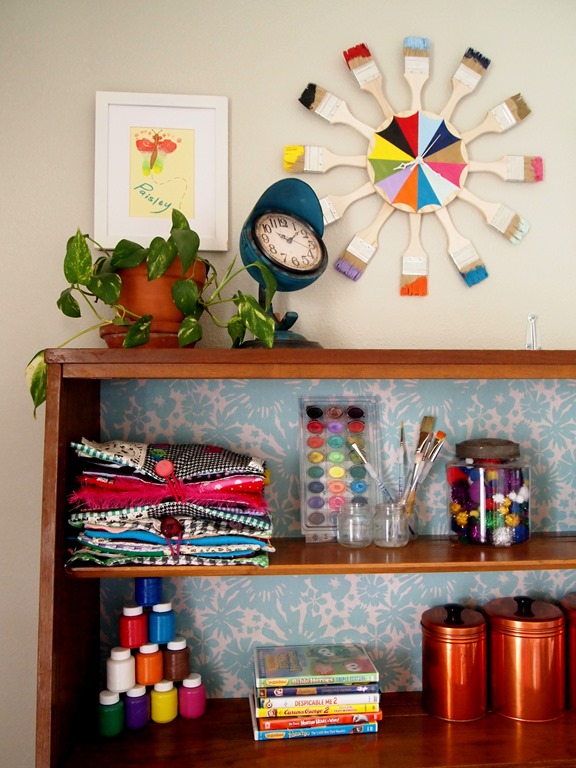

Be sure to check out the other ‘Starburst-Type’ clocks and mirrors I’ve made in the past. They add so much character to a room!
 |
 |
 Tutorial {Sawdust & Embryos}") |
Related:
-

Nick and I have dabbled in epoxy here and there, but we've never done anything…
-

We're in the dog days of summer, and it seems like my kids are always…
-

If you love unique art and have absolutely nothing to do with your time, come…
You are so amazing! Every day I look forward to reading about what you are creating. I really like the spoon clock but your paintbrush clock beats it hands down…pun not intended…lol! My husband is the handyman in our family and I must seriously think about how I can make this clock for his office. I know he would love it!
Your creativity never ceases to amaze me!!!!!
Adorable! I like your paintbrush version even better than the spoons.
That is just so darn cute! I am so jealous! You see something and you just make it! That, my dear, is talent and you have a pile of it!!!!
Even if I don’t win, I think I see a paintbrush clock in my future!
Love this!
Love this! Love the surprise give away! Much love to you and your family!