• Home
  • About
  • Tutorials
  • Recipes
  • Furniture
  • Contact
    • Contact
    • Infertility
    • Disclosure
    • Privacy Policy
  • Shop
    • Facebook
    • Instagram
    • Pinterest

Reality Daydream

The Dream is Free, The Hustle Sold Separately

  • Home
  • About
  • Tutorials
  • Recipes
  • Furniture
  • Contact
    • Contact
    • Infertility
    • Disclosure
    • Privacy Policy
  • Shop

How to repair a broken clock

November 27, 2013 by Bethany Sy

Winter is… OKAY. I used to love it when I would go snowboarding 3 times a week in the Rocky Mountains.

Snowboarding! Back in the day...

But now I tolerate it and try to stay positive.

Coping with winter Do what you can to tolerate the cold


The point that I’m trying to make here is that WINTER = NO GARAGE SALES. And as a mommy, garages sales are my escape. My special place. My alone time every weekend.

And it’s not really even about being alone… I’m just happy when I’m looking through other people’s junk. I’m sure there will be a psychological name for this someday.

The next best thing? THRIFTING.

Dell and I left Nick and Pais at home last weekend and went running errands together. And I decided to treat myself to a Goodwill stop.

It was glorious.

And I found this clock that was giving me heart palpitations.

Amazing thrifted retro clock

(you can’t tell by this picture, but this clock is over two feet tall (!!!)

I thought about staring at it for 5 minutes to make sure it was keeping time, but then I remember that my hubs can fix anything! So I really didn’t care if it worked or not. It would be mine!

As it turns out… It didn’t work.

And my hubs proclaimed that I should buy a clock kit and fix it myself. And I did! It was an intimidating thought, but it turned out to be simple enough that I’m gonna show ya so you won’t be intimidated either!

Buy a clock kit and fix your clock TUTORIAL

I bought this clock kit at Menards for something like $8 smackeroos. You can get them at any hardware store though. I wouldn’t be surprised if you could even buy them at walmart.

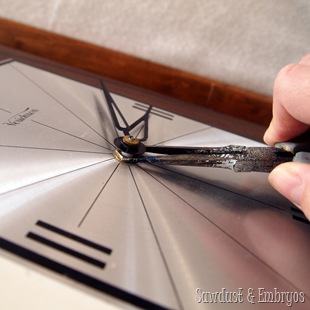
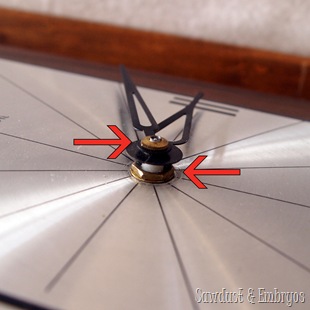
I started by unscrewing both bolts on the front of the old clock face using a pliers. One in front of the hands, and one behind.
TUTORIAL ~ Repairing a clock! Repairing a broken clock

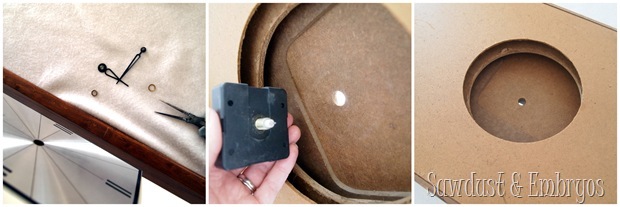
Once those bolts are off, the hands should just fall off and the square back thing can be pulled out.

How to easily repair a thrift store clock

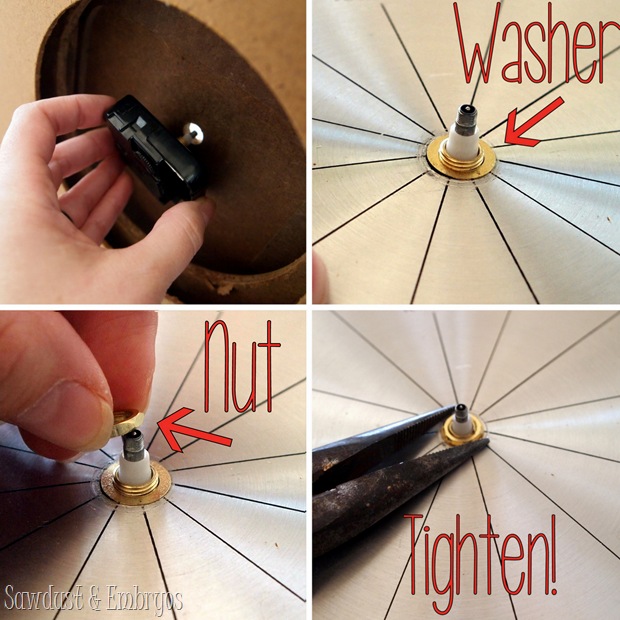
While holding the black box in place on the back of the clock, put the new washer on the front, then thread on the new nut on top of the washer, securing tightly with a pliers or socket.

Fixing a broken clock is easier than you'd imagine

Finally, put those hands on (which I totally spray painted black)! Small (hour) hand first, then the minute hand. Then thread on that last tiny nut to keep the hands secure. BE CAREFUL not to cross-thread!

Using a clock kit to fix a broken clock! {Sawdust and Embryos}

And then pop that second hand into place and give yourself a high-five!

How to repair a broken clock with a clock-kit {Sawdust and Embryos}

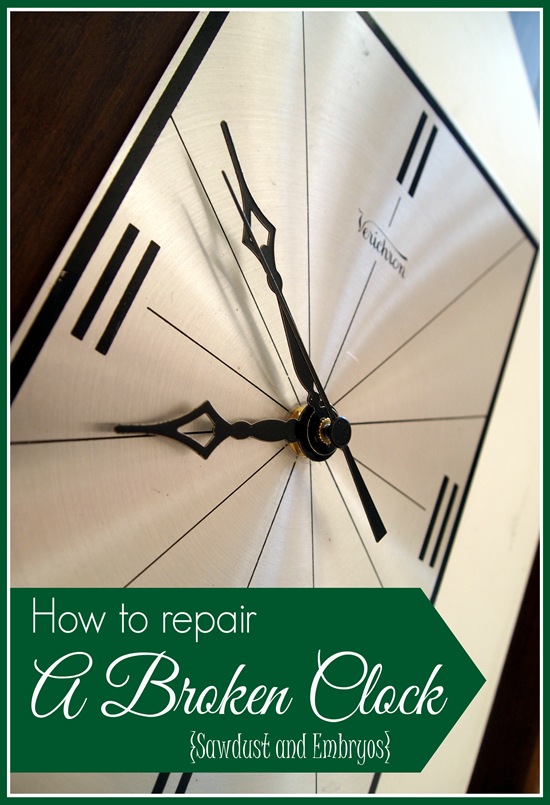
I freaking LOVE this clock. And I love how it looks hanging on ‘the pillar’.

AMAZING Retro Thrifted Clock

Let me tell you, fixing a clock is SIMPLE and a valuable skill to have… because when you fall upon that PERFECT vintage clock, you want it to function as a clock for your family too! You’re welcome!

How to repair a broken clock with a clock-kit

Hope you all are gearing up for a Happy and TASTY Thanksgiving! I know I have soooo many things to be thankful for!


Sawdust and Embryos

Related:

  • Plaster-Hardened Fabric Planters

    I've had this idea in the back of my mind for quite awhile... why not…

  • Stripping an Old Stained Desk

    We love the original wood of our library, and wanted to find a desk that…

  • Installing a Sliding Barndoor

    This is a sponsored post written by me on behalf of Masonite Doors. All opinions…

About Bethany Sy

Nick and Bethany Sy are the creative free-spirits behind DIY/Lifestyle blog, Reality Daydream. They recently purchased a historic mansion and have been documenting the ups and downs of renovation and making this home their own... all while sharing tips and tutorials along the way! When they found themselves in the trenches of infertility, they started a journey that would prove to be their most important DIY project ever, and have 3 beautiful girls to show for it. <3

« Nov Camera Dump
Christmas Tree Traditions »

Comments

  1. 9

    Sandra Patterson says

    August 15, 2019 at 10:26 pm

    I thought it was interesting that you were able to get a clock repair kit for only 8 dollars. My sister has a grandfather clock that she inherited from her grandma, but t doesn’t work anymore. I think that kind of repair might need something a bit more than a repair kit from Walmart.

    Reply
  2. 10

    Kenz @ Interiors by Kenz says

    December 2, 2013 at 8:14 pm

    Oh my gosh, this clock is amazing! That is the perfect spot for it. And who knew fixing a clock would be so easy 🙂 Leave it to Beth to show us the ways!

    Reply
  3. 11

    Mary Cole says

    November 30, 2013 at 5:30 pm

    I love that shot of the clock on the pillar, your house looks gorgeous! What is that ladder thing on the buffet?

    Reply
    • 12

      Bethany @ Sawdust and Embryos says

      December 2, 2013 at 9:26 pm

      Mary! That mini-ladder shelf is a DIY project we did a few months back! We use it to put food on when we’re entertaining buffet style. And I use it just to decorate with too! Here’s the link 🙂

      https://realitydaydream.com/2013/09/mini-ladder-shelf-for-serving-a-organization.html

      Reply
  4. 13

    Sarah Schwartz says

    November 28, 2013 at 8:44 am

    FYI – most of the big chain craft stores carry the clock kits AND you can use their 40% off coupons! I’ve made a couple of my melted crayon pieces into clocks, and was really glad when I discovered I could save a few bucks on the mechanics!

    Reply
    • 14

      Bethany @ Sawdust and Embryos says

      December 2, 2013 at 9:24 pm

      Ooo good advice!

      Reply
  5. 15

    Epiphany says

    November 27, 2013 at 6:34 pm

    Was there any reason you couldn’t re-use the original hands? The new ones are okay, but I think the originals go better with the look of the clock.

    Reply
    • 16

      Bethany @ Sawdust and Embryos says

      November 27, 2013 at 6:38 pm

      I agree I liked the old ones too, but the vintage ones weren’t compatible with the clock kit unfortunately. But painting them black made them a LOT better than their previous look. 🙂

      Reply

Trackbacks

  1. Butterfly Silhouette Clock - Sawdust and Embryos says:
    October 30, 2015 at 8:13 am

    […] Then slap on the clock hands according to the instructions on the package (if you need help with this, I have more detailed instructions on this post) […]

    Reply

Leave a Reply Cancel reply

Your email address will not be published. Required fields are marked *

Recipe Rating


  • Facebook
  • Instagram
  • Pinterest
  • RSS
  • YouTube
We are Nick and Bethany! Welcome to our blog, Reality Daydream where we share our DIY adventures!
Click here for lots of art projects using only wood stain on furniture!!
Please feel free to share or pin my posts! You're welcome to use ONE of my images (no collages or pinnables) with a link back to the corresponding post. Please do not edit or crop that single image in any way. Improper use of my photos, ideas or words is a violation of copyright. Thank you!

Categories

Attention: Almost any do-it-yourself project involves risk of some sort. Your tools, materials, and skills will vary, as will the conditions at your project site. Reality Daydream has made every effort to be complete and accurate in the instructions of the plans on this website. Reality Daydream will not assume any responsibility or liability for damages or losses sustained or incurred in the course of your project or in the use of the item you create. Always follow the manufacturer’s operating instructions in the use of tools, check and follow your local building codes, and observe all commonly accepted safety precautions.


Copyright © 2025 · Modern Blogger Pro On Genesis Framework · Customizations by Sweet Theory Designs · Privacy Policy · Log in