• Home
  • About
  • Tutorials
  • Recipes
  • Furniture
  • Contact
    • Contact
    • Infertility
    • Disclosure
    • Privacy Policy
  • Shop
    • Facebook
    • Instagram
    • Pinterest

Reality Daydream

The Dream is Free, The Hustle Sold Separately

  • Home
  • About
  • Tutorials
  • Recipes
  • Furniture
  • Contact
    • Contact
    • Infertility
    • Disclosure
    • Privacy Policy
  • Shop

DIY Wooden Paper Doll Tutorial

November 14, 2014 by Bethany Sy

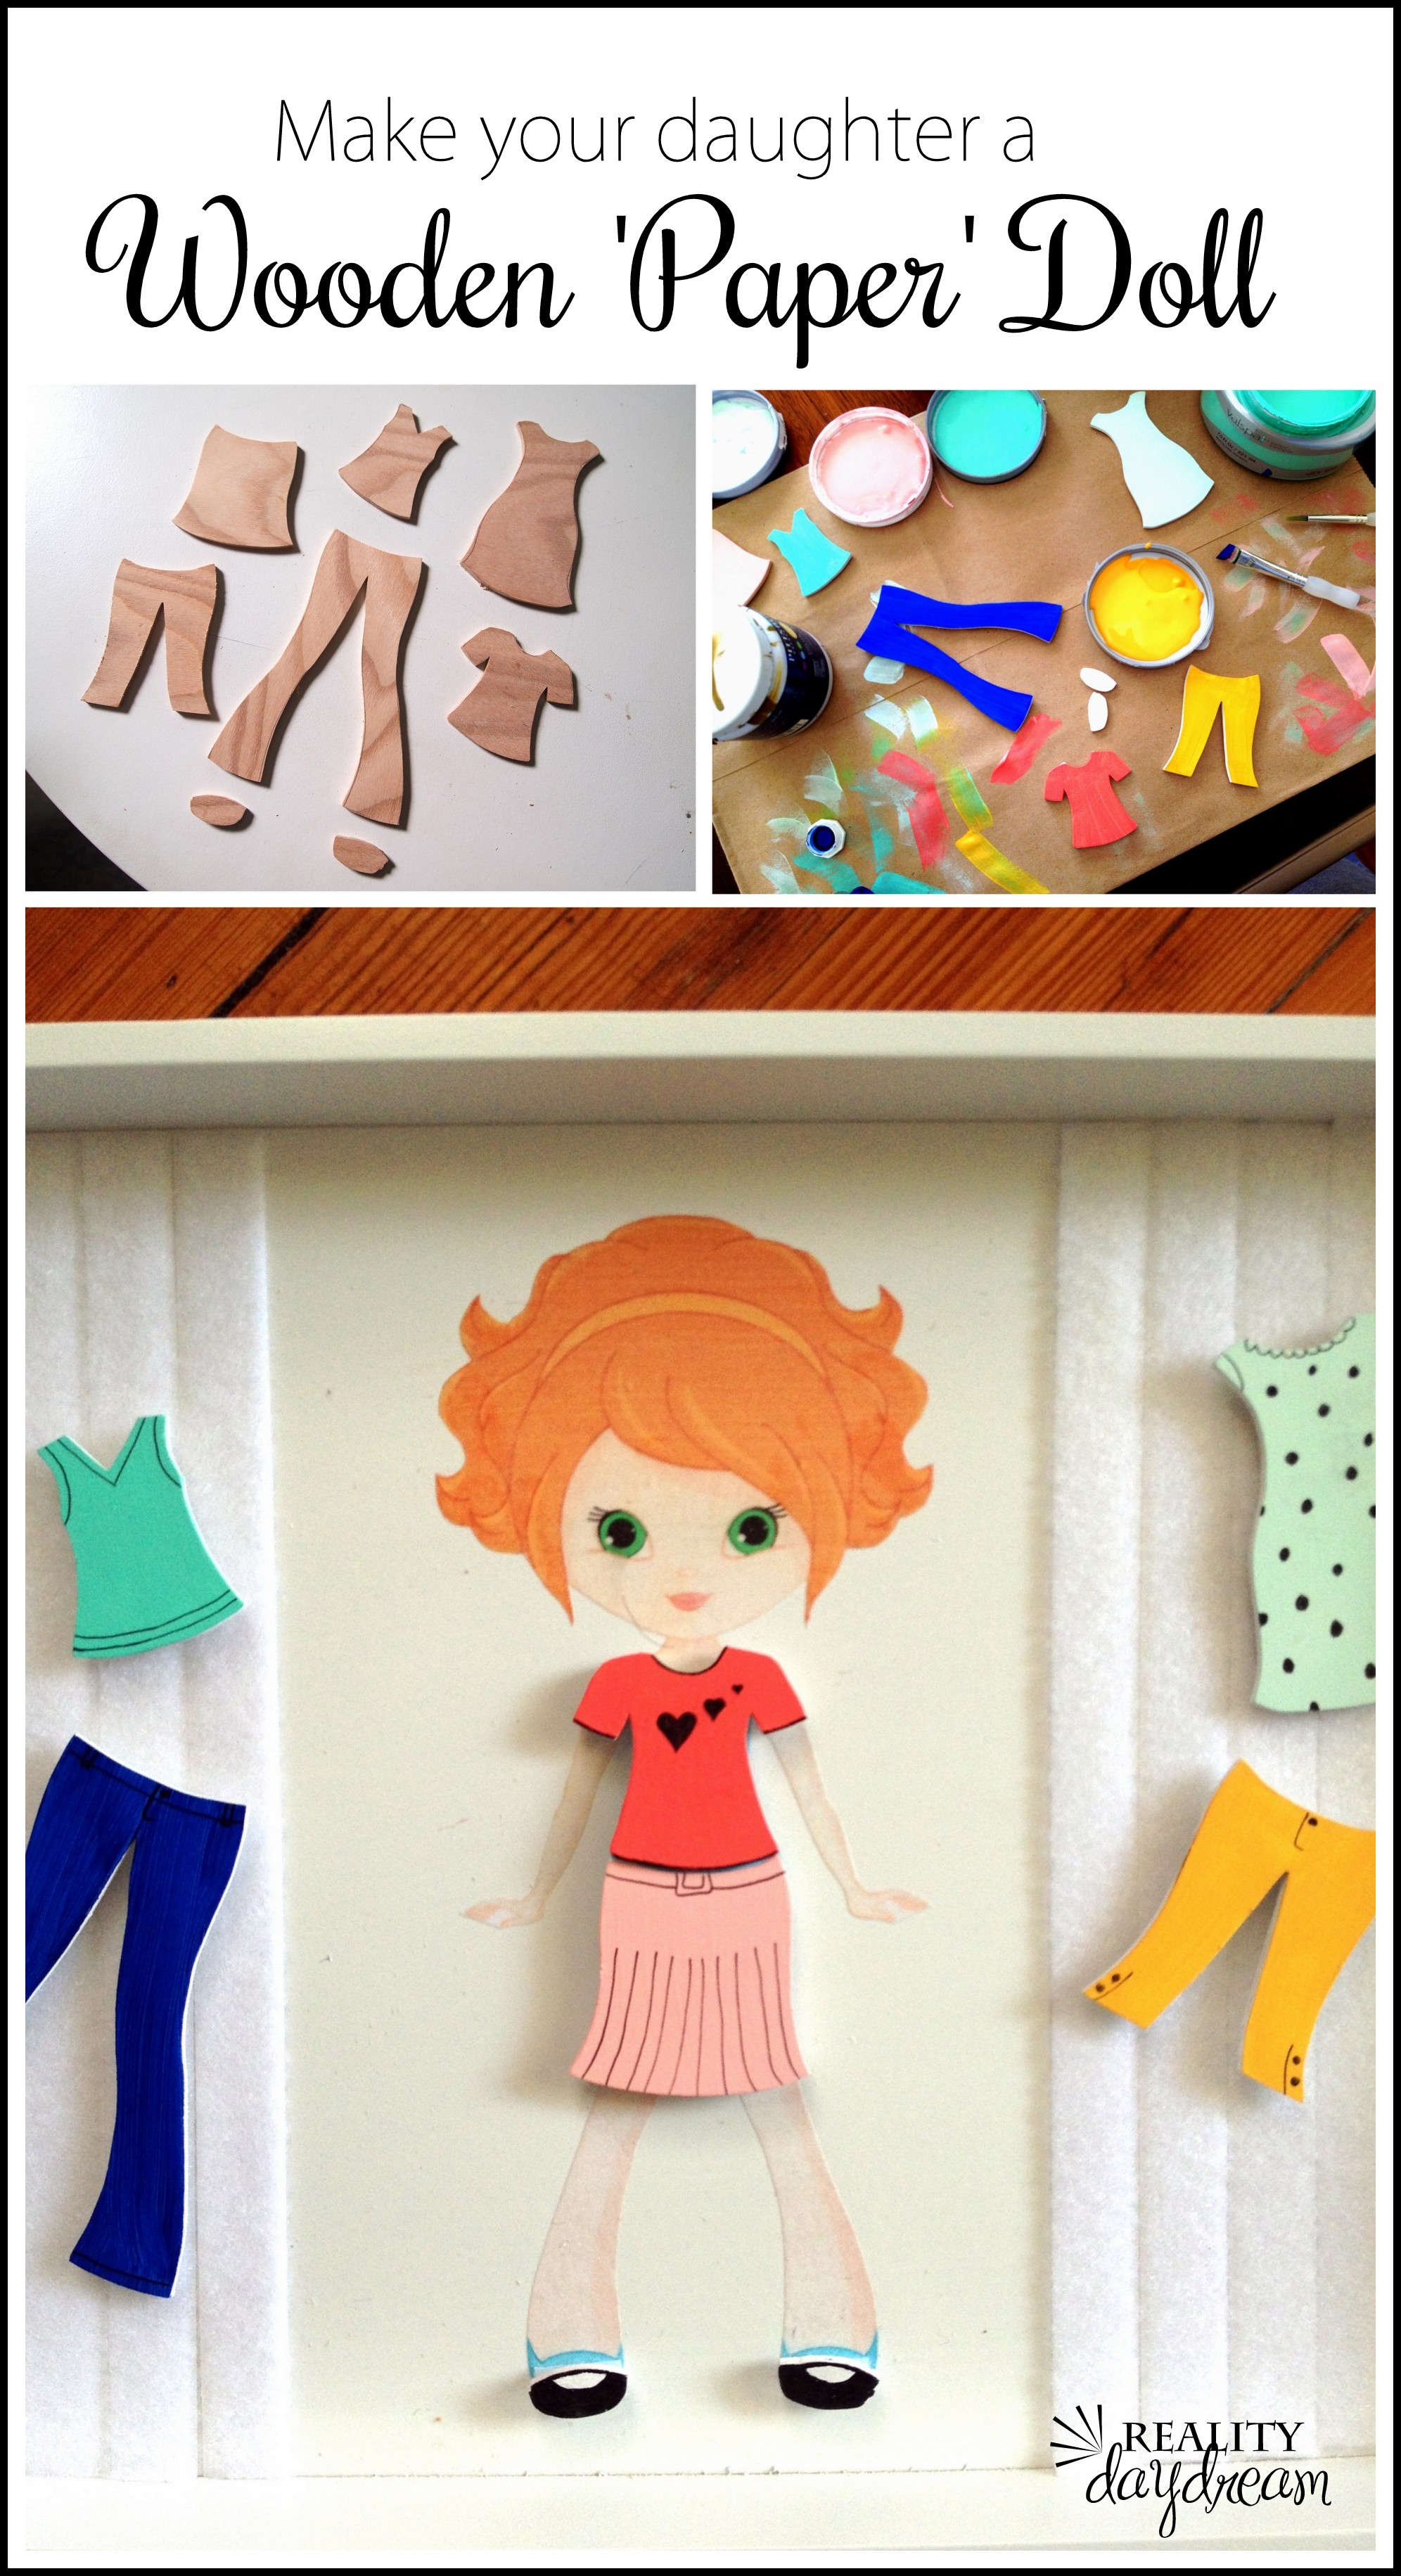
As much as the girls love to dress up, I knew that making some sort of ‘paper doll’ would be right up their alley, AND likely provide hours without whining of entertainment for the littles! And based on the changing season, indoor entertainment ideas are becoming very important these days.

Make a wooden paper doll (with customizable wooden clothing) for the little girl in your life! {Reality Daydream}


I had purchased this wooden tray from Target awhile back to put cupcakes on at a baby shower I was hosting for a friend. And since then, it’s just been a project WAITING to happen. (I couldn’t find a link to the same exact tray, but here’s a similar one)

Wooden paper doll on a tray with velcro! {Sawdust and Embryos}

I started out by priming and painting my tray white.

Wooden paper doll on a tray using velcro {Sawdust and Embryos}

After doing some searching online, I found this darling paper doll download for just a few bucks. I didn’t need the clothing images, just the doll… and I love that she’s bright/cheerful, and her body isn’t overly sexed-up (if you know what I mean). I she just seems kinda retro. Let’s call her Ginger, shall we?

Paper Doll Download for Wooden Paper Doll Tutorial {Sawdust and Embryos}

I sized the image to be an inch or so smaller than the width of my tray, printed her out on cardstock, and carefully cut her out with scissors. (disclaimer! my secretary desk, just happens to be stenciled in the same colors (and retro feel) as the paper doll… complete coincidence that I didn’t even notice until right now!)

DIY Wooden Paper Doll {Sawdust and Embryos}

I brushed a layer of RustOleum water-based sealer onto the inside of the tray… and while it was still wet, I pressed Ginger into place, being sure she was centered, and all the bubbles were smoothed out.

DIY Wooden Paper Doll project... great entertainment for little girls! {Sawdust and Embryos}

I waited two hours between coats, and lightly sanded with 220 grit between each. I applied 4 coats total so that there wouldn’t be much of a ridge around Ginger.

GIFT IDEA! Make your todder a DIY Wooden Paper Doll... completely customizable! {Sawdust and Embryos}

Print a second Ginger (again on cardstock), cut her out, and use this as a template to trace her clothing! I used a 1/8th” piece of hardwood we had laying around in the garage. This part is so fun, because you can come up with so many fun little outfits in your mind! (technically you could also use felt for the clothing, but I liked being able to paint and customize mine!)

How to make a wooden Paper Doll with little wooden clothes... super cute! {Sawdust and Embryos}

I’m sure you already guessed the next step… I used my trusty scroll saw to cut these out! This is the scroll saw I use and it’s A.M.A.Z.I.N.G. But if you’re looking for a more mid-range (read: less expensive) then this one is also great quality and handles well! Whatever you do, don’t buy a scroll saw in the $100-$200 range. You’ll regret it for sure.

Make your own wooden paper doll with darling wooden clothing that you can paint and customize yourself! [Sawdust and Embryos}

Lightly sand your clothing items (never thought I’d say that) so there aren’t any rough edges, then prime!

8

I have a small collection of sample pots of paint, so I grabbed a handful that I liked and started playing fashion designer!

DIY Wooden Paper Doll with tiny wooden clothing! Totally customizable... and DARLING {Sawdust and Embryos}

It took a couple coats of paint on each article of clothing to get good coverage. And once my final coat was dry, I took a fine-point Sharpie and added some detail. I think this is what really brought these pieces to life!

Making your own Wooden Paper Doll clothing for this DIY Wooden Paper Doll project! {Sawdust and Embryos}

I used strips of velcro to line either side of Ginger on the tray, and also put small pieces on her body where the clothing would go. Then added some to the back of the clothing, being careful to put it in the same spot that would coordinate with the piece that’s on Ginger’s body.

DIY Wooden Paper Doll with Wooden clothing! {Sawdust and Embryos}

I love that this ‘paper doll’ wont get torn or wadded up by aggressive toddlers, AND it can be taken in the car for long car rides since the velcro holds everything in place!

DIY Paper Doll Tray with little wooden articles of clothing! ADORABLE! {Sawdust and Embryos}

I totally need to make more clothing for Ginger so she has more wardrobe options. Maybe I’ll let the girls decorate the next batch!

DIY Paper Doll Tray with customizable wooden clothing! {Sawdust and Embryos}

Paper Doll Tray Tutorial with little wooden clothing items... completely customizable! {Sawdust and Embryos}

This could be a super cute handmade gift idea for the holidays… and remember if you don’t have a scroll saw, you could totally use felt for the  clothes! Just make sure you use the scratchy side of the velcro on the tray to the felt will have something to grab onto. As always, if you try one of our projects, please send us pics! We love to see the creative twists you guys put on things!

Sawdust-Embryos_thumb5

Thanks for pinning!!

Make a wooden paper doll (with customizable wooden clothing) for the little girl in your life! {Reality Daydream}

*this post contains affiliate links

Related:

  • Wooden Centerpiece Tray Tutorial

    I have a fun and easy building project for you! And while I do end…

  • DIY Fabric-Covered Bulletin Tutorial

    My kids are getting to the age where they want to tape pictures, cards, notes...…

  • DIY Scroll Saw Family Silhouette Sign

    Hello hello friends! Things have been wild as we've been navigating the holiday season, schedules,…

About Bethany Sy

Nick and Bethany Sy are the creative free-spirits behind DIY/Lifestyle blog, Reality Daydream. They recently purchased a historic mansion and have been documenting the ups and downs of renovation and making this home their own... all while sharing tips and tutorials along the way! When they found themselves in the trenches of infertility, they started a journey that would prove to be their most important DIY project ever, and have 3 beautiful girls to show for it. <3

« Wood-Disk Table Lamps {& Wiring Tutorial}
Dipped Paint Brush Starburst Clock »

Comments

  1. 17

    robin says

    July 11, 2019 at 4:39 pm

    Is there a different link to the doll, it says not available

    Reply
    • 18

      Bethany Sy says

      July 12, 2019 at 2:14 pm

      Bummer! That’s frustrating. Maybe you could find another little image/vector to use that would work??

      Reply
  2. 19

    Suzanne says

    February 7, 2016 at 8:56 pm

    I need a scroll saw!!!!! This is definitely a favorite one for me. I can easily imagine the smile on your girls’ faces. Kudos to you for this idea. I LOVE IT!

    Reply
    • 20

      Bethany says

      February 8, 2016 at 5:04 pm

      Thank you Suzanne! This is a fairly old post, and my girls STILL pull out ‘Ginger’ to play with often! Makes me so happy! My favorite scroll saw is this one! >> http://amzn.to/1nT5iNU (Aff Link)

      Reply
  3. 21

    Mindy Friedlander-Schaper says

    November 17, 2014 at 2:35 pm

    Great idea, especially that they won’t fall off in the car. You should sell these.

    Reply
  4. 22

    Karen says

    November 17, 2014 at 7:49 pm

    Very Clever!!

    Reply
  5. 23

    Stephanie, Sandpaper and Glue says

    November 17, 2014 at 10:24 am

    what a super cute idea!! i love it!!

    Reply
  6. 24

    Marie says

    November 17, 2014 at 8:42 am

    This is amazing. I am SO NOT crafty. Please sell these! I would love to buy for my nieces!

    Reply
  7. 25

    Kiana says

    November 15, 2014 at 11:30 pm

    That’s so awesome! I’m working on making one for my friend’s little sister, except I’m using a real picture of her I printed/cut out

    Reply
    • 26

      Beth @ Sawdust and Embryos says

      November 16, 2014 at 7:00 am

      Umm that is SUCH a great idea!!!

      Reply
      • 27

        Kiana says

        November 18, 2014 at 10:10 pm

        Thank You!!

        Reply
    • 28

      Kara says

      December 3, 2014 at 11:48 am

      This is an awesome idea! I totally want to do that for my nieces!

      Reply
  8. 29

    Laura says

    November 15, 2014 at 11:11 am

    Felt will hold to other felt or flannel as well. In fact I think the scratch side of velcro may be a little tough on the fibers of felt.

    Reply
  9. 30

    Christy Compeau says

    November 14, 2014 at 9:22 pm

    Super cute idea! I wish I had a girl for a project like this! But whose to say I couldn’t do this with a boy paper doll to dress as a firefighter, policeman, ghost buster, superhero or more!

    Reply
  10. 31

    Julie@followyourheartwood says

    November 14, 2014 at 3:44 pm

    That doll and clothes are just amazing! You could make some outfits that match your daughters’ own clothes, girls love that.

    Reply
  11. 32

    Jessica says

    November 14, 2014 at 9:40 am

    LOVE this idea!!! So so cute!!

    Reply
  12. 33

    Megan says

    November 14, 2014 at 8:25 am

    in a word…BRILLIANT!!!!!

    Reply

Trackbacks

  1. 40 Creative Scroll Saw Projects for Newbies and Pros + Free Patterns says:
    July 14, 2019 at 3:42 pm

    […] See guide | Photo: realitydaydream.com […]

    Reply
  2. 27 Fun DIY Bandsaw Projects You Can Start Today | SawsHub says:
    June 24, 2019 at 5:18 am

    […] Check out these Wooden Paper Dolls here: http://www.realitydaydream.com […]

    Reply

Leave a Reply Cancel reply

Your email address will not be published. Required fields are marked *

  • Facebook
  • Instagram
  • Pinterest
  • RSS
  • YouTube
We are Nick and Bethany! Welcome to our blog, Reality Daydream where we share our DIY adventures!

realitydaydream

Still can’t get over these shelves. 😍 These Still can’t get over these shelves. 😍

These Aksel Radius Floating Shelves by @shelfology are the perfect finishing touch to this wall in our kitchen. 🙌

#gifted #shelfology #radshelfie #floatingshelf #akselradius
I needed an instant-gratification project today fo I needed an instant-gratification project today for my well-being, and this little wooden stand was so fun and fast!

Details and links to everything in this pic in Stories!
If ya just need a slab of wood, grab a cutting boa If ya just need a slab of wood, grab a cutting board when you’re at Target or Walmart! They’re made of hard wood!

I used this cutting board to experiment and make some prototypes for a large-scale piece of art I’m doing for our church. It’s got me EXCITED!

Follow along for that project- happening soooon!

@dapproducts @dremel @jet.woodworking
You’ve all seen the video, but here’s some sti You’ve all seen the video, but here’s some still shots of the kitchen wall in all its glory!! 

The Aksel Radius Floating Shelves by @shelfology were the perfect finishing touch! 

Should I do a house tour of our main floor this week?!?! 🙌🌿

#sponsored #floatingshelf #radshelfie
Load More Follow on Instagram
View of our entryway of our historic mansion that we're slowly renovating and making our own.
Click here for lots of art projects using only wood stain on furniture!!
Please feel free to share or pin my posts! You're welcome to use ONE of my images (no collages or pinnables) with a link back to the corresponding post. Please do not edit or crop that single image in any way. Improper use of my photos, ideas or words is a violation of copyright. Thank you!

Categories

Attention: Almost any do-it-yourself project involves risk of some sort. Your tools, materials, and skills will vary, as will the conditions at your project site. Reality Daydream has made every effort to be complete and accurate in the instructions of the plans on this website. Reality Daydream will not assume any responsibility or liability for damages or losses sustained or incurred in the course of your project or in the use of the item you create. Always follow the manufacturer’s operating instructions in the use of tools, check and follow your local building codes, and observe all commonly accepted safety precautions.


Copyright © 2023 · Modern Blogger Pro On Genesis Framework · Customizations by Sweet Theory Designs · Privacy Policy · Log in