Sincerest apologies for leaving you hanging with the stenciling yesterday. I just hate for my posts to get too long and boring! And it’s fun to divide projects up into different sub-projects so they seem less daunting.
Recall for a moment that this is how our ‘solarium’ started out when we bought the house.

Painting the trim and around all those window panes was a huuuuge pain (PUN!), but so worth it! Getting rid of that bright yellow was an important matter.
And (this is where we left off yesterday.. linoleum (or is it vinyl?) cleaned, prepped, painted!

SPEAKING OF DAUNTING…
This is not really a tutorial on stenciling your floors, because the truth is, I legit don’t recommend it.
I’m not saying I regret it. Because I don’t. But it took sooooooo many hours. Like dozens. This was made possible by the sheer insane amount of time we spend at the new house while Nick is carefully dismanteling the kitchen.
Don’t feel bad for Nick… he doesn’t WANT my help, because it would involve me and a 12 lb sledge hammer, and that’s not his style apparently. We’re living proof that opposites attract.
So I’ve had lots of hours to get my paint on while the children frolic about the neighborhood.

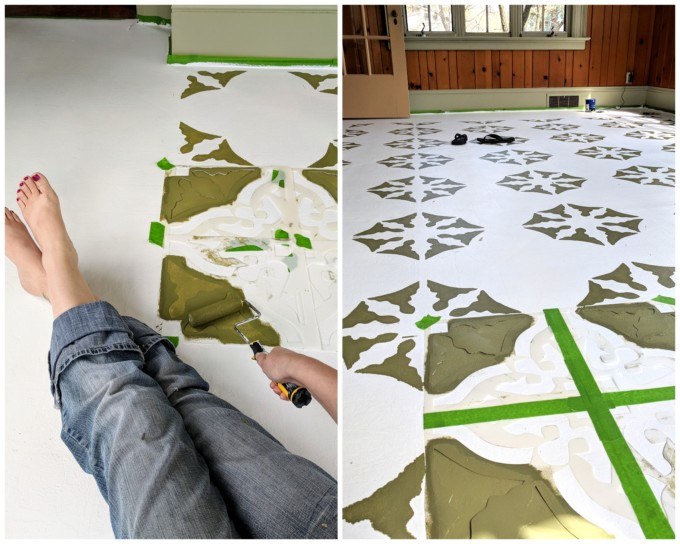
I picked a stenciling pattern based off these tiles and had my friend Dana makes some changes and do a little editing in her software. Then she blew the whole thing up SUPER LARGE and cut me a stencil on her laser! In order to make it as large as we did, we had to cut 4 separate stencils to fit together to make a larger one.
To keep things simple and make sure it all lines up in the end, I decided to just start with doing one part/color on the whole floor and then go back and do the rest. I did NOT expect this stenciling pattern to emerge. I kinda like it! (but not enough to stop here)

Of course there were lots of little stenciling oopsies, but I didn’t worry about doing touch-ups until the very end. I did two coats of this olive green color which was super frustrating. But worth it, you know?
FINALLY time to add a couple more colors!
Since I know I’m going to get some questions about this color combination I chose, and the truth is… I just picked some random colors that wouldn’t normally be seen together. Because I’m that kinda girl.

I made sure SW Sage was one of the 5 stenciling colors so that it would tie the floor in with all the molding and trim. It was so fun watching it come together ones I started stenciling 3 colors at a time!

Cypress loves to ‘help’ me with whatever I’m working on, and she had so much fun painting on this cardboard box while I stenciled away!


It needed two coats of every color. But I found that using the stenciling brush rather than a small roller (like I used on the first color) helped give a lot cleaner lines… which makes for less need for touch ups.

The stenciling ain’t perfect, but I’m LOVING IT!
You might remember I had 5 paint swatches picked out for this pattern… we’re still missing the peach shade! There wasn’t a spot for it on the stencil, but I knew right where to put it.
After finding a cute flower template via google image, I printed it on a transparency and cut out the flower with an Exacto knife to make my own stencil. (see this post for more details and instruction on making your own stencil)


After doing touch-ups on the stenciling with a craft paint brush, I sealed the floors with this stuff by just drizzling it right onto the floor and rolling it with a paint roller. It dries completely clear and will make this floor even more durable (and wipeable!) than it already is!
There aren’t a lot of rooms that can pull off this much pattern and color on such a large surface, but this sunroom is rocking it. And this will be the perfect space for us to create together as a family, learn, read, all the things.
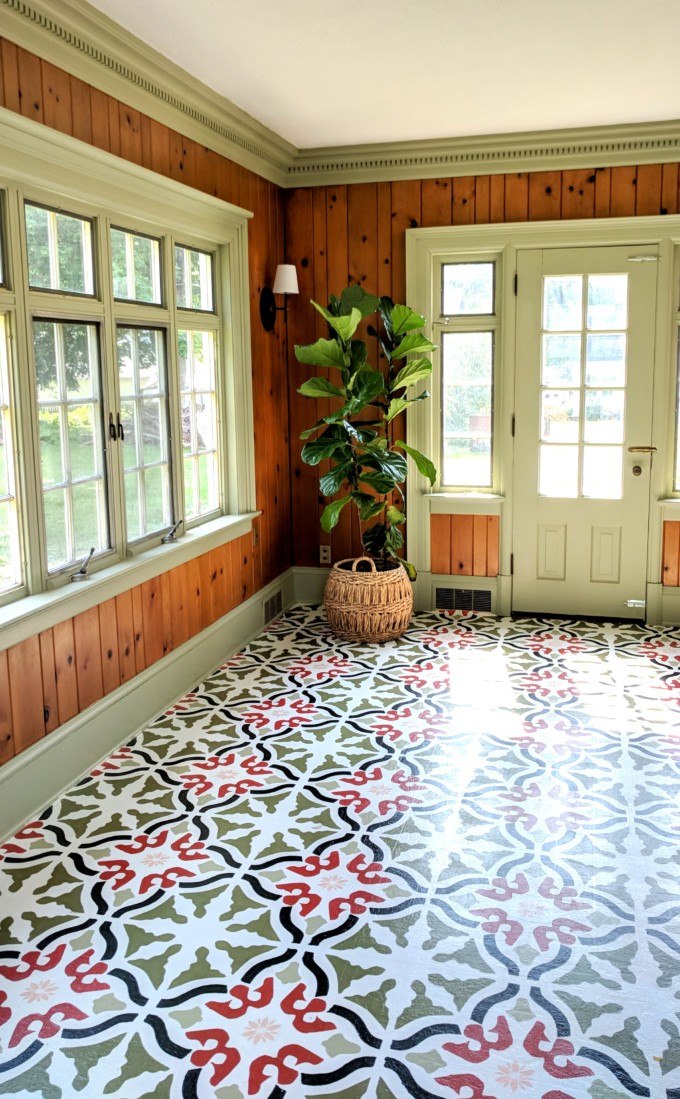
I can’t wait to start loading up this room with plants and a few pieces of furniture that will be both useful and inspiring! I want this room to be where we go when we want to escape to our own little world and get lost in a book, or get messy with a craft.
I. CANNOT. WAIT.
~Bethany
UPDATE! Below are links to posts that we’ve published about our ‘new’ house and it’s progress!
 .
. .
.
 .
.

 .
. .
.
~~~~~~~~~~~~~~~~~~
Now get stenciling! And thanks for pinning.


I LOVE this and have followed your exact instructions in doing the same to my basement linoleum, and purchases the exact prices you recommend; however, the sealer…getting ready to apply over my painted and stenciled linoleum floor-it clearly states on the back of the sealer can to only use on wood floors or cabinets, not painted surfaces…Al I missing something? Please help! Thank you 🙂
It has held up PERFECTLY for 4 years for us! And it’s a very high-traffic room. I also push heavy furniture around in this room, and it doesn’t even scratch!
PS …i would love to see pictures!
beth@realitydaydream.com
Thanks for sharing! We’re working this same project in our kitchen. I saw a few question on the sealing step – but one I have hasn’t been asked yet. Most sealers do not recommend rolling onto a surface, due to bubbling, did you consider applying with a brush or rag and did you have any bubbles after applying with the roller? Any special roller material? Thanks!
As long as you use a low-knap roller (like those ‘mirror finish’ rollers) and don’t shake the can of sealer (stir instead!), you shouldn’t have any problems with bubbles. Hope this helps!
love this!! I just did our floors as well! I did one coat of sealer, got satin but wish i would have gotten matte. Plan to do one more coat to be safe!
Absolutely beautiful Bethany!!! We just purchased a vacation home that needs a lot of work. I’d like to do this in the galley kitchen, until we decide on a permanent more costly upgrade. Or maybe not do a costly upgrade, since you said yours is holding up great, which is awesome! I’ve never done anything like this, but I’m up for the challenge. My husband was planning on painting the cabinets to brighten it up. We’re going for the cottage feel since it’s not far from the Lake. For a smaller galley kitchen, what size tiles or stencils would you recommend? I had pics of the kitchen but couldn’t attach here. And I don’t have the measurements available. If I had to guess I’d say 10 ft at it’s widest in the eat in kitchen and maybe 20 ft long. Thanks in Advance Bethany, Marina
Hey Marina! You can do any size you want, depending on the look you’re going for! I encourage you to do some looking on Pinterest for galley kitchens with a patterned floor and see what you like.
Love the linoleum paint and stencil tutorials and I’m wondering if the linoleum remains flexible after being painted? I would love to paint/stencil my travel trailer, but the flooring should have some give while being towed. Thank you!
Yes, the linoleum will still be a bit flexible with paint on it, and the paint won’t crack!
Beautiful job I wanna do my bathroom but how did u not get it to look so perfect I mean I try to stencil and the paint just runs and ruined the stencil
Mine is not perfect at all… if you look really close, it’s awful! 😉
Going to use your site for painting our bathroom linoleum. You don’t mention a need for undercoating (primer). Would that help or just not necessary because of the chosen paint enamel? Oh, and since it has now been a number of years, how did it hold up?
The paint that I used didn’t require primer, and I felt that since I sanded and deglossed the floor it would be fine. Honestly, looking back, I surprised I didn’t prime, but it’s held up beautifully. Zero scratches or chipping. And this room gets a LOT of traffic.
Your work is amazing, thank you for sharing. We just bought and plan to incorporate some of your ideas… especially over the yucky linoleum flooring… all the best I hope you are staying happy and healthy.
This looks great, how many coats of sealer did you use? And how is the finish holding up?
It’s holding up BEAUTIFULLY two years later. I did two coats of sealer!
Did you stencil with the same kind of paint as you painted the whole floor?
Yep, we used the same durable floor paint.
No questions. Just a, WOW! This is so beautiful!! You did such a fantastic job. I am in awe. Your sunroom is just gorgeous!!
Thank you Jennifer!!
Do the original tile lines in the linoleum show through. Wanting to do this but feel I would have competing lines.
Only if the light is hitting it at a certain angle. It helps to do a more satin or matte finish sealer. The more glossy, the more those grooves will show.
How many coats of the sealer did you do and do you need to redo the sealer for maintenance? Lastly, what do you clean it with? Whatever you want or somethingspecial since it’s now painted?
I think I put 2 or 3 coats of sealer on it. And you can clean it with whatever you want! I use pine sol.
Hi Bethany! LOVE this site!
I have painted the linoleum per your specifications. Even though I only used one color, I still am panicked and wish to seal.
I am at that step. When you sealed it, did you sand in between? I was surprised it recommended sanding.
Just cking before I dive in!
Thanks!
I did sand very lightly, just to knock down any high spots. Sometimes a piece of dust or a hair will get into your sealer, and you want to smooth everything out again before adding another coat of sealer. Does that make sense??
So clean, white porch paint, seal, stencil, seal. Does it matter what brand of paint you use for the stencil?
I wanted the stencil part to be just as durable as the rest of the floor, so I got quarts of the same type of floor paint in the colors I wanted. Does that make sense??
How is the floor holding up?
It has held up BEAUTIFULLY! It’s kind of a miracle, because we push furniture around in there all the time, and the girls rollerblade and all kinds of nonsense. 😉
That is crazy gorgeous ? congrats for sticking to it til the end!
I thought I would not like it when I first saw the stencil, but I love it finished!
Inspiring!!! Going to try it in our bathrooms!
Yayyyy! Send me pics when you’re done!!
This is really sheet vinyl, not old-fashioned linoleum, correct? Whatever it is, this turned out great!
Nope, it really is a roll of old fashioned linoleum. SO easy to clean now!
man that looks like a lot of work, but SO WORTH IT! It looks so great!
I’ve started installing linoleum underneath the sinks and putting a 5 inch wall kicker with some moulding for a finishing touch. Not only does it make it look 10X better but if there’s ever a leak the flooring under your sink won’t get damaged.
http://www.hhsandiego.com
That is a lot of work! I LOVE it! Beautiful!
This turned out so great!!!
Your floor turned out great Bethany! I’m loving seeing your new house come together room by room.
You are ridiculous. RIDICULOUS. This is gorgeous! Never in a million years would I have chosen those colors, but it does look like Spanish tile! Absolutely amazing. Also, giving the kid a box and letting her paint with you. Brilliant. Please come be my neighbor.
Absolute perfection! I’m so envious of your visionary skills. I could never picture this coming together so well in my mind. You’re a genius.
You are a brave woman for sure!! It looks fabulous. I’m sure you spent many many hours on your hands and knees, but it was totally worth it. CONGRATULATIONS!!
This is freaking fantastic!! Can’t imagine that much time on the floor, but it is totally STUNNING!
OMG, I LOVE IT!!!
Really beautiful, looking forward to seeing the whole house come together, thank you for sharing!
This is soooooooo inspiring! We just purchased a 100 yr old Colonial and there is so much to be done. In one of the bathrooms, there is old ‘school’ tile that I would like to just paint. This is exactly what I was looking for. How long in between steps did you let it dry?
I waited about 10 minutes between coats before moving my stencil and starting again. It was time consuming!