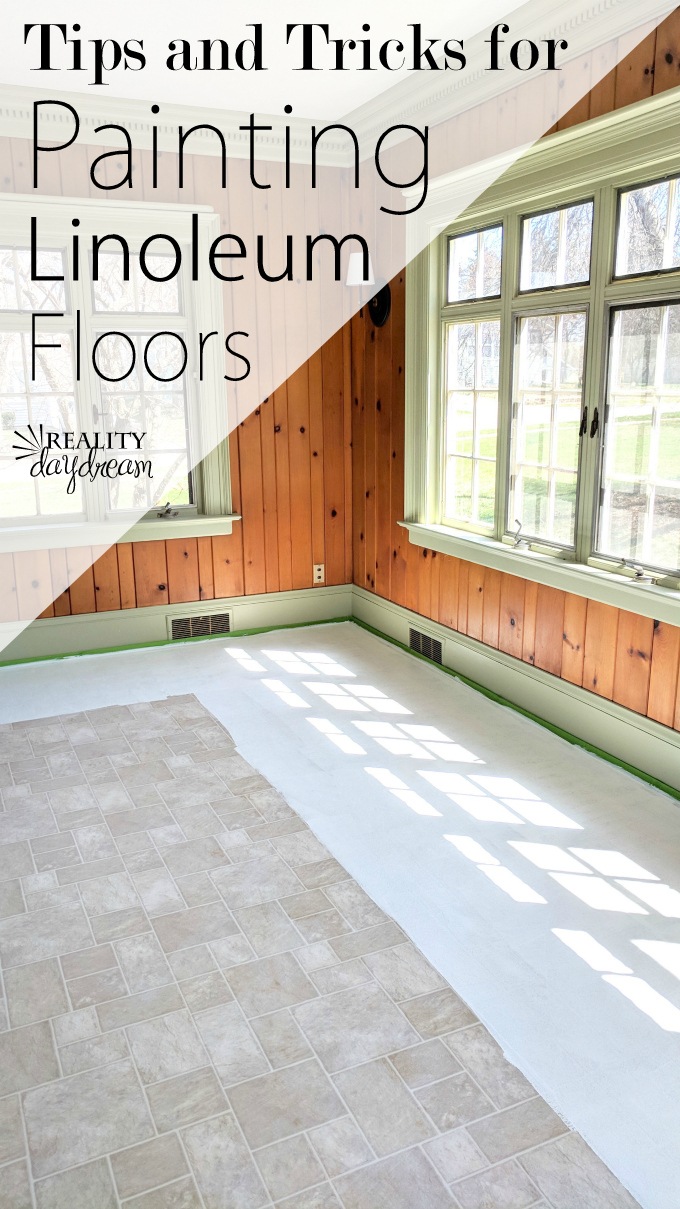
I’ve been inching along on my floor painting adventures in the ‘solarium’ (fancy word for sun room), and I can FINALLY CHECK IT OFF MY TO-DO LIST! And painting linoleum floors is such a great way to update old flooring without spending a fortune!
But let’s back up and chat about how far we’ve come in this room. We started out with big-bird-yellow trim (and there’s a LOT of trim). And for a room that’s already bright, I just couldn’t. So I painted the trim this gorgeous putty green color that Sherwin Williams creatively named ‘Sage’. (see this post for tips and tricks on painting trim, crown molding, and around window panes)

I’m tackling this sun room as my ‘project room’ to keep me busy and feeling creative while the dust flies in the rest of the house with all the kitchen demo/renovation. Despite much controversy, I love the wood carsiding walls (they aren’t paneling!) and how they look with the sage trim.
But what I don’t love?
The linoleum, y’all.

*This post contains affiliate links.*
Eventually we plan to replace this flooring, but if you could see our list of things to get done in the next year, you’d know why this floor is not a priority for our reno budget.
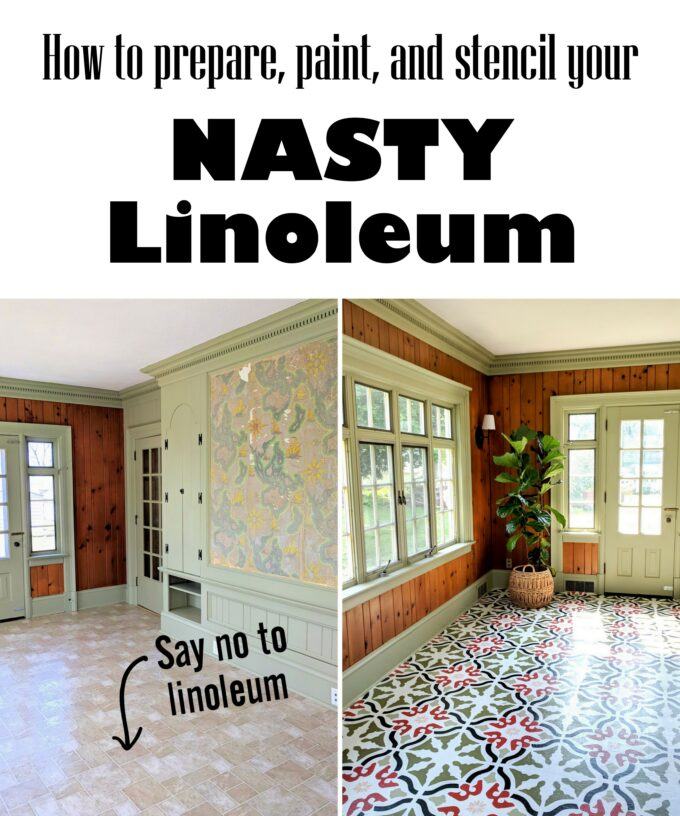
And since I’ve painted linoleum before with great success, I decided to give this a go! I’ma share the products and steps with you in case you too have a linoleum floor that you hate but aren’t in a position to change.
Painting Linoleum Floors
Supplies:
- Orbital Sander
- 120 grit sandpaper discs
- Deglosser
- Old mop that you’re never going to use again (or an old cloth on the end of a mop)
- Painters Tape<< FAVE
- Sherwin Williams porch and floor enamel
- Paint Roller
- Sealer

Sanding
First things first, I cleared everything out of the room, and swept it real good. Then I took my orbital sander and sanded the room down with 120 grit to give the floor some ‘tooth’. Sanding this whole room might seem like a daunting job, but it’s basically just like washing it on your hands and knees. It only took me about a half hour.
The hardest part is remembering where you’ve already been. You can kinda tell where you’ve sanded by moving until the light is just right so you can see which parts of the floor are still glossy and which parts are sanded. But I blocked our the room in ‘rows’ using the existing lines on the linoleum and just went back and forth across the room until I was done.

Deglossing
After sanding, there’s a film of dust on the floor that I mopped up with an old mop and just water. Then it’s time to further our efforts to get rid of that shiny quality of linoleum that makes it hard for paint to stick. There’s a product called ‘deglosser‘ that is great for taking sheen off furniture (or anything), so I squirted it onto the floor one row at a time and mopped it around and let it dry.

The deglosser leaves a really milky film on the floor, but the instructions on the back of this product say that it’s fine and you can paint right over it without cleaning if off. So darn it? That’s what I did!
Painting Linoleum Floors
Time to tape along the floorboards around the perimeter of the room and get to painting! We used SW Porch Enamel paint which is suuuuper durable and amazing. And if you’re painting linoleum floors, you WANT something durable and amazing!
I painted around the perimeter of the room with a brush first…

When it came time for rolling, I skipped the paint tray, and just dumped rows of paint onto the linoleum and rolled it on. So much faster and less cleanup!

It took two coats to get full coverage.


Finally, do yourself a favor and barricade off (OR AT LEAST CLOSE THE DOOR) to the recently-paint room to avoid… THIS:
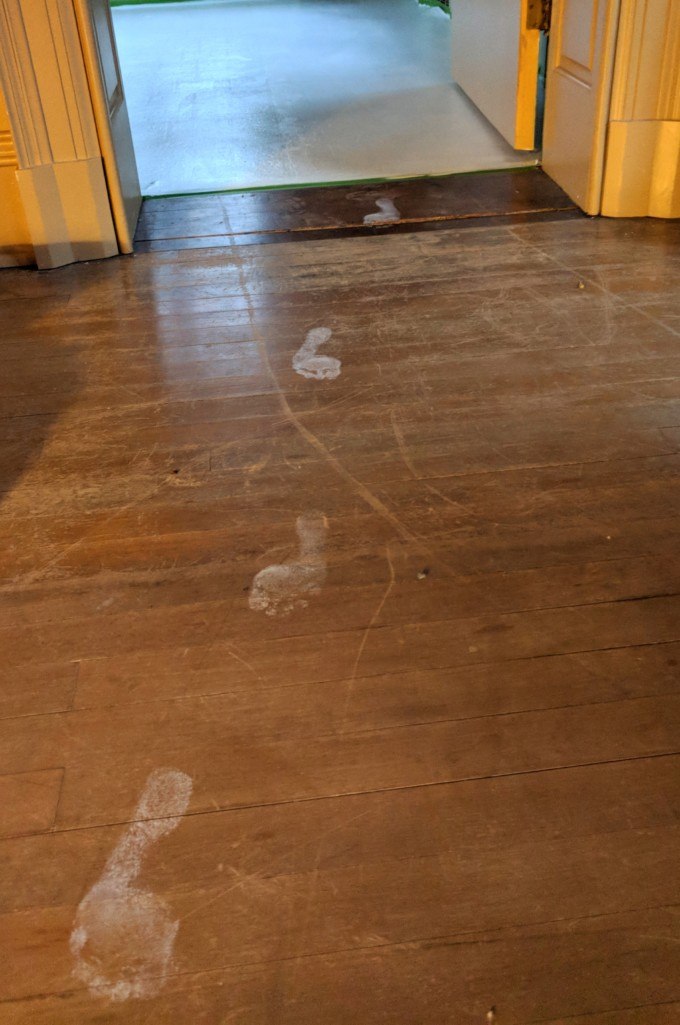
If you’re just painting your linoleum a solid color, you can stop here and seal with water-based sealer in the sheen of your choice!
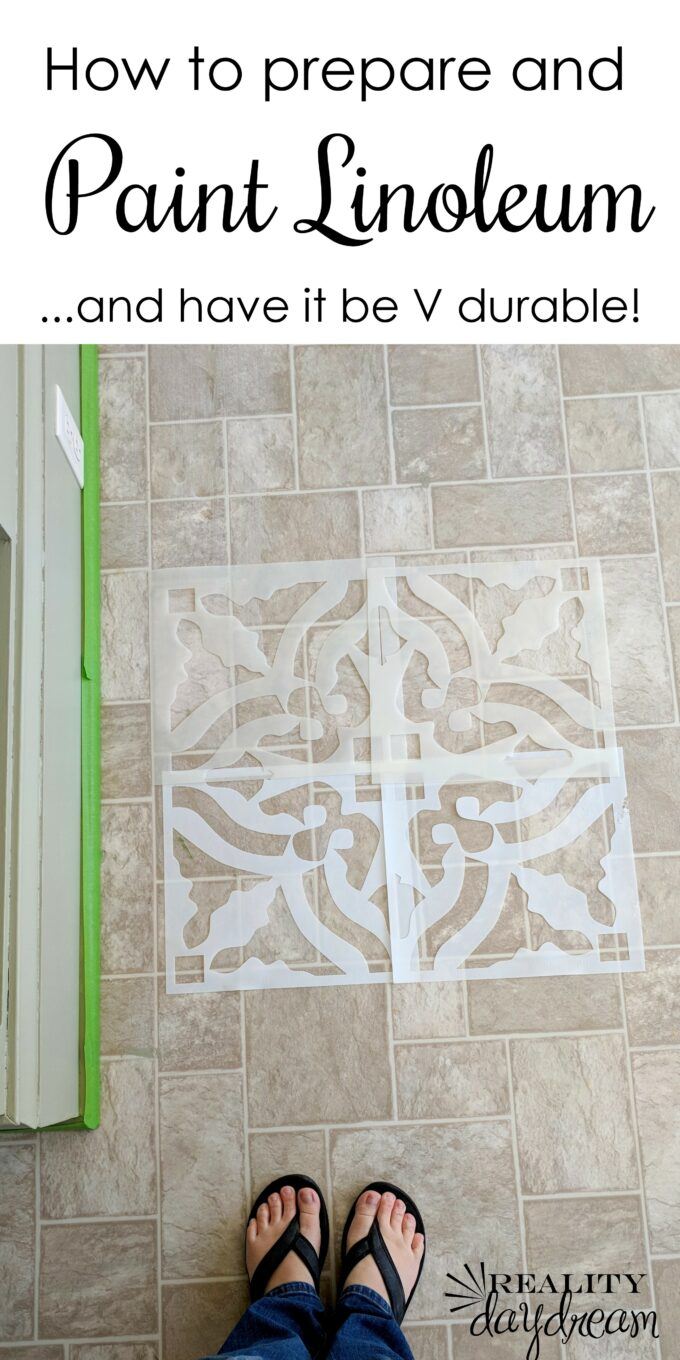
But you know I wasn’t going to stop there. Mama needs PATTERN! And COLOR!

UPDATE! Click here to see the next post where I stencil in all it’s glory! It legit looks like enormous Spanish tiles!
~Bethany
~~~~~~~~~~~~~~~~~~~
Thanks for pinning!

Related:
-

I have a fun and easy building project for you! And while I do end…
-

My kids are getting to the age where they want to tape pictures, cards, notes...…
-

I've been needing to figure out a solution for my overwhelming plant propagation situation for…
I have a linoleum floor that I only want change color of flower leaves from yellow to sage green. Any suggestions?
I would use this same technique, only just on the parts you want to paint. Don’t leave out the priming step!
I love this blog post! I’m a painter and I’ve been trying to learn how to paint linoleum floors the right way, and this post has really helped me. Thanks!
Thank you for your generosity – you shared clear step-by-step instructions, materials, hacks, etc. Your photos look terrific. Thank you. D
I can not believe how gorgeous this turned out!!!!! This is so my style. I’m planning to paint my ugly old kitchen floor. Crossing my fingers that my results come close to this ❤
Beautiful work! Love the pattern you chose and the colors.
Oh good lord I think your stenciling is as hideous as the original flooring LOL. But thanks for the step-by-steps way too many ads on your site and hard to read some of the content
Thank you for taking the time to leave such an encouraging message! Have a great day. <3
Good for you it looks Great ,I’m going to try and paint a kitchen floor .Thank you
This floor is beautiful, why would you take the time to say otherwise? If you don’t like it, keep scrolling…
On the can of the minwax polycrylic it says not recommended for floors!!!
Hey there! I’m thinking about painting my kitchen floors. Yellow old linoleum that was put in is not for me anymore! I’m curious as to why you chose a water base sealer? Very new to this so I curious if there are other options that may last longer. Thanks!!!
I chose a water-based sealer because I wanted it to be truly clear. Oil-based sealants have a yellowish tint that continues to yellow more and more over time. I hope this maes sense!
What is a sealer polyurethane?
It’s like varnish!
Hi
I’m curious if you tested your linoleum floor for asbestos? It wasn’t too long ago that linoleum contained large amounts of asbestos and sanding was the #1 thing not to do. Seems kinda scary suggesting to people they could sand without a lab test. And what about.a particulate mask in your list of supplies? It seems like PPE should be at the top of the list.
I believe that it’s the Mastick glue that used to have asbestos in it. Linoleum is made of plant fibers, linseed oil and pigments. This is not up-to-date researched info, but “I think”.
I agree 😊
So use a primer to seal the floor and ready it to “grab” the paint if you’re worried about air quality. Should work.
I have that same wood walls. Is it possible to paint. I wonder if paint would look good on it. i love your work
For sure! I would just lightly sand the walls before priming and painting.
Hi Bethany, So I’m ready to apply the polycrylic but after reading the can I’m a little Leary to use it because it says to use on wood? Did you run into any problems using it over the paint? Also, how did you apply it? Brush or roller? I have a small 6 inch microfiber roller I was going to use
It has held up BEAUTIFULLY. That stuff is sooo durable. I have used it over painted furniture as well, and it totally works. The way I applied it is to pour a bit on the floor and roll it on with a roller. Please send pics when you’re done!!! Good luck!
How long did you wait to walk on it after you put the polycrylic on it?
I am wondering this as well.
We waited 24 hours.
Hi!
Is the linoleum you’ve painted textured; if not, do you think texture would require additional steps?
Yes ours is slightly textured. If you do all the steps, you should be fine!
It is my understanding that linoleum should not be sander because it contains asbestos. Your thoughts would be appreciated
Hi! Warning bells rang when I heard of sanding anything! Releasing any dust into the air could cause breathing or long-term toxin issues . Please consult an expert … consult an expert… or the manufacturer of the linoleum for advice. Could you EVEN wear A….wait for it… DUST PROOF MASK? Aren’t we all thinking about masks in early Covid 19 DAYS!! (My woodworking Brother owned a professional quality mask when Corona Virus began. Lucky.) Try your best not to pollute your own living space! It may be more costly in the long run than replacing your old floor! Best Wishes!
This is a really good point. Thank you for bringing this up!
Hi,
Although in America the terms linoleum and vinyl are commonly used in relation to vinyl flooring, they are actually completely different products. Linoleum predates vinyl and is linseed oil and wood based. Vinyl is plastic with a printed pattern.
The good news is linoleum can be easily painted over after removing the polish layer. Then again lino is a premium product that can also be easily restored to its original appearance.
How can linoleum be restored to original appearance? I have an original Black and White checkerboard floor that has wax buildup. But even removing the wax doesn’t ‘whiten’ the floor. Any suggestions? Otherwise my thought was painting over the tiles in Black and White.
Unfortunately, I’m not sure. So sorry!
Did you not use a primer? Is that because you used the deglosser? I am going to do my basement stairs. Not fancy like yours, but they need to look better.
Your site is wonderful and you did an amazing job. I love it!
The paint that I used is such that no primer is necessary. I was skeptical about that too, but it’s held up BEAUTIFULLY with very high foot traffic. This room gets used a lot!
Can you comment on your drying times? How long did you wait to seal. How many coats of water based seal dm how long did you let that dry?
Hey Kim, it’s been a couple years since I did this project, and I just don’t remember the drying times. But I can tell you that I followed the instructions on the can for drying times, so maybe that helps? I believe I did two coats of sealer.
Hi! Are you certain your floors are linoleum and not vinyl? I have vinyl in a room that I’ve been wanting to paint. I just assumed vinyl and linoleum were the same thing, so after I read your post I immediately went to SW and bought the Porch and Floor Enamel….then I got home and carefully read the label that says “not for use on vinyl floors”.
=\
So, I’m very curious to know if maybe yours are actually vinyl and I’ll be just fine!!
Thanks!
Those are definitely vinyl floors, not linoleum. A lot of people misuse the term.
So, I am wondering about what size this room is, and how much of the paint and sealant you needed? We are going to redo our kitchen, laundry room and two bathrooms this way, but I am kind of wanting a comparison on size. 🙂
Hey Christine, unfortunately I don’t remember how much paint I used on this room. You should be able to check square footage amounts on the paint can though?
Well that is vinyl flooring not linoleum…
Hi Bethany,
I’m moving into an old place that has linoleum only in the bedrooms! 50s agh.. so I asked a lot of people from the branch and they all told me painting linoleum is not a good idea because its elastic and so the color would crack after a short time.. But your work looks so neat! How is the floor now after a year? Did you use a primer that works with the elastic linoleum? Any cracks or so?
I hope I can do it, thanks so much for this detailed blog!
xx
Hey Debbie… a year after painting my linoleum (and being VERY rough) on them, they’re in immaculate shape. I’m sooooo glad I went this direction! Although the stenciling part was a TON of work and very time consuming. I would follow my steps in the tutorial closely, and use the same paint that’s meant to be very durable. It’s worth it to do things the right way. Please send pics when you’re done!
I have a question. I have some gaps in my lin. flooring in my bathroom where they have slid apart. If I’m painting them, do you have suggestions what I could use to fill these gaps? I am unsure of asbestos so I don’t want to rip the floor up (at least not right now it’s my budget) It was built in the early 1900’s and there appears to be at least a couple layers of flooring. I’m trying to avoid another over top. Any thoughts on the gaps where the tiles have slid?
Unfortunately, I don’t have an answer for this. I too have a room with old linoleum tiles that have gaps, and I’ve considered painting it, but just don’t feel confident about the outcome. I’m sorry I’m no help!
I have a screw that popped through my marmoleum. I repaired hole by sanding and collecting the dust from a scrap piece, mixed with white glue and filled hole. After it was dry I sanded it. You may want to try that approach
so, just to be clear, you used an oii based floor paint but the stenciling was done with a water based paint,correct?
thank you!! I’m preparing to paint a linoleum floor I’ve been staring at and thinking I would replace for 15 years, but this seems like a great measure for the moment. My plan is to do the prep, do oil based floor paint, let dry, a simple (one color) stencil design in latex floor paint, then coat a sealant over the top. the Acrylic sealer you recommended does say “not for use on floors” so I was thinking of doing oil based polyurethane…
(like Polonia who commented earlier, I’ve got linoleum that is probably over 50 years old. I’m excited to see how it turns out! Let me know if you want me to send you a photo!)
YESSSS! I do want to see a photo! You can email it to me at beth@realitydaydream.com
Yay! It’s going to turn out amazing! You DEFINITELY need to email me pics. As for the acrylic sealer, I think it says ‘not for floors’ because it wouldn’t be very durable on hardwoods. But it’s held up beautifully for me. If you use oil-based poly, it dries with a yellowy sheen… but if you’re ok with that, then go for it!
makes sense! and thanks: the yellowy tone is not what I’m going for 😉
Hello Bethany,
Thanks for writing and sharing your article.
I am planning on adding this to a high traffic commercial area using textured deck paint, I’m planning on coating with 3 layers.
over half a year has passed since you’ve posted this article and I would like to know how the paint has been holding up?
Thanks,
Shimi
It has held up beautifully!
I am very curious if you could comment how well the painted linoleum has held up with pets walking across it? Thank you!
It has held up beautifully! And we even push furniture around in there, and there are zero scratches!
Love this. Have never heard oh sw paint. Can you clue me in?
Thanks mary Robinson
Sorry Mary! SW is short for Sherwin Williams! 🙂
Hello — I’ve got linoleum that’s at least 50 years old. I believe the fabrication was a lot more “natural” then, it probably does not have a polyurethane layer on top. Since I’d be using deglosser, is the sanding step absolutely necessary?
I’m thinking of a faux soapstone, irregularities in texture are fine, peeling paint not so good.
Thanks!
Hello Polonia! The most important thing is that there’s absolutely no ‘sheen’ left on the floor before you prime. If the deglosser does the job, and the floor is completely dull matte finish, then go ahead and start priming away! Good luck! Email me pics when you’re done! beth@realitydaydream.com
Have you dinner this yet? How do you get the faux soap stone look? I would love to see it