I’m always on the look out for beat-up tables to use my Shading with Wood Stain Technique on. The only stipulations I have is that they be sturdy, solid wood, and dirt cheap. This 90’s honey oak pedestal table fell into that category at $20 buckeroos.

First order of business was to strip the top surface. I used the same techniques from my stripping tutorial to completely remove the finish down to the raw wood grain. It’s a messy job, but somebody’s gotta do it!

The beauty about this is that it also removes the tint from the previous stain… so no more golden orangey yuckyness left! My little helpers took turns working the orbital sander to get it nice and smooth.

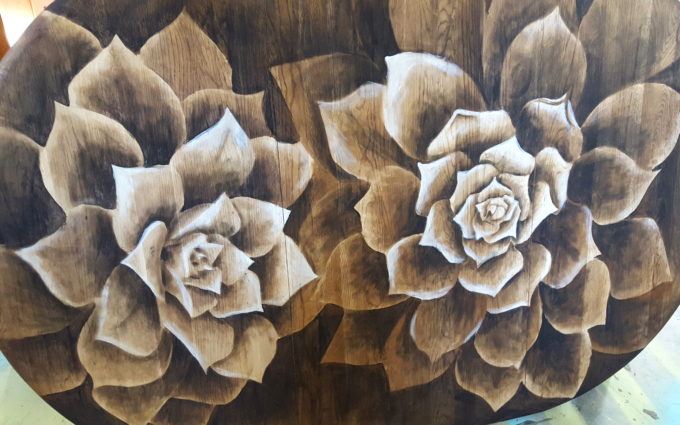
Now that I have a gorgeous/raw blank slate of a dining table, it’s time to choose a design to stain on! I actually have a folder on my computer of images that I would love to eventually stain onto a piece of furniture or wood wall art using my shading with stain technique. One of the images in that folder is this:

This gorgeous succulent photography is by the talented Ruby and Luna, who generously gave me permission to used this image as the inspiration for this table!
After printing the image onto regular printer paper, I traced the succulents onto a transparency with a Sharpie, and projected it onto the table top with my old-school overhead projector.

Then I simply traced on the succulent design with a pencil.

Finally it’s time for the fun part! I crave shading with stain the same way I crave no-bake cookies. JUST LOVE IT. Nick set up the Go-Pro camera on a tripod, and I got to work! The brown is RustOleum Dark Walnut, the black and white are gel stains by Unicorn Spit. (this post contains affiliate links)


We’ve been getting TONS of questions on our Facebook page and email about selling our tables and shipping domestically. Unfortunately, I’m not taking anymore commissioned pieces, and have just decided to keep this a fun hobby. So sorry!
If you love the idea of this technique, but are intimidated or nervous to give it a try, check out my Beginner’s Tutorial, or watch my step-by-step video demonstration below!
.
.
If you’d like to click through our other ‘Shading with Stain’ projects, click on each image below to be taken to that post! (these are in no particular order)
 |
 |
 |
 |
 |
 |
 |
 |

I know it seems like an intimidating technique, but we’ve had DOZENS of readers email us pictures of their own version that was inspired by us… so we KNOW you can do it!

You can always email me with questions too! beth@realitydaydream.com
And as always, email us pictures of your projects! There’s no better feeling than knowing we inspired someone to try something new!
If you don’t already, feel free to follow us on Facebook, Instagram, Pinterest, and subscribe to our blog here so you don’t miss any new posts!

Thanks for pinning!

Related:
-

We've been needing to update our coffee table situation in the living room for awhile…
-

Nick and I have dabbled in epoxy here and there, but we've never done anything…
-

We're in the dog days of summer, and it seems like my kids are always…
I’m late to the party on seeing this post and trying it myself! I had a lot of issues with the stain bleeding and not getting clean lines, any suggestions for eliminating/decreasing the stain bleed?
Hey Kaitlin! Yes stain bleeding can be an issue. Different wood types are better than others. I try to stick with pine or poplar. Occasionally I’ll stain on oak because I love the high-contrasted woodgrain, but it does seem into the grain more than I like. I just have to embrace the imperfection when that happens. Other than wood type, you can also just try to use the smallest amount of stain on your cloth as possible. Any excess and it seeps into the wood grain more. I’m working on a Stain Art Video Course that should be rolling out in the next couple months, so keep your eyes out for that!
Absolutely gorgeous. At one point in my life, I had a little talent. I was into woodburning, painting, staining and I loved working with and mixing different mediums. I have been thinking about trying it again. Your beautiful work is both intimidating and inspiring. I am so glad i stumbled upon your video! Thank you.
Wow, I just had an opportunity to see your talent, and yours is beautiful! a friend from church sent it and I am blown away at how beautiful your projects turn out. Blessings Jan
Oh, I wish I could buy one of those tables. That is gorgeous!!!! I had to laugh at the note about not keeping plants alive but this way-I can relate. I just accidentally some how killed another plant. I like this way of preserving a plant. At least I couldn’t kill it.
You should try, once Ann artists always an artist. When u do, be sure to comment me. I totally believe in you.
This is really really beautiful, have u ever done one with human images? The person that had the leaves, maybe a family portrait with parents on either end and kids on the leaves, remove leaves ad children leave the nest, end would be pic of mom and dad. Of course you’ll have to have a large family. You are amazing.
I’ve never done humans before… that seems so intimidating! I’m not sure I trust myself not to completely screw it up. Haha!
What is the white that you use in this video?
It’s a water-based gel stain by Unicorn Spit. Here’s the link to their site! http://www.unicornspit.com/
This is the post that introduced me to your page and all I have to say is I’m glad it did. I am so inspired by so many of your projects that I just want to redo all the furniture in my house!! I am going to work my way up to it but will definitely be trying this, thank you for sharing!!!!
I have a large dining room table that needs to be refinished. I want to do this type of technique. Have you ever done a table that has leaves in it? How would you do a design that would look good with the leaves in and the leaves out? Any ideas or images that would work well with that. It has 5 leaves that fit in the table so it gets pretty long.
The only thing I can think of to solve the problem of the leaves is to choose a floral pattern (with a repeat) instead of a design with just 1 or 2 large flowers. That way the pattern would line up with or without the leaves. Does that make sense? I’ve been thinking about giving it a try. 🙂
I watched a YouTube video that showed the stain painting with leaves. She essentially stained the table with the leaf out in a pattern that wa as easily “stretched.” Once she got the outline to where the patter would work with the leaf out, she placed the leaf in and extended the pattern inwards (hers was a basket of eggs and birds on either side. The leaf was placed inside and the nest grew to be oblong with more eggs in it. It could easily be done with flowers.
Oh fascinating! I love that idea!!
I would LOVE a set of end tables like this!!! They are beautiful, and that’s a real talent!! Care to make me some? 🙂
Totally! are you in Iowa? We’re backed up a couple months… but we could get you on the waiting list! 😉
I am not in Iowa unfortunately, but what if you created the end tables for me but didnt put the bottom halves on and I put it together here in North Carolina? Do you ship?
Sherry, send us an email at sawdustandembryos@gmail.com with details of what you have in mind. We do ship within the US.
Simply beautiful, you’ve given me a great idea and inspiration. Thank you Sharlene
WONDERFUL!!!
I simply amazed at the originality of this technique and the breathtaking end results. You’re very generous to share the knowledge!! Send you a pic when I’m done….gonna try on a small piece of furniture then perhaps a floor!!
Yes please do send pics when you’re done! And let me know if you have any questions along the way 🙂
wish you lived nearby have a table from the 50’s I would commision you to do for me
Wow, that is so beautiful! Pinning for reference!
It sounds weird but you can actually ship large pieces using Greyhound package service. I used them a few times for really large items. The recipient has to go pick up at their local greyhound.
I’ve heard that! We definitely need to look into that. I’d imagine it would be cheaper than the options we’ve been exploring 🙂
OMG! I have an antique dresser that still has the steamboat shipping tag on the back that belonged to my G-G-Grandmother. She brought it over from England…It is stripped to bare wood…If I lived in Iowa, I’d commission you to do it for me…one can dream huh! I am an artist (of sorts), and do watercolors and mixed media, but not sure I’d trust myself with this piece. I’ll check out your tutorial for sure! Your work is just stunning and would surely be a conversation piece in any home! Thanks for sharing your talents!
Great job putting jail art on beautiful antiques…
Two questions: 1) have you ever tried using the printable transparencies? 2) I know you listed where you got the succulent image from but where are some places I could find the other images from?
I have the printable transparencies, but I find that when I project onto a large-scale piece, it’s easier to see what I want to trace if I just outline with a sharpie beforehand. I’ve done it both ways, and just prefer the sharpie way. 🙂 As for your second question, I just find images that I like for a design and then email the owner or artist to ask permission. I’ve never gotten a ‘no’. If you’re just doing a project for yourself, I would think that you could use just any image. But if you’re planning to sell it, I would definitely get permission.
Oh gosh I just LOVE this!! Me and my oh were just talking yesterday about sanding down the table when we move house to freshen it up a bit. This is what we need to do with it!!
Yessss! DO it! And send me pics when you’re done!!
EXCELLENT JOB!!!! Love that you have a little helper & she’s thinking safety with her helmet 😉 also, Love the paint shadows on the garage floor – the one picture looks like an outline of a wrench in blue – ‘;)))
Lol Dana… you’re the most observant person I’ve ever met! 🙂
This is my first post from you. This and you are amazing!!! Working in the negative space to create those images is incredible! Did you develop this technique yourself? I am in awe of your talent!
You’re so sweet! Yes I came up with this technique myself a couple years ago… I shared a little bit about how I had the idea in this post:
https://realitydaydream.com/shading-with-wood-stain