There’s just something about posting ‘After pics’ in the Part 1 post that takes all the fun out of writing the Part 2 post. I need to quit doing that! You already know how awesome our Leather Tufted Storage Ottoman turned out… and I have a sneaking suspicion that some of you are actually going to build one of these for yourselves… so I must persevere and knock out this Part 2!

*Deep Breaths*
Now that we taught you how to make the base, let’s talk about the tufting of that cushy glorious top!
In the same fashion that I glued the boards for the walls of the box (to be wider than the boards I had), I glued the boards to make the lid. I knew that after upholstering, my lid would be about 1/2” wider on al sides, so I added an inch to the width and an inch to the length when calculating the dimensions for the lid. I wanted it to fit in snuggly without being difficult to pull out. In my case, these dimensions were 18 3/4 x 33 1/4.
Don’t ask me why some of this wood is gray.

Like I mentioned in Part 1… I’m no pro at upholstery. So if you know a better way, by all means go for it! I only know what I’ve learned from trial/error. And YouTube videos.
We started by laying out our wooden lid onto some egg crate foam that we’ve acquired here and there for next to nothing. If you’re actually buying foam specifically for tufting, plan on taking out a second (or third) mortgage. We traced around the lid with a sharpie and repeated this 4 times… because we want super deep tufting, so it needs to be thick! We used 3M Spray Adhesive to slap those foam layers together.

Here’s where I’m not sure if this is the ‘proper’ upholstering technique, but we stapled the edges of the foam down to the edge of the board to give it this rounding effect using our upholstery staple gun (this post contains affiliate links). This worked really well when we were upholstering the twins’ Fainting Couch Toddler Beds…

Next, we measured out where we wanted our buttons to go. I wanted 3 rows of buttons… the two outer rows with 4 buttons, and the center row with 3 buttons.

My friend Cindy from Goodhaus Design introduced me to this amazing tool… it’s a drill bit that cuts perfect holes out of foam so that the buttons can sink down deep when diamond tufting. We bought ours here.


The family who plays together STAYS TOGETHER.

Once we had all the foam holes drilled, we marked the same holes on the opposite side of the board and drilled with a 1/8” drill bit. Then we wrapped a double layer of batting around the foam side and stapled it around the edges on the back… cutting off the excess with fabric scissors.

Now time for the actual tufting!
If you’re reupholstering ANYTHING, The Leather Hide Store has some really good info to show you how much material or leather you need for whatever upholstery project you’re tackling.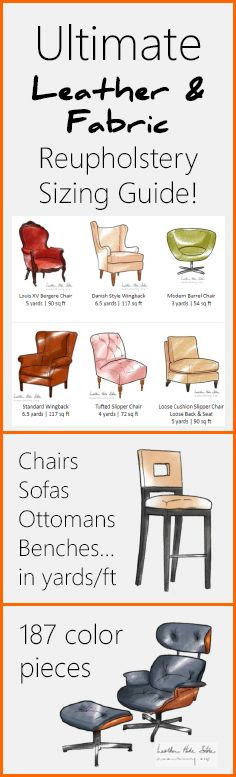
I have the perfect collage oh images explain this process from the tufting of the twins’ Fainting Couch Upholstery project, so instead of reinventing the wheel, I’m just going to post the same collage below so you can get the idea of this process.

The only difference this time around is that (OBVIOUSLY) we were using leather instead of upholstery fabric… and we used a giant upholstery needle and super hefty button thread.

We found the center of our leather rectangle by folding it into fourths and marking on the point with a sharpie, then tufted the very center button first.
NOTE: the traditional button-cover kits didn’t work with the thickness of the leather. We took our leather to a local upholstery shop, and even with their huge industrial button-covering machine, we still had to take the leather home and shave it down with a wire brush on the grinder to make it thinner. It was a huge pain, but TOTALLY worth it to have the buttons match perfectly. Huge thanks to 3rd Generation Upholstery for their help on this!

Once we had finished tufting all the buttons, we pulled the sides tightly over the edge and stapled. When you’re measuring out your leather for this tufting part, be sure to give yourselves several extra inches than what you estimate… because this diamond tufting takes up more fabric (or leather in this case) than you’d expect!

Now that the lid is done and we know the thickness of the tufting, we can add the wooden rails on the inside of the base that the lid will sit on. We just screwed on 1×2’s after drilling pilot holes, and created a ‘rail’ that goes around the entire inner perimeter for the lit to set on.

We still plan to add a look of fabric for ease of lifting the lid, but our sewing machine had a tragic accident that needs to be fixed before we can hem those leather edges. I’m just not ready to talk about it yet.
So lets look at some more after pictures! Eye candy heals all wounds!

I’ll admit, when we were in the midst of the actual tufting, it felt like no matter how tight we pulled the leather between each button, it always looked loose and bunchy. But once we finished them all and wrapped the leather around the edge… IT LOOKED PERFECT. At least our version of perfect!

I love how the caramel color of the leather so perfectly coordinates with our Bamboo Blinds!

Don’t let intimidation prevent you from tackling projects! Step out of your comfort zone and GO FOR IT! We all have to start somewhere!

Thank you for pinning!!


Huge thanks to The Leather Hide Store for partnering with us on this project! We were not compensated, but we did receive a complementary leather hide to use for this project. It’s an awesome opportunity for us to be able to join hands with companies that we love so that we can offset expenses for the projects we share on our blog, and give exposure to companies with awesome/quality products! All opinions are always our own!
Related:
-

We love the original wood of our library, and wanted to find a desk that…
I know why the wood is gray! It’s something called “beetle kill pine.” There’s a blue stain fungus that basically spreads from these bark beetles that turns the trees into nutrients for the beetles. The wood isn’t really changed and the fungus gets killed away during the kiln drying process. The trees have been harvested for some time to try to preserve the lumber while limiting the spread of the beetles. It’s one of my favorite things to come across in the hardware store since it’s already got a “weathered” look. Some people sell pieces made with “BKP” for good money.
That’s fascinating! Thank you for sharing! <3
Where oh WHERE did you get that gorgeous large leather piece ?! Love!!
We got it from the Leather Hide Store. It’s held up BEAUTIFULLY! <3
https://www.leatherhidestore.com/
Oh your living room is lovely.
I love this and your step by step process makes it seem like I coukd actually make one (which seems like a crazy idea in my head haha) maybe when we have moved house I could give it a go 🙂
Your living room is gorgeous!!!
I love it! I have an over stuffed chair and ottoman I want to recover using drop cloths. I just wish someone had as good of directions as you do.
Oh man, I don’t blame you. Upholstering is one thing… but REupholstering is a whole other level of intimidation for me. 🙂 I’m sure there are some good tutorials out there if you do some searching though?
Could you talk a little more about the buttons? I’m interested in recovering my faux-leather ottoman with real leather (it’s structurally sound, but showing wear), and I don’t really understand the button-making process. Did you opt to have professionally-made buttons because you were unable to make your own? Did you attempt it? Also, were they expensive? Leather (even remnants) isn’t cheap, at least for my budget.
We did try using traditional button-covering kits that you can buy at any sewing or craft store. But the leather was far too thick. It was even too thick for the upholstery shop’s industrial button-making machine. So we took a remnant of the leather, nailed the corners down on a board, and went at it with an angle grinder with a wire brush attachment. It took about 20 minutes, and there was leather fluff EVERYWHERE when we were done. But the leather was noticeably thinner, and the upholsterer said it barely worked with their button machine. But we were so glad we finally got it figured out. And I hope you do too!
Great work! I noticed your comment about why the wood was grey. That is likely due to something called a blue stain fungi. Little bark beetles spread it and it can kill the tree! They used to discard the wood, but now people seek it out to make cool bars and furniture. Or cover it up like you did.
Anyway! Just an aside. Never get tired of seeing what you come up with!
Amazing Project Bethany! You both make such an incredible team and your projects are always impressive!
Thanks Gillian! We’re lucky to have skills that complement each others 🙂
Seriously, Beth and Nick? What can’t you do? Gorgeous babies, fab diyer’s, LEATHER ottoman that looks like it belongs in a Pottery Barn catalog….. Great job.
We do make pretty cute kids too, huh?! 😉
Amazing job you two? I want one just like it! Where do I sign up?
LOL thanks Renee!