Ahhhhhhh! I’m so excited to finally be writing this post! It’s been a long time coming. Recall for a moment my granny’s dining table that she so generously passed down to me.

*this post contains affiliate links*
The yellow is… charming. But not the look we’re going for in our home. And the top surface was in pretty bad shape. Scratches up the wazoo. The finish was so old and deteriorated that it sanded off pretty easily, so I didn’t have to strip! I went at it with my orbital sander until the finish was completely gone and I was left with raw wood. Then I finished it off with 220 sand paper to make it suuuuuper smooth.

We taped/papered off the top surface and lightly sanded everything else with 120 grit sandpaper. When preparing to paint, it’s important to rough up the surface so the prime/paint has something to grip onto. Especially if the previous coat of paint has any glossy qualities to it.

We used Rustoleum Primer using our paint gun. It only took one coat! I kinda loved it simply being white! But that wasn’t my vision.

We reached out to the folks at Modern Masters, because we’ve heard wonderful things about their metallic paints. I really wanted to try their ‘Warm Silver’ …which translates to a muted gold/copper on my opinion. They were excited about our project, and generous enough to send us some of their fabulous paint to try out! It’s such a smooth creamy texture, with great coverage.

I love how it’s shimmery, yet still an earth-tone… because I’m wanting to accent in other colors. And I also didn’t want the color of the table to be too loud and take attention away from what I’m about to do to the top. *EVIL LAUGH!*

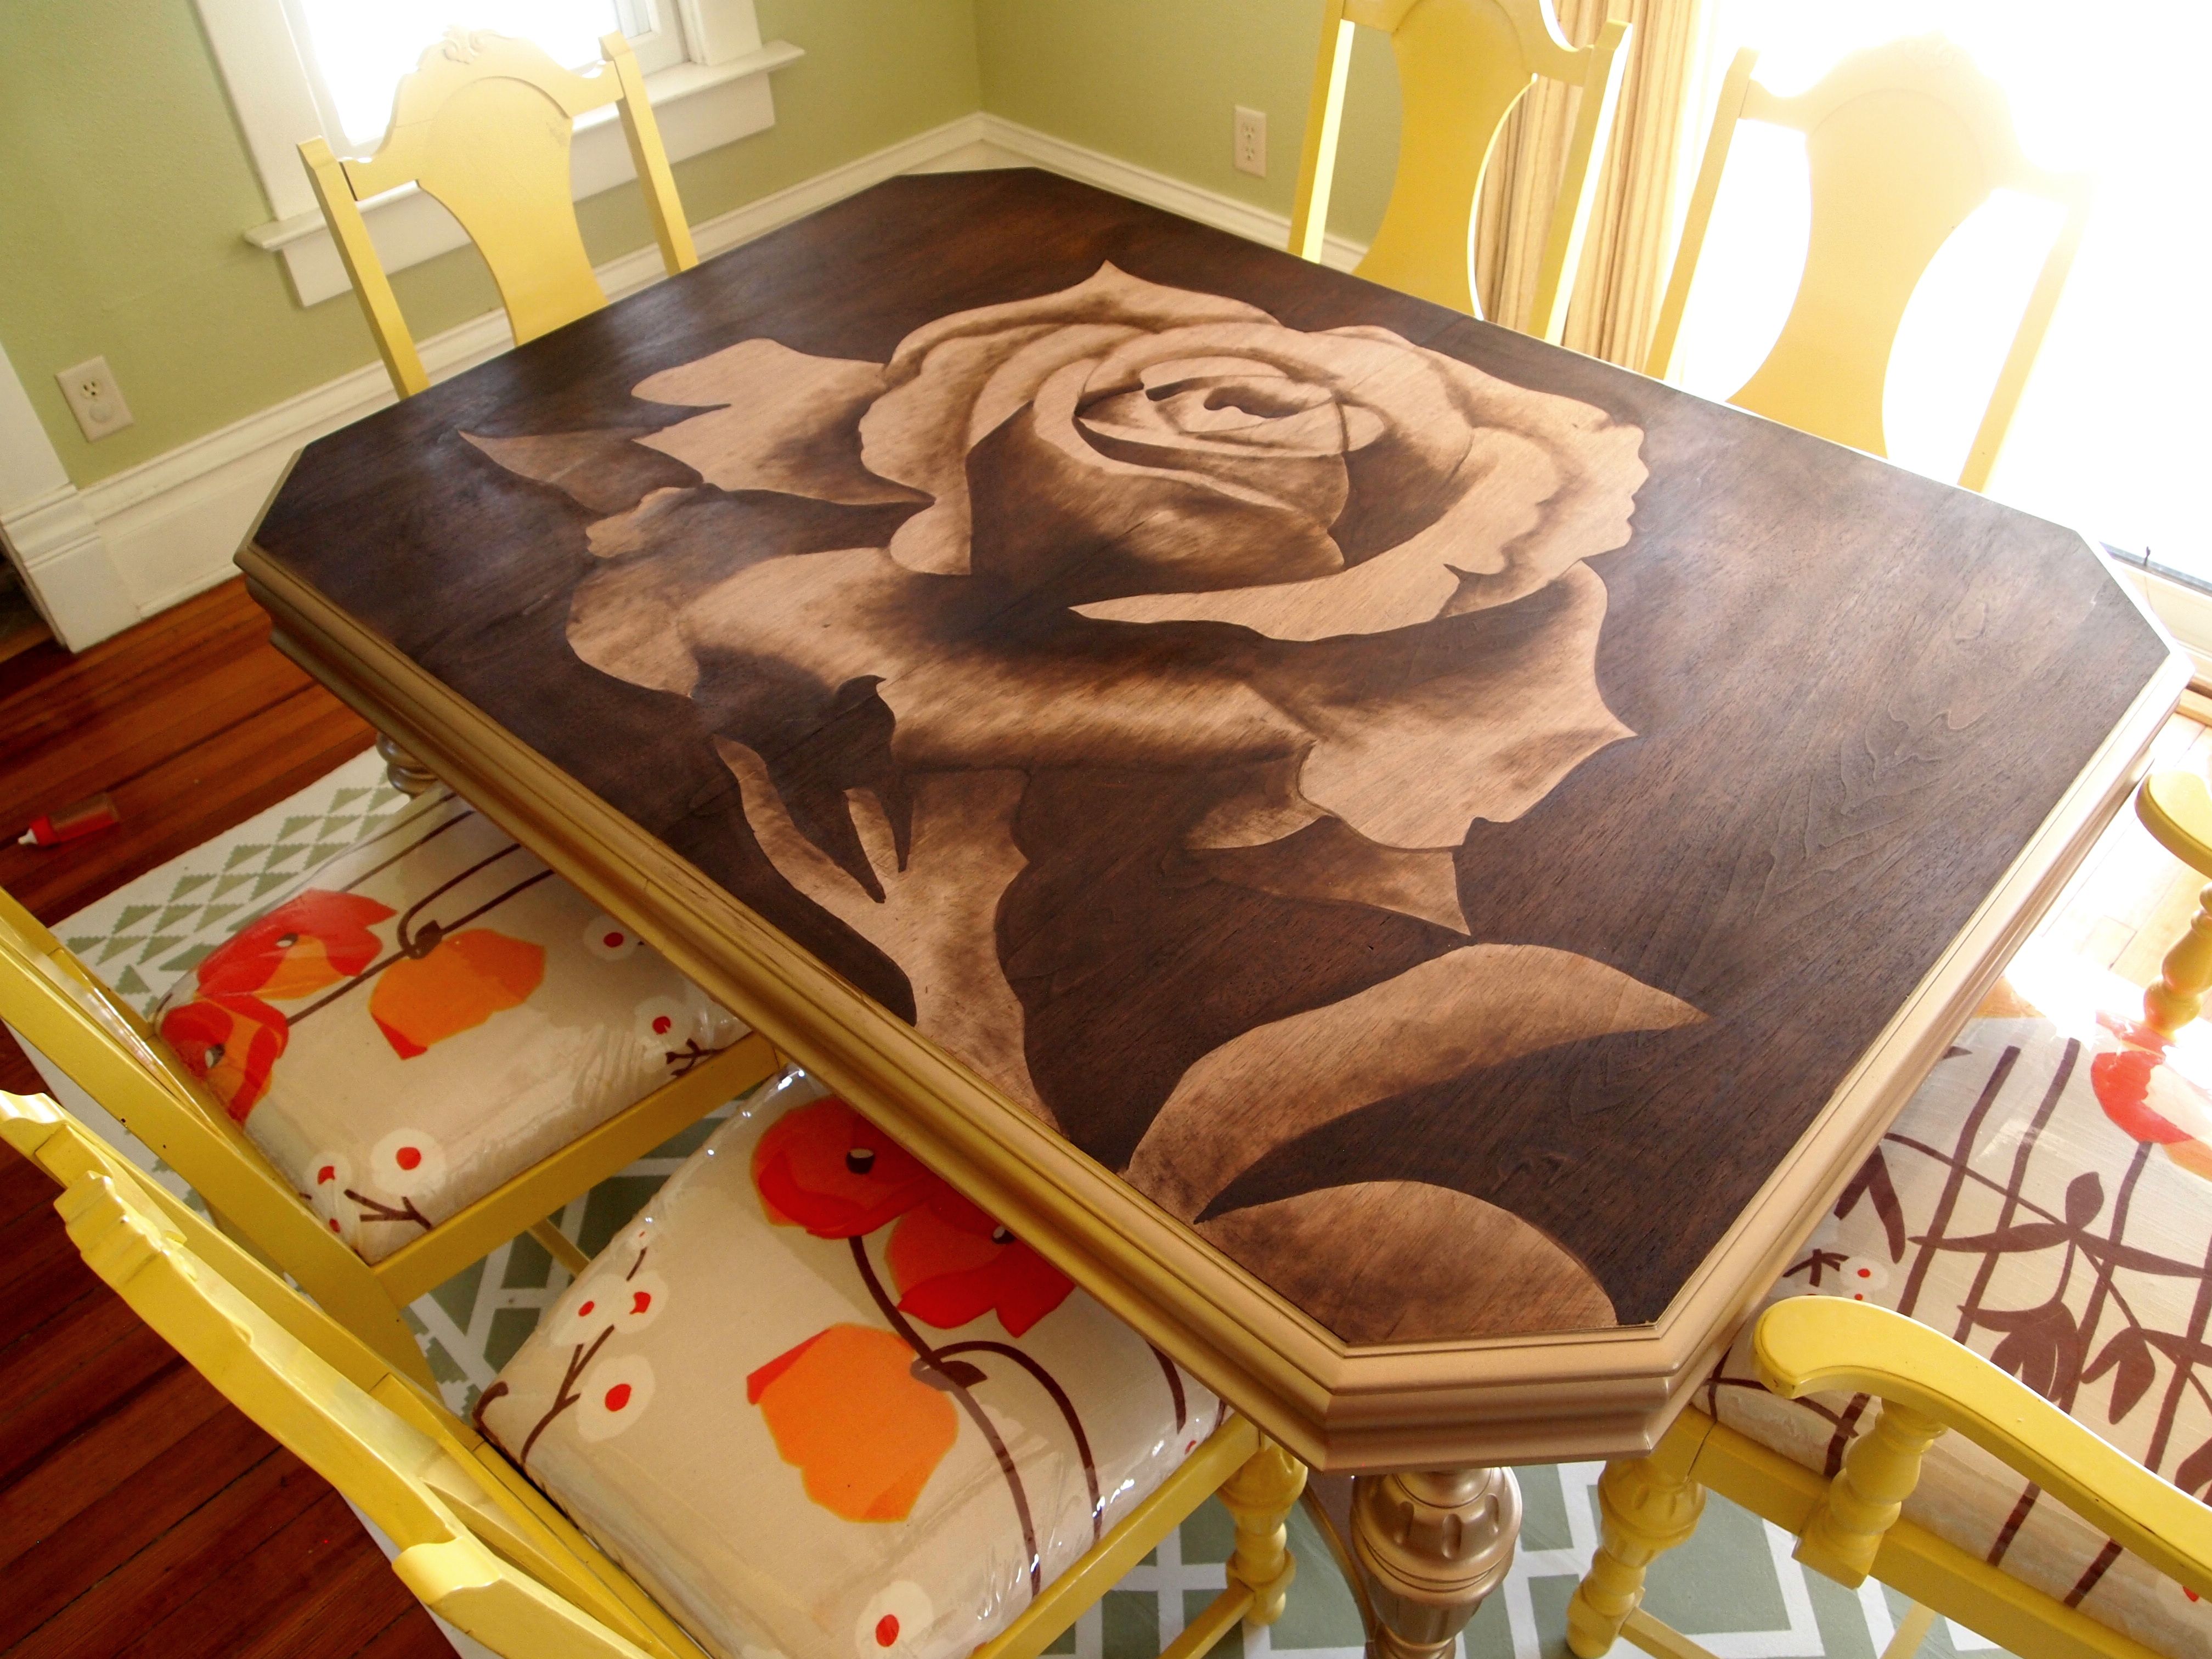
Our staining technique has been one of our most popular posts of all time, and we’re suuuuuper proud of the fact that we sort of ‘invented’ the idea of using wood stain as a medium for artwork and shading. I started by finding an image of a rose that I liked, traced it onto a transparency with a sharpie, projected it onto the table top with an overhead projector, and traced with a pencil. (Talk about a run-on sentence!) As cliché as they are, I love roses… but after this mornings’ post, I’m thinking I should have done a dandelion!

I used JUST ONE SHADE OF STAIN on this one (RustOleum Dark Walnut) and I love the organic and beautiful feel it gives. Let’s just say it’s my favorite furniture transformation OF ALL TIME. And it’s sentimental, being an heirloom… so double whammy y’all.
We video taped the actual staining process for you to watch for yourself!
.
If you are intrigued by this technique, but not feeling confident enough to give it a try for yourself, be sure to check out my Beginner’s Tutorial, and/or watch the step-by-step demonstration in the video below!

And be sure to check out the other projects we’ve done using this technique!
 |
") |
![Shading-with-Wood-Stain-Technique-by[1]](https://realitydaydream.com/wp-content/uploads/2014/06/Shading-with-Wood-Stain-Technique-by1_thumb.jpg "Shading-with-Wood-Stain-Technique-by[1]") |
 |

Thanks for pinning!

Huge thanks to Rustoleum for agreeing to sponsor this project. Their stains are hands-down the best, and we’re thrilled and honored to have this opportunity to represent them and spread the word! *this post contains affiliate links
![]()
Related:
-

Nick and I have dabbled in epoxy here and there, but we've never done anything…
-

We're in the dog days of summer, and it seems like my kids are always…
-

If you love unique art and have absolutely nothing to do with your time, come…
WOW! I’m SO inspired to tackle a nesting table set. Thank you…your tutorials are very detailed and easy to follow! Beautiful work.
Simplesmente maravilhoso o seu trabalho e a sua boa vontade de compartilhar. Parabéns. Fiquei seu fã. Abraço, Neto.
Amazing!!!! But the video of your process is NOT the big giant rose, it is the colored roses. I would love to see the video of the full rose on your heirloom table. The pics and the pinned example show the big rose, but not the actual video. Can we see that somewhere?
Thanks you so so much!
You’re right! Thanks for letting me know… I just went into the post and fixed it. 🙂
https://realitydaydream.com/shading-with-stain-a-video-tutorial/
Can I ask where you got your rose image? I really like it but I can’t find one like it.
Teresa, I’ve been searching and searching for where I might have found that rose image, and I’m coming up with nothing. I’m so sorry! It’s been a couple years and I just can’t remember. Have you done a google image search for Rose? There are some really beautiful ones! <3
Hi,
I love this technique of shading you have come up with. After perfecting the shading skill from your tutorial I plan on stripping my mother’s tea cart and putting to use what I’ve learned from you. I have a few questions though. First, my tea cart has two side extensions each about a foot in width and the center top is only about 24″L X 18″W. Have you ever worked on pieces that have drop-sides like mine? If so, since the sides are normally folded down, how would you advise me in working in the design along the seams? After creating my masterpiece, I prefer the table to have a soft satin finish instead of using a glossy polyurethane. Is there a specific product you have used in the past, similar to what I’d like my results to be, that you prefer over other product finishes that you could recommend?
I read that you prefer to keep you location obscure, only stating you’re in Iowa; however, I wondered if you have ever been requested to finish a personal piece for a customer?
Do you use any wood conditioner before staining?
I would love to know this too!
gente muito lindo parabéns .como queria aprender mas vou tentar muito obrigado
Hi Bethany, I recently was introduced to your shading with stain technique from a friend and thought “No Way can I do that” with the extent of my drawing skills being stick figures but I gave it a shot with another first time project building a bench. Here is the finished project.
Yay! You MUST email me a photo! I wish there was a way you could add attachments here in the comment section. Our email is sawdustandembryos@gmail.com. Can’t wait to seeeee!!
Hi Beth, I have been following you since last October and just being blown away by your artistic talent!!!! I noticed on the “granny” table that you did the rose on that the paint gun you used was small…I am interested in where I might be able to find one like it. I bought a spray gun but it has this really long hose and stuff and I haven’t used it due to the cleanup involved…I am going to “try” your technique…notice I said TRY….I figure if I mess it up, I can do it over or change the plan entirely….we’ll see. I hope you can share with me. Thanks! my email is
A MAZING!
Simply amazing, I am going to love trying this technique!!!!! I was looking for wood burning shading tips etc., then saw this…..totally awesome, you rock 🙂
Yay you should do it! Email us pics when you’re done!!
Thanks Darca! You SHOULD! And email us pics when you’re done!
Wow, that is absolutely stunning!
Thanks Shawna! You’re super sweet!
I absolutely love that you made is the amazing gold sunburst mirror you did awhile back, but after watching this awesome talent you posse with this stain tecninic, WOW
I just stumbled across your blog on pinterest and I actually do similar work with stain, through a different technique. I’ve done a couple of coffee tables, I have a wooden toy chest that I’m currently working on, and a round dining room table that i have only sanded down so far…got ahead of myself starting another project before finishing the first. I have never met anyone else who works with stain as a medium and you do gorgeous work.
Fantastic idea and tutorial! Thanks so much for sharing and yes, love Rustoleum products!
-Susan
Beth, you are SUPER talented and I look forward to reading your posts! I would love an original piece of artwork from you!!
Oh, wow! I can’t wait to try this for myself!
I absolutely love this technique. I have no artistic ability so I have enlisted my very talented BFF who is an excellent artist to do a piece for me. We shall see. LOL. Thanks for the ideas and wonderful blog that keeps me inspired.
beautiful!!
I am a HUGH FAN!! I’ve been waiting for you to do this tutorial. Your work is outstanding!!
I am a ceramic artist and I am definately gonna give this a try!
I love the table and the technique. Thank you for sharing. I am seriously thinking about painting my backsplash too!
Wow, looks Great! I tried to do a coffee table with an owl on it but it didn’t take. I couldn’t get the shading to take. I am going to try again with different wood.
Your talent is off the charts! And the video you made is SOO good. Wowza. The table is just so so beautiful.
So impressed!
Love this technique,so glad that you showed us how to do it.I have a question,if you decide that a certain area is to dark can it be lightened up by using some lacquer thinner?
Love it! Beautiful 🙂 I would hang the picture in my twins’ room…due later this year!
Love, love, love it!
Holy CRAP!!!!!! That table is phenominal! I am completely blown away.
-andi
Beautiful!!! Great work!
Awesome process!
So beautiful! I love all your projects.
I love this technique, it’s just gorgeous…. I might try it after getting some good “simple” furniture pieces under my belt 😉
Oh my goodness! I am so excited for this video! I have loved all your shading with stain projects, but when I tried it just turned out awful! Thank you so much!
So beautiful, Beth! Thank you so much for the video tutorial! I just might have to do another piece like this! The Rose is GORGE!!! You rock!
Gorgeous!! I love this technique and am on the lookout for something to try it on. And you should be proud for “inventing” it.
Bethany, your diningtable turned out absolutely gorgeous. You have an amazing talent for everything you do. In watching the tutorial, I actually am beginning to believe I might me able to replicate your technique on a smaller scale…something like your picture…lol! I enjoy flowers of any kind and would love to hang your picture on my wall. Thank you for the opportunity.
I think it turned out beautiful!
I think it turned out beautifully. I have loved your website for awhile now and you have motivated me to start tackling some projects of my own. I think i’ll just start out doing a small table and work my way up,,,lol As far as the shading projects you have done…they are my absolute favorite! I just don’t know where you would go darker or lighter and what spots to shade in exactly and i would be afraid to mess up…then again messing up is part of the learning process. 🙂
Wow! That looks awesome!
Simply beautiful
Just amazing! And so generous to share the how to. Thank you. I can’t wait to try this.
So beautiful! I would be afraid to even attempt this and you make it look so easy.
You are so creative. These are beautiful.
You are so talented. These are beautiful.
Beautiful!!!
Your work is so beautiful!! I don’t think I have seen anyone else in blogland do what you do!! Gorgeous!
The table turned out amazing!!
In love! That’s a great color.
Stunning! I have to give this a try! Thanks for the tutorial!!
You are amazing!!! I love it!!
Wow!! I love this technique!! Now I want to try this out!!!
how absolutely gorgeous, i will say i was attached to the f.r.i.e.n.d.s looking version of the table, so cute! that’s a gorgeous makeover though, i’ve never seen anything like it!
Amazing! I love that you kept her set and made it your own.
Beautiful!! I love your work!
Beautiful work Beth, I hope Grandma gets to see it!
Also love the dandelion story, I’m the same way with fingerprints on glass. My neighbor used to complain all the time about her grandbabies messing up the windows and I always thought how I’d give ANYTHING for messy fingerprints everywhere. Now thanks for IVF, I have just that and I love it! 🙂
LOVE! LOVE!LOVE IT! I am going to do this!
I too thought the chairs were pretty awesome before… But I am addicted to your staining techniques and this design is beautiful too! I have gotten so many compliments on the table top I did with your high-jacked idea! Keep ’em coming!!!!
You have such a talent! What a beautiful piece!
I would love this
Pretty! I love staining wood! I love your projects. Keep them coming!
wow! love it!
that is SO cool!
You have such amazing talent and I’m so glad you decided to share this technique with us. It must be hard to know that the camera is running but you were great and so is your camera guy.
I look forward to seeing more of your adventures and wish you the best in your parenthood quest.
LOVE LOVE LOVE!!! I’ve watched a couple times it’s that cool- cool techno music in the background- I somehow hear ‘flight of the bumble bee’ in my head
Rustoleum should be super proud of their product & being a part of your technique!
SUPER JOB!!!
SUPER LOVE IT!
~dana~
LOVE!! I really need this framed art! 🙂
Love it! Can’t wait to see you all this summer.
I love this and hope I’m one day adventurous to try it myself!! Thank you guys! Also good luck in the baby world; my husband and I are struggling too which is how I found your site many moons ago!!
Looks awesome! My daughter loves it!
i am kinda thick but i finally got it when you did the middle dot lol…still don’t know if i would be brave enough to try it….still sending good vibes to your two little babies that they work and come home with you someday xx
Wow! That was amazing to watch! I would hate to ever have to set that beautiful table!! My brain is buzzing with ideas on how I can utilize your staining as art technique!
Wow! Beautiful! And a beautiful way to use your granny’s table and add your own style too.
Love it! Enter me please!
It’s beautiful. I would love to do this to our coffee table. Now to talk my husband into it. ^_^
I love the table and the artwork! You did a great job!
I would love to try this!
Gorgeous!!
I would love to try this technique on a little side table I have.
What a beautiful table. Great job, you’re so talented!
Incredible! Love it!
Your work is awesome!!!! Sharing!!
I love this! What a clever idea and I love how this is the perfect piece to sit around the table at! I do have a question ~ what did you seal this with? It probably needs to be super durable considering all the use a kitchen table gets!
Keep up the awesome work you two! Love it!
That’s a good question, I should update the post with that info. We used Rustoleum Spar Varnish oil-based with a satin finish. Lots and lots of coats for durability!
This is SO Amazing! Wonderful job!!!
You. Are. Crazy.Talented.
I love the table!!! Please oh please let me win 😉
I kind of liked the yellow table – but it’s your table 🙂 Great job
Nice job on the table.
You guys do amazing work! I’m envious of your talent.
Pretty neat watching it in the video format! Looks great!
You and your husband are supper talented. I enjoy your blog so much and would consider it an honor to own something that you created. It is beautiful!
I still remember the first time I met you at the Iowa Blogger Event in IC – I had been pining over one of your buffets that you redid with my teacher friends, and there you were in the flesh! It was like I met my celebrity DIY crush! Keep up the great work, B!
So neat! Gonna share with my super crafty mom.
This is so cool!
I have loved what have you done with this since the first project. I was just wondering if you have thought about ever trying a different drawing or image? I have been thinking of trying to do an Ultra sound picture of my son. Do you think it would work? I have not tried it yet bc I didn’t think it would be a good idea to deal with stain while pregnant. I also have hesitations bc my drawing skills are not that great. I also wanted to wish you the best of luck and that you will some day meet all of your embryos!
Diane, that is SUCH a good idea. I would wear a respirator mask because of the fumes since you’re preggers. If you try this, pleeeeease send me pics!
Wow! I absolutely love the end result. Some day I will try this technique, but I have to get caught up on all of my other half-done projects first! Love your blog!
Awesome!!
Love it! I’m glad the paint was more of a gold tone rather than silver.
the music is so dramatic, ha ha, I loved it
Huge fan of your projects!!!
Awesome!
Awesome, innovative creativity & the video of the table reminded me of a graffiti artist working their skills on the street…just mesmerizing, bravo!
You are an amazing artist!! I would love to win! Thank you for all the work you do on your blog. You are in my prayers as you go through everything to become parents again!
Really beautiful! I think I am going to try to do a piece for my own home and then come up with some Christmas gift ideas using this technique.
Your table turned out absolutely gorgeous!!!! You are an inspiration with your talent!
Its gorgeous! I`d love to have such a lovely bit of pretty in my house. With 4 guys, pretty can be hard to come by!
I love this table!!!! I have followed you for the past year and I am finally going to do my coffee table! I love your ideas and your blog!
It’s gorgeous! You’re so talented!
Beautiful. I love the metallic on the table, You done good! pam
Well done!
It would be such an honor to have one of your pieces in my house! Like getting a Dali or a Monet, before they are known throughout the world.
I LOVE the table! Your grandmother would be proud! I have loved your stain work from when I first saw it. Thank you for the tutorial…it almost looks easy! Am looking forward to trying myself this summer.
So gorgeous!! I always look forward to seeing the newest projects on your blog!
Can’t wait to see it! Eric was commenting the whole time “she is good at what she does.” “the shading on that flower is beautiful!” 🙂 you’ve got more than one fan over here. 🙂
Absolutely fabulous! What a creative use of stain.
That staining is so neat and I love that metallic color on the table!
Love the makeover!…I HAD to post it on PINTEREST!!!
I’m in awe, so gorgeous.
I love your blog! The staining technique is awesome!
Absolutely beautiful! My respect to the artist. Love all your projects! ♥
Freaking awesome. Your talents are insane!
I’ve seen your staining technique a couple of time & absolutely love it. I really want to try it myself, but I just need to find the right piece to work with. I’m thinking start small…
Beth,
I love the technique and want to know so thank you for the video.
Maureen
Amazing work!!
You are so talented. It really is a fun technique and the finished product looks great.
Beautiful!
Amazing!!
I LOVE your staining technique!! I wish I had the patience and artistic ability for it! (But it would be great to just win it and not have to do it myself!)
Beautiful! Just beautiful!!
Beautiful work.
I love your staining technique! It’s such a pretty way to incorporate the stained look without being too boring!
Amazing! Simply beautiful! Your art is gorgeous, your talent immeasurable! It reminds me of once when I took a watercolor class, using the same kind of techniques. Looks really awesome!
I HAVE been on the fence about this technique in regards to my coffee table so im siper excited to see another example w a VIDEO!!!
love love love it! the paint color, the stain work… AMAZING! can’t wait to get into our own home later this year to start working on some fun projects i’ve seen you do.
ps will be thinking of you on the 12th. 🙂
All these amazing projects and I’m sporting a broken (dominant) hand for summer! Darn it! Can’t wait to try this.
Awesome! Love the video. And the table turned out absolutely gorgeous!
Love that warm silver color! Nice work!
I love this!!! I was just looking at the other ones you did a few weeks ago. Every coffee table I come across I wonder if it will be the one I try this on. You are very talented!!
Thank you! Thank you! Thank you! Now I really understand how you did this. One of my summer projects was to try this. Now I’m ready to dive in. I love, love, love your grandmother’s table! Thanks for this inspiration! You are so creative!
I love to see what you guys will come up with next. Thanks for sharing!
Your table turned about beautiful! Some day would you mind sharing your opinion on refinishing furniture with chalk paint? 🙂 By the way, I just love your blog. 🙂
I wish I had half as much talent as you guys.
Love love as usual!! You guys are amazing and give me so much inspiration! Would love to have one of your pieces of stained artwork in my home!
Ugh perfect!
This project is just breath taking. The beauty in it is unbelievable. Kudos to you for the talent!
thanks for the giveaway- this technique is so so neat! 🙂
Love, love, love!
These tables are so beautiful!
This is such a gorgeous idea! I love how creative and unique it is! You are so amazingly talented! I would love to see a dandelion for your daughters’ adorable room as artwork, I think it would be spectacular!
Oh my, so awesome! You are so talented!
You guys are so talented. Love it!
Beautiful! I always love what you do with furniture…such talent!
Beautiful! You’re so artistic, Beth!
Beautiful! You’re so artistic, Beth!
So Awesome. Love it.
Love your projects!
I think this is my favorite staining project yet! So beautiful!
We close on our first home in a month and I already have a list of projects based on what I’ve seen you two do.
Beautiful work!
You are so talented!
WOW!! Fantastic, a true work of art, from a true artist.
Beautiful work!
Wow. Just wow. Beautiful
So impressive! Also liked that you could sit on the floor! Old alert here.
Such a fan of all your work. Your Grandma is proud!!
Love this! Amazing. Thanks for sharing the video!! 🙂 Hope I win!!!
Such talent! Beautiful work once again.
Beautiful!! Loved how to table came out. Plus loved seeing the video. It was awesome to see u in action instead of just pictures!
Absolutely beautiful table! I wish I had as much talent and creativity as you do. Thank you for sharing.
Awesome table!!!!
We are dying to try this technique!
You are so talented! I love reading your blog and drooling over all of your projects!
Absolutely lovely!
Very neat!
Lovely work!
So lovely and creative! Always inspired by how you guys transform ordinary things!
Definitely an art form – except you can’t go back and “erase” quite as well as you can with a pencil … 🙂 Thanks for the giveaway!
This is stunning! I really, really hope we can win the rose board- we’re in the final stages of an adoption of our gorgeous little girl Rose! I’d love to hang this in our home for her, when she gets here!
Ever since you used this technique on the dresser I’ve been dying to try it out myself. Do you Have any ideas of images that would work well with this technique that doesn’t involve flowers? My husband isn’t such a fan of them but we both love the idea .
LOVE IT!!!!
As always, beautiful work!!!!
Beth you are beyond amazingly talented! ! I envy you SO much and always look forward to your posts !! I would LOVE to own a one of a kind original from you!! ♡
Beautiful!!
You are incredible Bethany!! 🙂
I think you’re akin to a fairy. You work magic! LOVE THIS!!!
That is such a beautiful table! I truly love all of your projects. You have such a creative approach to everything, and I am always looking to your blog for new ideas:) I love seeing what new ideas you come up with because they are so unique and fun. I am not as handy as you (I hope to learn to be!) but I am always directing my boyfriend to your blog to try new projects. Thank you for always sharing the process!
I hope everything goes well for you and your family. I will be thinking about on you on June 12th:)
Absolutely fabulous!!! Well done!
This is absolutely lovely! Love all your projects!
Your table looks absolutely gorgeous! (although i do have to say i was rather attached to the yellow and the mismatched chairs 🙂
Wow these are just so attractive and eye catching! I love that you have chosen to do something new with an older piece. It updates the look without ruining the beauty of wood! Very unique and innovative!