Awhile back, I participated in a challenge with a group of other ‘buildy bloggers’ to make something out of ONE BOARD (dimensions 1x8x8’). That post may be more than a year old, but it’s still going strong! We love seeing you guys tackling projects and using our tutorials!
P.S… it seems like a lifetime ago that Cypress was that small.

*This post contains affiliate links*
We often get questions about some of the details on this project, so we decided to republish it with easier-to-follow instructions, including a video on how to make the jig!
I knew I wanted to chop this bad boy into a zillion little pieces and make some wall art… similar to my Wooden Kilim Art… but this time I wanted it to be a geometric pattern that appears to look 3D. Something like this inspiration pic I found.
Obviously, the hardest part of this would be THE MATH… ugh. Think cold-sweats and gnashing of teeth. So I shared my idea with Nick and he accepted the challenge! I wanted the art to be as large as possible… while still saving enough for a 2” frame… all from the same board!

The wider board above is 2” and will be the frame. The other three narrower strips are each 1.5” and will be cut down into cute little triangles! This is how our board is divided:

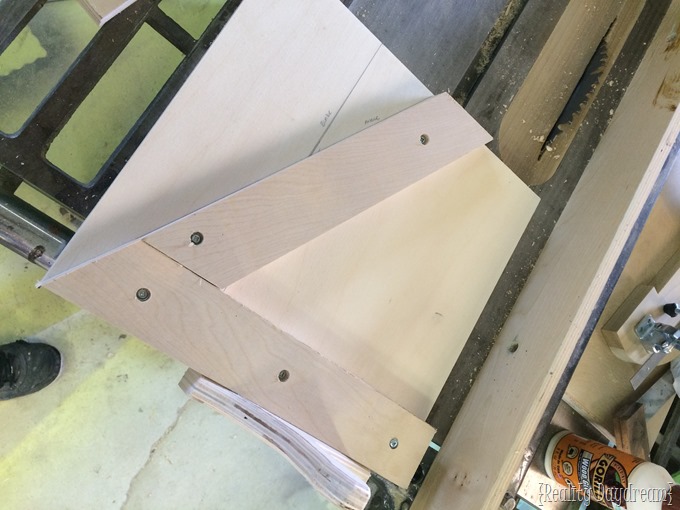
Nick loves angles… and building jigs. If you’re not familiar, a jig is a contraption that guides your board to be cut at a certain angle. I think I said that right… (Buildy Friends, please confirm).

He whipped up this little thing that holds the board in place at a certain angle while pushing it through the table saw. When I originally planned this project, I wasn’t thinking about the fact that miter saws only angle out to 45 degrees, so that won’t work! This sweet jig made things super easy, and we had all these little triangles cut in no time at all!
If you’re reading this in your email or a reader, you might not be able to see the video. Click here to view in browser! And if you’re NOT an email subscriber but wish you were, click here and you’ll be delighted to find that you receive an email update every time I publish a new post!
It turned out to be roughly 90 triangles, and the next step was to knock off those rough corners with the router. I wanted them to have some dimension when laid out flat, instead of all running into each other. You’ll see what I mean in a sec!

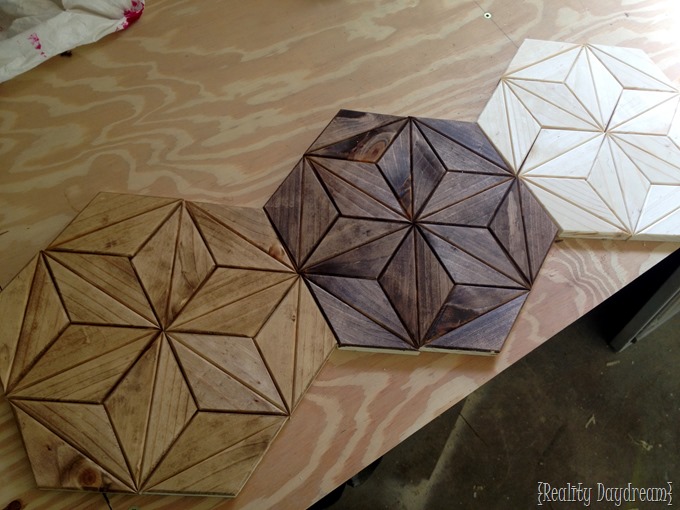
I set aside 3 triangles, and divided the rest into 3 equal parts. One third was stained this light-ish oak shade. Another third got stained Dark Walnut. And the final third didn’t get stained at all! Just raw pine!

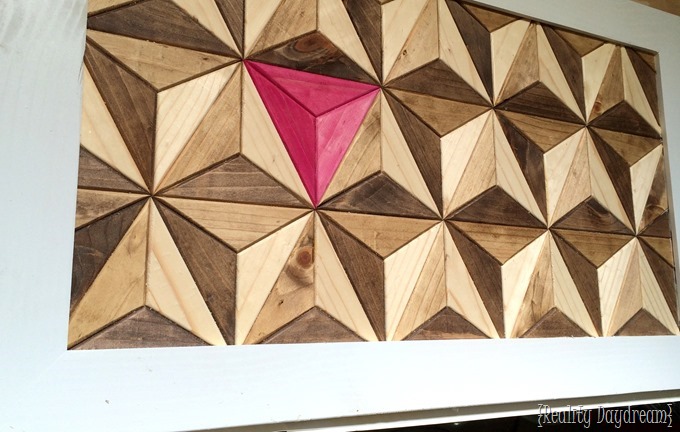
The remaining 3 triangles that I set aside, I stained a bright fuchsia with my new fave colored stain Unicorn Spit. The color is so rich and smooth! I stained one triangle dark and rich, the second one medium, and the last one very lightly. This part is totally optional, but I wanted to add a little unexpected accent color. A ‘pop’ of color if you will.

So since I wanted this to look very geometric and 3-dimensional, I started putting one triangle of each shade of stain together to create larger triangles with all 3 shades of wood. And the same concept for the pop of fuchsia triangle!

I liked this hexagon shape that emerged, but I had more triangles to add… and, naturally I wanted to use the whole board. So I ended up with this large rectangle. LOVE!

After laying down some wax paper, I slapped on some wood glue to each triangle and pieced the whole thing together nice and snug on the wax paper.
All that’s left was to take that final 8’ strip of wood and make a frame! We used a 3/8” rabbet bit to route a groove for the art to sit in.

After painting the frame white, we popped the now-solid wooden mosaic, spread wood glue all over the back, and pressed on cardstock. Then flipped it over and let it dry!
Note… if we hadn’t been desperately trying to use just one single board for this project, we would have put a 1/4” sheet of plywood on the back as a substrate to add strength.


We put one of these beefy picture hangers on the back for easy hanging, but I decided to throw this thing up on the crown moulding ledge in our living room for now. I could just stare at this thing for hours!

And, since I know somebody’s going to ask, the wallpaper isn’t wallpaper… it’s a stencil! And that post is here. The secretary desk was given a white-wash treatment, and the family photo was taken by the talented Molly Long!
~Bethany
Pssst! If you love this project, you might also enjoy my Wooden Kilim Mosaic Artwork!
Thanks for pinning!

 source


Love this project. I’m wondering what router bit did you use for the triangle. Thanks.
Wow! I am in awe…I am loving on your blog today. Doing some barnwood style painting …I can’t leave your blog as there are so many great ideas and you are great at explaining the how too’s..Thank you for all the time you have put into it.
This TOTALLY amazing.
I love this! About how big did it end up?
I just found your blog and am blown away with your work. I will be back. You do truly beautiful work.
You’re so sweet Sandra! Thanks for taking the time to comment <3
Yowza! This is super cool! The Unicorn Spit is perfect for this project! It was great meeting you at Haven! Our table top turned out beautiful!
this is amazing! You guys are so creative! Love how it turned out!
-Shonee
http://www.hawthorneandmain.com
Unreal! I am in awe of your talent and patience. This is beautiful.
I love this with all my heart. Amazing and beautiful.
LOVE it!! The pink is perfect!
Brilliant. Love the decision to add the little bit of color in there.
Any chance you have directions for the jig, and the measurements for making this awesome project? I would love to make this as a gift for my wife.
Send us an email and I’ll have the hubs give you some more detailed instruction on the jig! sawdustandembryos@gmail.com
Beautiful! The routed edges make such a difference, and that pop of pink!! Love.
Beautiful!!!!! Such a genius idea! Love the way it came out!
Holy cow! That’s gorgeous!! I LOVE the hexagon arrangement! Just sayin’ – I’d buy it in a heartbeat if you posted it up on Etsy 🙂
That is absolutely Beautiful! I love the angles and what you did with a router.
Wow!!!! That is amazing, you guys make a great team. Question for you, when you routed the triangles, did you round just the edges or did you actually routed it in an angle????? From the pictures it looks like pyramids. I love it!!!!
I just routed the edges… but it totally has the illusion of being 3-dimensional, doesn’t it?! I loooove how it turned out. 🙂
Amazing, it looks like slopes, I’m so totally in love with it! I hope you don’t mind but I’m gonna have to try making my own 3D art with this 🙂 LOVE IT!
This is amazing! I love the way you stained it, it is gorgeous. What a fun challenge!!
That is crazy wonderful! You are so doggone talented and I am so impressed. Loved the video of the actual cutting. Man–the man would have had me baffled for this from the beginning and I would have had to have called in my expert. Thanks for another fabulous example of your work. I love your house. And go get some more coffee—I have a feeling you are going to be needing it today! Along with that nap.