• Home
  • About
  • Tutorials
  • Recipes
  • Furniture
  • Contact
    • Contact
    • Infertility
    • Disclosure
    • Privacy Policy
  • Shop
    • Facebook
    • Instagram
    • Pinterest

Reality Daydream

The Dream is Free, The Hustle Sold Separately

  • Home
  • About
  • Tutorials
  • Recipes
  • Furniture
  • Contact
    • Contact
    • Infertility
    • Disclosure
    • Privacy Policy
  • Shop

Old Papasan turned Canopy / Reading Nook

February 21, 2014 by Bethany Sy

I definitely think there’s a connection between a creative personalities and hoarding tendencies. I mean, obviously there are different levels of hoarding, and some are downright unhealthy. I’m not collecting empty pizza boxes, and broken hula hoops. all I’m trying to say is that… I SAVE STUFF for one of two reasons:

  • It’s sentimental
  • I’m going to use it someday. For SOMETHING

Take an old Papasan Chair, slice it in half, and mount it on the wall with a mosquito net draped over! PERFECT girly canopy or reading nook!

*this post contains affiliate links*

And I’m here to tell you that I always end up using things that I save. It just may take a few years for me to find the perfect use for it!

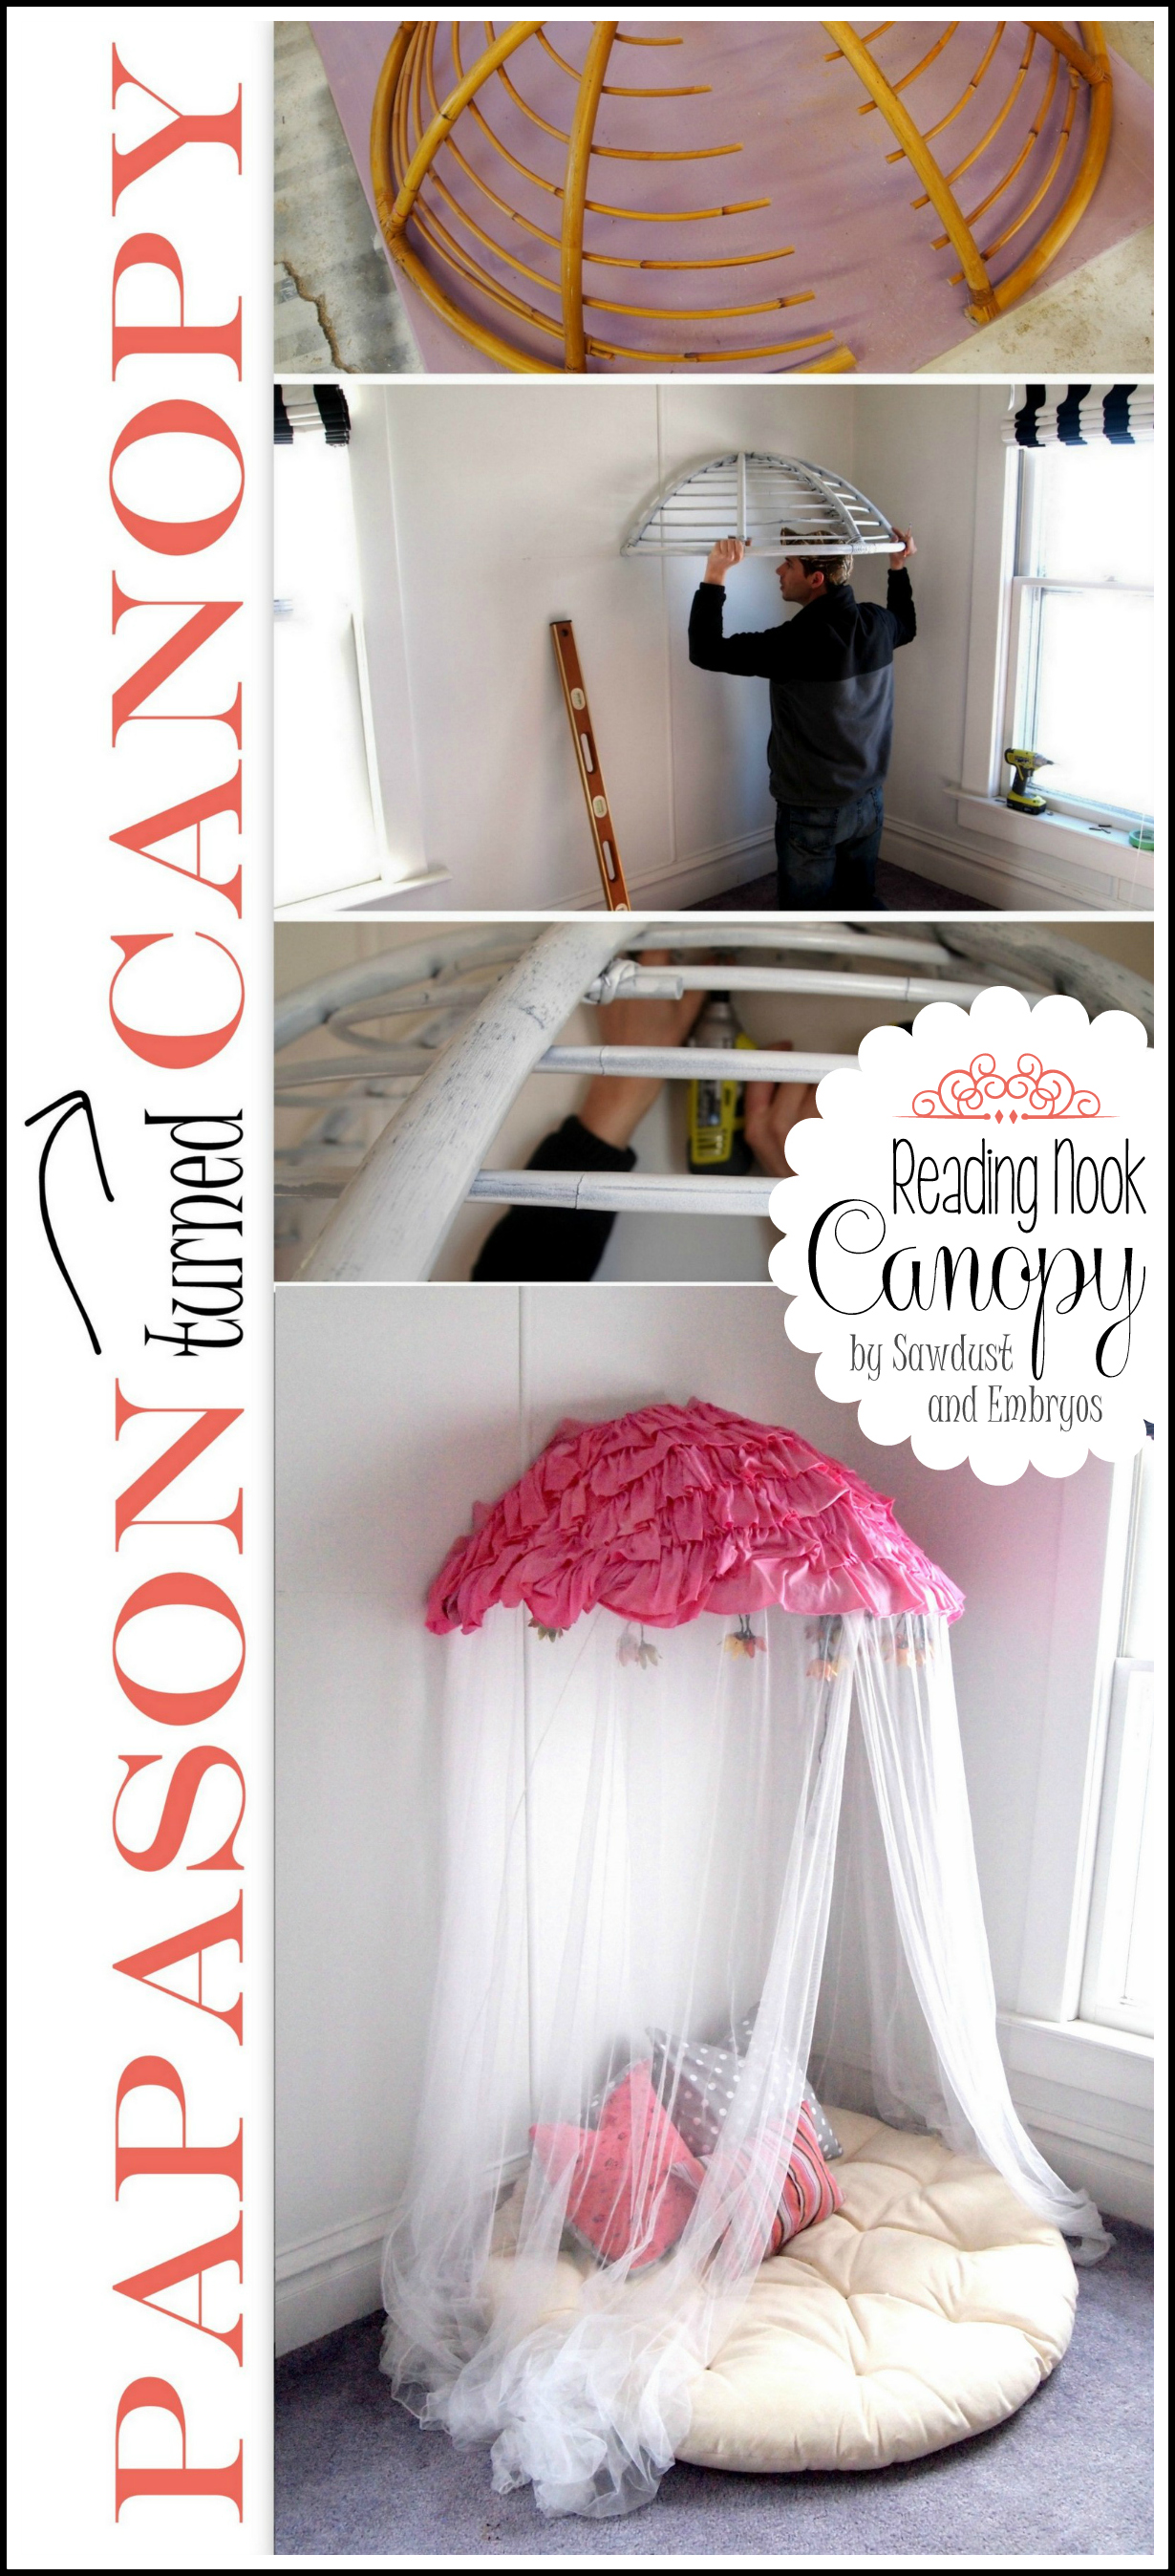
Take this Papasan frame for example.

Turn a papasan frame into a canopy reading nook for kids!

I’ve had it since college. And I threw the cushion away a long time ago because my cat peed on it. So for years, I’ve had that frame… just lying around. I’ve rescued it from Nick’s ‘burn pile’ on many occasion. ‘WHAT ARE YOU GOING TO USE IT FOR? IT’S JUST TAKING UP ROOM’ he would say.

But the man-child has grown to trust my creative process.

And recently I thought of the perfect use for it. It would become a canopy ‘reading nook’ in the girls’ new room! STAY WITH ME!

To start! Chop it in half!! I used my RYOBI Reciprocating Saw and it cut through like butter. But you could use a jigsaw, circular saw, or… if you’re desperate… a branch-cutting shear. It doesn’t have to be pretty.

DIY papasan canopy

Then I primed and painted white, and recruited Nick to help me hang it using small L-brackets (that I also primed/painted white). We just held it up where we wanted it, made a mark on one edge, and drew a straight line with a pencil using a long level. Then screwed the brackets into the wall (on the two edges and the top/center beam) and into the bamboo using our RYOBI Impact Driver… and that thing is SOLID. Won’t need to worry about it falling!

Cut a papasan chair frame in half and install it on the wall for a children's canopy!

I had one of those sheer mosquito-net things (also from my college days… HOARDER!) and I sliced an opening in the center of the back and laid it over my ‘Papasan canopy’. I just tucked the edges behind some of the wood slats of the Papasan. (you can see we left some space above the canopy… we did that so it would feel more cozy for the tiny humans. There has been talk of putting a long floating shelf above it across that wall. No decisions have been made)

How to use a papasan frame (cut in half) to make a canopy for a kids room!

My sister let me have her Papason to use the cushion on the floor of our canopy, and ironically…. her cushion came with the frame… which brings my hoarding papason chair problem full circle.

I also made some pillows using fabric from some shirts that haven’t fit me for years (HOARDER!) and followed Mandi’s pocket pillow tutorial.


And I strung some flower lights that I bought at a thrift store a long time ago… I KNEW I would find a use for them eventually (HOARDER!). Aren’t they the perfect colors though?


Canopy made from a papasan chair

I was planning to stop here, but it seemed like it needed SOMETHING on top of the papason frame. I didn’t mind that the frame showed through the tulle, it just felt like it was missing something. I thought about making a bunch of large scale flowers out of coffee filters or some kind of similar madness, but then I remembered THIS. Are you thinking what I’m thinking?

Making a Children's Canopy

I used some RIT dye and dyed that thing pink, and laid it over the ‘dome’ of the papasan canopy. I feel like it looks like flower petals. And it makes me less bitter about all the time I wasted making that ruffle-y comforter that flopped.

Children's canopy using a papasan chair frame

Sorry, no tutorial on the ruffle-y thing. I just can’t go there. I CAN’T. But here are some instructions that are similar.

But I will tell you that this looks WAY more ‘floofy’ and over-the-top than something that I would normally design. But it came from things that we already had on hand… and I just went with it. And I love how it turned out. I mean, it IS for toddler girls. Me-thinks they’ll like it.

Make a children's reading nook 'canopy' using a papasan chair (cut in half) installed on the wall with the cushion below!

Here’s my best attempt at getting the other side of the room in the pic… so you can ‘orient yourself’

Little girl's room

And here it is at night!

Little girl's room at night

I know you may have a papasan chair lying around. Or perhaps you’ll find one at a garage sale or somesuch. They’re accessible is all I’m trying to say, so don’t disregard this tutorial just because you don’t have one!

Turn an old papasan chair in to a Canopy Reading Nook for the littles!

And HOW SUPER CUTE would this be over a little girl’s bed? Somebody please do that asap, and send me pictures. You can have the other half of my papasan frame. 🙂

UPDATE… a few years have passed, and we moved this canopy to actually BE ABOVE THEIR BED! It’s so darling. Come and see!

Sawdust & Embryos


And if you’re not familiar with this room transformation, come check out the other projects we’ve done so far!

Stenciled Herringbone Accent Wall {Sawdust and Embryos} DIY Roman Shades {Sawdust and Embryos}
DIY Tufted Fainting Couch Toddler Bed TUTORIAL (Sawdust and Embryos) DIY Vintage-esque Starburst Mirror Tutorial (Sawdust & Embryos)
End Table Tulle Chandeliers {Sawdust and Embryos}  *this post contains affiliate links

Related:

  • Stripping an Old Stained Desk

    We love the original wood of our library, and wanted to find a desk that…

  • Kids Closet Storage Ideas

    When the twins moved into what used to be the guest bedroom, I knew I…

  • Split / Shared Room for Siblings

    I love the idea of my girls sharing a room; whispering and giggling into the…

About Bethany Sy

Nick and Bethany Sy are the creative free-spirits behind DIY/Lifestyle blog, Reality Daydream. They recently purchased a historic mansion and have been documenting the ups and downs of renovation and making this home their own... all while sharing tips and tutorials along the way! When they found themselves in the trenches of infertility, they started a journey that would prove to be their most important DIY project ever, and have 3 beautiful girls to show for it. <3

« Baby Fever
Operation Laundry Room {wiring/plumbing} »

Comments

  1. 67

    Nola Franic says

    May 14, 2016 at 12:52 am

    love it. it would be the perfect solution for a child that like to make a cave in their room all the time with all the sheets in the house now i could set up a space permanatly and they can just go in there for their ‘cave’ time. i would just use a pretty sheet instead of the mosquito net. thanks for the idea.

    Reply
  2. 68

    Kathleen Maier Aispuro says

    February 18, 2016 at 4:59 am

    Most people don’t understand that type of hoarding. Sometimes we just can’t explain what it will be used for, but we know it will be perfect for something.

    Reply
    • 69

      Beth @ Reality Daydream says

      February 18, 2016 at 4:34 pm

      YES! I’m so glad you understand 🙂

      Reply
  3. 70

    Kaela Wyles says

    February 10, 2015 at 10:50 am

    I am new here, I stumbled across your blog via pinterest, the papasan chair reading nook tutorial. I love it! I am a new fan, you are hilarious and awesome!

    Reply
  4. 71

    Nikko says

    January 9, 2015 at 3:57 pm

    A half a toboggan would work too, for those lacking a papasan.

    Reply
  5. 72

    Marlee says

    September 30, 2014 at 12:52 pm

    I bought an old papasan chair at a yard sale years ago for a steal, but it ended up just being too big for the space I had. It’s been in my attic all this time collecting dust. I love this idea, and may even try it over my full size bed.Thank you so much for sharing!

    Reply
  6. 73

    Jessica says

    September 29, 2014 at 12:23 am

    You don’t by chance still have that other side do you?!?! I would love to make this for my daughters room but I’m not sure where to buy the papasan frame!!! I can pay!!! 🙂

    Reply
    • 74

      Bethany @ Sawdust and Embryos says

      September 29, 2014 at 12:38 pm

      Darn it! Sorry, we held on to it for awhile, but eventually threw it away. I see Papasan chairs all the time on Craigslist and at garage sales. I bet if you keep your eye out for you, you’ll find one soon! If you do, be sure to send us pics when you’re done making your own canopy!!!

      Reply
  7. 75

    Jennifer says

    May 24, 2014 at 1:35 pm

    Wow.This is one of those projects where I have to pick my jaw off the floor and take a breath. You blew me away with the AMAZING-NESS of it all. Talk about magical and seriously too fun–thanks for sharing your creative genius. I HAVE to make one, or two, or even a full size one hanging . . . . I’m sure I won’t possibly find a great deal on a Papasan chair–their used-price will skyrocket from all the crazy hoarding moms (who hadn’t yet hoarded one after a cat accident), all trying to scavenge one for JUST THIS PROJECT. There won’t be a single one left around . . . .. unless I get to it first! 🙂 I am in love with this idea–wish my brain worked like yours!

    Reply
  8. 76

    Valerie @ Making It Worthy says

    March 15, 2014 at 5:16 pm

    I save stuff for this repurposing reason as well. Unfortunately, my hubby throws my treasures (crap to him) away at every chance. I was going to make one of these for our girls from a bent hula hoop, but it “disappeared”. 🙂

    Reply
    • 77

      Bethany @ Sawdust and Embryos says

      March 16, 2014 at 4:10 pm

      Bummer Valerie! Sounds like you need to have a talk with him! (or start hiding your treasures) 🙂

      Reply
  9. 78

    marie says

    March 7, 2014 at 7:58 pm

    omg hilarious story. I also have one of these… in my basement… without a cushion… cuz the cat peed on it. I this this would be too adorable in my girls rooms!!! I will seriously hafta do this. let’s be honest, I’m not going to get a cushion for it anymore…

    Reply
    • 79

      Bethany @ Sawdust and Embryos says

      March 11, 2014 at 8:17 am

      Ummmmmm WE’RE TWINS! 🙂 You should totally make a canopy! Yesterday I was hanging some pictures in the girls’ room, and my back was hurting, so I curled up in their canopy and almost fell asleep. I’m pretty sure I need one for myself in my own bedroom… HAHA! 🙂

      Reply
  10. 80

    Kenz @ Interiors By Kenz says

    March 3, 2014 at 4:06 pm

    HOW GREAT IS THIS?! K, You are on a roll! The girls are going to DIE when they see their big girl room.

    Reply
  11. 81

    Marcie says

    February 25, 2014 at 3:54 pm

    That is so cute and amazing! I’m sure your girls will love it. I know I would!

    Reply
  12. 82

    ira lee says

    February 24, 2014 at 1:59 pm

    amaze-balls! that is the coolest thing! their rooms is so cool!!! i would like to read under that canopy, with a blanket, and then fall asleep on a lazy afternoon!!!

    Reply
  13. 83

    Mandy says

    February 24, 2014 at 11:43 am

    OK. This is amazing. You’re awesome! Such an awesome idea!

    Reply
  14. 84

    Peggy says

    February 24, 2014 at 11:29 am

    Genius! Absolute genius! Thanks for sharing!

    Reply
  15. 85

    Tammy says

    February 23, 2014 at 9:01 am

    Looks good you hoarder… lol

    Reply
  16. 86

    Kelli says

    February 23, 2014 at 1:21 am

    That is just so adorable. I’ll be working on a big girl room soon and I’m storing up all these ideas!

    Reply
  17. 87

    Tiffany K says

    February 21, 2014 at 10:22 pm

    That was such a cute idea!! Now I can’t wait to see the finished product of the room!!

    Reply
  18. 88

    Karen says

    February 21, 2014 at 8:50 pm

    Once again, a masterpiece! Your ability to take something simple and make it something wonderful is inspiring. 🙂

    Reply
  19. 89

    Hannah Reid says

    February 21, 2014 at 8:19 pm

    This is so awesome! Especially love the pink-dyed ruffly topper! I totally get the “I might need it someday and it has sentimental value” reason for holding onto stuff. Thank you for sharing!

    Reply
  20. 90

    Erica @ For the Love of Decorating! says

    February 21, 2014 at 8:01 pm

    Yep, this is EXACTLY why I save things! You just never know! LOL

    Erica
    http://www.fortheloveofdecorating.com

    Reply
  21. 91

    Jennifer S says

    February 21, 2014 at 5:07 pm

    This is so adorable!! thanks for the inspiration 🙂

    Reply
  22. 92

    Katie @ On the Banks of Squaw Creek says

    February 21, 2014 at 3:40 pm

    I’m so glad you got to use Nick’s for something! (right now, Bart is mumbling something to new about how I have too much stuff in our sheds. Le sigh.)

    Reply
  23. 93

    Denise says

    February 21, 2014 at 2:36 pm

    My family tells me I’m a hoarder all the time! But just yesterday as I was driving home from work, I remember some old Scrabble tile trays I had hoarded, ‘er saved, and knew they would be perfect as chalk trays for the chalkboard I’m painting on a wall for my granddaughters! Ha! Who’s a hoarder now family? I love this nook and I now need a papasan frame in the worst way.

    Reply
  24. 94

    Mindy says

    February 21, 2014 at 2:31 pm

    Once again, amazing! Fantastic use of your materials!!!

    Reply
  25. 95

    Ann Marie @ Twice Lovely says

    February 21, 2014 at 12:50 pm

    I’m always blown away by your out-of-the-box creating! What an amazing little snuggle nook. 🙂 I also really love how you update things as you go along. I always feel like I need to wait to share until everything is 100% complete, which (guess what?) it never is. I want to get better this. Thanks for the inspiration! 🙂

    Reply
  26. 96

    Rhonda says

    February 21, 2014 at 12:45 pm

    Love this! We built a 6 foot floating desk that looks like it’s suspended with chain-links in my son’s room. Sort of like a draw bridge I suppose, except ours doesn’t draw up….anywho, that was a project for our sons room and it turned out pretty darn cool and perfect for all his drawing, painting and lego needs. Now our daughter jelously wants something cool for her room, I think this will be perfect for her dormer area and give her something cool to brag about in her room! Now if I can convince my mother-in-law to give me that papasan chair sitting in her basement storage!!!

    Reply
    • 97

      Bethany @ Sawdust and Embryos says

      February 21, 2014 at 5:11 pm

      LOVE the idea of the ‘suspended desk’ with chains. I like adding little touches of industrial to a room, so I just might steal that one from ya at some point! 🙂

      Reply
  27. 98

    Esther says

    February 21, 2014 at 12:30 pm

    Adorable!! Can’t wait to see pictures of the girls in there!

    Reply
  28. 99

    Pamela @ Little Red House says

    February 21, 2014 at 12:26 pm

    Adorable. I might want one too. And those pink ruffles on top are great.

    Reply
  29. 100

    sandy says

    February 21, 2014 at 11:51 am

    You’ve done it again …. excellent idea. The girls will love it, spending so much time in their nook. Congrats.

    Reply
  30. 101

    Maaike says

    February 21, 2014 at 11:42 am

    Too cute! How about turning the base into a tuffet?

    Reply
  31. 102

    Maria Trader says

    February 21, 2014 at 11:25 am

    amazing!

    Reply
  32. 103

    Stephanie, Sandpaper and Glue says

    February 21, 2014 at 11:25 am

    that is so wild & perfect!!! I was just organizing my (NEW! EXCITING! JUST FOR ME!) craft space and in my “fabric” draw there are about a dozen shirts that I love and either have puppy teething marks or don’t fit, but I saved them JUST IN CASE. you are not alone 🙂

    Reply
    • 104

      Bethany @ Sawdust and Embryos says

      February 21, 2014 at 11:43 am

      Haha! I’m glad I’m not alone!

      Reply
  33. 105

    Renee Pedersen says

    February 21, 2014 at 10:36 am

    Ok, I have to admit when I first started reading you post, I thought you are NEVER going to pull this off to the point that it will look good, but you proved me wrong again. Darn, if that isn’t the cutest little reading nook I’ve seen! The girls are just going to love to hang out in it; especially at night with the flower lights on. I guess hoarding isn’t such a bad thing after all!

    Reply
  34. 106

    Kathy @ The Fruitful Vine says

    February 21, 2014 at 10:10 am

    You come by the hoarding tendencies naturally. Do I say “sorry” or “you’re welcome”? 🙂
    Love, Mom

    Reply
    • 107

      Bethany @ Sawdust and Embryos says

      February 21, 2014 at 10:30 am

      That explains so much Mommy! I wouldn’t REALLY consider you a hoarder… But maybe that’s because I’m just now emerging from the denial phase. 🙂

      Reply
      • 108

        Kathy @ The Fruitful Vine says

        February 21, 2014 at 10:35 am

        The reading nook is adorable. I love the pink ruffles on top! You are SO creative!

        Reply
  35. 109

    Beth @ Design Your Dwelling says

    February 21, 2014 at 10:00 am

    Such an awesome idea!! Love it! 🙂

    Reply

Trackbacks

  1. 15 projets de réaménagement des ménages impressionnants que vos enfants adoreront Budget-friendly says:
    December 2, 2019 at 2:54 pm

    […] Didacticiel […]

    Reply
  2. 75 Best DIY Room Decor Ideas for Teens - Share Camp says:
    November 24, 2019 at 6:49 am

    […] realitydaydream […]

    Reply
  3. 25 Easy DIY Room Decor Ideas That Are Basically Magic | DIY by Geekwads says:
    October 7, 2019 at 3:12 am

    […] via realitydaydream […]

    Reply
  4. 60 Brilliant DIY Room Decor Ideas for Teens - Best Crafts Ideas says:
    July 6, 2019 at 7:41 am

    […] A cute and comfy round bed with the cushions would make a lovely finishing touch to this cute book corner where your girl would love to read some of her favorite books. Here is the tutorial realitydaydream […]

    Reply
  5. 60 Brilliant DIY Room Decor Ideas for Teens - DIY & Crafts says:
    July 5, 2019 at 6:53 pm

    […] A cute and comfy round bed with the cushions would make a lovely finishing touch to this cute book corner where your girl would love to read some of her favorite books. Here is the tutorial realitydaydream […]

    Reply
  6. 31 Easy DIY Room Decor Ideas That Are Basically Magic - Craftsonfire says:
    April 8, 2018 at 1:53 pm

    […] via realitydaydream […]

    Reply
  7. 60 Brilliant DIY Room Decor Ideas for Teens - I Heart Crafty says:
    December 28, 2017 at 2:30 am

    […] To have a pretty reading nook in her bedroom is the dream of every teen girl and now you can make it for them and that too at no cost at all. Using half cut Papasan with me curtains and the frilled fabric to cover the canopy roof. A cute and comfy round bed with the cushions would make a lovely finishing touch to this cute book corner where your girl would just love to read some of her favorite books.Here is the tutorial realitydaydream […]

    Reply
  8. Misterios DECO - 18 IDEAS PARA HACER ÚNICA UNA HABITACIÓN INFANTIL - Misterios DECO says:
    December 19, 2017 at 10:25 am

    […] 1 · 2 · 3  · 4 · 5 · 6 · 7 · 8 · 9 · 10 · 11 · 12 · 13 · 14 · 15 · 16 · 17 · 18 · […]

    Reply
  9. Pretty Princess Crafts and Decoration Ideas for Your Little Girl - Listing More says:
    December 6, 2017 at 9:23 am

    […] Tutorial: Reality Daydream […]

    Reply
  10. DIYs Fit for Your Little Royal Princess | Nifymag.com says:
    May 1, 2016 at 10:00 am

    […] Sure, your daughter will love sitting under this elegant canopy, but we all know once she heads back to school you’ll be lounging in this cozy corner for as long as possible. (via Reality Day Dream) […]

    Reply
  11. 26 Genius Ways To Make Something Old New Again | Prepper's Survival Homestead says:
    March 14, 2016 at 11:15 pm

    […] Reading canopy – If that old papasan chair from the 80s is still gathering dust in your basement, flip the whole thing on its head to create this cozy reading canopy. […]

    Reply
  12. 26 Genius Ways To Make Something Old New Again says:
    March 14, 2016 at 2:54 pm

    […] Reading canopy – If that old papasan chair from the 80s is still gathering dust in your basement, flip the whole thing on its head to create this cozy reading canopy. […]

    Reply
  13. Wall-mounted Secretary Desk for Kids - Sawdust and Embryos says:
    October 9, 2015 at 10:11 am

    […] around the room, giving it our touch. You can see why this is my favorite room in the house. That papasan chair turned canopy? I still hang out in there, […]

    Reply
  14. 20 Adorable Ways You Can Upcycle Household Items For Your Kids | www.FabArtDIY.com says:
    September 3, 2015 at 3:38 pm

    […] If you don’t have (or see yourself stumbling across) a papasan chair, you could modify this and use a hula hoop. You can find the tutorial Here. […]

    Reply
  15. 내 아이를 위한 DIY 장난감 아이디어 20가지 | likes (라잌스) says:
    June 10, 2015 at 12:44 am

    […] via Sawdust & Embryos […]

    Reply
  16. A Tour of our Homestead! - Sawdust and Embryos says:
    May 28, 2015 at 4:29 pm

    […] the Stenciled Herringbone Patchwork Wall for first place as my favorite thing in this room. Or the Papasan Chair turned Canopy Reading Nook? I can’t. I just can’t choose. Don’t make me […]

    Reply
  17. Have an old papason chair? Turn it into a fun canopy/reading nook for your littles! SO FUN! {Sawdust and Embryos} - The Home Decor DIY says:
    May 18, 2015 at 12:57 pm

    […] Source: sawdustandembryos.com […]

    Reply
  18. This Dad Turn An Old Papasan Into A Canopy Reading Nook | Diy interesting says:
    March 8, 2015 at 10:29 am

    […] frame is transformed into a canopy reading nook. What a creative project! Check out how to make it here. If I find an old papasan, I will for sure save it now for some awesome DIY decorating or home […]

    Reply
  19. Ein halber Sessel zum Träumen. | babamilie says:
    March 3, 2015 at 3:27 pm

    […] Bild und Anleitung sawdustandembryos.com […]

    Reply
  20. 20 diferentes y creativas maneras de reutilizar viejos objetos en cosas para los niños | La nube de algodón says:
    February 27, 2015 at 5:29 am

    […] Si no tenéis una silla de este tipo, siempre podréis sustituir la estructura que sujeta el dosel por un aro de hula hoop. Descubre cómo hacerlo pinchando aquí. […]

    Reply
  21. 20 maneras creativas de reutilizar objetos del hogar para los niños | La voz del muro says:
    February 25, 2015 at 12:27 pm

    […] Si no tenéis una silla de este tipo, siempre podréis sustituir la estructura que sujeta el dosel por un aro de hula hoop. Descubre cómo hacerlo pinchando aquí. […]

    Reply
  22. 28 Household Items You Can Repurpose For Your Kids | PociNews says:
    February 10, 2015 at 5:30 am

    […] sawdustandembryos.com […]

    Reply
  23. 28 Household Items You Can Repurpose For Your Kids | SOCIOSCENE says:
    February 9, 2015 at 3:15 pm

    […] sawdustandembryos.com […]

    Reply
  24. Decor #1110 says:
    December 8, 2014 at 6:56 pm

    […] here via […]

    Reply
  25. This Dad Turn An Old Papasan Into A Canopy Reading Nook - HowToInstructions.Tips says:
    October 28, 2014 at 6:50 pm

    […] frame is transformed into a canopy reading nook. What a creative project! Check out how to make it here. If I find an old papasan, I will for sure save it now for some awesome DIY decorating or home […]

    Reply
  26. This Dad Turn An Old Papasan Into A Canopy Reading Nook | DIY Tag says:
    October 28, 2014 at 11:12 am

    […] frame is transformed into a canopy reading nook. What a creative project! Check out how to make it here. If I find an old papasan, I will for sure save it now for some awesome DIY decorating or home […]

    Reply
  27. 28 Household Items You Can Repurpose For Your Kids says:
    October 24, 2014 at 10:29 pm

    […] sawdustandembryos.com […]

    Reply
  28. 28 Household Items You Can Repurpose For Your Kids » Blogfrogg.com says:
    October 19, 2014 at 3:25 pm

    […] Learn how to let your kid read in style here. […]

    Reply
  29. 28 Household Items You Can Repurpose For Your Kids | Sharing Interesting Stuff, Updates News & Free Tips says:
    October 18, 2014 at 11:59 am

    […] sawdustandembryos.com […]

    Reply
  30. 30 Bedroom Craft Ideas for Girl - oh.maze.ing says:
    September 10, 2014 at 1:06 am

    […] 24. Reading Nook at Sawdust and Embryos […]

    Reply
  31. Reading Nook/ Fun Fort | MamaWearsLipstick says:
    May 7, 2014 at 1:14 pm

    […] went the papasan chair route.  It just so happens that a woman I know was going to throw her frame out and I rescued it! […]

    Reply
  32. Pinwheel Collage {using scrapbook paper} - Sawdust and Embryos says:
    March 25, 2014 at 12:27 pm

    […] for the girls room to make it feel more personal and… finished. Ever since we added the papason canopy ‘reading nook’, I knew I wanted some sort of book storage nearby. I pinned this awhile back as an idea for cute […]

    Reply
  33. Toddler Artwork Paintings {using vinyl as stencil} - Sawdust and Embryos says:
    March 12, 2014 at 10:52 am

    […] planning to put a little bookshelf next to the Canopy Reading Nook, and have a small gallery of pictures and sentimental things above that. Among some other pictures […]

    Reply

Leave a Reply to Wall-mounted Secretary Desk for Kids - Sawdust and Embryos Cancel reply

Your email address will not be published. Required fields are marked *

Recipe Rating


  • Facebook
  • Instagram
  • Pinterest
  • RSS
  • YouTube
We are Nick and Bethany! Welcome to our blog, Reality Daydream where we share our DIY adventures!
Click here for lots of art projects using only wood stain on furniture!!
Please feel free to share or pin my posts! You're welcome to use ONE of my images (no collages or pinnables) with a link back to the corresponding post. Please do not edit or crop that single image in any way. Improper use of my photos, ideas or words is a violation of copyright. Thank you!

Categories

Attention: Almost any do-it-yourself project involves risk of some sort. Your tools, materials, and skills will vary, as will the conditions at your project site. Reality Daydream has made every effort to be complete and accurate in the instructions of the plans on this website. Reality Daydream will not assume any responsibility or liability for damages or losses sustained or incurred in the course of your project or in the use of the item you create. Always follow the manufacturer’s operating instructions in the use of tools, check and follow your local building codes, and observe all commonly accepted safety precautions.


Copyright © 2025 · Modern Blogger Pro On Genesis Framework · Customizations by Sweet Theory Designs · Privacy Policy · Log in