We get an tons of emails from readers who have questions about glazing furniture. And since we aim to please, we’ve whipped up a little tutorial for you DIYers. There’s little more satisfying in life than glazing a beautifully ornate piece of furniture. You’ll see what I mean when you experience your own glazing satisfaction.
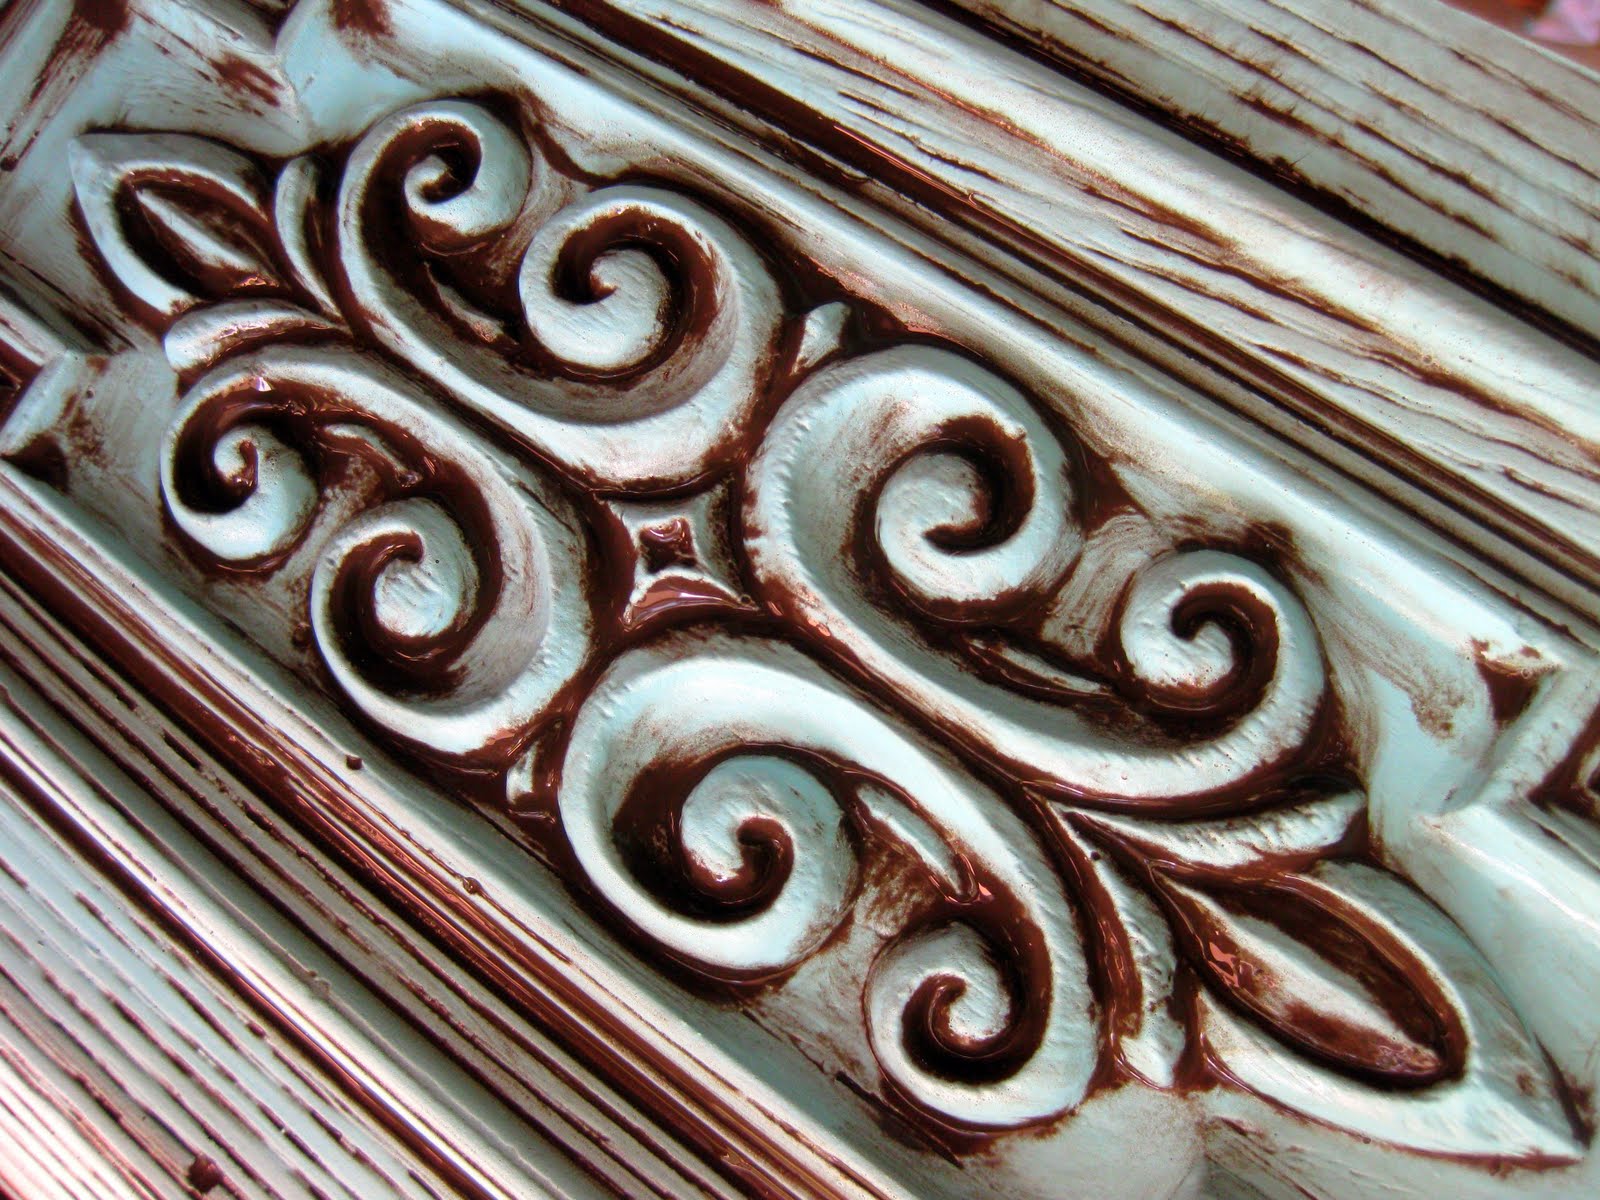
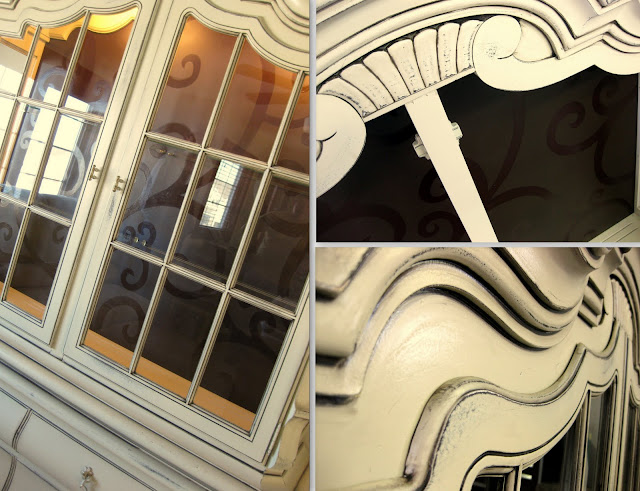
Instead of using a hefty large piece of furniture for this demonstration, I decided to use this waste paper basket that my girl Kathy snagged for me awhile back. It’s got great scrolly detail, and lots of cracks and crevices, nooks and cranies…. which is the basic guildline for knowing if your piece of furniture is a good candidate for glaze. Below are some examples of detailed pieces we’ve glazed and sold. You can click on each photo for the corresponding post.


So here’s how the waste basket started out:

I started by priming with Kilz.

After an hour of dry time, I sprayed on Krylon’s Blue Ocean Breeze that we had leftover from Eloise. I could list off reasons for why I almost always prefer spraypaint over brushing it on, but my bloggy friend, Brooke, spelled it out so eloquently on her blog, I decided that was super sufficient! See that post here.

After letting it dry overnight, I started prepping for glazing. We use Ralph Lauren Technique Glaze, but any technique glaze will do. Other common brands are Valspar, Dutch Boy and Martha Stewart. You won’t need more than a quart, unless you have an entire house full of furniture to glaze
I wanted a dark brown glaze, so I used a mixture of black and brown latex paint that we had leftover. You’ll mix 4 parts glaze with 1 part paint. This isn’t an exact science. Do like Rachel Ray and just dump some in. I’m sure you’ll be pleasantly surprised to find out that you can glaze in any color!!! I’ve used white glaze before on this project, and totally look forward to trying out other colors!!
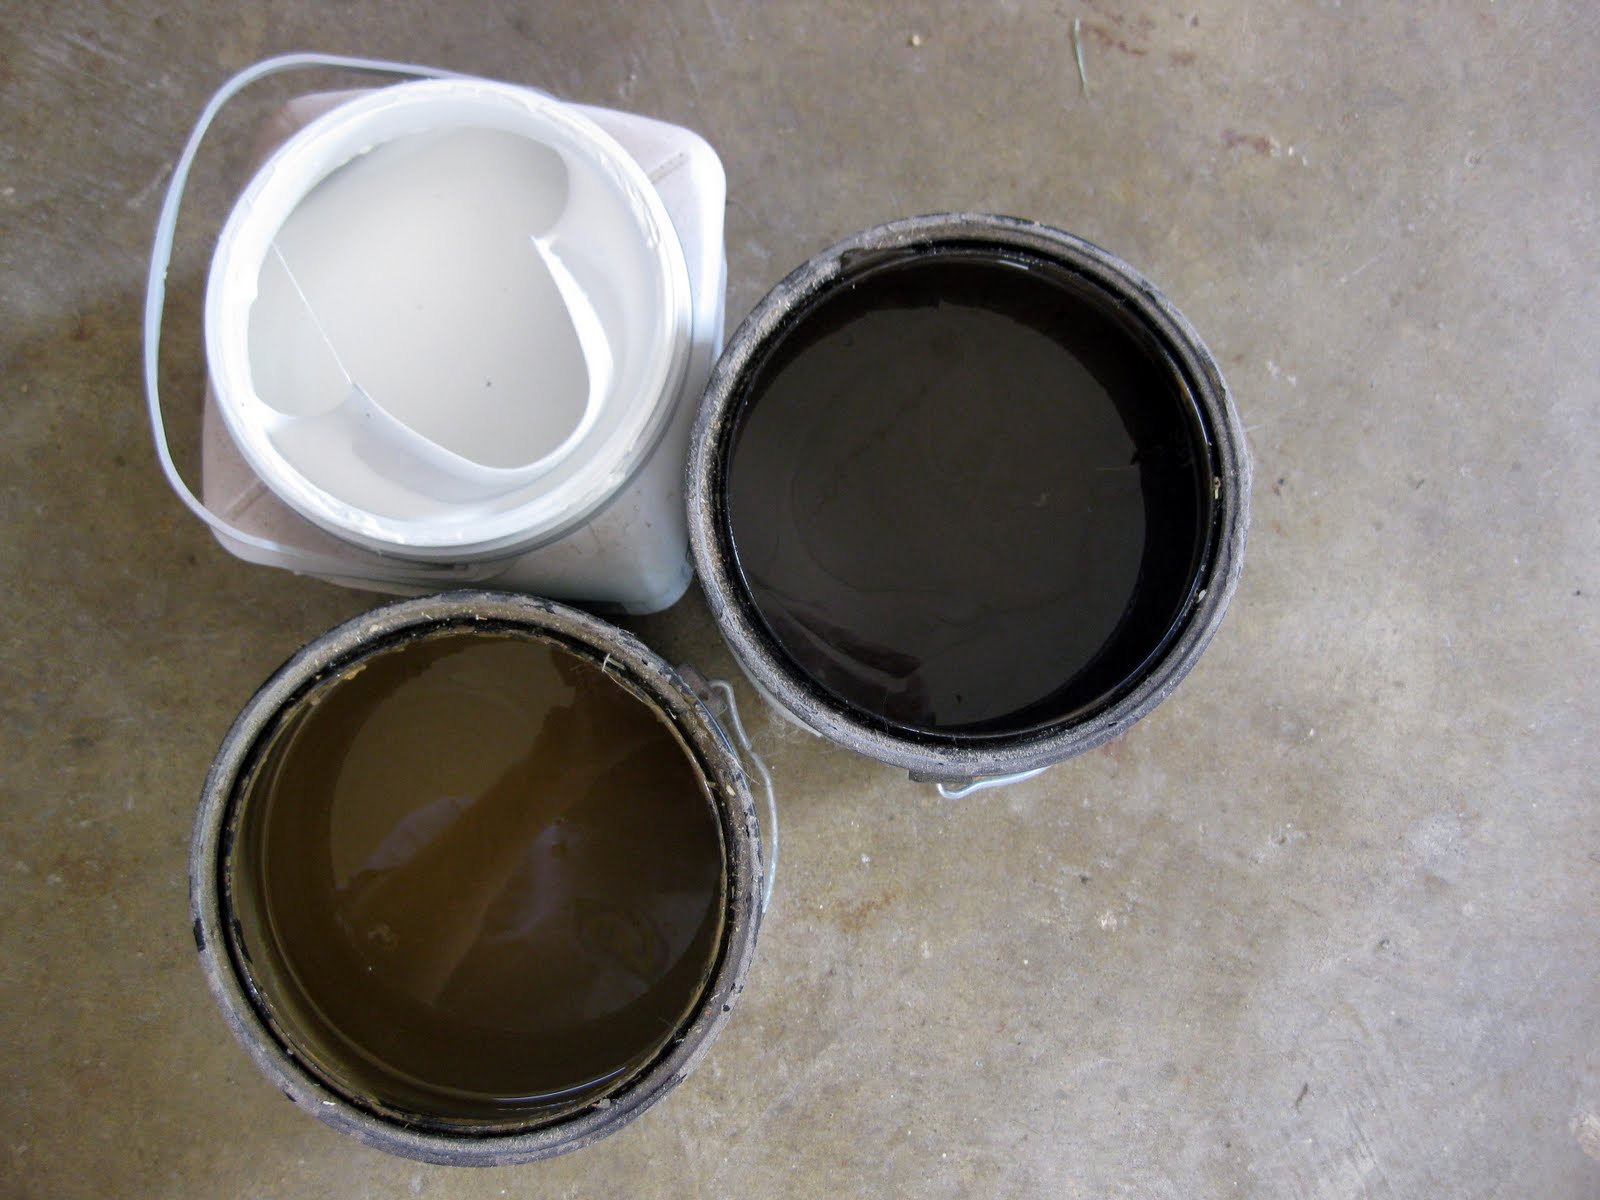
Mix it all together, kids.

Now that you’ve got your glaze prepared, all you need is a paint brush or sponge brush, and some damp rags. (I just wring out the water with all my pathetic strength, but you could use a spray bottle with water in it too).
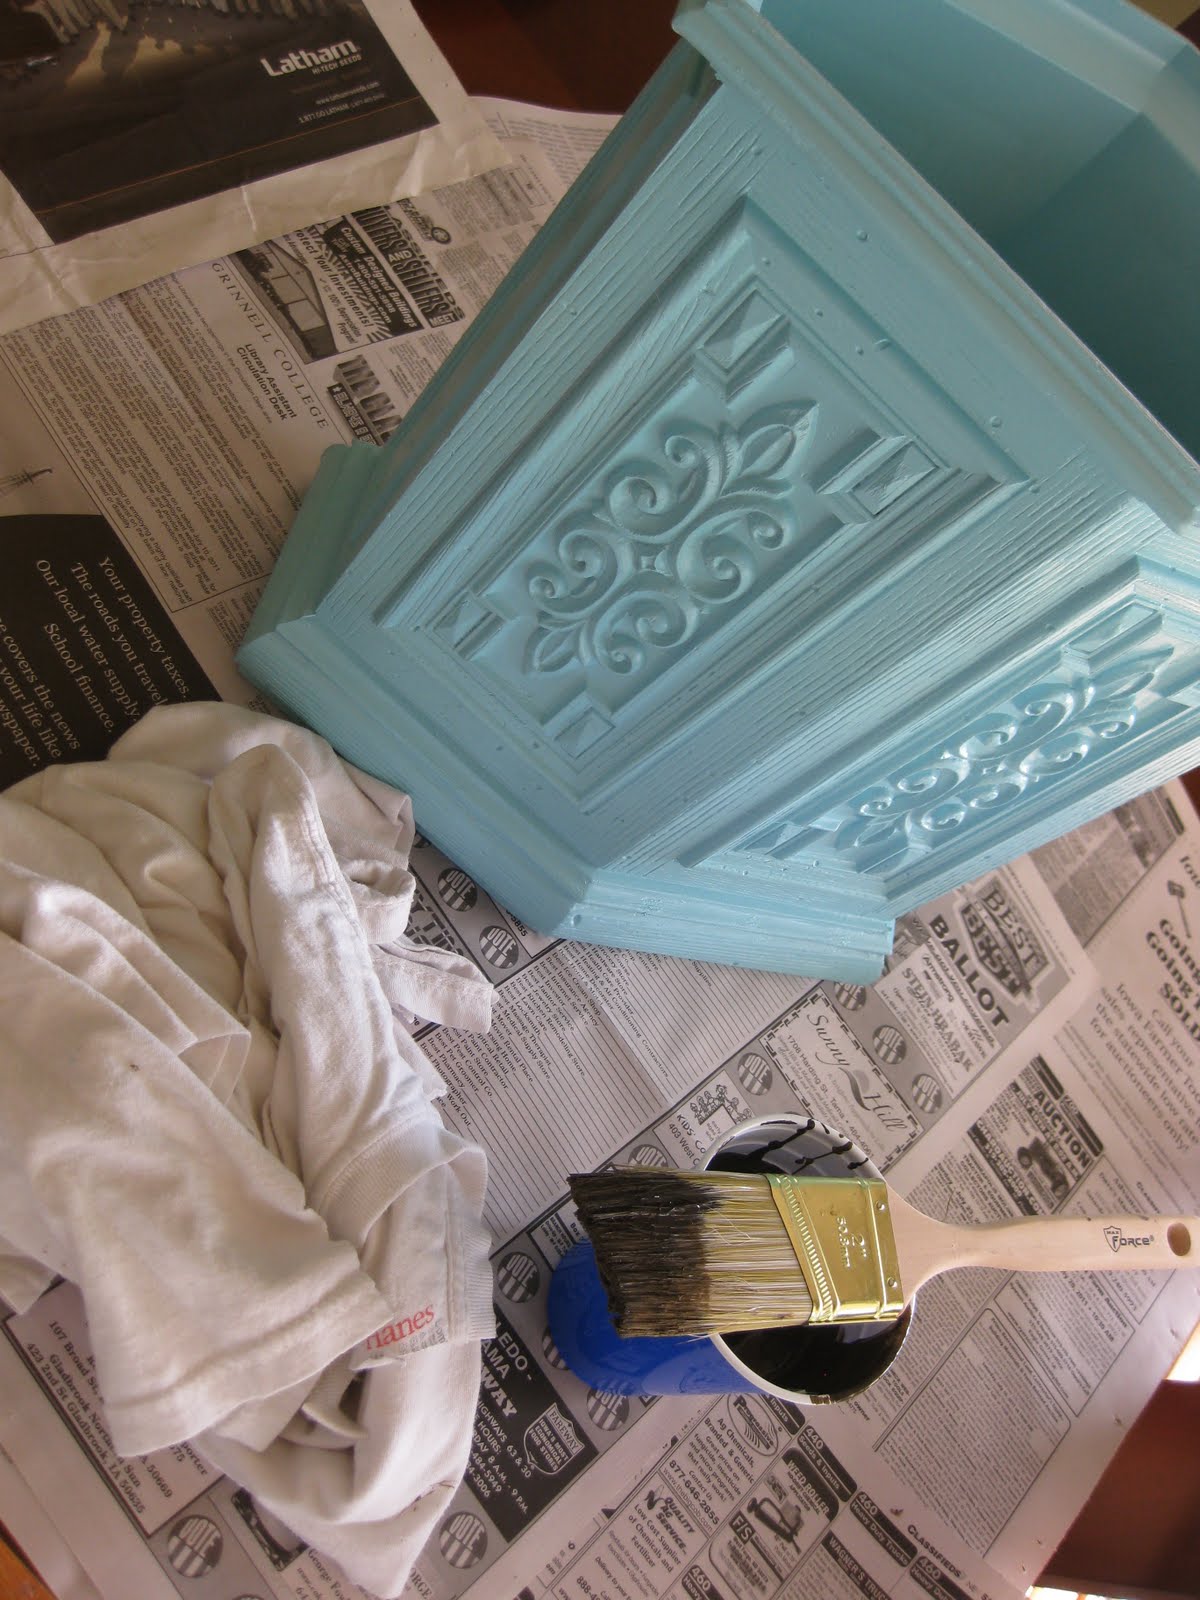
Brush on a thin layer of glaze, making sure to get the glaze into all the cracks and crannies, nooks and crevices. It’s tempting to get globby to more efficiently cover the surface, but remember you’re going to be wiping off 90% of all the glaze, so that could potentially get messy with your damp rag.


Next, you’ll take your damp rag and wipe off the glaze on all the raised surfaces. With each wipe, you’ll want to use a clean part on the cloth.


Look at the difference glazing makes!

You can wipe off as little or as much as you want. Below is an example of how you can leave more glaze, or wipe it almost completely off. I ended up wiping the whole thing down real good, but you really can’t go wrong with this. That’s the beauty!
NOTE: Glazing over a Flat finish paint soaks up the glaze more and gives it a more rugged/rustic look. Glazing over a Glossy paint, you can wipe the glaze completely off… leaving the glaze in just the deep cracks. Just depends on the look you’re going for! This example I used a satin sheen, so it’s somewhere in the middle. 🙂

And just like that, you’ve got a beautifully antiqued piece, with the details popping out real loud like. Doesn’t it make a huge difference?! FANCY!


We recycle spaghetti sauce jars to store leftover glaze. Seals tight, and stays juicy till your next project!!

There you have it… a glazing tutorial! Do you likey?

Do you have a project you’re about to tackle? Have you used a glaze color other than black or white? Have you been wanting to glaze but weren’t quite sure of yourself?? I hope my tutorial helped! Feel free to ask any questions you might have. And be sure to email us your before and after pics!!!
~Bethany
*this post contains affiliate links
Related:
-

My kids are getting to the age where they want to tape pictures, cards, notes...…
-

I have a fun and easy building project for you! And while I do end…
-

I've been needing to figure out a solution for my overwhelming plant propagation situation for…
I am currently glazing the vanity in my bathroom and am frustrated with the uneven marks made when I wipe the glaze off, moving from top down to bottom. Also, since the top sits under a ledge, this area remains darker and uneven in tone with brush marks ( I remove the glaze with a sponge brush per directions of glaze company). How do I get up under the ledge and down to the floor trim with even strokes while removing the glaze so the effects are somewhat pleasing? I am probably not describing this very well, but imagine that the middle of my vanity is smooth and beautiful while the surrounding edges have black smudges, uneven brush marks, etc. It is really difficult for me to wipe smoothly from the top and carry all the way down to the wood trim. Thank you in advance, Cheryl
Hey Cheryl, I’m sorry you’re having trouble! Have you tried using a damp cloth? Or perhaps the glaze is drying sooner than you’re able to wipe it? It’s hard for me to tell exactly what you’re talking about, but I hope this helps.
Yes, I understand completely what you are explaining….Ive had that problem myself and dont know how to solve it…if you even can….it happens when the edge of whatever you are painting etc is not an open edge….so youcant start at the very top or if on bottom edge, cant wipe all the way down in the same direction!
Hello,
I loved your tutorial! I just have one quick question. I’m refinishing a dresser that will be the perfect piece for glazing, However, in a couple flat spots im wanting a little extra glaze to stick. After I paint it can I distress/sand a couple areas that I want the glaze to soak into. If I do this will the glaze stick more in the sanded area or would it wipe off?
Thanks so much!
If you were using stain instead of glaze, it would work to sand some spots because the stain would soak into the exposed wood. But if you’re using glaze, just do a second coat (or third!) until you get the look that you want on those flat spots. Does that answer your question?
Thank you. The trash can experiment worked out well for the tutorial. My problem, now is, and I don’t know if you can help me with this but, is it possible to glaze with two overlapping colors ??? Because I can’t decide which one to go with, either a roual blue or a teal. It’s a two color piece, part will be turquoise and the other will be chartreuse.
Are you able to put polyurethane over the glaze?
Yes totally! As long as the coat of glaze is verrrrrry dry.
I recently painted some kitchen cabinets with chalk paint. I’m ready to glaze and knowing that the glaze will soak more into the chalk paint, I bought sealer wax to apply before glazing. My question is, should I use polyacrylic then glaze without using wax? Or wax, glaze, then polyacrylic? Does the glaze need a protective coat beneath it and over it?
Hey girl! I don’t ever use wax, so I can’t really counsel you one way or another with that. If it were me, I would seal with polycrylic, then glaze, then seal again with polycrylic. Hope this helps!
Do not use was for kitchen cabnits you will regret it…….. you need to be able to clean and the wax will not clean up with the abuse cabinets go through in a kitchen……. I read about this somewhere else and a lady had to redow hers….. they were hammered!
I have a large piece of furniture that is a laminate veneer. I have sanded it down and was thinking of painting a dark brown or black then sanding down the edges to distress a bit then putting on a provincial stain or brown glaze to warm it up. Have you ever done this or have any suggestions?
If you’re painting the piece dark brown or black, adding brown stain or glaze probably won’t even show up since they’re both the same color. I think sanding and roughing up the edges will be enough for it to look awesome!
This project is very pretty! Would love to paint something like that. I love the glazing technique. My question is about the prep you did on the wastebasket. Did you sand all that beautiful detail? If so, HOW?! I stay away from such detailed furniture because I’ve been taught to always sand. I know you primed it, but does priming eliminate the need for sanding?
When you’re sanding detailed pieces, it’s ok to just rough up the raised details because that’s the part that is most important to be durable because it will be more likely to get ‘bumped’ by things and cause chipping. Don’t worry about getting in the nooks and crannies! Then prime with a good oil-based primer. 🙂
Hi all… had to comment as I luuuurve glazing.
As a painter (on canvas), I have all the pretty colours and loads of colour mixing books. I always keep a bottle of Jo sonja clear glaze on hand for when I do furniture.
I usually do one part water, two parts glaze, and add the colour plus artist’s white to the opacity I want. Last thing I did was a little cream plant stand with a lavender glaze on the reddish side. As I distressed it lightly, the lavender colour kicked off the original rosewood. She’s a beauty now, and I put a vase with white and green hydrangeas on her.
Glazing is my favourite way to make colours pop. If you do a piece in a glaze that is opposite on the colour wheel but shifted one or two shades over and smoked out with a little burnt umber – you can be amazed at the vibrancy you can achieve without being ‘bright’.
Thanks for bringing the efficacy of glazing back into everyone’s mind!
Wish this worked since I can’t find any type of dark brown glazing. But this I thought would be great. Total fail. Did what you described. All I have is a waste of paint and glaze and still just clear glaze.
That’s so weird! You brown paint and yet the glaze was still clear? I don’t understand.
Hi Bethany, I thought I had lost you with the Blog’s new name and a computer change (so bookmarks lost). I have done a couple of doors with your stain shading (turned out well). Now I am onto the glazing of a couple of pieces. I love these projects but I am a little more handicapped as I am doing this all in Peru where the vast resources are quite a bit more limited. There is no such thing as glaze here. I have done a lot of reading online on how to create my own glaze. I actually did a bathroom in my house by adding glycerin to latex which was recommended by one person and worked to some extent. But most opinions are that it is impossible to make one’s own latex glaze without a degree in chemistry. However the only confirmed way of making one’s own glaze is enamel with a greater percentage of thinner. I had planned on using this mix as my glaze until I reread your tutorial and read the part about a wet cloth to wipe it down. Do you believe that just using a thinner on the rag would do the same as water for an enamel based paint (homemade glaze)?
Yikes, I’m not sure about the enamel based paint as a glaze, but it’s definitely worth a try! Yes I would try wiping it down with thinner instead of just a dry cloth. I’ve had some luck just using watered-down latex paint. Have you tried that?
No where can I find if anyone seals their furniture after glazing. is the glaze a seal also?
Hey Kersten! Sorry we didn’t touch on the sealing aspect! This is a pretty old post, and we weren’t very thorough with our tutorials back in the day. HAHA! We love to use Minwax Polyurethane… in whatever finish you want! (Satin is my personal fave) …just remember that if you’re sealing a piece that’s WHITE, use the water-based version ‘PolyCrylic’ so it won’t have a yellowish tint. Hope this helps!
Love your work! I do have a question please….I had someone paint/glaze an old console for me. Yesterday my 2 year old granddaughter marked on the piece with a permanent marker. My daughter attempted to remove the marker with rubbing alcohol however it removed the polyurethane as well as the glaze…. Help! What would you recommend to fix this??
Oh nooooo! I had no idea that rubbing alcohol would do that! I would recommen just lightly sanding that spot with 220 (or higher) sandpaper, and just brushing on another coat of polyurethane. Preferably in the same finish if you’re able to guess whether it’s satin, gloss, or flat. Hope this helps!
Por favor,explicame la tecnica de acristalamiento,y que pinturas debo usar.
Soy de chile,y no tengo acceso a las pinturas de tu pais.Ojala toda la tecnica ,desde
el principio,ya que soy nueva en esto.Si es posible a mi correo ,para tenerlo mas presente.GRACIAS
I think you’re asking about how the glazing works? Technique glaze is a compound that you add to paint, and it allows it to easily be wiped off… leaving paint only in the cracks and crevices of your furniture. Does that make sense?
Beautiful!!!
Did you put a protective coating?
Yes! This is the stuff I use and LOVE: (affiliate) http://amzn.to/2bPSWCR
I love it! I’m soo mad because I used to have a vintage trash can just like that and I got rid of it! Now, I’ll have to glaze these awesome lamps I found at Goodwill!
Hi,
I was quite impressed by your pieces! I have recently taken on a bigger project than my usual
tables and such. I fell in love with an old entertainment center at the Salvation Army store.
Took it home where it sat in the garage for a year. This summer I tackled it and realized what
a rough life it once had. I sanded and filled nicks and scratches for a few weeks. Then after a
coat of primer I noticed more nicks that I now am calling “character”. Needless to say I painted it
a pretty green and am ready to hire four guys to carry it in the house (its that heavy) But now I am
wondering if I should distress or glaze. Actually it is naturally distressed as I said and I have never
glazed before. So my question is this…can you glaze furniture that doesn’t have many curves or crevices as Its really kinda plain but charming with a door with what looks like six window panes.I wish I could share a picture so you could understand what I mean. Thanks for listening and for sharing.
Tammy
You CAN glaze pieces that don’t have the pretty details… it just won’t have as big of an impact. It will make your original color appear to be a little more dull and ‘old’. Does that makes sense? It all depends on the look you’re going for! Here’s a link that shows the difference between glazed and un-glazed flat surfaces:
https://realitydaydream.com/2012/09/long-awaited-intro-to-our-paint-gun.html
Hi,
I was quite impressed by your pieces! I have recently taken on a bigger project than my usual
tables and such. I fell in love with an old entertainment center at the Salvation Army store.
Took it home where it sat in the garage for a year. This summer I tackled it and realized what
a rough life it once had. I sanded and filled nicks and scratches for a few weeks. Then after a
coat of primer I noticed more nicks that I now am calling “character”. Needless to say I painted it
a pretty green and am ready to hire four guys to carry it in the house (its that heavy) But now I am
wondering if I should distress or glaze. Actually it is naturally distressed as I said and I have never glazed before. So my question is this…can you glaze furniture that doesn’t have many curves or crevices as Its really kinda plain but charming with a door with what looks like six window panes.I wish I could share a picture so you could understand what I mean. Thanks for listening and for sharing.
Tammy
Hi Beth, GREAT tutorial! I’m really glad to have found this broken down so easily – glazing sounded very scary to this newbie DIY-er. I also read your About – and love your little family, and thank you for sharing your infertility journey. Congratulations on your twins. <3
I am going to redo my dining room table. I want to use this technique. I have researched annie sloan and DIY Chalk paint, versus completely sanding the whole 8 seater oak table. I am just doing the pedestal part as I am refinishing the top with a stain. Could I just prime the legs on top of the already existing finish, or would you just suggest the chalk paint. My only hesitation is they are heavy traffic areas and I wouldn’t want it to scratch off. Thanks for your help.
Andrea, we don’t have any experience with chalk paint, so we cant recommend it one way or another. We know other bloggers either love or hate chalk paint. If it were our table, we would sand down the bast of the table, prime, paint, and seal with poly (because it’s a high-traffic area that you don’t want to chip eventually). Best of luck!
I just painted a quilt rack white, would like it to look old, what shade should I use????
I would just use a technique glaze mixed with dark brown paint over the white. It should look really pretty! Here’s a link of a dresser we did in white with a brown glaze: https://realitydaydream.com/2011/04/dresser-for-laurie.html
Thank you so much for the tutorial! I just finished a dresser in chalk paint and am ready for the next step. Question- can I go straight to glazing or should I poly first? Also, should I poly after I glaze or leave it alone? Does the glaze act as a sealant? Thanks again!!!
Hi Emily! Since you used chalk paint, I would recommend using a damp cloth (instead of dry) to wipe your glaze away. No need to seal until after! And the glaze doesn’t act as a seal, however I don’t think chalk paint needs to be sealed? I’m not exactly sure on that since I’m not familiar with chalk paint as much as I should be. It should say on the can if it needs to be sealed or not. Good luck! Send pics when you’re done!
Thanks for sharing all this wonderful information on everything on your site. Your instructions are simple and to the point, nothing left to guess about. Thank you for offering a hand in any questions and leaving your door open. And, lastly thanks for you quirky, real person comments and instructions. Makes for a much better read and laugh. Cheers to you both.
This makes it much easier to understand. Thanks for the info. I am now ready to give it a try.
I love your website, it’s got such amazing and simple techniques that one can employ when on a budget! My question to you is this. I have nice and solid, but contractor-grade-looking oak cabinets in my kitchen. Replacing or refacing costs money that we don’t currently have, so I was thinking about updating their look. I am going to paint backsplash per your tutorials, and will also add modern hardware, but I am not sure that will be enough. Now I don’t like the look of painted wood, and I can’t stain the cabinets either, because the sides are vinyl and won’t take the stain. I am thinking about adding some glaze into the crevices of each door and drawer, but am not sure how to do it without going too far… I am kinda scared of tackling the whole door, if you know what I mean! Any ideas? Thanks! 🙂
Anne, I think adding a little glaze to your oak cabinets would look fabulous! I would recommend doing one cabinet door that’s located in a not-so-visible part of your kitchen to see if you like it first. If you use a damp cloth, you can wipe the glaze off if you hate it. Just make sure you wipe it off within a couple minutes of applying it. You’ll have to make a decision FAST! HA! Hope you’re not indecisive. 🙂 You be sure to send me pics if you go for it! I can’t wait to see!
I just repainted a mirror turquoise using flat latex paint and planned on glazing it with black glaze. I had a friend tell me I shouldn’t have used the flat. Will I have the same outcome using the flat paint or should I have used semi-gloss? I don’t want to have to repaint this darn thing so please give me good news…
I have good news! You can still glaze on flat paint. But you’ll want to do a small area at a time and use a damp cloth to wipe instead of dry. Good luck! It’ll be great!
I have a large piece of furniture that I can’t move out of the house, what would be the best paint to use that isn’t a spray paint? And should you always prime it first? Thanks!
You should prime unless you’re painting over paint. If it’s bare wood, definitely prime. You may have issues with brush strokes since you’re not spraying, but I recommend Benjamin Moore paints. Top quality and great color selection!
Most of antique furniture has designs like that, I remember our old cabinet it was also the same with the picture listed above. If I were not mistaken it last for 60 years as my mom told me. It was been used by my late grandfather.
Love the tutorial! I’m trying it now so hopefully it turns out good. Thanks 🙂
Thank you for sharing! Your family is lovely!!
Just when I thought that giving our old cupboard a paintjob was enough. Now I want to make it look authentically antique! Thanks for the idea.
Impressive work with the colors! This just gave an idea on how to give those boring old side cabinets we have at home a new look.
I just did this technique to a side table used a green glaze..didnt come out quite like i wanted…going to try adding a brown glaze..wish me luck.
So sorry to hear that Grace. You should send photos… I’d love to see the green glaze. I’ve only dabbled in color stain a little, and am very curious to see yours before you tackle it with brown stain!
This is a great idea. Maybe I could do it to some of my old cabinets in my apartment instead of throwing them away.
Omg this is soo cool. Want to glaze my dresser ASAP. Love the dark glaze idea. Thanks
can you mix white paint in the glaze and use over a red color? do you have any pictures of a white glaze used?
Hi Elizabeth! Yep, you can definitely add white paint to the glaze instead of brown or black. It definitely gives you a different look, but it’s kinda fun. Here’s a link of a vanity that we did with a white glaze: https://realitydaydream.com/2012/02/glaze-doesnt-have-to-be-brown.html
I am new to all things DIY. this is a beautiful technique. Thank you for sharing. My questions is when you are finished with the glaze to you have to protect the finish with something?
Hi MommyMac! We do seal all our pieces with poly. We prefer to use Polyurethane, but it does have a yellowish tint… so if you’re sealing a piece of furniture that’s white, I would use water based PolyCrylic. It’s crystal clear, but isn’t quite as durable as the oil base.
So this is how you do the glazing and antiquing the furniture. It looks like the tutorial is easy to follow. Which leads me to my curiosity on how do they glaze or emboss some sample epitaphs.
I’ve always been intimidated by the thought of “glazing”, but not anymore! Thank you for this wonderful tutorial. I can’t wait to get started.
Thanks for sharing nice and informative blog.
Hotel furniture
I remember my grand mother have the same cabinet filled with chinese ceramics when I was young. It’s been year since our last visit on our old house where my grandparents used to live.
Hey there,good job I really like that you used an oak piece for the grain detail in this demo. As well,I like that you sprayed only as that doesn’t fill in all of the grain and details you will need for your glazing to be trapped in so to speak. Nice!
The post is giving tutorial of furniture glazing. Useful information
The finer points of improving woodwork are the more difficult and crucial ones. Your results look very good!
Best tutorial I have come across for glazing! Answered some of my questions and I can’t wait to get started on some pieces I have picked up for this! Love you blog, keep the cool ideas coming 🙂
Great tutorial! I have a retro headboard that I have been wanting to paint. I think I will use this technique! Thanks for the idea!!!
This really makes me happy because I just bought this exact trash can at Goodwill and was planning to remake it tomorrow almost exactly as you have. Thank you for the tutorial and the pictures. Now I know I can’t screw it up.
That is awesome and I am so glad that i found this!
This was awesome!
Have you ever tried using just a dark brown stain? I have done this using a stain, but it does change the color of the paint a little. I haven’t tried a glaze yet so I’m just curious if you have compared using a stain vs a glaze and your thoughts.
Thanks for sharing this great tutorial! Glazing has been a mystery to me until now 🙂
Thank You!!! I just bought a fun piece of furniture off craigslist that I’m dying to try this on. What kind of sprayer do you use?
Great tutorial! Glazing is fun!
Jen, I wore gloves when I was pregnant… but usually I don’t bother. With this small project, I didn’t get much on me. But if you’re doing a big dresser or something, you’ll definitely get glaze all over your hands… so gloves aren’t a bad idea. Good question!
I have to try this! I’m sure yo make it look so easy 🙂
I do have a question, Don’t you wear gloves?
It’s great! What a difference a little gaze can make on an otherwise ordinary project!
Wow! That actually looks like something I could DO!!! Thank you for sharing!