I love that plywood is so inexpensive, yet often has some AMAZING wood grain. I also love that it’s having a moment in design…
 1
1See? Classy! And so readily available at your local home improvement store!
In fact, we put up a geometric plywood accent wall in our old house, and I’m still obsessed with how it turned out AND I MISS IT OK?

The project I’m sharing today is one I did several years ago, but I love it as much today as I did then. So I want to share it again and maybe inspire you to make your own plywood sign with your favorite quote!


This is such a simple DIY project, even if you’re a beginner with power tools! The jigsaw is a perfect ‘first power tool’ experience, so don’t be intimidated!
I started by drafting up a little image using PicMonkey. You can play around with the size, spacing, font types, (etc!) until you love it. The fonts I used here are called Champagne and Birch.

Print this image onto a transparency, and project it onto your plywood! For this project, I chose to use 2’x2’ sheet of 1/2” plywood.

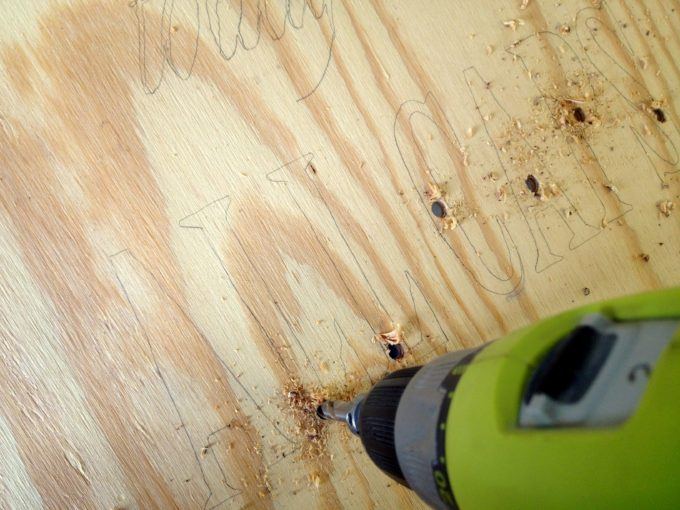
Use a pencil to lightly trace your letters onto your plywood.

I thought about cutting all the words out, but ended up deciding to just cut out the ‘ALL CAPS’ part so it would stand out. The rest I decided hand-paint with a small craft brush. In order to have a place for my jigsaw to start cutting, I drilled holes in each letter.
I clamped down my plywood with the edge extending out past the workbench, then cut along my pencil lines to create the circle.

I’m FAR more accustomed to using my scroll saw… but because of the size of this piece, I knew it wouldn’t fit into my scroll saw! That leaves, my trusty jigsaw (I use this one)… which I haven’t used in quite awhile. If you’re little intimidated to tackle these letters, cut the circle first for practice and to get a feel for your jigsaw! And this babe is surprisingly easy to maneuver. Especially using detail blades… (my friend Kristi has some great info on which jigsaw blades to use HERE)

All 7 letters took me about 20 minutes. (in the pic below, you can tell that my ‘circle’ isn’t very circular. I went back and sanded down certain obvious areas to make it perfectly smooth and circular).
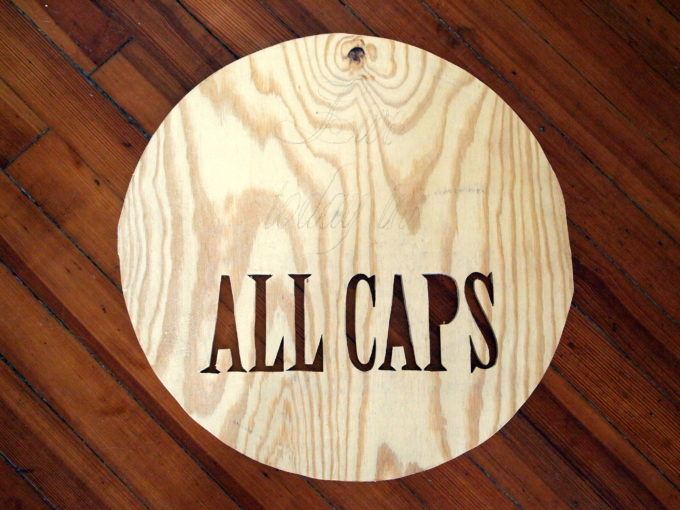
Using a teeny-tiny craft paintbrush, I filled in the scripty lettering above using white acrylic paint. I know this kind of detailed painting intimidates a lot of people, but if you just take your time… you’ve got it! And if you mess it up, just wipe it off while it’s still wet, or sand it off after it’s dry. I did two coats to make the white extra bright.

Can you imagine the possibilities with this idea? So many quotes you could use! I kinda want to make one for the girls’ new room that says ‘I’M SO FANCY‘.


This custom piece of art was less than $10 to make (literally just the cost of the plywood!), and took me an afternoon to finish! You can totally do it!
~Bethany
~~~~~~~~~~~~~~~~~~~~~
Thanks for pinning! <3

Related:
-

If you love unique art and have absolutely nothing to do with your time, come…
-

Hello hello friends! Things have been wild as we've been navigating the holiday season, schedules,…
-

My kids are getting to the age where they want to tape pictures, cards, notes...…
I love the wood, the white, and the cut out! It’s a perfect combo for art! Nailed it.
Beth help!! I downloaded Picasa and for the life of me I cannot figure out how to create a blank project. 🙁
I loved this idea so much and I’d like to try to do something similar.
Hey Krista! Sorry it took me so long to respond!
To get a blank image into Picasa, I actually did a Google Image search for ‘WHITE’ and downloaded a plain white pic. Then just uploaded it into picasa. Does that make sense? It sounds silly, but it’s the only way I could figure it out!!
Hope this helps!
Sort of off subject…but what font did you use in the word “giveaway” on your Cordless Ryobi Jigsaw pic?? I love it!!
ps…I’d LOVE to win the jigsaw!!!! I can think of tons to make!
It’s called Centeria Script, and I LOVE it too! Here’s the link for the free download. 🙂
http://www.dafont.com/centeria-script-demo.font
It looks awesome! I’m totally entering. x
I’m not sure what happened but most of my post was cut off…I’ll try it again.
I really like the curtain fabric you are considering for your dining room. I have always liked the combination of yellow and navy. You might want to get a swatch of the fabric or other fabric with near color and pattern and put them near your dining room chair seat covers just for a try out.
“I’m So Fancy” would be perfect for the girl’s beautiful new bedroom…maybe with a couple of their tutu’s hanging nearby : )
I tried entering the Ryobi giveaway but the Rafferty enter button doesn’t appear to be working. I’ve reported it to them so hopefully it will be up and running soon.
Have a blessed day to the whole family!
The rafflecopter wouldn’t accept my entry without filling in the box. I kept getting an oops message so I put my email in. Hope that’s ok.
I’m sure that’ll be fine! I’m not sure why it’s doing that. Good luck!!
Hi Beth,
So love your wall hanging and sure would love to live life in CAPS…trying to get to the mid-case stage
Ugh, I would cut someone for that tandem print. I am in love with it. Also, my dad is helping me make a project for my wedding that would really put this jigsaw to good use!!! http://seecatecreate.com/diy-vintage-light-up-marqueelove-sign/ If he couldn’t make it for me, I was going to commission y’all to cut out the letters for me…. 😉
I love, Love, LOVE the curtain pattern! I’m currently in search of the perfect curtains for my master bedroom, and you always post great links for material and/or patterns. Ooohh, and did I mention how much I like this giveaway? Fingers crossed.
You guys gave me the courage to tackle refinishing an antique barrister bookcase. I referred to your site constantly. It turned out so great. Now you have inspired me to try a jigsaw. Thanks for your wonderful ideas!!!
Awesome! Send us pics of your bookcase! sawdustandembryos@gmail.com
Beth,
For your curtains, have you heard of freezer paper stenciling? That may work for you or you could cut a stencil using a stiff plastic. Walmart has wood burners/stencil cutters for under $20.
Maureen
Where ever did you get that pillow! It just makes the room! : )
Thanks for the giveaway and great idea.
Love it! And love the “I’m so fancy” idea for the girls!
Very cute project! I could totally handle that one! But I don’t know about living in all CAPS; I would be more comfortable in a nice medium font!!!! That is about all I can handle….. I do, however, absolutely love the picture of the Tandem bike on the plywood! It is amazing! Do you think there is a certain type of plywood you would use to do something like that? Is one more smooth than others? I think I would like to tackle something like that this winter.
Always inspiring! Now to get my own jigsaw. Does it come in pink? ;0)
Awwww shoot! I had already filled in my e-mail and hit enter for the contest when I saw “Open to US residents only”. And I sooo wanted that jigsaw!. Oh well. Love the quote tutorial. With all these designs you do, you should def invest in a multimedia projector. Eliminates the need to print on transparencies. Anything you can bring up on your laptop screen you can project on your wall. You can also use it to do presentations of tutorials or project movies on a wall or even a plain white sheet that you hang on a fence or rope between two trees. If I had little kids, they definitely would have a movie set up for watching movies outside on lazy summer nights. Again, thanks for sharing.
I’ve always wanted a jigsaw! What a great tutorial!
On the Rafflecopter, it’s asking you to fill in the spot before hitting enter. Do we just type our names?
Nope! you don’t have to put anything there. If you’ve gotten to that point, it means you’ve registered with Rafflecopter, and your name will be recorded as an entrant when you click enter!
I couldn’t get it to work either by leaving it blank so I just put my name in
Not sure why that ^ says my name is alisa lol
I have an old jig saw (from the 70’s?) that I inherited new in the box, but I never thought to try something so detailed with it. I had no idea you could do something like that with a jig saw – thanks for the inspiration!!
So cute! I seriously love your site, i have been checking in almost daily for the last two years. You and your hubby are so creative. Your girls are adorable too. I love hearing about how your pregnancy is going, especially since I’m in the 1st tri for our last child (i get super sick, loose lots of weight, and also have to have c/s so it is getting too dangerous to have anymore). Thanks for the great giveaway and good luck with all your projects, i look forward to reading about them!