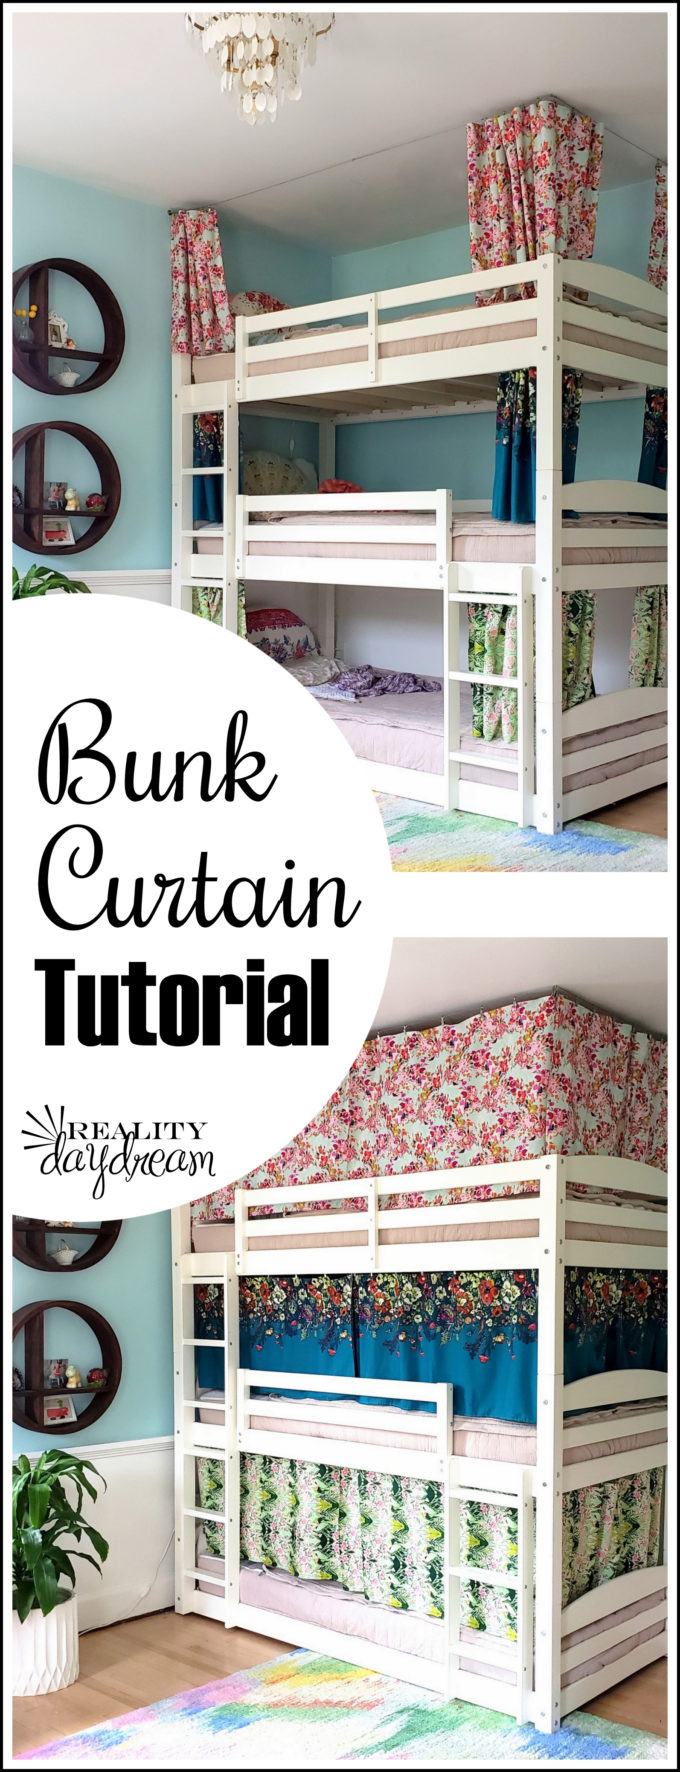
If your kids have bunk beds, then you can be mom-of-the-year by sewing them some bunk bed curtains using our tutorial! Minimal sewing skills required!
I may do a ‘room reveal’ here on mah blog, but that doesn’t REALLY mean that the room is done. You know? I’m constantly tweaking and having new ideas! Nothing is safe… even when it’s already been checked off my subconscious ‘room-list’. 😉
Even the kids’ room…

*This post contains affiliate links.*
Having bunk beds has opened a whole new world of shenanigans… part of which I’m sure is the fact that Cypress is now sharing a room with the twins. But the truth is that they sleep better (and longer) now than they did when the twins shared a full size bed. So we’re rejoicing!
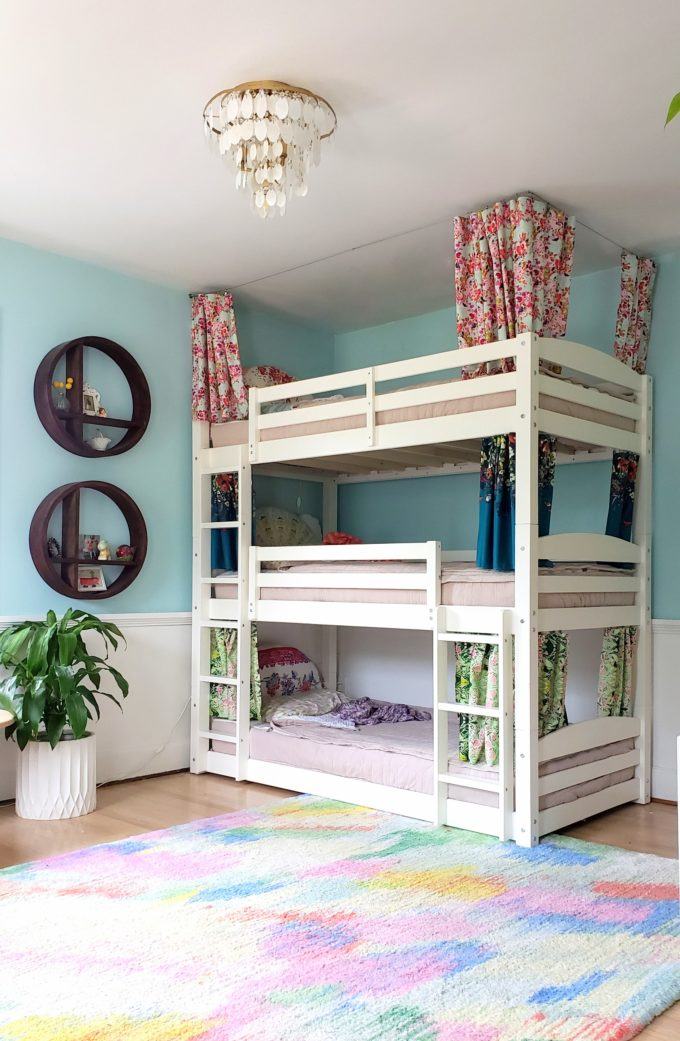
And so far we’re loving having a triple bunk! The exact one we have is sold out, but this one is similar! It’s solid and sturdy, and each of the kids surprisingly has plenty of head room!
But when they started draping blankets from the bunks above them (and the kid on the top bunk started complaining that she couldn’t drape blankets) I realized that bunk beds were the perfect opportunity for TENTS!

You’re loving that fabric, aren’t you? ME TOO!
Let me introduce you to my Instagram friend, Bari J! She’s an insanely talented artist who shares my love of bright colors, patterns, and florals. I’ve been following her on the ‘gram and admiring her work for years. And when I saw that she was releasing a new fabric line, I had to get my hands on it!
I put on my big girl panties and hesitantly reached out to her and asked if I could help her promote her line of fabrics, and she agreed! And she let me choose 3 different prints for this project!
Cue the angels singing in the distance.

I’ve been excited to get back in front of the sewing machine. I haven’t had it out since we moved last fall, and it feels so good to be sewing again!
Supplies for Bunk Bed Curtains
- Bunk Bed (obviously!) (We have a triple bunk similar to this one, but you could use a regular two-tier bunk bed as well)
- Fabric of choice
- Curtain Wire Rod System
- Clips with hooks
I’m not a very experienced seamstress, but I can sew in a relatively straight line! (and apparently I’m not too shabby at a circle either!). So if you’re intimidated by the sewing portion of this project idea, be encouraged. You can do it.

I measured the openings of each of the bunks (they weren’t all the same, so measure each one individually). I decided I wanted 4 panels for each bunk… 2 for the long opening, and 2 for the short opening. That way it would look pretty when they’re open and closed!
I cut each panel about 3 inches longer than the dimensions of the opening, and hemmed the edges all the way around. I considered adding some pom pom trim at the bottom, but with all the busyness of the patterns, I felt like it didn’t need that extra detail this time.


I did a lot of research on how to go about hanging these curtains. My brain staggered between things like shower curtain rods, and those room-divider curtain things that are affixed to the ceiling like in a doctors exam room.
But ultimately I decided to go with these stainless Curtain Wire Rod System where you put clips with hooks on that clip onto your curtain!

In that pic above they’re using it to hold kids art, but it’s made for curtains and is quite sturdy.
You’ll need one of these for each bunk.

The wire curtain rod comes with instructions, but sometimes it’s easier to see pictures of the steps, so here ya go…

Mark your spot on the bunk and drill a pilot hole for the hardware.

Screw in the provided screw, then thread on the curtain adapter.
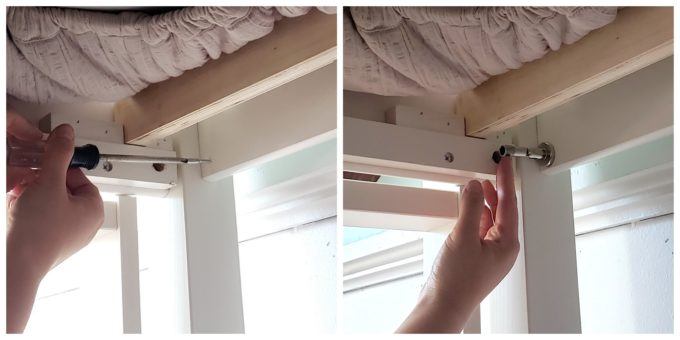
Do this on both far corners of the bunk. And to create the corner for the wire, add an eye hook on the post where the wire should turn. We also added an eye hook halfway across the longer expanse for added support of the wire.

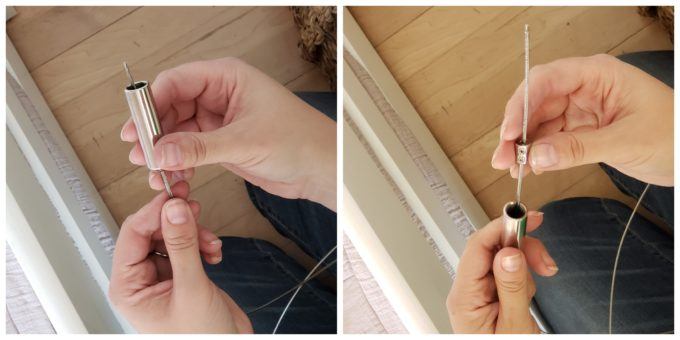
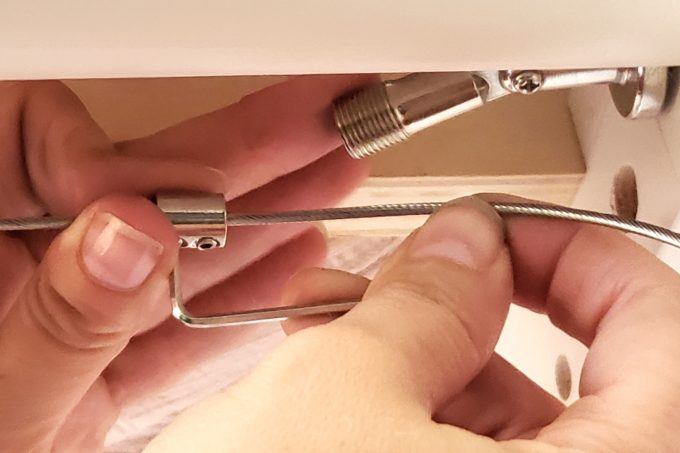
On the far end of the wire, pull the wire tight and put the little cylinder clasp about an inch from the curtain hardware, and tighten it into place with the allen wrench provided.
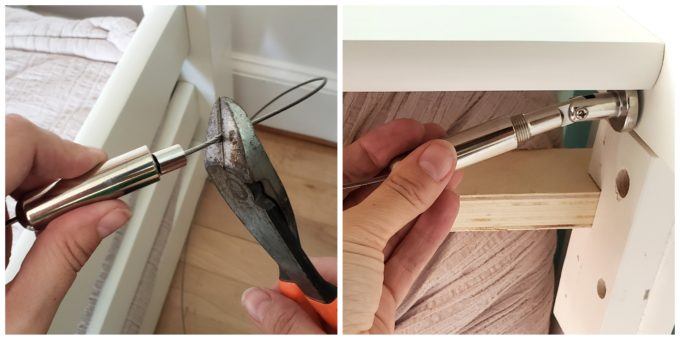
Use a wire cutter to cut off all the excess wire, and screw into place! YOU’RE DONE!
For the wire that goes along the ceiling for the top bunk, just put the two curtain adapters into the wall instead of the bunk, and put eye hooks along the ceiling and the corner. Here is what the corner eye hook looks like on the ceiling.

HOW MUCH DO YOU LOVE THIS?!?!?!?!
The little hooks just loop onto the wire, and clip onto the fabric… super self-explanatory. I put a hook every 5″ or so on the fabric panels.

The girls are so obsessed with their tents, and all 3 of them actually sleep with them closed. It’s hilarious.
But I also love how amazing it looks when they’re open. It’s like a border for all the corners!


I took this low-quality, low-light pic of the girls being silly and loving their bunk curtains! SO FUN!

This was such a fun project for me, and i haven’t seen the girls this happy about a thing I made for them in a long time! Bunk bed curtains for the win!
If you give this project a go, be sure to tag me on Instagram @RealityDaydream so I can share! Or email me pics at beth@realitydaydream.com.
~Bethany
~~~~~~~~~~~~~~~~~~~~~~~~~~~~~~~~~
Thanks for pinning!
Related:
-

We're always in awe of how spending a little extra time redefining our garden beds…
-

It's been awhile since I've done a sewing project, and as weird as it sounds,…
-

I've had this idea in the back of my mind for quite awhile... why not…
My kids have the exact same triple bunk! Do you still have the measurements you used?
I am planning to do this with the top of my daughter’s loft bed. Did you anchor the ends of the curtain hardware in studs, or just in the wall? No surprise that our studs don’t line up just right with the boundaries of the loft. Thanks!
Yes our studs didn’t line up either. We used drywall anchors!
Hello from Sweden, and thanks for this tutorial. I thought you might be amused to know your last name means “to sew” in Swedish 🙂
Hehe! I love knowing that!
Wow this is so cool. I have 4 boys in two sets of bunk beds, and I cannot wait to do this for them!
Hi, can you tell me what kind of fabric are curtains made of? Thank you! And I loooooove the idea! I’m trying it for my girls bunk bed.
It’s just a basic cotton fabric! Please send pics if you make some bunk curtains for your daughter. I’d love to see!!
Absolutely love this and can’t wait to try it for my girls’ loft beds! How many yards of fabric did you need for each bunk? Thanks!
I would love to know this too!
I love this idea!!
I was, however, looking at the bedding lol. I have bunk beds for my grandkids and making the bed is a pain. Yours looks so neat and tidy. Any insights for m
Thank you!!
Yes, the brand is Beddys! We love them!
If you put a piece of painted (maybe even painted with a specific pattern) ‘luan’, a floor underlayment, the girls would have something interesting to look at rather than their sisters mattress pad. Just an idea, we did it with our boys.
Love this and totally want to do this, like this week as we just got our daughter a big kid/teen sized tall loft bed. She is 9 and will love this. I have 1 question. It would be a ceiling mount for us. I totally get using the hook eyes. However, the cable wire set that was linked says it only has 6 feet of cable. That will not be enough length for the length and width of a twin bed. Seemed like yours was longer and you used the single cable? Help!? Please lol.
That’s weird. The listing on Amazon must have changed in the last couple years. I would definitely get the one with the correct length.
So Im alittle confused about installing the hardware . How many sets of the wire system do you need? you would need one to go along the long side in front and a shorter one for the bottom of the bed?
Nope, you just need one set of hardware per bunk, because you put an eye hook in the corner and the same wire goes around the corner continuously. Does that make sense?
Placing a wide crown molding in front of the wire would give the top bunk a more finished look. What a great idea. Bedroom looks great.
Hello. About to enclose my son’s upper bunk bed with curtains to create a private fort him (its a full, so lots of room). I want to use your tutorial, but am confused about how you did the wires on the ceiling in the outer corner. Did you use two of the round bases next to one another? Is there a corner bracket type piece that allows wires to extend from both sides? Going to order asap, if I can figure this out ! Thanks for inspiration, and advice.
Best, Andrea
Hey Andrea! I just put an eye hook in the corner… right into the ceiling. Does that make sense??
Do you have a picture?
I’m having this same problem. I can’t zoom in on the pictures. Can you post a picture of what you used specifically in that corner? There are so many sizes of eye hook!
I updated the post with an up-close pic of the eye hook that’s along the ceiling. Hope this helps!
Just curious if you used an entire pack of clips per bunk or did one package of clips cover more than 1 bunk? My girls are going to love this as a Christmas surprise!
I got one bag per bunk!
Hi there! Following your tutorial for my own bunk bed curtains 🙂 I have a question though, where exactly did you get the curtain hardware? Is it from Amazon or a hardware store? So far in Canada I can only find it at IKEA and I like the look of that hardware you have better.
It’s linked right in the post! From Amazon <3
Thanks Bethany, I just scrolled right by it haha. I am wondering if you could give any insight into how big the base of the hardware is? We bought a similar kit from Ikea and the hardware is so big it can’t fit under the bunk bed as you did and be hidden. Thinking of ordering the set you linked, but it is pretty expensive shipping to Canada! 🙂
I’m on Pins & Needles over here…. I’m Sew in Love!!!!!
Great job!!! (yes, those are sewing puns…. I”m punny that way.
Sew glad we’re friends.
This is so adorable, and I can only imagine how cozy it makes your girls feel! Love your idea!
Love the fabric, but is the middle panel flowers growing upside down, or maybe it’s just me. Lol
I LOVE this! (The middle bed fabric is SO good.)
I wish I would have known about this hardware when we put curtains under our boys’ loft bed. We used PVC pipe, shower rings and leather loops. Just the only things we could think of!
Beth the genius! Your girls are so blessed to have you.
Oh my God! Thanks for this!! I just built my daughter an awesome loft bed and have been struggling with how to hang the curtains underneath. Tension rod was a joke! I have one of these sets downstairs somewhere. Now to go find it.
Your daughters bed looks awesome and I love the fabric.
Where were you when I was a kid? I am so jealous of your girls. This is an awesome idea!
These are absolutely adorable! I love this idea–and those prints are so pretty! You are too crafty!