• Home
  • About
  • Tutorials
  • Recipes
  • Furniture
  • Contact
    • Contact
    • Infertility
    • Disclosure
    • Privacy Policy
  • Shop
    • Facebook
    • Instagram
    • Pinterest

Reality Daydream

The Dream is Free, The Hustle Sold Separately

  • Home
  • About
  • Tutorials
  • Recipes
  • Furniture
  • Contact
    • Contact
    • Infertility
    • Disclosure
    • Privacy Policy
  • Shop

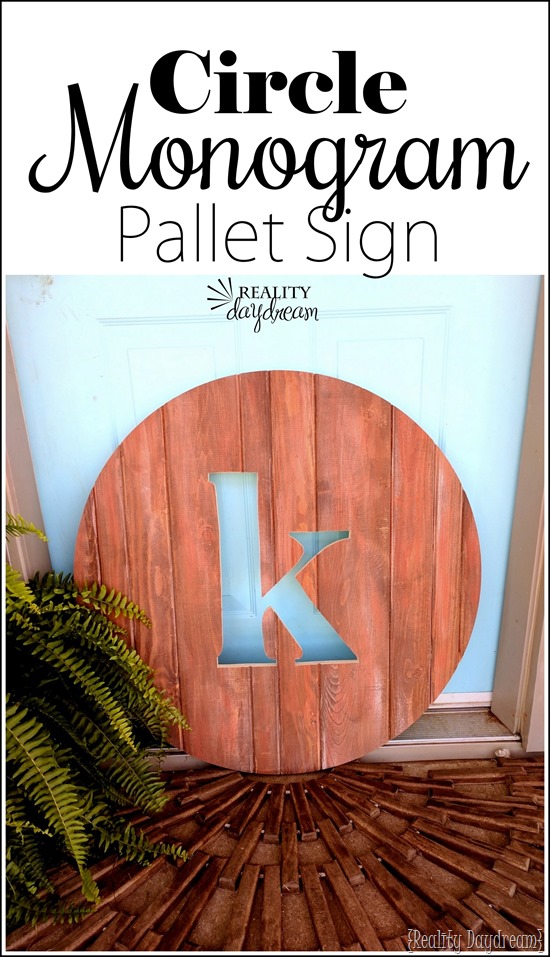
Circle Monogram Pallet Sign

May 9, 2017 by Bethany Sy

I love the look of big monogram décor on front porches, and had an idea in my head to pull off something showstopping! Unfortunately, we don’t have an obvious place to put something this large on either of our two porchy areas, so I decided to make it for my parents… can we call it a Mother’s Day gift?! Hehe!

Circle pallet wood monogram wall hanging! {Reality Daydream}*This post is sponsored by Rockler. Thank you for supporting the brand partners that make Reality Daydream possible! This post contains affiliate links.*

This is SUCH A SIMPLE project, and is an excellent DIY for someone that isn’t proficient in power tools yet, but has the desire! Let’s do this together!

Circle Monogram Pallet Wood Décor

Supplies:

  • Pine or pallet wood (we used a variety of widths, but you wouldn’t have to)
  • Outdoor Wood Glue
  • Biscuit joiner
  • Biscuits
  • Pipe clamps
  • Paint and Stain of choice
  • Circle Cutting Jig
  • Plunge router
  • Scroll Saw (or jigsaw would work too!)
  • Hefty Picture Hanger


After sanding down our strips of pine and rounding the edges a bit, we decided to add a little color using this technique… this time using a terra cotta bronze-y color (I mixed Unicorn Spit… orange, brown and black) and slathered it on with some white. Randomness is key! Tiny helper optional but totally encouraged!

Aging the new wood to look like old barn wood... tinted a terra cotta color! Monogram rounds {Reality Daydream}

Once you’ve got it looking all streaky and, well… a hot mess… let it dry! I completely acknowledge that this looks like a crime scene, or maybe something you’d see at a butcher house. But stay with me!

circle monogram

Now that your paint is dry, sand it down real hard with a rough grit sandpaper (80 or 60 grit). I use my orbital sander for this, but I’ve done it by hand before and it isn’t that bad. Just a little elbow grease!

Making new wood look like old bard boards for this Monogram Round project! {Reality Daydream}

So you see how after sanding it’s not as choppy and abrupt-looking? Now we’re going to add some stain! For me, this is where the magic happens. It mutes that brightness of the terra cotta color and adds a deep/rich brown, while still allowing that gorgeous woodgrain to pop through!

Making new wood or pallet wood look like old distressed barn boards with a tint of color! {Reality Daydream}These were new pine boards 5 mins ago! Learn how to make new wood look like old barnboards with this technique {Reality Daydream}

Here’s a video showing the process of staining/sanding/staining so you can see how it comes together before your eyes time-lapse-style!

. .


Time to affix these boards together! In the past, we’ve often used a 1/4” board as a substrate for the backing, but we want to keep this thing a light as possible since it’s already a ton of wood. So we used our biscuit joiner and some wood glue to keep these babies together as one board!

circle monogram-001

We wiped off excess glue that was bulging between the boards, and let these sit clamped up overnight. Now it’s time to cut THE CIRCLE! This is way more fun than any single thing should be.

Use this circle cutting jig to make a Monogram Round! {Reality Daydream}

We laid our big slab of glued-together-boards upside down with a piece of plywood underneath it. We drew a line to connect the corners and make an ‘X’ to find the center. Then drilled a 1/8 inch pilot hole and set the threaded spur that came with the circle cutting jig into the hole.

circle monogram-002

We measured and set the location on the Circle Jig and secured it in place. You can make your circle as small or as big as you want! (within reason)

Circle Cutting Jig by Rockler... for this Monogram Round! {Reality Daydream}circle monogram-003

Set the depth of the plunge router so that you are plunging into the wood about an 1/8 – 1/4 inch, Raise the bit above the work surface, start the router, plunge into the wood and rotate the jig in a counter clockwise motion.

Cut a perfect circle of any size with this circle jig. Round Monogram tutorial! {Reality Daydream}

This process will probably take three to four passes and it would behoove you to vacuum the sawdust out of the groove between passes.  Keep going around until you see air on the other side!

Cutting the percect circle using a jig for this Monogram Round {Reality Daydream}

I mean, this was FUN. And the edges were so clean we didn’t even have to sand them.

Round Monogram Pallet sign using a circle jig {Reality Daydream}

Next, I printed the letter ‘K’ onto a transparency and projected/traced the K onto my circle. If you don’t have an overhead projector, try checking with your local library or craigslist. You can always fall back on the chalk transfer technique too. (more Projector Projects HERE)

circle monogram-004

I drilled a hole on the inside corner of my ‘K’ so I could feed my scroll saw blade through, and got to cutting! (This is the scroll saw I use) …You could totally use a jigsaw for this too if that’s what you have. (more Scroll Saw Projects HERE!)

circle monogram-005

I usually don’t try to cut my corners too perfect on the first pass. After you get all the way around, you can go back and crisp up those corners.
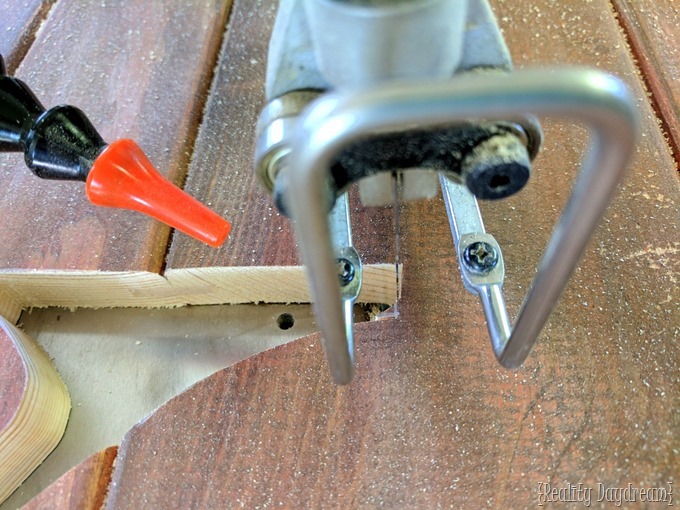
Cutting the letter out of your circle momogram pallet sign using a scroll saw {Reality Daydream}

Boom.

Round Monogram Pallet sign using a circle jig and scroll saw! {Reality Daydream}

We added the French Cleat Picture Hanger (which holds up to 60 lbs) and mi Madre popped this bad boy up on her front porch!

Using a Circle Jig to make a Monogram Round out of pallet wood or pine {Reality Daydream}

I think she likes it pretty good, and it looks great on their porch! My mom was going to try to get the cat to pose in the rocking chair in this pic, but it looks like that was a failed attempt. Ain’t nobody tells Bella what to do.

Be sure to check out these other similar projects we’ve done by clicking the pictures below!

DIY-Bracket-shaped-Barn-Board-Sign-or-Wooden-Plaque-...lean-how-to-HAND-PAINT-perfect-letteringBracket-Shaped Barnboard Plaque

Use-plywood-and-a-jigsaw-to-make-a-custom-piece-of-wall-art-with-your-favorite-quote-Sawdust-and1Circle Quote Artwork

Thanks for pinning!

Circle Monogram Pallet Sign for indoors or outdoors. Makes for cute art for patio or porch! {Reality Daydream}

Related:

  • DIY Scroll Saw Family Silhouette Sign

    Hello hello friends! Things have been wild as we've been navigating the holiday season, schedules,…

  • Wooden Circle & Test Tube Propagation Art

    We're in the dog days of summer, and it seems like my kids are always…

About Bethany Sy

Nick and Bethany Sy are the creative free-spirits behind DIY/Lifestyle blog, Reality Daydream. They recently purchased a historic mansion and have been documenting the ups and downs of renovation and making this home their own... all while sharing tips and tutorials along the way! When they found themselves in the trenches of infertility, they started a journey that would prove to be their most important DIY project ever, and have 3 beautiful girls to show for it. <3

« Banana Pudding Trifle Recipe
Tutorial for Boho Style Hanging Planters »

Comments

  1. 1

    Tara Smith says

    July 14, 2018 at 12:03 pm

    Hi
    What stain did you use? Love it.

    Reply
    • 2

      Bethany Sy says

      July 16, 2018 at 6:42 pm

      We used Minwax!

      Reply

Leave a Reply Cancel reply

Your email address will not be published. Required fields are marked *

  • Facebook
  • Instagram
  • Pinterest
  • RSS
  • YouTube
We are Nick and Bethany! Welcome to our blog, Reality Daydream where we share our DIY adventures!

realitydaydream

Still can’t get over these shelves. 😍 These Still can’t get over these shelves. 😍

These Aksel Radius Floating Shelves by @shelfology are the perfect finishing touch to this wall in our kitchen. 🙌

#gifted #shelfology #radshelfie #floatingshelf #akselradius
I needed an instant-gratification project today fo I needed an instant-gratification project today for my well-being, and this little wooden stand was so fun and fast!

Details and links to everything in this pic in Stories!
If ya just need a slab of wood, grab a cutting boa If ya just need a slab of wood, grab a cutting board when you’re at Target or Walmart! They’re made of hard wood!

I used this cutting board to experiment and make some prototypes for a large-scale piece of art I’m doing for our church. It’s got me EXCITED!

Follow along for that project- happening soooon!

@dapproducts @dremel @jet.woodworking
You’ve all seen the video, but here’s some sti You’ve all seen the video, but here’s some still shots of the kitchen wall in all its glory!! 

The Aksel Radius Floating Shelves by @shelfology were the perfect finishing touch! 

Should I do a house tour of our main floor this week?!?! 🙌🌿

#sponsored #floatingshelf #radshelfie
Load More Follow on Instagram
View of our entryway of our historic mansion that we're slowly renovating and making our own.
Click here for lots of art projects using only wood stain on furniture!!
Please feel free to share or pin my posts! You're welcome to use ONE of my images (no collages or pinnables) with a link back to the corresponding post. Please do not edit or crop that single image in any way. Improper use of my photos, ideas or words is a violation of copyright. Thank you!

Categories

Attention: Almost any do-it-yourself project involves risk of some sort. Your tools, materials, and skills will vary, as will the conditions at your project site. Reality Daydream has made every effort to be complete and accurate in the instructions of the plans on this website. Reality Daydream will not assume any responsibility or liability for damages or losses sustained or incurred in the course of your project or in the use of the item you create. Always follow the manufacturer’s operating instructions in the use of tools, check and follow your local building codes, and observe all commonly accepted safety precautions.


Copyright © 2023 · Modern Blogger Pro On Genesis Framework · Customizations by Sweet Theory Designs · Privacy Policy · Log in