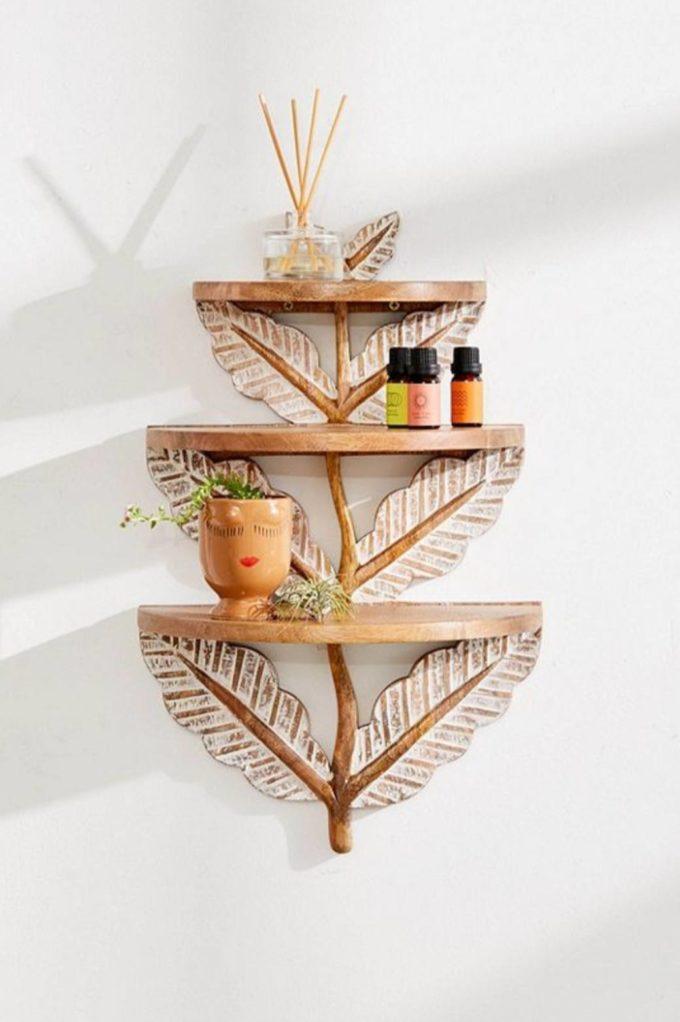
I have to admit, I’ve had a project on my to-do list for… A LONG TIME. As in, years. I’ve loved this little leaf shelf and had it pinned to my Pinterest Projects board for a very long time.
*This post is sponsored by Dremel. Thank you for supporting the fabulous brands that make Reality Daydream possible! This post contains affiliate links.*
Now that I have some pretty amazing Dremel rotary tools (and the Dremel 4300 is perfect for this type of carving project!), I know I could pull this off. So it was finally time to TAKE ACTION ALREADY!
Leaf Shelf Supplies
- 2’x4′ board (3/4″ thickness) …I used pine
- Long ruler or T-square
- Jigsaw
- Drill
- Dremel 4300
- Bit #1
- Bit #2
- Sandpaper
- White acrylic paint
- Wood Stain (I used this stuff)
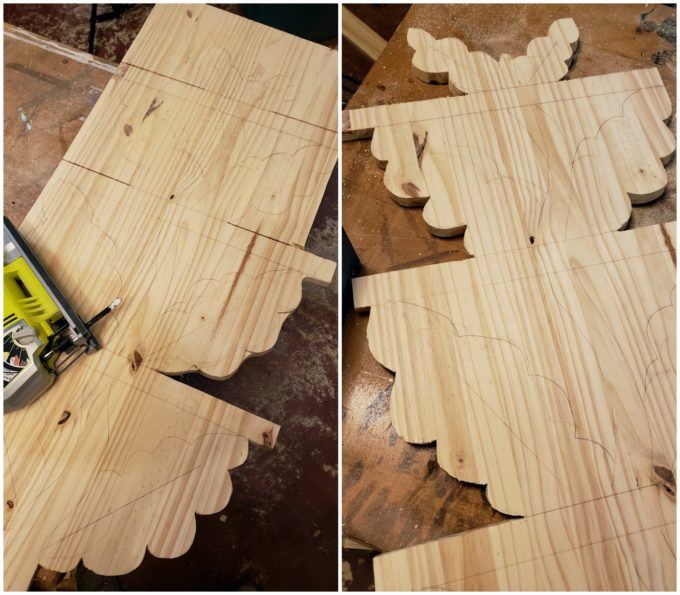
Since I have no idea what the actual dimensions of the leaf shelf are, I decided to just start drawing out my design the size I wanted it. I started out drawing the straight lines where the shelf would be, and then doing the scallopy leaves between them.
This might seem daunting to you to just draw it out, but it’s not bad! Just use a pencil so you can modify your design as you go… until it’s just right!

Begin cutting out the outline with a jigsaw! Remember, this doesn’t have to be perfect. Leaves come from nature, and they’re all different in their own special way!

At this point, it’s time to drill holes in those spaces between the leave and stem. Just make sure you’re using a drill bit that’s large enough that your jigsaw blade will fit into it.

Go ahead and cut out those inner pieces with your jigsaw now!

BOOYA!

Time for the fun part! Let’s get out that Dremel 4300! This thing is SO multi-purposeful. It can be used for engraving, sanding, routing, polishing, grinding, cutting… THE SKY IS THE LIMIT!
I recommend playing around with it on a scrap piece of wood for a couple minutes just to get the feel for it, and try out different bits to see how they perform for your project vision.

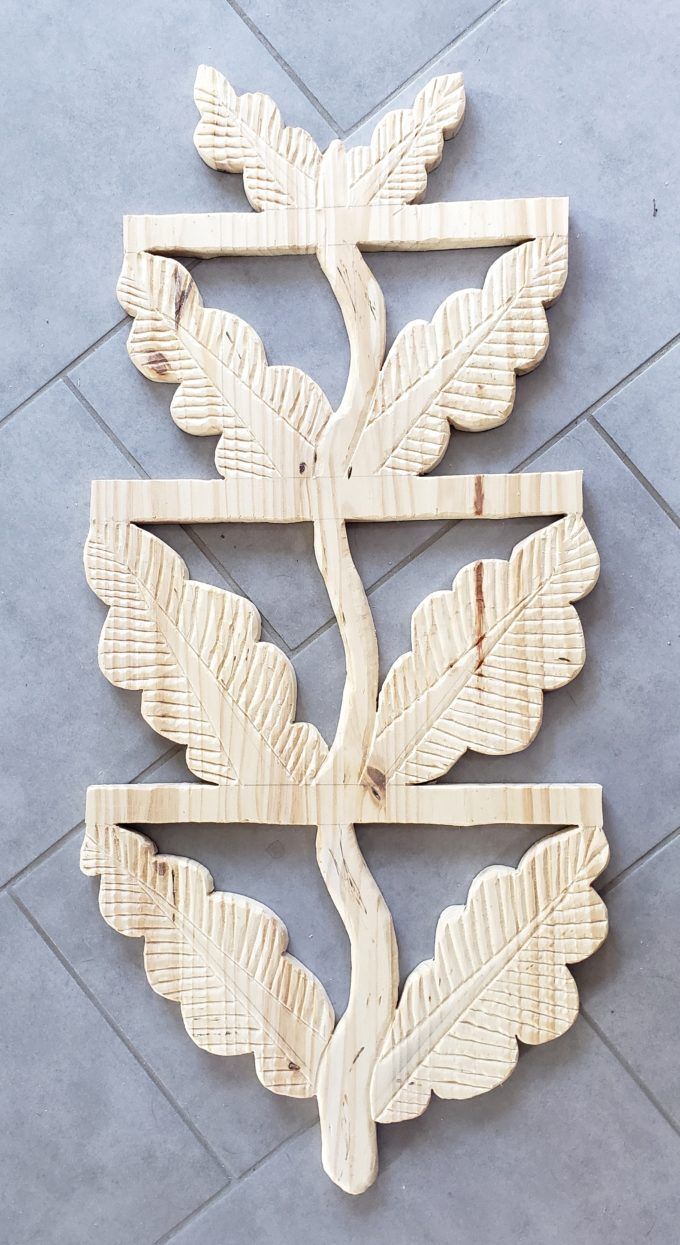
I ‘outlined’ the midrib of the leaf (which is the main vein) with the Dremel, and then came in with smaller veins coming out of that. I did use a ruler to draw out the main vein, but the smaller veins… I just went for it and eyed it. I want it to look artsy and carved. Not too perfect. 😉


I also rounded off that center stem from the bottom all the way to the top. Here’s what it looks like with my carving half done! The Dremel 4300 is SO FUN to use. There are so many things I want to experiment with it!

EEEEK! Isn’t it gorgeous!

I took an orbital sander to it to smooth things out a bit, then hand-sanded the inner edges and nooks/crannies.
I love how it looks as natural wood! But the goal is to make it look as much like the picture as possible. So I dry-brush on a little white acrylic paint to ONLY the stripey part of the leaves, being sure I get it down into the crevices.

Then, once the paint is dry, I hit it with an orbital sander to take the paint off the high surfaces. Then stain the WHOLE THING!

Do one leaf at a time, and wipe it off with a cotton cloth as soon as you’re done applying it.
Let’s add the actual shelves now, shall we?!
If you have a large-ish compass, use that! But we don’t, so we fashioned one using two shop pencils and a teeny tiny clamp.
After measuring the lengths of each of the 3 shelves, I found the center and traced the half-circles.

These got a coat of stain too! And the original plan was to affix them to the leaf backer using pocket holes… but unfortunately this ended up cracking the wood. So we decided to use a countersink pilot hole and go straight through the back into the shelves.

This worked beautifully, and I was kicking myself for putting those pocket holes in at all!

YOU GUYS. I’m soooooooo in love with how this turned out. I don’t even know what I want to put on it. But I DO know that I can’t decide which room to hang it in… I want one for every room in my house!
Look at the carved detail! I DID THAT!

It’s such a conversation piece! And I love that it incorporates my love of plants AND woodworking!

Be sure to check out our master list of DIY Handmade Gift Ideas!

I would be so grateful if you would pin this to Pinterest to help share the love!

You should also check out these other ‘leaf-inspired’ woodworking projects I’ve done in the past!


Related:
-

I have a fun and easy building project for you! And while I do end…
-

My kids are getting to the age where they want to tape pictures, cards, notes...…
-

I've been needing to figure out a solution for my overwhelming plant propagation situation for…
Wow! This is beautiful! I especially love the finish on the leaves. I’d love to try this technique on some future projects.
Love this will try.
Hi, Great idea with just a simple slab of inexpensive pine. need to give it a try, hope you don’t mind. Going to try with vine leaves to get that climbing effect. Your does look rather good though. Keep up the good work!
I love how turned out. It looks amazing!
Gorgeous!!! I can’t wait to make one. …after the kitchen remodel and you know how those go.?
Magnificent! You did an awesome job and I can’t wait to try it.
Oh. Em. G! It turned out amazing!! Love it!!??
Love your style! Great project, it turned out amazing!
as an amateur woodworker that’s really cool and if you don’t mind I’m going to try my own!
Love it!!
I’m impressed with your skill with the jigsaw!! Then with the dremel. Looks great.
Looove it! I definitely pinned it and hope I can get the courage to tackle this one day!
Another masterpiece! This shelf is so unique. I love it with the stain but I’m thinking it would look good painted also.