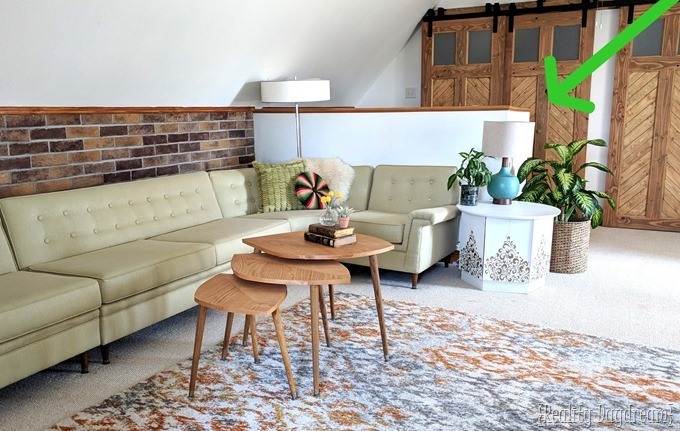
As you know, we’ve been making some headway in our attic family room. It’s come soooooo far! Remember when it looked like THIS?!
WOOF, that pistachio green and poop-brown couch has me breaking out in hives. You can scroll back through the various projects we’ve done in the attic to see the progression to what it is now. We’re so happy with how it’s coming along!
Part of the struggle with this space has been all the awkward angles, and the big ‘jut-out’ around the stairway. It’s a waist-height wall that’s pretty much in the middle of the room.
When we worked with Modsy a few weeks back, they had the brilliant idea to make a home bar on the end of this jut-out area! This idea is actually SO PERFECT, because anyone sitting there would have a perfect view of the TV, and most of the seating areas!
Here’s another side angle where you can see the jut-out.
 *This post is sponsored by Rockler. Thank you for supporting the fabulous brands that make Reality Daydream possible! This post contains affiliate links. *
That was the longest introduction to a project EVER, no? Five pictures and a lot of explanation. Hehe! Now that we’re on the same page for what’s going down here, let’s chat about how we’re going to pull this off.
You know I’m a big fan of corbels. They’re pretty AND they serve a purpose of ‘holding things up’. Remember when I made these pretty scrolly corbels for the breakfast bar? I still love those. But I wanted something more simple and sleek for this space. And after dinking around on Rockler’s website, I found these corbels that are SO PERFECT!
But let’s back up and talk about how we assembled the actual home bar top. We cut a piece of Purebond plywood down to the size we wanted for the bar. And we decided to chop off the corners to prevent anyone from stabbing themselves walking around that corner.
Nick ripped down some lumber to use as edging to make this bar top look more polished and clean.
The edges got mitered for that corner, and then glued into place!
I used these suuuuuper handy Bandy Clamps that are so perfect for applying edging like this.
Then we did those flattened corner edges after the glue was fully dry on the 3 longer sides.
With a flushing bit on the trim router, we smoothed out the edges , sanded, and rounded the edges off with a 1/4” roundover router bit.
We took our corbels up to the attic to get some measurements, level things out, and install the screws that the corbels will slide onto. If you don’t have studs to screw into, be sure to use drywall anchors. These puppies are heavy! You don’t want to be sitting at your home bar and have everything tumble down!
Since we had everything up in place, it was time to stand back and decide what color to stain this home bar! We thought about matching the stain to the barn doors, but that would just be TOO MUCH of that shade, and the bar would just blend right in. We considered a graywash stain, but there really isn’t any other gray in the room to tie it in with. In the end, we decided to go with a BLACK stain to tie in with the barn door hardware, the TV, and the chairs around the gaming table (not pictured).
We used black alcohol dye by Behlen. It’s a very deep black but still allows the wood grain to show through!
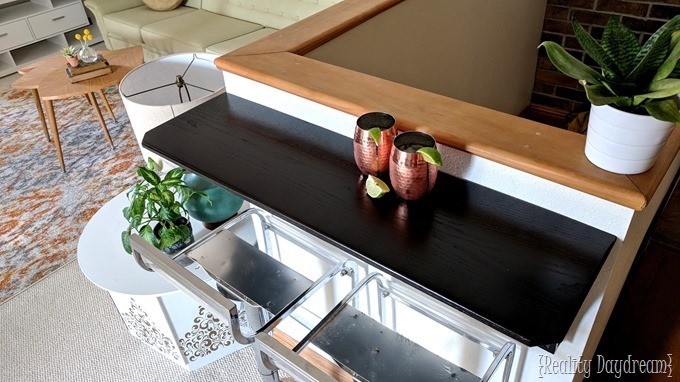
Then we brushed on a couple coats of oil-based poly in a satin sheen. It ended up being a bit more glossy than I expected, but I like it!
Ain’t she purrrrty?! Here’s a little more context of the room.
I took this opportunity to make some drinks. LOL! Jk… full disclosure? That’s water and ice. But the lime is real.
And from this angle (below) you can see the view of the room and television that those sitting at the bar will have. They can still be part of the conversation, and have a birdseye view of the room!
I’m going to call this side of the attic DONE! On the other side, we still have to set up a few things and do one last painting project. The full reveal of this room isn’t far off! What’s your favorite element of this attic space so far?!
~Bethany
~~~~~~~~~~~~~~~~~~~~~~~~~~~~~
Thanks for pinning!


Its awesome DIY design and looks very wonderful. I really appreciate this design I hope this DIY home bar idea make my home more beautiful. Thanks for sharing Please keep it up!
Outstanding fabulous, and want say thanks for this outstanding idea.
My favorite thing is the couch upholstery!
Second favorite is the nesting table set you built.
(But overall, you introducing me to Modsy was really the best. I had them help with my living room as a Christmas present to myself and I’m slowly transforming the room to resemble something loosely based on their suggestions. So fun and helpful to get me out of being “stuck”. And, I plan to gift room design through them to my mom this Christmas!)
What a great addition to the attic! It’s simple, doesn’t taken up much space, but adds a lot of function. I love the transformation of this room!