If you have (or have ever had) a baby, you know that there’s a difference between an eating bib, and a drooling bib. Eating bibs are larger and often stained in a variety of bright colors (HELLO carrot puree). But today, we’re going to discuss drool bibs. Those smaller bibs that baby/toddler wears all day so that their shirt isn’t soaking wet. You know, the ones that usually have annoying sayings on them, or gaudy animals that match NO OUTFIT.

They’re cutesy. And not it a good way. Especially if it’s basically a part of their highly curated outfit for the day. So I set out to make my own ‘custom’ drool bibs! Because Cypress needs to wear a bib all day er’ day.

Supplies for DIY Drool Bibs
-
Lightweight 100% Cotton Fabric (I used this print for my tutorial)
- Terrycloth (I used this terrycloth for my tutorial)
-
Sewing machine (this is the one I use)
-
Fabric scissors
-
Pins
NOTE! This tutorial seems long… not because these are hard to make (they’re not) but because I share every blasted little detailed step just in case you’re a beginner like me. I don’t want anyone being confused!
I chose terrycloth for the backing or ‘liner’ of this bib for it’s absorbent qualities. Because drool. Place your existing (ugly) bib on your terrycloth, and trace about 1/2? from the edge all the way around with a disappearing ink fabric marker. Or be classy like me and use one of the kids’ crayola markers that are conveniently scattered all over every room of our house.


Then cut it out y’all.

I’m soooooo obsessed with this fabric. The print is of these gorgeous brassica plants (lots of google images and info here)

I picked a part of the print that I loved, and laid the terrycloth bib over it, and cut around the perimeter so I have two identical bib shapes.

NOTE! If you’re making a boy bib and are skipping the lace, omit the next few lace-related steps!
Flip over the terrycloth bib so the ‘hook’ of the neck strap is pointing to the left. Then start lining up your lace! Remember that we’re sewing this inside-out first, so that part of the lace that will ultimately be showing in the end, is the part that’s facing to the inside of the bib. Find some ‘markers’ on your lace to help you line up and pin the lace straight. I used the teardrop opening and made sure that the point of the teardrop had the same little opening all the way around. See arrows in image below.
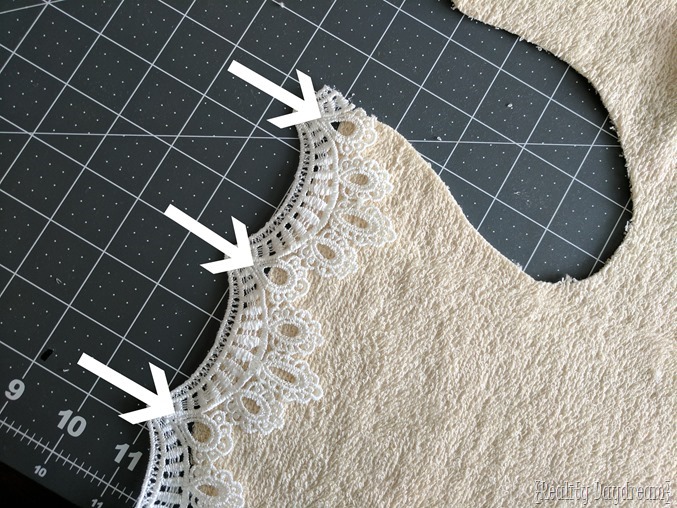
Pin it all the way around, ignoring that the corners make the lace bunchy. It won’t show in the end!

Sew a stitch along the lace just 1/4” from the edge of the terrycloth. It’s pretty easy to see the terrycloth through the lace.
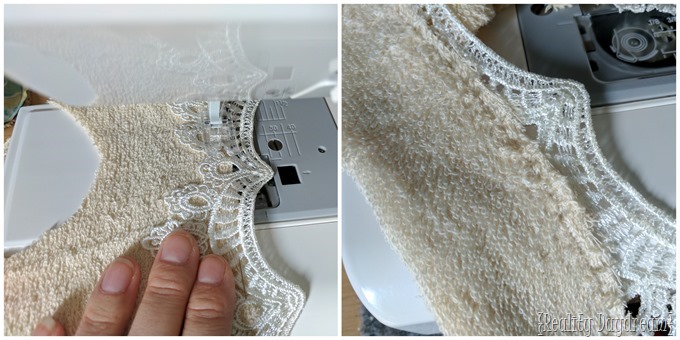
Cut off the excess lace all around the bib, and lay your cotton print fabric facedown on the terrycloth/lace, missionary style. Pin all around the edges of the entire perimeter of the bib, including down through the neck area!
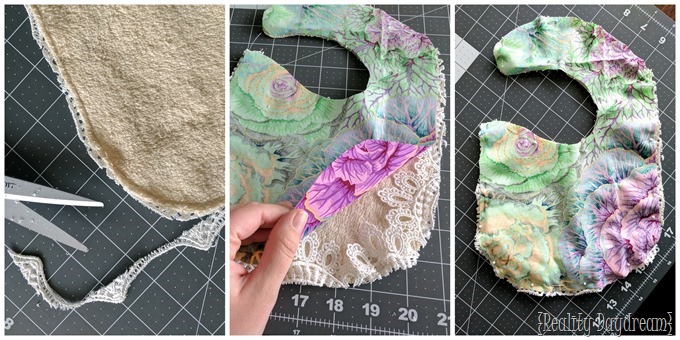
Sew around the entire bib, except these 4 inches on the inside of the neck ‘hook.

Then start pulling the inside of the bib out, through your 4” hole!

Fold the edges of the opening in toward each other, and sew a stitch close to the edge to close up your hole.

Get out your Velcro, and cut about a 3/4” off both the hook and loop sides. Then place them how you want them on both edges of the bib.

Sew an ‘X’ over both rectangles of velcro, and you’re done!

Iron your bib so it’s not so ‘poofy’ around the edges, and you’re ready to slap that sucka on your sweet little drooling cherub!

OH! And I made a few others… because I’m obsessed. And they take about 30 minutes to make.


I even played around with using two different kinds of terrycloth on the backs! Below you’ll see regular terrycloth in cream on the left, and that fun white ‘waffle’ terrycloth, on the right. Both are super soft and super absorbent!

And since I know that there are parents out there with boy babies, and not just girl babies (gasp!) I made a little boy version for my nephew Rollie! I used this Lumberjack print on one side, and this red checkered flannel on the other side. Totally reversible! I’m also SO IN LOVE with this print for boys.

Here’s my little drooling toddler-model demonstrating how cute it is!

So there you have it! Another semi-easy sewing tutorial! And if you don’t have a baby or toddler of your own, these would be such a sweet baby shower gift too! Are you going to give it a go?! If you do, pleeeease send pics! Or tag me on social media @RealityDaydream on Facebook and Instagram!
~Bethany
~~~~~~~~~~~~~~~~~~~
You might also enjoy these simple sewing tutorials from our archives!
.
~~~~~~~~~~~~~~
THANKS for pinning!
![Make darling 'drool' bibs with fun fabric and trim... pompoms or lace! {Reality Daydream] Make darling 'drool' bibs with fun fabric and trim... pompoms or lace! {Reality Daydream]](https://reality-daydream.s3.amazonaws.com/wp-content/uploads/2017/01/22175427/Make-darling-drool-bibs-with-fun-fabric-and-trim...-pompoms-or-lace-Reality-Daydream.jpg)


Can’t wait to make the poncho and bib for our newest granddaughter Lucy.
Lucy is lucky to have a Grandma like you! <3
I printed this pattern from another person, or rather I tried only half would print. THANK YOU…yours printed just fine.
ADORABLE! Thank you so much for sharing!
Sooo PRETTY!!!!! & SUCH PRETTY PRINTS!!!!