When you have a smallish living room like ours, every piece of furniture has to serve a function other than just being pretty.

Trust me, the monstrosity of an Exersauser (baby entertainment play-thing) isn’t my favorite feature of our main living space right now, but it serves a very important purpose… so it stays. At least for a few more months.
Anyway! We’ve been using that hexagon end table (that we made over a few years back with the white and gold swirls) as a coffee table… because I’m one of those people that just needs a coffee table. Otherwise when I’m sitting on the couch, I just feel so… so EXPOSED. Or like I’m not wearing a bra. It just doesn’t feel right.
But the white/gold swirly end table / coffee table was just standing in temporarily until we could find something we loved. What I really wanted was a leather ottoman with storage inside for blankets.
But those suckers are EXPENSIVE.

So I had it in my mind that SOMEDAY… I would DIY an upholstered ottoman for our living room. Then time passed, and it got pushed to the back burner. UNTIL The Leather Hide Store contacted us and asked us if we had any projects in the works that we needed leather for. Light bulb!
After browsing their selection of leathers and colors, we chose this Restoration Distressed Gold because we loved the caramel color and felt that it would accent our living room nicely, while still letting us accent it pops of color.
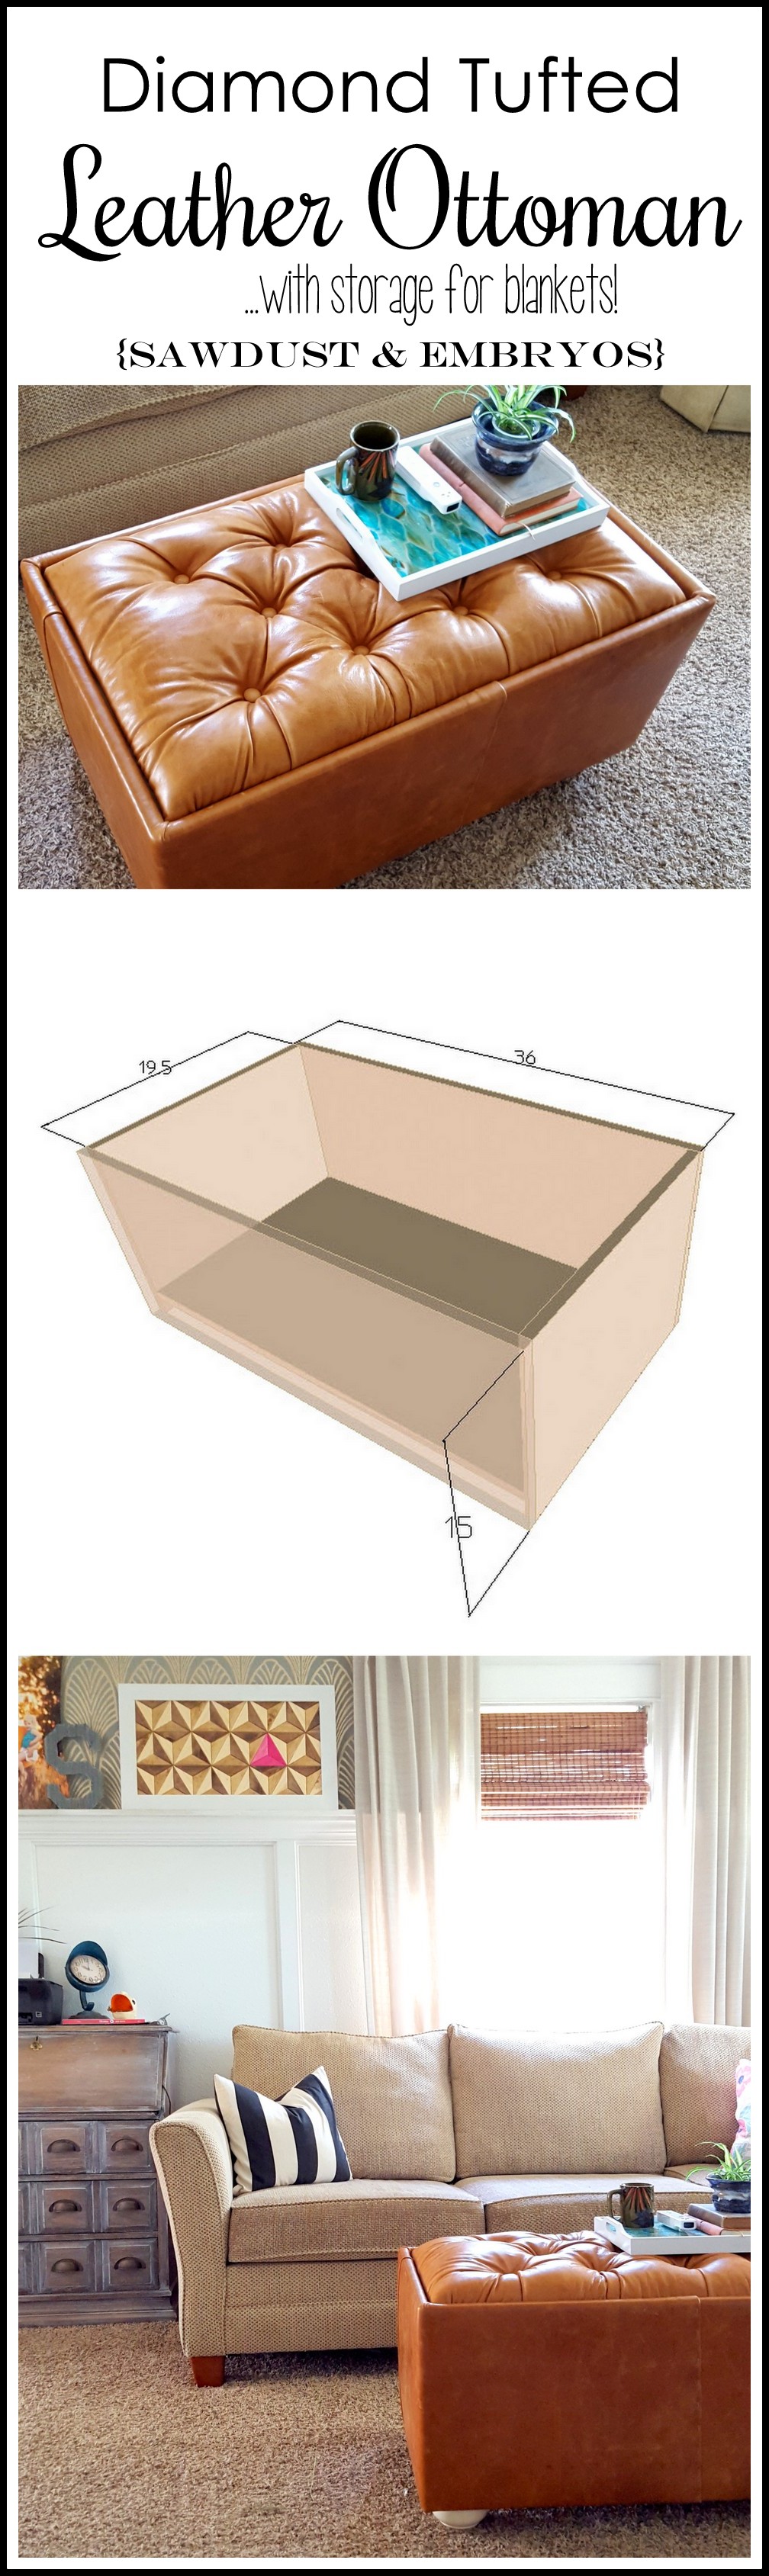
Time to get busy drawing things out! Because space is limited, I knew my ottoman would have to be substantially smaller than the ottoman in my inspiration photo, I still wanted it to be the same style.
After putting tape on the floor, we decided on dimensions for our ottoman.

Then it was time to cut some boards! Since the height of the base (box) for the ottoman was 15”, I needed to glue boards together. So I cut two of each length.

These got glued and clamped so they would be the width that we needed.

Then we drilled pocket holes and assembled our box!

")
When we put the bottom of the box on, we put it 2” from the bottom so there would be a lip underneath. This would make the actual upholstery easier so that the batting and leather could wrap all the way up under the lip. You’ll get it in a sec.
I also chopped up a 2×4 into squares to put in the corners for added support when the feet go on later.

I used a forstner bit to drill 4 giant holes in the bottom of the ottoman base. The reason for this is BECAUSE… when I was a kid, my dad always told me a story about him and his little brother climbing into a trunk in the basement and getting locked in… screaming for help and running out of air. I wanted to make sure that if/when the girls are playing in this ottoman and inadvertently get trapped inside… THEY CAN STILL BREATH.

Time for upholstery! (cue the cold sweats). I’m pretty intimidated by upholstery projects… but the girls’ Fainting Couch Toddler Beds turned out decent. So I’m holding tight to that success story.
We laid out our leather hide back side up and started drawing out where we need to cut. Using the measurements from the base box, we added 3-4” on all sides so that the leather could be wrapped around and stapled. Since we needed a long strip to wrap around the base of the ottoman, we cut two strips that would need to be sewn together. Aint nothin’ wrong with a seam, right?

Nick loves a good challenge and jumped right into sewing that seam with upholstery thread (this post contains affiliate links!) and a hefty needle. It totally worked!


We folded our batting in half for a little extra softness, and wrapped it around the outside of the wooden box. We stapled the batting around the top edge with about 3” to spare.

Here’s a little visual of how we did the corners.

You know that when I’m saying ‘we’, I’m talking about my little helper… right?

Now it’s time to do the same thing with the leather!

As for where the two ends of the leather come together on the side, we used these upholstery tack strips. I forgot to take a picture of this part! But they’re pretty self-explanatory.
We wrapped the leather up around the top edge of the wooden box, pulled tightly, and stapled it around the edge.
 {Sawdust and Embryos}")
At this point, the base of our ottoman is upholstered and finished! We added some wooden bun feet (pretty similar to this), and let the girls break it in!

I’ll be back soon (Update! CLICK HERE for part 2!) with the second half of this tutorial… but in an effort to save you from a sleepless night, I’ll just go ahead and show you how it turned out!

Prettyyyyyy, RIGHT?! And now our blankets don’t end up just thrown in a corner of the living room! I love it when beauty and function have a strong and healthy marriage.
Click here for Part 2 (TUFTING!) of this ottoman tutorial!
I hope you come back for the second part of this tutorial! We’ll be tackling the lid and all that diamond tufting business. It’s not as hard as it looks! I promise!
Happy Monday!

Thanks for pinning!
Huge thanks to The Leather Hide Store for partnering with us on this project! They provided us with leather, but didn’t compensate us or tell us what to say. All opinions are our own… as usual!
Related:
-

When the twins moved into what used to be the guest bedroom, I knew I…
-

My kids are getting to the age where they want to tape pictures, cards, notes...…
-

It's been awhile since I've done a sewing project, and as weird as it sounds,…
Planning on ordering some leather to do up one of these and would like to know how much extra you need to plan for to tuft the top. The link for the second part didn’the work for me. I love yours as well as the one on the picture (inspiration) you provided.
Suzanne, that’s so weird that the second link didn’t work for you! Here it is: https://realitydaydream.com/leather-upholstered-ottoman-diamond-tufting/
Thank you Shoneeeee!! You totally SHOULD make one!
It was so fun to get a sneak peek of this on Periscope! You guys totally rocked it! I love that you left the feet blond. Wanna make me one! haha! xox
This is fabulous. I scoffed a bit at your small living room thought (but to be fair you said smallish). Ours is tiny and with two openings and a large window, so no real room to do anything. So it stays as is until I figure it out… which means our free (uncomfortable couch) my hubby’s Lazyboy recliner ($2 from an auction!) and a bunch of random, um, junk!
If I started with an ottoman, I could build the space around it, right?! 🙂
Hehe! If it makes you feel any better Annet… our living room looks much bigger in photos than it actually is in real life. But I’m sure there are smaller living rooms out there, so I’m not complaining! If you build an ottoman with storage like this one… you can put all that junk INSIDE it! 🙂
I love that! You did a wonderful job on it. Are you going to stain the feet?
I haven’t decided about the feet yet… I like that they contrast the leather, but I also don’t want them to look unfinished or forgotten. What do you think?
Hmm, I think they stand out a bit more than I’d like, I think a light stain would be be better than leaving them as is… just my 2c!
Maybe one of your paint jobs!
Awesome project, Beth and Nick! I love it when Beth does all the cutting and drilling and Nick does the sewing. Can’t wait to see the rest of the tutorial so I can do a project like this in my dreams.
Haha I didn’t even THINK about how Nick did the sewing and I worked the power tools on this project. I guess sometimes we like to trade out rolls. 🙂
Someone just calls and offers you leather? I’m soooo jealous right now! Nice job. Personally, I would’ve done the one in the picture, but love yours!
I love the one in the inspiration pic too… but that sucker would take up our ENTIRE LIVING ROOM! So that’s why we had to modify the dimensions to fit our personal needs. 🙂
As for the free leather… YES! It ends up being such a blessing for us when companies want to partner on projects. It offsets our expenses, and if gives them free advertisement and exposure to other DIYers. Win WIN!