• Home
  • About
  • Tutorials
  • Recipes
  • Furniture
  • Contact
    • Contact
    • Infertility
    • Disclosure
    • Privacy Policy
  • Shop
    • Facebook
    • Instagram
    • Pinterest

Reality Daydream

The Dream is Free, The Hustle Sold Separately

  • Home
  • About
  • Tutorials
  • Recipes
  • Furniture
  • Contact
    • Contact
    • Infertility
    • Disclosure
    • Privacy Policy
  • Shop

Which Scroll Saw Blade Should I Use??

December 30, 2020 by Bethany Sy

Hey friends! Today, by popular demand, I’m going to be throwing down some knowledge on scroll saw blades! There’s a lot of variety out there, and it can all be very confusing, so let’s explore different types of scroll saw blades together!

Inevitably, I know there are a few of you that JUST SIMPLY WANT TO KNOW EXACTLY WHICH SCROLL SAW BLADE I USE, so instead of making you read this entire article word-for-word, I’ll just go ahead and link it here. (But! Depending on your needs and/or scroll saw, you may want something else!)

Choosing a Scroll Saw Blade

The first thing you need to narrow down your scroll saw blade search is to determine if you need plain-end blades or pin-end blades. This isn’t a matter of preference, you actually need to check your scroll saw to see which kind yours uses.

Most scroll saws use plain-end scroll saw blades, with the exception of some entry-level saws. (this is the scroll saw I have)

1. Size

The bigger the scroll saw blade, the more durable and long-lasting it will be. But unfortunately this also means that you won’t be able to make tiny/intricate cuts with as much ease.

You also need to consider what kind of wood you’re cutting through, as well as thickness. Hard woods will require a thicker blade (higher number) to cut through than soft woods.

A good rule of thumb is to use a #5 or #7 scroll saw blade for cutting ~1x wood. You could go up to a #9 for a thicker and/or harder wood (like cherry, walnut, or maple), or down to #3 for thinner/softer wood (pine, poplar, or cedar).

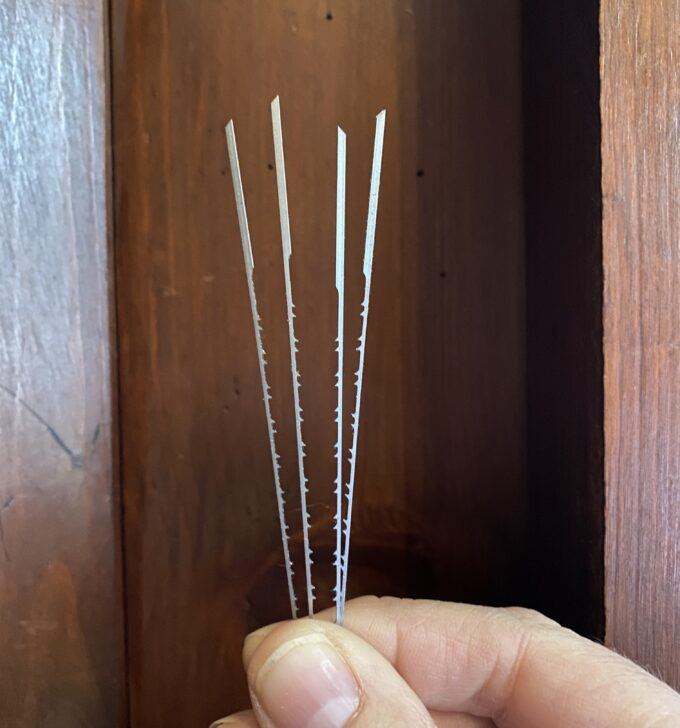
2. Configuration of the Teeth

The most common tooth configuration of scroll saw blades is called ‘Skip Tooth’, which basically means there is a space between each tooth that allows sawdust to pass through easily. Do you see the difference?

There are other tooth configurations you can choose from for your scroll saw blades. But regular-tooth and skip-tooth are the most common, and the only ones I’m going to discuss today.

You’ll notice on the packaging of the Olsen Scroll Saw Blades I use, each number of blade also has a ‘Teeth Per Inch” (TPI). The truth is, TPI doesn’t matter nearly as much as the actual width of the blade, so the # is what I look for.

This assortment pack of scroll saw blades comes with #5, #7, and #9… which is soooo handy! I most often cut 3/4″ pine for my simple scroll saw projects, so I typically use a #5. But #7 is a perfect middle-of-the-road blade. And #9s are nice for when I whip out the fancy walnut!

Be sure to check out my post on How to apply a Scroll Saw TEMPLATE!

ANNNNND, I’ve gathered up all our scroll saw project into ONE TIDY POST for you to access easily! So many good ones!!

Related:

  • DIY Scroll Saw Family Silhouette Sign

    Hello hello friends! Things have been wild as we've been navigating the holiday season, schedules,…

  • How to Apply Wood Veneer

    If you follow us on the 'gram, you know I've been stripping the finish off…

  • Stripping an Old Stained Desk

    We love the original wood of our library, and wanted to find a desk that…

About Bethany Sy

Nick and Bethany Sy are the creative free-spirits behind DIY/Lifestyle blog, Reality Daydream. They recently purchased a historic mansion and have been documenting the ups and downs of renovation and making this home their own... all while sharing tips and tutorials along the way! When they found themselves in the trenches of infertility, they started a journey that would prove to be their most important DIY project ever, and have 3 beautiful girls to show for it. <3

« Lots of Creative Projects using your SCROLL SAW!
Stain Art Butterfly »

Comments

  1. 2

    Michelle says

    January 19, 2021 at 5:45 pm

    Your choice of photo for the Top of this post is spot on! I got such a chuckle out of it!

    Reply
  2. 3

    Maureen Cory says

    January 1, 2021 at 11:29 pm

    Bethany,

    Is it ok to store a scroll saw in the garage over the winter? Probably a silly question but we are moving this month and I can’t put mine in the basement until some improvements are made. I worry about it rusting or something.
    Happy New Year! I am wishing the best for you and your family.

    Maureen

    Reply

Leave a Reply Cancel reply

Your email address will not be published. Required fields are marked *

  • Facebook
  • Instagram
  • Pinterest
  • RSS
  • YouTube
We are Nick and Bethany! Welcome to our blog, Reality Daydream where we share our DIY adventures!

realitydaydream

Still can’t get over these shelves. 😍 These Still can’t get over these shelves. 😍

These Aksel Radius Floating Shelves by @shelfology are the perfect finishing touch to this wall in our kitchen. 🙌

#gifted #shelfology #radshelfie #floatingshelf #akselradius
I needed an instant-gratification project today fo I needed an instant-gratification project today for my well-being, and this little wooden stand was so fun and fast!

Details and links to everything in this pic in Stories!
If ya just need a slab of wood, grab a cutting boa If ya just need a slab of wood, grab a cutting board when you’re at Target or Walmart! They’re made of hard wood!

I used this cutting board to experiment and make some prototypes for a large-scale piece of art I’m doing for our church. It’s got me EXCITED!

Follow along for that project- happening soooon!

@dapproducts @dremel @jet.woodworking
You’ve all seen the video, but here’s some sti You’ve all seen the video, but here’s some still shots of the kitchen wall in all its glory!! 

The Aksel Radius Floating Shelves by @shelfology were the perfect finishing touch! 

Should I do a house tour of our main floor this week?!?! 🙌🌿

#sponsored #floatingshelf #radshelfie
Load More Follow on Instagram
View of our entryway of our historic mansion that we're slowly renovating and making our own.
Click here for lots of art projects using only wood stain on furniture!!
Please feel free to share or pin my posts! You're welcome to use ONE of my images (no collages or pinnables) with a link back to the corresponding post. Please do not edit or crop that single image in any way. Improper use of my photos, ideas or words is a violation of copyright. Thank you!

Categories

Attention: Almost any do-it-yourself project involves risk of some sort. Your tools, materials, and skills will vary, as will the conditions at your project site. Reality Daydream has made every effort to be complete and accurate in the instructions of the plans on this website. Reality Daydream will not assume any responsibility or liability for damages or losses sustained or incurred in the course of your project or in the use of the item you create. Always follow the manufacturer’s operating instructions in the use of tools, check and follow your local building codes, and observe all commonly accepted safety precautions.


Copyright © 2023 · Modern Blogger Pro On Genesis Framework · Customizations by Sweet Theory Designs · Privacy Policy · Log in