• Home
  • About
  • Tutorials
  • Recipes
  • Furniture
  • Contact
    • Contact
    • Infertility
    • Disclosure
    • Privacy Policy
  • Shop
    • Facebook
    • Instagram
    • Pinterest

Reality Daydream

The Dream is Free, The Hustle Sold Separately

  • Home
  • About
  • Tutorials
  • Recipes
  • Furniture
  • Contact
    • Contact
    • Infertility
    • Disclosure
    • Privacy Policy
  • Shop

Scrap Wood Decorative Inlay Nesting End Table

April 11, 2017 by Bethany Sy

You might think that we must have a swanky wood shop with ample space, stacks of exotic rough-cut hardwoods, Festool everything, and gloriously organized-according-to-color spray paint collection (OKAY we totally do have that last thing). Everything else? #notsomuch …In reality, we use our two-car garage as our wood shop, and park our vehicles outside in the elements. Because priorities.

But one thing we do have an abundance of? SCRAP WOOD. Soooooo many piles scraps leftover from our many building adventures. And every so often, I get a wild hair and decide to do a little something decorative with them. You know how much I love intricate Wooden Wall Art …and this Wooden Kilim Art is still one of my fave projects to date.

But this time, instead of a pretty thing to slap on a wall, I thought it would be fun to work it into an actual piece of furniture.
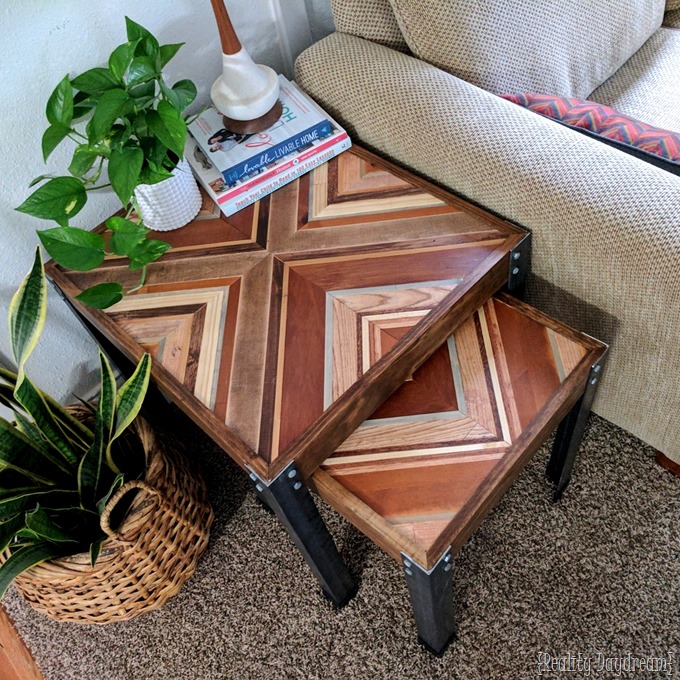
Decorative Wooden Inlay furniture nesting end tables TUTORIAL! {Reality Daydream}

This build took some thought process, math, and sketching… but we survived. And we gone share the dirt.

Nesting end tables with decorative wooden inlay using scrap wood and angle iron! {Reality Daydream}

We laid out boards in a variety of widths from our scrap pile, ripping some of them down with the table saw to make sure they were all a similar thickness. Some had seams because they weren’t long enough, but we were ok with that. The whole design of this is kinda ‘rugged’ if you will. Then I grabbed a few different stain colors, and wiped them onto a few of the boards. Some of them I sanded to get that worn rubbed-off look, and some I left raw wood. Basically I just wanted a variety of shades of neutral wood tones. Just a quick swipe with a chip brush and immediately wiped off with a cotton cloth.

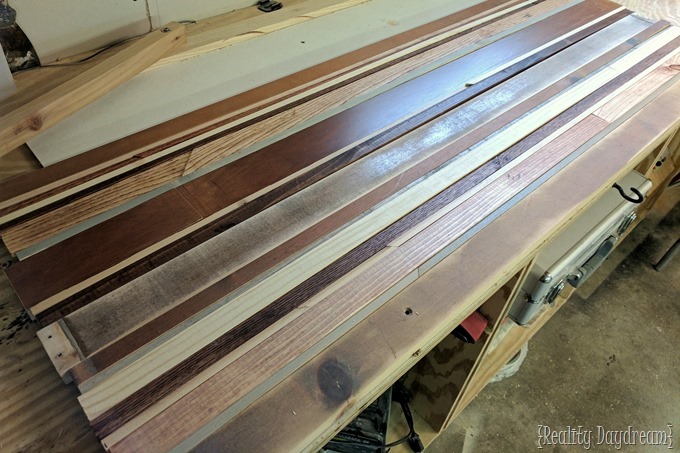
Nesting end tables with decorative wooden inlay using scrap wood and angle iron!! {Reality Daydream}

Use your scrap wood pile to make these pretty nesting tables with decorative wooden inlay! {Reality Daydream}

We slapped down a strip of wood glue between each board, and clamped them good and tight. It’s important to go scrape off the beaded glue after about a half hour with a putty knife or old credit card. It’s much easier to clean up after it’s set a little, but not after it’s rock hard. Set an alarm on your phone if you have to!

scrap pile nesting tables

After the glue was good and try, we ran it through the table saw to straighten up all the edges.

Nesting End tables using scrap wood for the decorative wooden inlay {Reality Daydream}

Time for the ANGLES! The square diagram on the image below is a view of what we want the top of the end table to look, and the rectangular diagram is how we’re going to cut our slab of glued scrap wood to make these perfect angular squares! Stay with me OKAY?!
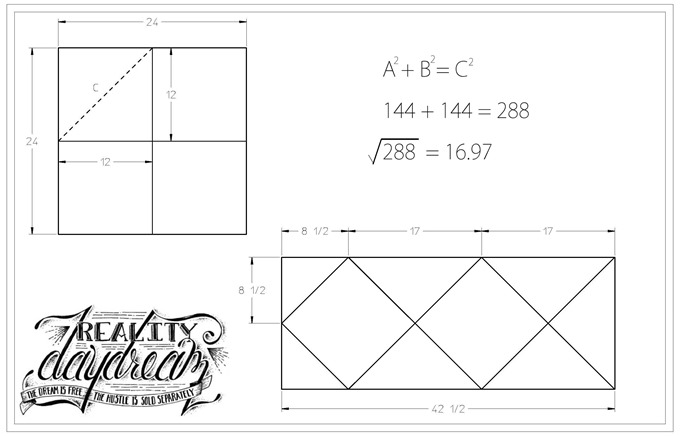
I

Cutting scrap wood into angles for this decorative inlay end table {Reality Daydream}

scrap pile nesting tables2scrap pile nesting tables3

We decided to go with this ‘X’ pattern for the inlay design… but you could easily turn each square 45* and make it a square pattern. That’s what we do on the second nesting table, so you can see how they both look.

Nesting tables with a decorative wooden inlay design... using scrap wood and angle iron! {Reality Daydream}

We glued all 4 squares down to a backer board substrate, and put heavy paint cans on each square while the glue dried.

scrap pile nesting tables11

After trimming up the edges again on the table saw, we framed everything up with a 1×2, stained with General Finishes ‘Antique Walnut’ stain (my new FAVE chocolatey brown stain!), and attached to the substrate with pocket holes.

Frame up your decorative wooden inlay for these nesting end tables {Reality Daydream

Glue and screw and flip that baby over to admire your handiwork! That and slather on a couple coats of polyurethane.

Decorative wooden inlay end tables using wood from your scrap pile and angle iron legs! {Reality Daydream}

Now it’s time to deal with these angle iron legs. We bought 16 total feet of angle iron (for both end tables, not just one) at our local home improvement store. Nick used an angle grinder with a cut-off wheel to slice these guys down to size and round off the edges a bit so they aren’t so sharp. We rounded the corners of the end table frame so the angle iron would fit closely, then drilled holes with a HSS drill bit, and slapped these suckas together with galvanized lag screws and bolts!

Cutting angle iron to be the legs of an end table {Reality Daydream}

I’m pretty sure Dell thought Daddy was setting the garage on fire. LOL!
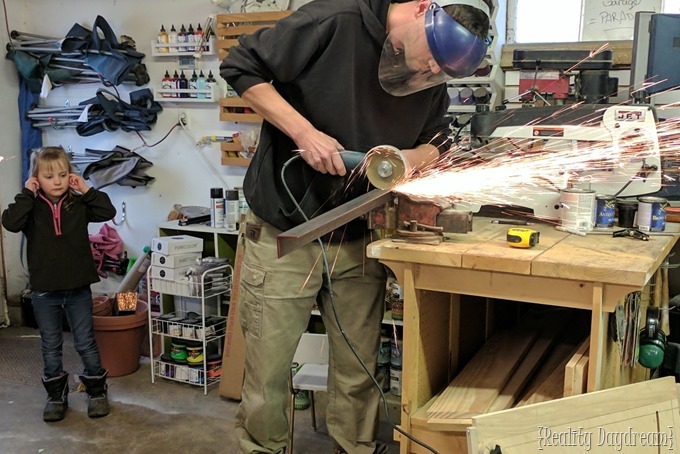
Cutting angle iron to be the legs of an end table! {Reality Daydream}

Boom!

Nesting End Tables with decorative wooden inlay and angle iron legs! {Reality Daydream}

Make these Nesting End Tables out of scrap wood for that gorgeous decorative inlay... and angle iron for the legs! {Reality Daydream}

Aren’t they SO PRETTY?! I can’t stop staring at them!
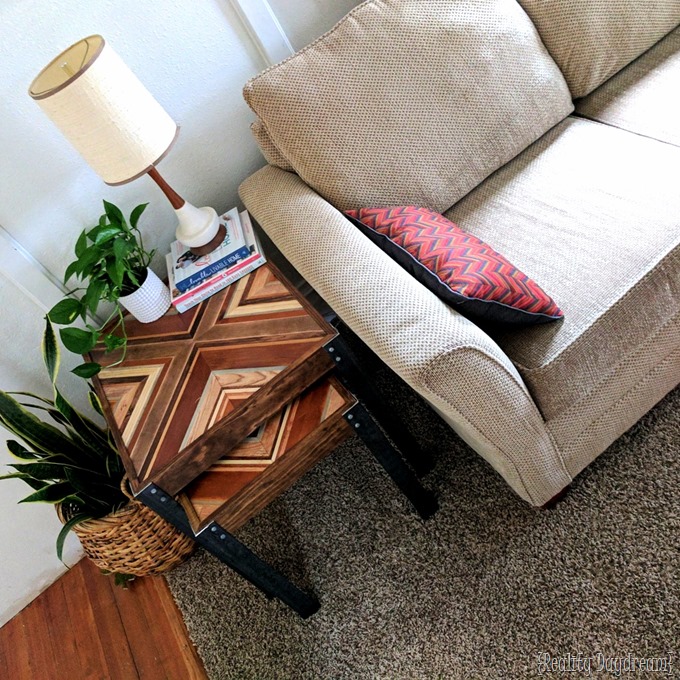
DIY Nesting End Tables made from scrap wood for that decorative inlay, and angle iron for the legs! {Reality Daydream}

Here’s a pic with the smaller table pulled out so you can see how we laid out the scrap-wood squares differently to make this square pattern.

DIY Nesting End Tables made from scrap wood for that decorative inlay with angle iron for the legs! {Reality Daydream}

I hope the math and angles doesn’t scare you off from this project (or even all the sparks!)…but I’ll admit it’s pretty handy to have a mathematically inclined man-child around these parts. This was a fun project to do together! And we still have a TON of scrap wood to use up, so you can look forward to more projects like this with pretty decorative wooden inlays. I feel like this adds so much personality to an otherwise straight-forward (BLAND!) design. Can I get an amen?!
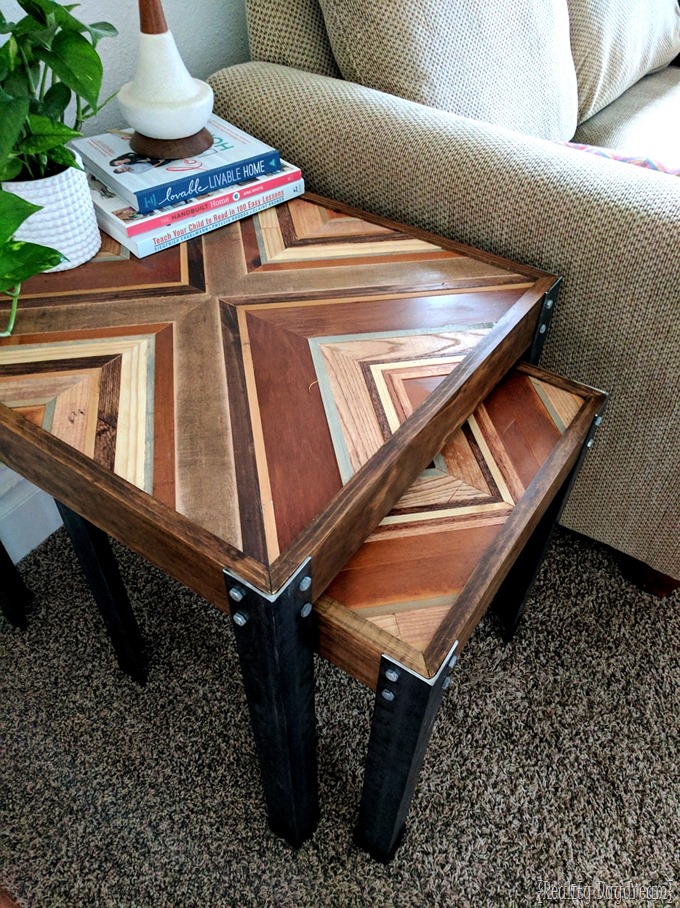
These nesting tables are made from scrap wood to make the decorative wooden inlay, and angle iron for the legs! {Reality Daydream}

P.S… it’s hard to see in these pictures, but they make these rubber plug things to slide onto the edges of the angle iron so they won’t scratch your floor if you don’t have classy wall-to-wall carpet like we do (*sarcasm).

AS ALWAYS, if you give one of our projects a try… please tag us in your posts on social media so we can see your handiwork! We’re @RealityDaydream on both Facebook and Instagram. Or you can always email us at beth@realitydaydream.com to share you project as well! Feel free to leave any questions you might have in the comments below.

Happy creating!

~Bethany

~~~~~~~~~~~~~~~~~~~~~~~~~~~~

Be sure to check out this post chock full of pretty Wooden Wall Art inspiration by lots of different makers!

Awesome-Wooden-Wall-Art-Tutorials-Sawdust-and-Embryos

Thanks for pinning!

TUTORIAL to make these Decorative Inlay Nesting tables with scrap wood and angle iron! {Reality Daydream}

Related:

  • Coffee Table / Lego Table

    We've been needing to update our coffee table situation in the living room for awhile…

  • How to Apply Wood Veneer

    If you follow us on the 'gram, you know I've been stripping the finish off…

  • Nesting Cutting Board Tutorial (with a bonus project!)

    Have you seen those 'nesting' cutting boards where the two cutting boards fit together like…

About Bethany Sy

Nick and Bethany Sy are the creative free-spirits behind DIY/Lifestyle blog, Reality Daydream. They recently purchased a historic mansion and have been documenting the ups and downs of renovation and making this home their own... all while sharing tips and tutorials along the way! When they found themselves in the trenches of infertility, they started a journey that would prove to be their most important DIY project ever, and have 3 beautiful girls to show for it. <3

« Easter or Spring-themed Kids Craft …MARBLE PAINTING!
Baby Doll Crib Rescue–fixing the wobbly joints! »

Comments

  1. 8

    Renee p says

    May 12, 2018 at 11:15 pm

    Wow Bethany – those are darn beautiful! You guys are like mad scientists with wood! Totally amazing!

    Reply
  2. 9

    Courtney says

    April 12, 2017 at 4:34 pm

    Wow. Just…wow.

    Reply
  3. 10

    Rachel says

    April 11, 2017 at 4:28 pm

    Those are GORGEOUS!!!

    Reply
    • 11

      Bethany Sy says

      April 11, 2017 at 5:27 pm

      Thanks Rachel! I love how they turned out too! <3

      Reply
  4. 12

    Nicky Bob McGee says

    April 11, 2017 at 2:25 pm

    Those look awesome!!!

    Reply
    • 13

      Bethany Sy says

      April 11, 2017 at 5:24 pm

      Awww THANKS Mr McGee!

      Reply
  5. 14

    Annet M says

    April 11, 2017 at 12:47 pm

    Love the look – like quilting with wood!
    Wondering if you think the bottom of the angle iron needs something to protect the floor. I see you have it on cardboard but thinking it might really scratch hardwood floor. Or am I overthinking this?

    Reply
    • 15

      Bethany Sy says

      April 11, 2017 at 3:37 pm

      THANK YOU for reminding me… because I meant to address that in the post. They make rubbery plug things to slide onto the end of the angle iron… which is BRILLIANT. Here’s my affiliate link: http://amzn.to/2p3UUom. I’m going to go update my post with that info too! <3

      Reply

Leave a Reply Cancel reply

Your email address will not be published. Required fields are marked *

  • Facebook
  • Instagram
  • Pinterest
  • RSS
  • YouTube
We are Nick and Bethany! Welcome to our blog, Reality Daydream where we share our DIY adventures!

realitydaydream

Still can’t get over these shelves. 😍 These Still can’t get over these shelves. 😍

These Aksel Radius Floating Shelves by @shelfology are the perfect finishing touch to this wall in our kitchen. 🙌

#gifted #shelfology #radshelfie #floatingshelf #akselradius
I needed an instant-gratification project today fo I needed an instant-gratification project today for my well-being, and this little wooden stand was so fun and fast!

Details and links to everything in this pic in Stories!
If ya just need a slab of wood, grab a cutting boa If ya just need a slab of wood, grab a cutting board when you’re at Target or Walmart! They’re made of hard wood!

I used this cutting board to experiment and make some prototypes for a large-scale piece of art I’m doing for our church. It’s got me EXCITED!

Follow along for that project- happening soooon!

@dapproducts @dremel @jet.woodworking
You’ve all seen the video, but here’s some sti You’ve all seen the video, but here’s some still shots of the kitchen wall in all its glory!! 

The Aksel Radius Floating Shelves by @shelfology were the perfect finishing touch! 

Should I do a house tour of our main floor this week?!?! 🙌🌿

#sponsored #floatingshelf #radshelfie
Load More Follow on Instagram
View of our entryway of our historic mansion that we're slowly renovating and making our own.
Click here for lots of art projects using only wood stain on furniture!!
Please feel free to share or pin my posts! You're welcome to use ONE of my images (no collages or pinnables) with a link back to the corresponding post. Please do not edit or crop that single image in any way. Improper use of my photos, ideas or words is a violation of copyright. Thank you!

Categories

Attention: Almost any do-it-yourself project involves risk of some sort. Your tools, materials, and skills will vary, as will the conditions at your project site. Reality Daydream has made every effort to be complete and accurate in the instructions of the plans on this website. Reality Daydream will not assume any responsibility or liability for damages or losses sustained or incurred in the course of your project or in the use of the item you create. Always follow the manufacturer’s operating instructions in the use of tools, check and follow your local building codes, and observe all commonly accepted safety precautions.


Copyright © 2023 · Modern Blogger Pro On Genesis Framework · Customizations by Sweet Theory Designs · Privacy Policy · Log in