Y’all, the design process is in FULL SWING for the girls’ new room at the new house! With all the chaos happening there, and the shuffling back and forth between two houses, it will be so nice for the kiddos to have a dedicated space that’s clean, organized, and DARLING.
I can’t share details with you quite yet, but I’m going to share one component with you today. Are you pumped?
 *This post is sponsored by Mohawk. Thanks you for supporting the amazing brands that make Reality Daydream possible! This post also contains affiliate links.*
When we asked the twins how they’d like their room decorated, they both chirped ‘rainbows‘! The first thought that came into my mind was taping off wide stripes on the walls to be painted with ROYGBIV from floor to ceiling. Then I reigned myself back in to give this a little bit more creative thought.
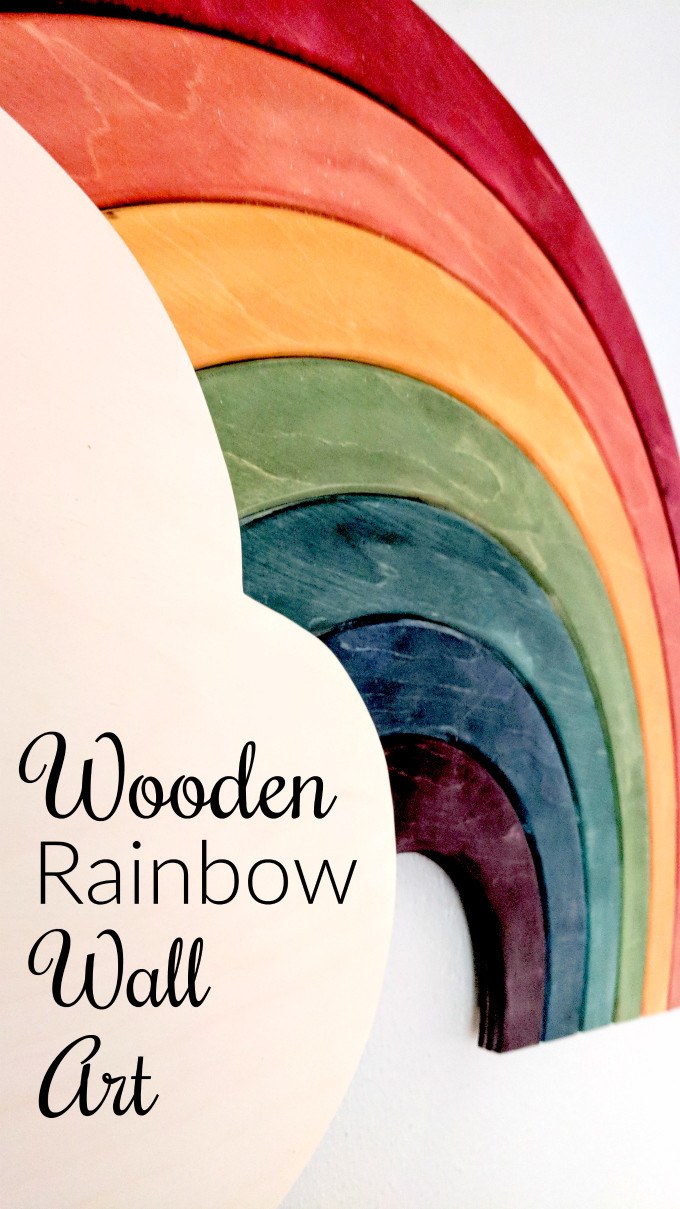
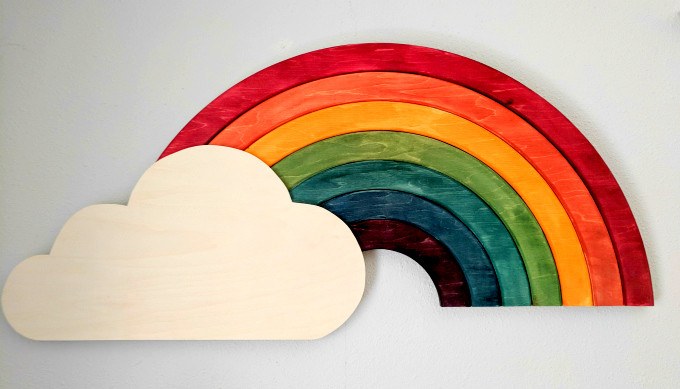
As you know I fell in love with this rug that I deemed to be rainbow-themed. And it was the jumping-off point for this whole room design! But Nick thought we should have a more literal rainbow element in the room, and dreamed up this Behlen-dyed wooden rainbow wall art THAT LIGHTS UP. (of course it does)

Of course it’ll be in the twins room and not our dining room like it is in the above pic. But we had to hang it up somewhere to take pictures.
Let’s get started!
Rainbow Wall Art Supply List
Supplies
- 4x4x1/2 plywood
- 2x2x1/4 plywood
- Behlen Solar Lux Dye
- Wood Glue
- LED strip lights
Tools
- Table saw (optional)
- Plunge Router
- Router
- Router table
- Drill
- Bandsaw
- Orbital Sander
- Overhead Projector
- 1/4” crown stapler
Tid-Bits
- Trim Router Circle Jig
- 1/8” drill bit
- ¼” roundover bit
- ¼” upcut spiral bit
- 5/8” staples
- Handscrew Wood clamps
- 1/8” 14 TPI Olson Blade – Used for cutting tight radius on a band saw
- Miter Gauge
- Sand Paper – we like this brand
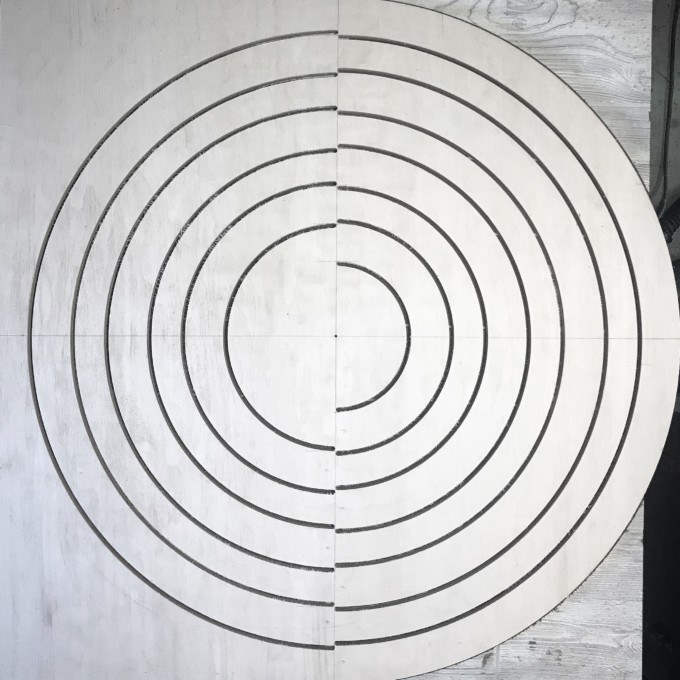
We started out by finding the exact center of our 3′ board, and drawing a line through it with a pencil. Then find the center going the other direction and draw that line too, dividing your board into 4 equal squares.
Then you’re going to map out the arches of your rainbow. Because the router bit will eat 1/4″ of material we decided to alternate the arches on each half (1st – top, 2nd bottom. 3rd top, etc). It will be very helpful to mark this out, hence the X marks.

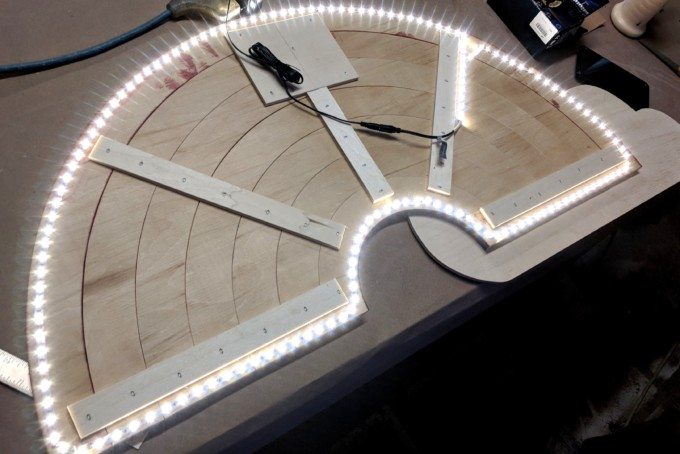
Using our Circle Jig, we started routing the outside circle first, making fairly shallow passes each time. It took us 4-5 passes for each arch.
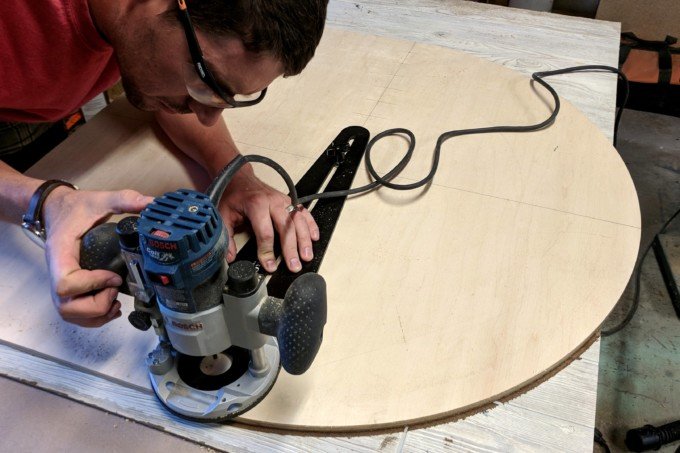

Even though our rainbow is only going to be a half circle, we’re utilizing the whole board in such a way that we can account for the thickness of the router bit. Do you see how we’re staggering the lines?

So the wider arches will be the pieces to our rainbow, and the narrow ones will be scrap wood. (or a second, slightly smaller rainbow!)

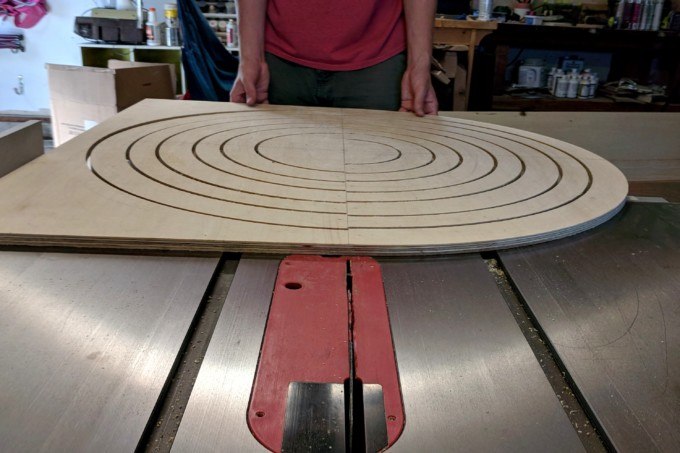
Next we run this sucker through the table saw right down that center line to separate all of these arches!

They fit together LIKE A GLOVE. And we rounded off the edges with a roundover bit on the router table. Then sanded them all smooth with the orbital sander. This plywood has a very ‘fuzzy’ texture to it, so hand-sanding isn’t really an option unless it’s arm day at the gym.
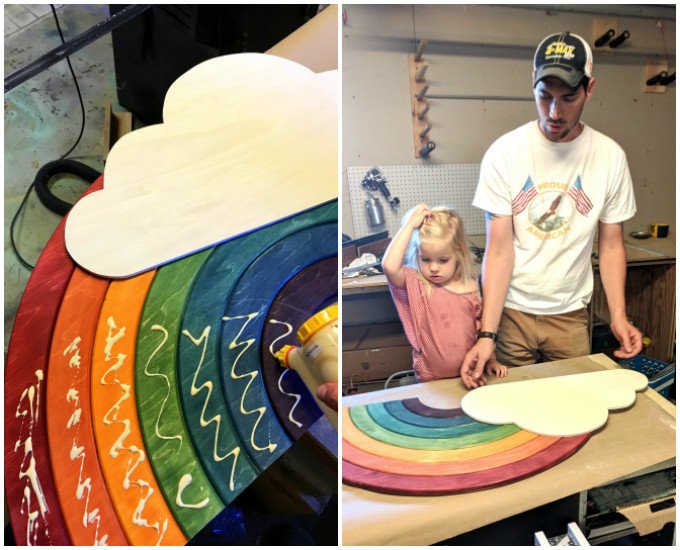
Now it’s time to get our your Behlen Solar Lux Dye and stain these arches! The beauty of this stuff is that it dries almost immediately on the wood, and doesn’t raise the grain at all. Not to mention the fact that the colors are SO VIBRANT, yet still show off the wood grain!
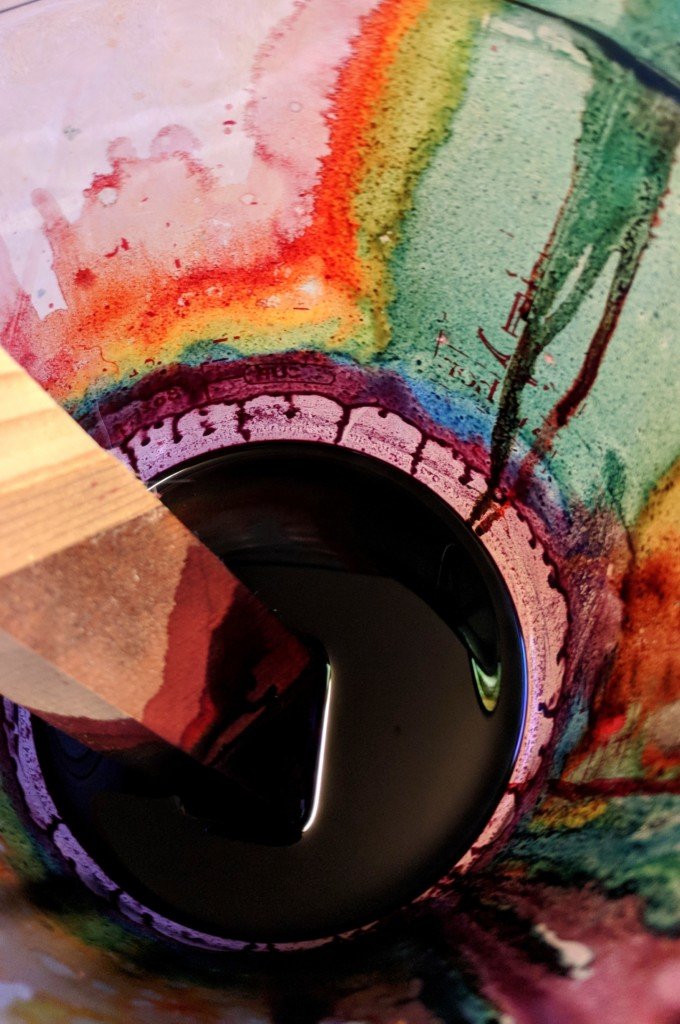
The first arch (red) was all Blood Red, then for the orange arch, I added equal parts Lemon Yellow to create a 50/50 mix. (You can test these colors out on a scrap piece of wood if you want… that’s what I did!) For the green, you guessed it, 1 part Lemon Yellow, 1 part Dark Green. I felt the Dark Green shade was darker than I wanted for my green arch, so I added a splash of yellow to lighten it up. I wanted a shade between green and blue (BECAUSE TEAL), so to my existing green mixture, I added equal parts of Sea Blue to create the perfect turquoise. Finally, for the blue arch, just solid Sea Blue! And to that I added equal parts Blood Red to make that deep gorgeous purple!

Behlen Solar Lux Dye is fade resistant, so this rainbow is gonna look like this forevvvvver! Check out this super artsy video we made.
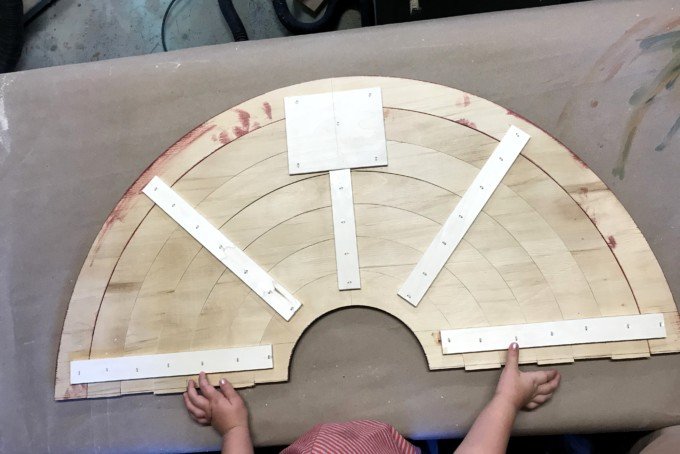
We created some braces on the back to hold all the arches together, and a square to put our mounting hardware on.
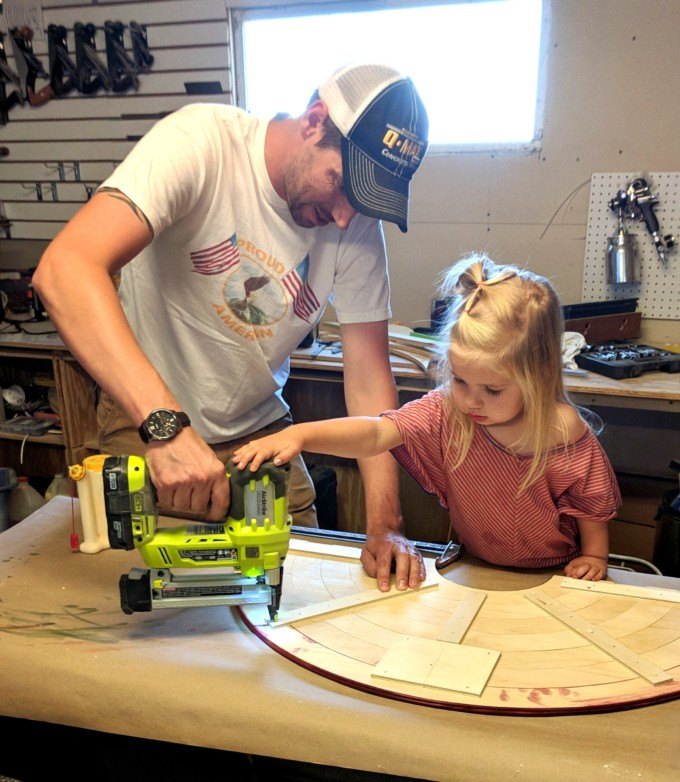
Slice off those rough edges in a straight line with the band saw.

But wait! Let’s discuss this cloud! We used our other slab of plywood to cut out a little puffy cloud shape using the overhead projector. I could have easily free-handed this, but Nick has no faith in me. So I traced his perfect cloud with a pencil using the projected image as a guide. Then we cut it out on the band saw! (this could be done with a jigsaw too) and affixed it with wood glue. It looks almost white in the pics below, but it’s actually the raw wood. We liked this look and so we left it!
What’s that? We forgot to talk about the lighting element? YOU’RE RIGHT. Let’s do that now.
We ordered This LED light strip that is literally a roll of what seems to be clear tape… but it lights up! You just stick in place where you want it, and plug it in. No electrician’s license required.
Note: if you’re not familiar with LED lighting and it’s properties, when the label says ‘Daylight White’, what it actually means is CRAZY BRIGHT BLUISH FLORESCENT LIGHTING THAT’S ANYTHING BUT NATURAL. Go for the ‘Warm White’, which is not a yellowish hue at all. Just plain white without the brain-freezing headache-inducing alternative. #yourewelcome
Pop this sucker up on the wall, and YOU’RE SET!
It’s soooo hard to photograph it lit up because it really washes out the color. But you get the point, right?

I’m not gonna lie, I totally photoshopped out the cord because it looks so terrible. When we put this rainbow wall art up in the girls’ actual room, I’ll probably staple it to be taut, and paint it the same color as the wall so it doesn’t show as much. This is 2018… shouldn’t everything be cordless by now?

This is the perfect rainbow element for the girls new room, and I can’t wait to show you what else is happening in the room. Stay tuned!!
~Bethany
~~~~~~~~~~~~~~~~~~~~~~
Thanks for pinning!

Related:
-

Nick and I have dabbled in epoxy here and there, but we've never done anything…
-

If you love unique art and have absolutely nothing to do with your time, come…
-

We're in the dog days of summer, and it seems like my kids are always…
You inspired me to make one of these and add battery operated LED’s in the back as a Rainbow Bridge Memorial Wall.
I love how it turned out and I get compliments all the time for it.
I love that! It would mean so much if you would send me a picture! beth@realitydaydream.com
Rainbows are my ashtetic
C’est trés joli, bravo!
You guys are so stinkin’ talented. I can’t wait to see the twins room all decked out in beautiful rainbow colors. You probably know that the rainbow is a sign of the covenant between God and the earth. In this covenant, God promised unconditionally that He would never send another flood to destroy all life on the earth.
Your video is awesome, the sounds effects were great! Especially the hallelujah type music as the end 🙂
Impressive! I love seeing all the details you put into every room!
We use LED lights all the time for our projects too, and what’s great is that: 1) the strips we get are all colors, so you can do white, or change it to another solid color, or have it scroll through, which is absolutely gorgeous. 2) ours comes with a remote to turn them off or on or to change the color scheme. and 3) they do come in wireless form. It includes a battery pack. It’s a little pricier for the wireless, but it’s definitely great not to have that wire hanging down!
Mind=BLOWN. This is such good info… I had now idea! Thanks Hali!!!