Having 3 littles, I’m always trying to think of ways to keep them busy and keep their minds working. I know it’s not my job to entertain them (and they do play independently really well, especially since I implemented this), but there are times where when we’re not at home and I need them to behave themselves and have an activity … like the waiting room at the Dr’s office, or at church, or in the car.
Here we are standing in line at Best Buy customer service counter. Could have used something right about then FOR SURE.

I’ve had this idea rolling around in my head for several months now. In fact, I distinctly remember the moment I thought of it… I was having my post-delivery exam after Cypress was born, and I was laying back with my legs in the stirrups listening to the girls whining and arguing and not sitting still. And there wasn’t a damn thing I could do about it. #helpless

Let me just say that we are not judgmental AT ALL towards those who let their kids play on ipads/tablets and such. We’re just avoiding it for as loooong as possible. There are several reasons for this (that I’m not going to go into right now), but the biggest reason is… there are two of them and we can’t afford two iPads. LOL!
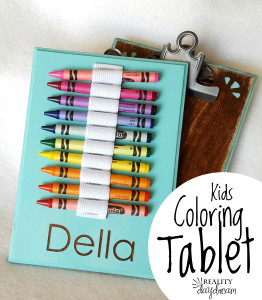
So last weekend, I finally whipped these Kid’s Coloring Activity Tablets… And I loooooove how they turned out! And so simple!
KIDS PORTABLE CRAYON ACTIVITY TABLET (*includes affiliate links)
OPTIONAL:
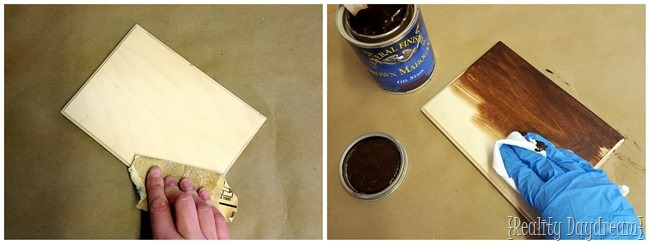
I started out by sanding my board and staining. Childs play.
Next, I used my Silhouette Cameo to cut out the girls’ names onto vinyl to make these more personalized!


Now, I’ll admit that I’ve had my Silhouette for several months and have been intimidated to try it out. There are just SO MANY amazing things you can do with it, it literally gave me anxiety. I even had my friend Emily come over and show me some basics to help me feel more comfortable.
Next step was to slap those names on! I made sure the vinyl was pressed down reallllll good before I took off the transfer paper. And then I painted with several light coats, and let’er dry.

Meanwhile, while that was drying, I went back to the Silhouette and cut some little decorative flourishes for the other side. Again… optional! This little design is actually a font (Bergamot Ornaments) and is the semi-colon. Hehe!

Then I slapped those little flourishes in the corners and taped off the rest of that entire side with painters tape.

Then I painted that side the same color! And after a couple hours and it was dry to the touch, I peeled off the tape and vinyl!

The edges where the tape came off didn’t leave a very crisp paint line, so I took a little sandpaper to it to clean things up. Then both sides got a coat of poly! (this is THE stuff).

After letting the poly dry overnight, I got out the elastic and staple gun! I folded over the very edge of the elastic and stapled it about a half inch from the top center of the painted side. I was feeling reckless, so I didn’t find the ‘exact center’.
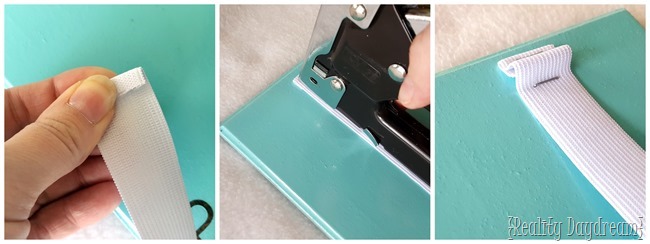
…nor did I measure an exact amount between each additional loop. But I will tell you it was about a centimeter, and I left enough of a loop on the elastic that it was slightly smaller than a crayon. Don’t you love my precision and detailed instructions?!

There’s something inexplicably satisfying about how perfectly the crayons slide in there.
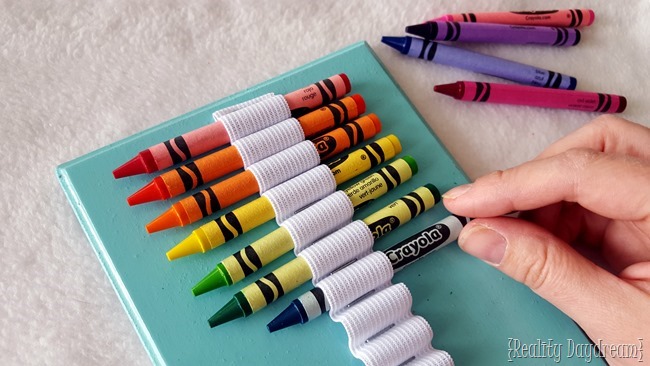
That side is DONE!
Flip that sucker over and get out your Gorilla Glue and Clipboard Clip. I used a pipe cleaner to open the ‘mouth’ of the clip and keep it open so it can glue down level. Then I put a thin smear of the glue on and pressed the Clipboard Clip into place and clamped it down with some hand clamps. You could also just balance a couple books on top or something. As long as there’s some weight on it, because the glue expands as it dries.

After a couple hours, it’s SO DRY and rock hard. No screws necessary! I’m pretty picky about my adhesives, and that stuff works sooooo good.
And friends? There she blows. (drawing courtesy of Della)

The girls helped me make these from start to finish, and were SO EXCITED to use them yesterday on the drive to school. I didn’t hear a peep out of them the entire 20 minute drive. And when we got there, they were overjoyed to show me there latest artwork. #momwin

Who knew that they made those little clipboard clips? So cute. And so perfect.
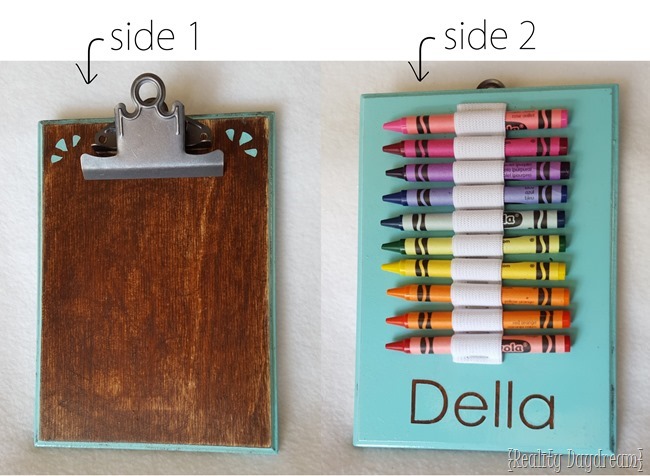
And I love that I can just slide these into my bag as we’re heading out the door. Lickity split.

I must have called it a ‘tablet’, because when the girls got to school, that asked their teacher if she wanted to see their TABLET! I’m guessing she was thinking we bought them Ipads. But nope!
The clipboard fits a quarter-sized piece of paper perfectly, so I chopped some printer paper down to size. I think I’m going to have little notepads made at Staples or something like that so they have more paper.

The girls LOVE to color and create. And if you ask them what they want to be when they grow up… they say ARTIST. #meltsmyheart

If you enjoyed this project, you might also love these kid-friendly tutorials from our archives!
*This is not a sponsored post, but I was provided with a Silhouette Cameo. This project idea came out of my head and I was not told what to do, say, or feel. This post contains affiliate links.


Such a nice idea to manage kids color pencils such a creative idea Thanks for sharing.
SOOOO cool and very much needed! Love it and stapling the elastic..BRILLIANT! Pinning and sharing.
So awesome! Perfect for my littles! Love it!!
I currently NEED this in my life! This would be perfect for church and in the carpool lane…..YES girl…genius!
such a fun idea! my kids would have loved this when they were younger!
Mind.Blown. Love it!
Love it! I love clipboards, and did not know they had the clip sold separately!
I want to tell you how to make your own little notepads – with a paper cutter and Aileen’s Tacky Glue. Soooo easy. Cut to the size you want, knock the edge you want to glue on the table to get perfectly (?) straight, the using clamps or clothes pins or a heavy book protected with plastic wrap or something, apply a bead of the Tacky Glue on that end , spread with your fingertip, and clamp till dry. Easy peasy! I mend books with this glue – it is almost exactly like library book glue and the edge now just right for a small tear off note pad. I’ve saved sturdy cardboard and used it as a backing, or the times you don’t have the clipboard.
AWESOMESAUCE!!!!!! SOO CUTE & FUNCTIONAL!!!! GREAT IDEA!!! & not to mention adding to their creative minds
Love, love, love this idea! And it’s the perfect size for those little hands… Most clipboards are so large, I have trouble holding them, so they’re waaaay to large for little peeps. Nice job!