• Home
  • About
  • Tutorials
  • Recipes
  • Furniture
  • Contact
    • Contact
    • Infertility
    • Disclosure
    • Privacy Policy
  • Shop
    • Facebook
    • Instagram
    • Pinterest

Reality Daydream

The Dream is Free, The Hustle Sold Separately

  • Home
  • About
  • Tutorials
  • Recipes
  • Furniture
  • Contact
    • Contact
    • Infertility
    • Disclosure
    • Privacy Policy
  • Shop

Herringbone Patchwork Accent Wall {Part 1}

November 14, 2013 by Bethany Sy

There’s been a lot of snot flying around over here… mostly from ME. Tis the season I guess, right? Last night I slathered Vick’s vapor rub on the bottom of my feet, turned on the vaporizer, chugged some Nyquil, and went to bed early. I hope the girls don’t get it as bad as I have it!

Lucky for me, I can sit back and relax because we just finished a bunch of orders from our Etsy shop and a big project in the girls’ big-girl room… and that’s what I’m going to show you today! (well, at least the first half of the project. I’ll be back tomorrow for the big reveal!)

We decided to go with a herringbone pattern on the wall that the toddler bed / fainting couches will sit against.

Herringbone Pattern for Accent Wall {Sawdust and Embryos}source

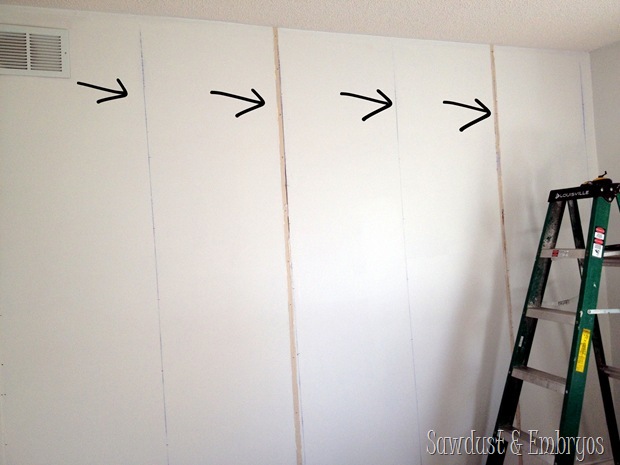
We started by measuring out 5 equal parts, and then used a chalk like to give us perfectly vertical lines to work with. The walls in this room are paneling, and had trim pieces on the seams that we removed (you can see where they were below), so we made sure that two of the 4 lines would fall on those spots to hide them.

Laying out a Herringbone Wall with Chalkline {Sawdust and Embryos}

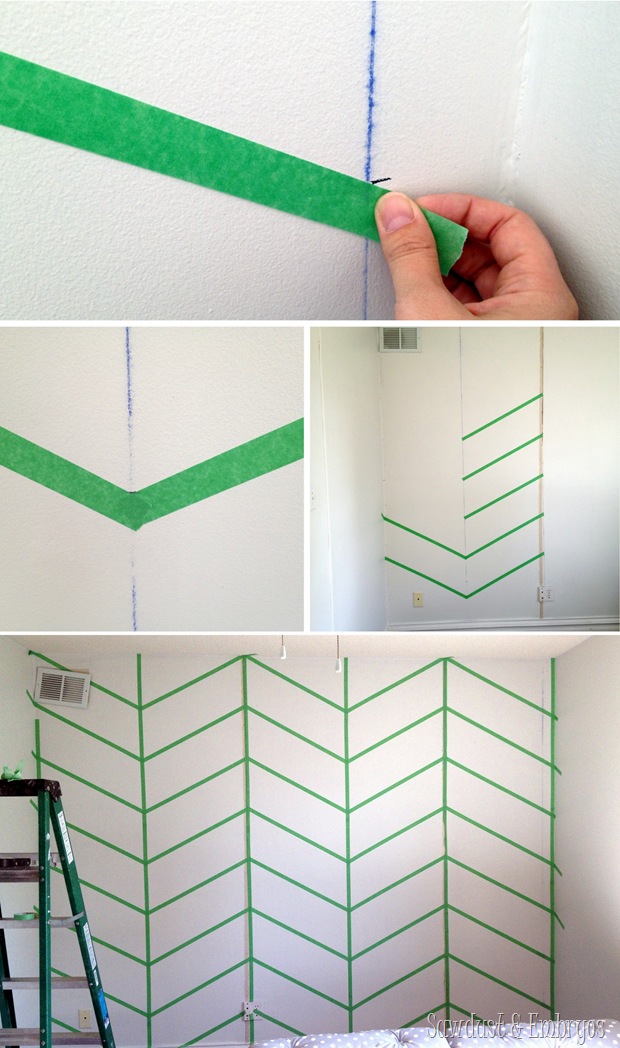
We measured and marked 12” intervals all the way up each vertical line. Then we taped our angles by going from one mark to the next mark lower. Does that make sense? No?

Taping up a Herringbone Accent Wall {Sawdust & Embryos}

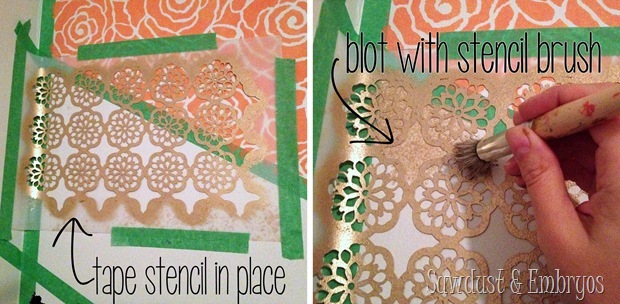
Once the whole wall was taped up, the fun part starts! We reached out to our friends at Royal Designs Studio to see if they would be willing to send us a handful of stencils for this project, and they were so excited about the idea… they let us take our pick! BOOYA! We wanted this wall to look like a patchwork quilt, so we I started stenciling away! (more on that tomorrow)

Stenciling a Patchwork Wall {Sawdust and Embryos}

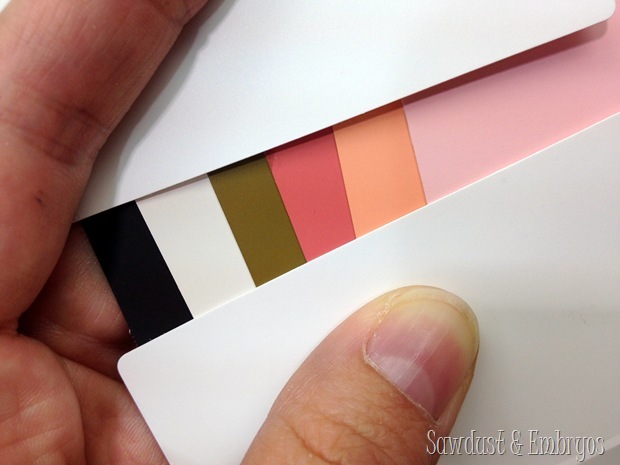
These are the colors we picked out: Pittsburgh Paints: Red Cedar, Silver Strawberry, Wool Tweed, and Crab Apple. And we used Martha Stewart metallic ‘Gold Pearl leftover from our Living Room, and a simple black.

Color Scheme Inspiration {Sawdust and Embryos}

I just tried to be as random as possible with placement of the colors/patterns. You guys, it looks SO AMAZING!

Click here to see phase 2 and the big reveal!!

Sawdust and Embryos

Related:

  • How to fix a hole in the wall!

    Got a hole in your wall that you wish wasn't there? We do! When we…

About Bethany Sy

Nick and Bethany Sy are the creative free-spirits behind DIY/Lifestyle blog, Reality Daydream. They recently purchased a historic mansion and have been documenting the ups and downs of renovation and making this home their own... all while sharing tips and tutorials along the way! When they found themselves in the trenches of infertility, they started a journey that would prove to be their most important DIY project ever, and have 3 beautiful girls to show for it. <3

« Incorporating wood items into your design!
Herringbone Patchwork Accent Wall {REVEAL!} »

Comments

  1. 8

    Erin says

    February 4, 2019 at 7:01 pm

    Great tutorial on how you taped out the design. I didn’t do patchwork, but chose just to do a gray herringbone pattern as an accent wall in our bathroom. Let me know what you think: https://thediynuts.com/herringbone-accent-wall/ Thanks for sharing your work.

    Reply
  2. 9

    Cristina says

    November 26, 2018 at 12:04 am

    É lindo!

    Reply
  3. 10

    Barbara says

    November 14, 2013 at 2:56 pm

    Ah – you are killing me with these multi day posts lately! Can’t wait to see the finished wall.

    Reply
  4. 11

    Geralyn says

    November 14, 2013 at 2:53 pm

    I loooove anything patchwork…can’t wait to see it tomorrow

    Reply
  5. 12

    Margo says

    November 14, 2013 at 2:41 pm

    You’re killin me smalls 😉 Can’t wait to see it! I would NEVER have thought of stenciling a pattern in a pattern….you guys are amazing

    Reply
  6. 13

    Megan says

    November 14, 2013 at 2:06 pm

    Love the color palette!

    Reply
  7. 14

    Kate Thompson says

    November 14, 2013 at 1:47 pm

    Hellooooo beauitful!!!! ACK! I LOVE the color combo can not WAIT to see the finished product!!!!! Great work !!!

    Reply

Trackbacks

  1. Herringbone Patchwork Accent Wall {REVEAL!} says:
    November 15, 2013 at 11:33 am

    […] sorry to leave you hanging yesterday. We had some last minute finishing touches to take care of before ‘after’ pictures were ready. […]

    Reply

Leave a Reply Cancel reply

Your email address will not be published. Required fields are marked *

Recipe Rating


  • Facebook
  • Instagram
  • Pinterest
  • RSS
  • YouTube
We are Nick and Bethany! Welcome to our blog, Reality Daydream where we share our DIY adventures!
Click here for lots of art projects using only wood stain on furniture!!
Please feel free to share or pin my posts! You're welcome to use ONE of my images (no collages or pinnables) with a link back to the corresponding post. Please do not edit or crop that single image in any way. Improper use of my photos, ideas or words is a violation of copyright. Thank you!

Categories

Attention: Almost any do-it-yourself project involves risk of some sort. Your tools, materials, and skills will vary, as will the conditions at your project site. Reality Daydream has made every effort to be complete and accurate in the instructions of the plans on this website. Reality Daydream will not assume any responsibility or liability for damages or losses sustained or incurred in the course of your project or in the use of the item you create. Always follow the manufacturer’s operating instructions in the use of tools, check and follow your local building codes, and observe all commonly accepted safety precautions.


Copyright © 2025 · Modern Blogger Pro On Genesis Framework · Customizations by Sweet Theory Designs · Privacy Policy · Log in