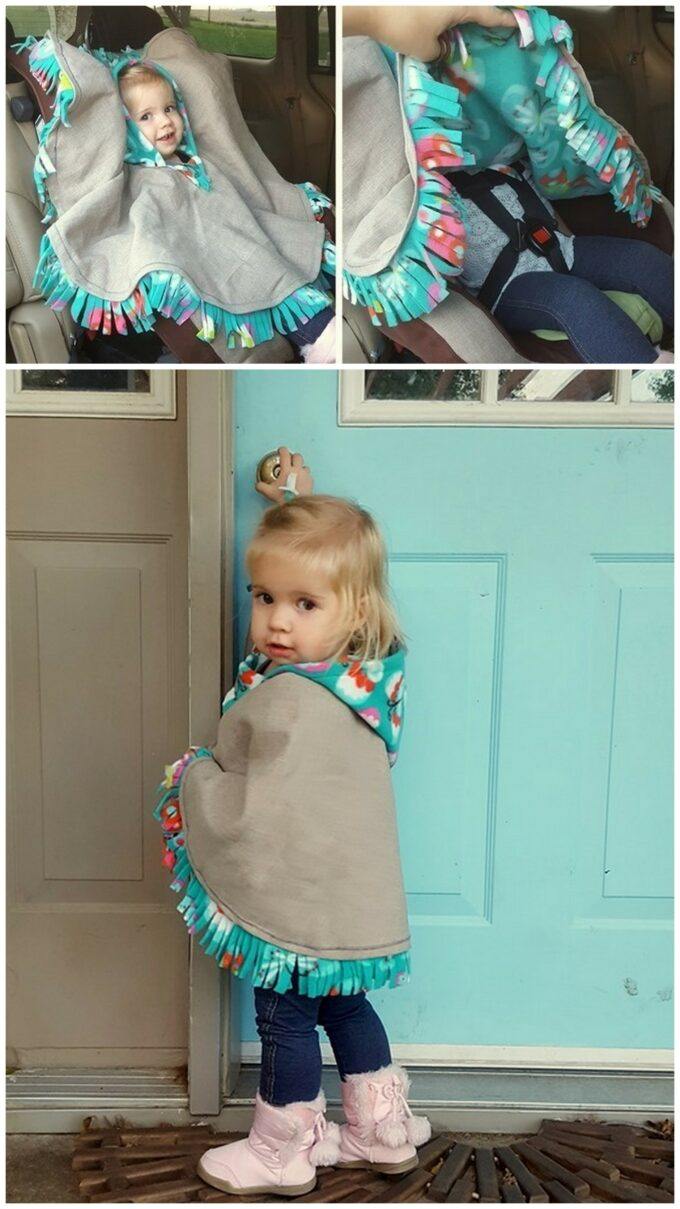
Even if you don’t consider yourself a pro at sewing (hand raised), this hooded poncho for babies and toddlers is so easy and doable for anyone! You could even make it reversible if you wanted!
Not only are these ponchos so cute and cozy, they also make your child much safer in their carseat than a bulky coat! Your kiddo basically snuggled in a wearable blanket that goes on top of their 5-point harness, allowing you to since those belts nice and snugly to their little bodies. Who doesn’t love a fleece poncho?!
Before you comment or email me to ask if I sell these fleece ponchos, the answer is no… BUT! Since making this poncho 3 years ago, it has be come a thing and there are a ton available on Amazon now. Check them out HERE! If you want to make your own with our simple tutorial, read on!

This post contains affiliate links.
This fleece car seat poncho tutorial will work for sizes 12m to 3T. You can easily adjust the dimensions slightly to fit a baby or bigger kid by measuring from their neck to wrist and modifying accordingly. Heck you could make one for yourself if you feel so inclined. They are pretty darn cute!
I decided to go with a solid neutral linen fabric in ‘Mushroom’, with a fun/colorful fleece for the cozy liner and accent colors. Since my toddler wears a lot of bright colors, I wanted the majority of the car seat poncho to be a neutral color, and then accent that with a fun colorful fleece print as the border and hood!
You could use anything though! You could even use two layers of fleece to make it warmer, and tie the ends like those ‘fleece knot blankets’ to make a no-sew poncho version!

Supplies for car seat poncho:
- 1 yard Formenti Linen fabric in ‘Mushroom’
- 1.5 yards fleece fabric
- Sewing machine (I have this one)
- Thread to match your fabrics
- Sewing scissors
- Super cute child model (I’m sure you already have this on hand, right?!)
Hooded Fleece Poncho Instructions
Step 1 – Cut your fabric to size
I started by cutting my fleece to a 36” x 36” square. Fold in half twice… and and then corner to corner, like so:

Using your super sharp sewing scissors (that you NEVER let your kids use to cut plastic milk cartons) cut through all the layers at a slight circular curve.

UPDATE! A lot of you were having a hard time knowing which edge to cut to make a circle, so I whipped up this little video for you using a piece of paper to demonstrate!
Open that sucker up and you’ve got a near-perfect circle! If it’s not a perfect circle, it’s ok. You’ll see why later!

Lay out your solid color ‘linen’ fabric (after ironing if necessary), and lay the fleece circle on top. Cut around the edges so you have two identical-sized circles.

I needed to cut a hole for the head, but I wanted to be really careful not to make it too big… because that can’t be fixed! You can always make a hole bigger later, but smaller? Not so much!
I’m glad I ordered extra fabric, because my first go ’round, I cut the head hole the size I THOUGHT would be appropriate… and it was wayyyyyyy too big. Like ridiculous.
So I used one of Cypress’ shirts and found an item that was a similar-sized circle as the head hole of her shirt. It happened to be a plate from the girls’ play kitchen, but you could use a lid or a saucer (which I call a ‘dessert plate’… but Nick corrected me and says it’s a saucer). #eyeroll
UPDATE: I’m getting lots of emails saying that you’ve cut the head-hole way too big for this car seat poncho for toddlers. I know that little saucer looks like a TINY hole that would be far too small for your little one, but it’s deceiving! When in doubt, use your child’s shirt hole as a template.
Find the center of the circle and pin it so you don’t lose it. Then place your circular item over it, trace with a marker, and cut out your circle!


Step 2 – Hem that poncho!
Hem the outer circle (not the fleece layer) under 2-3 inches or so. This part is tricky because you’re hemming a CIRCLE… not a straight line. So feel free to take some little ‘tucks’ along the way to stay on track. It will look like this on the under side.

Hem around the circle for the head hole too. Then lay it over the fleece circle and try to get it as centered as possible. This is a good time to think about whether there’s an ‘up or down’ to the print. Pin it down along the seem every 4-5 inches, then sew the two layers together right over the existing seam. I used a zigzag stitch so it would be a little forgiving, just in case I didn’t follow the line perfectly.

This is what we have now!

Step 3 – Time for the Hood
Let’s make a hood for this car seat poncho! Cut an 18” x 18” square out of your fleece fabric. Fold the edges over and hem them (about an inch).

Then fold the hemmed edges in toward each other with the pretty side of the fabric on the inside. Then sew across the folded edge.


My girl was napping, so I couldn’t try it on her head to make sure it would sufficiently cover her noggin, so I blew up a balloon approx the same size as her melon head, draped my circle poncho over a little trash can, and put the hood on. I crack myself up!

I measured my hood to be extra long so I would have some wiggle room. Stick the hood down between the fleece and linen material, and decide where you want to sew it on. I realized that I had about 3 extra inches of fabric that I didn’t want to bulk things up unnecessarily, so I whacked them off. Then pin the hood to the linen (outer) fabric, and stitch it up! I used the zigzag stitch again for this part,

Step 4 – Figure out the hole
NOW it’s finally time to cut out the circle of fleece! Cut it slightly smaller than the existing hole, because you’re going to hem them over too.

Fold the edge of the fleece over about 1/2” and pin every couple inches all the way around. When you stitch this up, TAKE IT SLOW! And just do an inch or so at a time, feeling as you go to make sure everything is staying in place just so.

When I went to try this sucker on Cypress for a test run, the head hole was slightly too small (which you want! It’s so much better than it being too big!). We can totally fix too small!
Fold the car seat poncho in half to find the center of the front, then cut a slit (I cut about an inch and a half). Sew around it close to the edge just to keep it from fraying. It doesn’t have to be pretty because it will be covered! Then cut a diamond shape out of your fleece material the same width of the opening between the two edges of the hood.

Tuck that diamond shape long-ways in behind the slit you cut, and fold it over in the front so that it’s folded exactly in half. Pin it down!

Step 5 – Fringe that fleece poncho!
No folding or hemming on this one. Just stitch about a half inch from the edge! I took a scissors to it and added a little fringe on the point of the triangle. And I fringed the entire perimeter of fleece sticking out the bottom.


This darling hooded car seat poncho turned out SO ADORABLE. I’m so glad I stepped outside of my sewing comfort zone on this!
And I actually think the little detail around the neck hole just adds to the cuteness! I love it when a mistake leads to something even more amazing! And the fact that the little triangle is fleece allows a bit of stretch so as your child (and their head) grows, the poncho should still fit!

I just can’t stand the cuteness!

Step 6 – Keep your little one safe in a 5-point harness but letting them snuggle up in this car seat poncho!
One of my favorite parts about this design is that our girl can wear this in her car seat while still being securely buckled underneath. It’s the ‘law’ for kids to not wear coats in their car seat because they can’t be buckled tight enough. But with this poncho jacket, she can be buckled and still have a warm fuzzy BASICALLY BLANKET all around her.

Ok… ONE LAST PICTURE of my super cute Cypress:

I have a feeling a LOT of you are going to be making one of these car seat ponchos for your toddlers and babies, so be sure to send me pics or tag me on social media! (@RealityDaydream) …I can’t wait to see how yours turns out!
~Bethany
Also! Check out our master list of DIY Handmade Gift Ideas!

~~~~~~~~~~~~~~~~
Thanks for pinning!


Related:
-

My kids are getting to the age where they want to tape pictures, cards, notes...…
-

I have a fun and easy building project for you! And while I do end…
-

I've been needing to figure out a solution for my overwhelming plant propagation situation for…
Mine looks like a flower when I cut it…. Its never a circle!
Has anyone else wasted $20 of fabric and there’s turned out into a flower?!
Directions are hard to follow with a lot of wasted fabric. read them through before starting or you end of cutting and hemming considerable excess.
Hello, I am planning to make 2 of these ponchos, one for my 10-month old granddaughter and one for my 5-year old granddaughter. Do you have any advice or measusrements for including “hand holes”? I want my girls to be able to access their hands while in the car without giving up the warmth. Thank you very much!
Mine didn’t end up in a circle 🙁
on page 19/117 on car seat poncho not sure on what edge you are talking about to sew a 1/2 in to do fringe??
Debby McPherson
You mentioned a video in your instructions for folding and cutting. I’m not seeing it. I think I’m supposed to fold in half, and in half 2 more times. Would that be right, just looking at the pictures.
Thank you for the awesome tips!!! I used plaid fleece and minky on the inside, turned out wonderful!
where is the link for the pattern pieces . . . I have looked all over this site. It shows a sample pattern layout but where is the pattern
Hello! a few years ago i used this pattern to make a poncho for daughter. My daughter still loves this but i need to make another, in a big size. In the directions, you reference measuring from the neck to fingertips to make a bigger size, but once you have the number, how do you know what size to cut the circle? Thank you!
So the diameter of your circle should be the neck-to-fingertips measurement x2 (plus the 5ish inches for the neck hole)
Why times 3? Seems like it would be times 2. What am I missing?
Yes you’re right! That was a typo. Thanks or letting me know. I’ll fix it now!
I’m so excited to try this either today or tomorrow! I saw the idea last year and bought some adorable fabric for our now 17-month-old granddaughter. Thank you for your detailed instructions and tips. And for the photos of your adorable daughter. When I’m done posting this comment, I’m searching your site to be added to your email list. Blessings!
Yay that’s so exciting! Please send pics when you’re done! My email is beth@realitydaydream.com. And you can sign up for my mailing list in my sidebar!
Thank you so much for this pattern. It so simple and easy to modify for whatever look I’m going for. I needed a windbreaker for my daughter and was able to make her a nice one by sewing some vinyl in between the layers. As well as modding the hood so that it had multiple layers that I could stick the vinyl between. Now I don’t have to worry about her saying warm in the wind and rain. I will defiantly be using this pattern as a base to make more ponchos in the future. Thanks again!
Thank you Mari! I’m so glad it worked so well for you!
Hi Bethany,
First of all, I want to say that your daughter is super cute. I wish I could hug her right away. Second, this article is amazing and tackling the very common problem of buckling up kids in the cars while keeping them warm. I will sew the one for my little son as per your guidelines. Thanks for sharing!
Hi! I am having a difficult time understanding what you mean by hemming the hole for the neck. Won’t it bunch of I do that? Will I need to cut nicks in it? Am I actually not folding the fabric down, as in more of a basting hem?
Do you have this tutorial in a downloadable PDF? It would make following some much easier.
I love this so much!! I made one for my 8 month old with both layers of fleece because New England is so cold and we are already having a bad winter. It came out amazing and I’m a pretty terrible sewer!! Thank you!
Are these washable? I’m super freaked out about the linen shrinking.
Just pre-wash your linen!
Thanks. Would it work to use fleece on both sides?
Yes! Totally!
Thanks. Would it work to use fleece on both sides? Also, how long does it take to make one?
Yes it would totally work with fleece on both sides! Mine took me an afternoon to make. But if you’re more experienced with the sewing machine than I am, you could probably knock this out in an hour or two.
Thanks, Bethany!
Prewash it and let it shrink in the washer and dryer
Hi, I just ordered some fabrics to make this poncho. We live in Manitoba so it is cold in the winters. I was thinking about double layering the materials. I only bought 2 metres of fleece though so I may not have enough. How would you reccomend attaching a second layer? Thank you!
I tried to watch the video, but it would allow me to watch a second of the video then an advertisement would pop up. This happened repeatedly. I finally gave up!
That’s sooooo weird and annoying! I’m sorry it keeps happening to you. I’m going to look into it! Thanks for letting me know!
Hey everyone. I have some pointers or hardships that I had, lol. If I make another one someday, I am going to do it a little differently.
I had troubles hemming the linen neck hole. It took me a few times of riping it out before i decided to put tiny nicks in the fabric every so often then fold/hem. It helped stop the material from bunching up and made a smoother hem.
Also I am not sure of it’s because I double fleeced it but hemming the fleece over on the neck after was extremely difficult. I ended up not hemming it down and actually “hemming” it up. I also sliced the fabric like the bottom to give it that same frilled look. Also next time, i would cut a hole in the fleece at the same time as the linen (keeping the fleece hole smaller still). I found it hard to sew the materials together without having a hole to put my hand through. That’s all. 🙂
Girl – change the fleece measurement requirements to 1.5 yards.
18” is .5 yard.
I was at the fabric store when I found your post – .5 yard short for the hood because you didn’t include it in the actual total fabric.
In a recipe the total amount of an ingredient is listed – why in the world would you list the additional 18” square separately and omit it from the total.
– Frustrated I have to go back to the store or omit a hood.
You’re totally right. Why did I even do that? I’m not a sewing blogger, so doing this tutorial was a stretch outside of my comfort zone. But I’m so glad I did because SO MANY PEOPLE have used this tutorial!! I’m surprised nobody has called me out on the fabric measurement situation until now. 😉 I will fix it ASAP.
How would you modify to use a directional fabric and avoid one side being upside down?!?!
Thank you!!
What kind of fleece do you use, anit-pill or blizzard!!!
I used Anti-pill, but if you’re in a very cold climate, Blizzard wouldn’t be a bad idea!
Thank you so much for posting this free tutorial. I am getting ready to start this little project. I am sure with your great tutorial, and fantastic comments, That all will go well. Thank you, thank you !!
Sharron
Yay! Good luck! Send me pics when you’re done <3
Love this but I am making for a small 1 yr. old. Do I need the 18×18 for hood or use excess from the 60 wide x 36
I have a sewing machine. It runs. Ive never made anything besides a pillow when I was a kid and a few repair stitches. Am I insane for wanting to make this? Or is relatively “beginner” friendly? Thank you!
Yes! I totally think you could pull it off!!
Just finished this project this morning! I love how it turned out. I used “heavenly fleece” for both layers which has to be hemmed at all edges but it was an easy modification. The only thing I wish I would’ve done different is to make it bigger. I would have done 60×60 for the first square so the blanket would cover her legs. Thank you for the tutorial!
This would be great for those carseat-to-supermarket trolley moments as well as being handy for popping under the buggy as a just-in-case cosy.
So is your second piece 36 x 36?
Lol.. the balloon is too funny. I love that you did that! I would’ve LOL but I didn’t want to wake my son. Thanks for the tutorial and the laughs.. hope to get this going in the next few days!
Pattern for this poncho
It says there is a tutorial but the only part is for the Circle? Can you post the original?
Is there a way to fix the head cut out if you made it too big? I completely finished it and i overcompinsated. I feel absolutely sick! 🙁
Do a button and loop! Or read through the comments here… there are a lot of good ideas for fixing this problem. You’re not the only one! 😉
Thanks so much for this pattern! I made one last yr for my daughter and just finished making another one for this year. I made it out of double layer fleece (one patterned and a complimentary plain colour) andade it reversible (which hurt my brain a bit to figure out… But so worth it!!)
My sister-in-law gave material to make this for her granddaughter. I’m not sure how well it’s going to turn out. She bought a fabric that is very stretchy for the outside and the a flannel material for the inside. Have you made this with other materials before or do you recommend using a linnen and a fleece.
If you don’t plan on fringing the bottom, what do suggest as far as sewing?
Thank you!
You would put the 2 materials on top of each other with the right sides facing. Then, see the outer edge completely around.and then turn it right side out. You will have the neck opening still and finish.
I made this for my daughter. It came out so cute. Thank you for sharing this. Your instructions were easy to follow. I used a pattern that had feathers, so I cut some feathers from the scrap and sewed onto the front of the poncho. Adorable. Thank you!
I made this for my daughter after getting tired of taking off her jacket everytime we get into the car. She loves it, and it looks great. I have lots of experience sewing, as I made my wedding dress and other things. But I would not have thought of this on my own. Thanks for sharing the tutorial.
I purchased enough fleece to make 2 ponchos, not realizing that the material needs to be 60 inches wide. My circle came out way to short. Please add the width to your material requirement so others are aware. I’m hoping I can add a long ruffle at the bottom to make it longer .
So sorry that happened Lisa. I will update the post with that info. Thank you for sharing.
I’m confused, why does it need to be 60 inches wide if you’re cutting it into a 36” square? Won’t you just be throwing 24 inches of material away (or scrap pile)?
I have the same question!
Me too!
You need the excess for the hood! I just made two today for a newborn and 1 year old… I used 36×36 squares and 28×28 squares, plus the hood material. Overall you will need about 36×60 of the fabric you want the hood to be made out of and 36×36 of the other material.
I want to make sure I don’t cut it too short. Did you include fringe in your measurements? My granddaughter measured 29” wrist to wrist. I was going to add a couple inches for growth so I would cut my square 31×31? That doesn’t seem very long. Should I add a couple more inches? She is 3 ft tall.
You could make a ruffle trim out of same fabric of outside of poncho
I’m a little confused on making the hood and then attaching it to the poncho part. I’m fairly new at sewing and I cant really tell what I’m doing by the pics.
Same here! Does the hood attach to just the linen first or are all three sewn together?
I had the same problem. But I kept looking at it and thinking about it and it finally hit me last night what needed to be done. I will be finishing up mine today. I was stuck on the hood.
I’m confused on the hood. I get the first steps on sewing the hems on the long sides and folding in half to meet each other. Then I am not abke to follow along with the directions.
Can you please help me out with the rest of the hood please?
This is adorable! I was thinking of adding snaps on the inside for when it is super chilly to keep it closer to the body. Do you think that would be helpful or no?
Totally! That’s a smart idea!
so i have a question. the child i am making this for her head is 15 inches around and 12 inches from front of hair line to back. when cutting the hole do i just find something that is 12 inches across and make a circle with that. i’m sure this sounds silly but my mind is just not getting that part with the directions
Hey Michaela! I’m not good with math and dimensions. LOL! But due to the somewhat stretchy nature of fleece, I wouldn’t use your child’s head measurements and cut a hole that size. Plus after you hem the neck hole, it will be even larger. My daughter’s head was off-the-charts large when I made her this poncho, and I used a saucer with a 5″ diameter for the head hole. It seems SO STUPID SMALL when you’re tracing it. But it will be close! I promise! You can always make the neck hole bigger, but not smaller 😉
A 5” diameter circle gives you a 17.8” opening.
Diameter x 3.14.
I kept the fabric folded after the first cut (to make the circle). Then I went down 2.5 inches from the top point (the center) and cut a curve to 2.5” on the other edge.
This is such a cute project! I tried to get one started this afternoon, but for some reason my fabric comes out in the shape of a round cornered square instead of a circle. I practiced with paper before cutting the fabric, but never could get it to come out right. I watched your video over and over. What am I doing wrong?
Gah! I don’t know! I know others have had this problem too, and I was hoping the little video would help. You could really just make sure your fabric is a perfect square, and lay it out flat and eyeball cutting it into a circle. It doesn’t have to be perfect!
When cutting, the edges of the triangle need to end up being the same distance from the point. That means cutting quite a bit more on the longer edge. If the shorter edge is 18”, then mark the long edge at the 18” mark and curve from the shorter edge to longer edge as shown in the video. This gives you a point to aim for.
Use a tape measurer. Pin the measurment you want to the top of the folded fabric (where their head will go) like 18 inches. Just glide the tape from top to bottom of your folded fabric making a light mark on your fabric as you gently move the tape measurer. Then cut with sizzors. This should help you get a perfectly round circle.
I had the same problem , but i rounded my cut a little more and it came out perfect .
can you use different material besides the linen
Yes totally! I just liked the tailored look of it.
When you use the linen , does that make it harder to wash?
What did you use to cut through all the layers of fleese? I had a hard time.. I wasted fabric cutting this out.
I used my super sharp fabric scissors, and it was fine! I’m so sorry you’re having a tough time. 🙁
I have only boys in my family, but I’m thinking a cute “super hero cape” look would solve my problem!
YESSSS! Totally! I don’t think there’s anything inherently ‘feminine’ about a poncho anyway. 😉
I just made a maroon one with an Avengers pattern fleece for my 4 year old son (cut a 43” square since he’s taller, but the 36” square worked for my toddler daughter!). He won’t take it off and calls it his super hero cape! Thanks for the design. It’s awesome!
made mine in camouflage with tan on the back…Wished I would have used bright orange but it turned out nicely. I also made it reversible as well. That was the tricky part on the hood.
Love this idea I want to make one for my niece. For a no sew version, because I don’t have access to a sewing machine, how would you make a hood?
I just got done hand sewing the entire poncho. Take needle and thread if you can and follow the same directions for the hood but by hand.
There’s a fabric fuse tape at Wal-Mart for about $3.50. Maybe give that a shot.
Funny you should ask this because I intend on doing the same no see version today for the same no access to a sewing machine reason. I am just using a large hand sewing needle and the thick thread like for friendship bracelets to do a chunky sewn edge because let’s be real, when the bottom of the hood is tucked in between the 2 layers, it’s not like wind is getting in there anyways
This is adorable! I made and turned out super cute! My daughter LOVES it and wants to wear all the time. The head opening turned out too large but I just added a strip of elastic and it ended up making a keyhole opening in front then and still turned out.
Can you tell me how you did that? Mine came out big too.
I was thinking that maybe a strip of ribbing (contrast in color or matching in color, if desired) may work as well. But keep in mind that the hood would then have to be attached a bit differently if you were to use ribbing. If you need to know what ribbing is…this is what would also be used on the neck of a t-shirt or the end of a long sleeved t-shirt. This fabric would be the stretchy type. If you are unsure on how to sew ribbing onto this part of the poncho, i would suggest looking on youtube.com to see how this can be done.
What size would you recommend making for a 3 month old? My daughter is 15lbs and around 24 or 25″ in length and I want to make one for her for this winter.
I would personally just take measurements of the child or see about finding average sizes of a child that age. Every baby is different though, so I would definitely get their measurements and then figure out the size of the poncho for it to be worn in the same fashion this toddler sized one falls.
Hi I want to make one for my daughter.. she is 3 and 37.5 inches tall… will this fit her or do I need to buy more fabric than what is listed here?? Iyou can send me an email if you like… i absolutely love this because I have two that are tall there weight is not going to be where needed for a while.:)
To mKe sure the poncho fits my granddaughter iI taped newspaper together and followed the pattern. That way I knew the neck hole would be the right size. And I wouldn’t waste the fleece.
Deb … THAT. IS. BRILLIANT! I would love to see pics of how your poncho turned out. You could share pics on our DIY Facebook group by asking for an invitation here>> https://www.facebook.com/groups/DIYRealityDaydream/
I am planning on making this for my 18 month old grand daughter. I do not see them much as they live 800 miles away. What is the saucer diameter for the neck . What size balloon or length used for the hood. Would the 36 inch diameter poncho be correct or would it need to be adjusted? I would like this as a surprise so I hate to call and ask . Thanks for your help
Long distance Grandma
I was was thinking maybe doing a button up doing the circle then adding a larger slit in the front then getting some larger wooden buttons that way it can last longer as they grow
My daughter is in 12 to 18 month clothes right now and I plan on making one this week. I measured her neck to fingertips and she’s approx 12inches so I’m thinking it will be perfect size, if she were bigger I would want more fabric. As for the hood I have no idea.
Genius!
I just cut a pattern the circle for a poncho for my granddaughter out of leftover large sheets of paper from our recent move. (used a pencil taped to a string to make an easy circle. ) Taped the string to the center of the paper and to the pencil. Held firmly and drew the circle. It will now take less fabric and I am sure that the circle is the size she will need. Looking forward to sewing the poncho with fleece and making it reversible. Have some cute poke-a-dot fabric and plain black for the underside. I love the suggestions for salvaging if the head opening is too large.
Just made 2 of these ponchos, one for my great granddaughter and one for my Aunts great granddaughter and they came out beautiful! thank you for the pattern.
Yay! I’d love to see pictures! You should come join our DIY group on Facebook and share your project! <3
https://www.facebook.com/groups/DIYRealityDaydream/
I’m using fleece on both sides for extra warmth in Minnesota winter. Can this be reversible? (I can settle for it not being reversible as one of the fleece fabrics is a solid.) From your pictures the linen is the outside color and enough underlap from the fleece to cut fridge. However I’m making this for a 24mo boy and don’t want the fridge. Do you have a suggestion about whether I should sew it as shown in instructions and leaving the solid color without fringing? Or should I make the pieces the same circumference and hem/sew them together at the bottom? Thanks!
Yes! You can absolutely make it reversible! Especially since you’re doing fleece on both sides! I totally get that you want to avoid the fringe for a little boy (although, I made a poncho for my nephew with ‘boyish’ color choices, and it didn’t look girly at all with the fringe!). If you still want to ditch the fringe, you should still do the layered look like I did and just skip the cutting of the fringe, OR you could make both layers the exact same length and hem them together at the bottom. Totally up to you! Pleeeeease send pics when you’re done! beth@realitydaydream.com
I literally just finished making this for my 1 year old and i think it turned out perfectly! I used a solid fleece amd a printed fleece. The neckhole was a little tedious but I followed your instructions and had zero problems at all throughout the whole thing, which NEVER happens for me lol. I am by no means at all an experienced sewer which is partly why I’m so surprised it all worked out 🙂 I love it and am pretty proud of myself! Cant wait till she wears it tomorrow! Thanks for this great tutorial!!
I would like to make this without the hood. Suggestions?
Hey Sandy! Just omit the hood step, and saw the two layers together to make the neck hole!
Thanks for your comment. I have another question….I’m using fleece on both sides for extra warmth in Minnesota winter. Can this be reversible? (I can settle for it not being reversible as one of the fleece fabrics is a solid.) From your pictures the linen is the outside color and enough underlap from the fleece to cut fridge. However I’m making this for a 24mo boy and don’t want the fridge. Do you have a suggestion about whether I should sew it as shown in instructions and leaving the solid color without fringing? Or should I make the pieces the same circumference and hem/sew them together at the bottom? Thanks!
I just made a double fleece one, and I cut and tied it. I used my fringe cutter that I use to make blankets with. But if you’ve never made a blanket it would be hard to do the circle.
If making a poncho without the hood, I would think the poncho would ‘ride up’ & partially cover the child’s face while sitting in the car seat. I’m thinking some ribbing (think turtleneck sweater) sewn on the neck opening would be needed to hold the poncho in place. Anyone have any experience using the poncho without the hood?
I just did this for my four-year-old daughter and it turned out so well! Upped the starting square to 40 inches and the hood square to 20 inches, in case anyone wonders (she wears a girl’s XS top). I used the tip to measure the opening on one of her shirts and that worked absolutely perfectly, no modifications needed for the opening! She loves it. Now it just needs to get cold enough for her to use it!
Yay Erin! I’m glad it turned out so well!
I have been sewing for over 20 years and never have I ever had such a hard time with a pattern. I read and re-read over the pattern many times before actually starting. I followed everything to a tee. 1) it was way too short! My daughter is in size 18-24 months and it was above her bum. 2) of course I had issues with the neck being way too big, as others did as well I see. The hole I cut was only 6”. This is my first time ever commenting on one of these threads, but I feel I needed to. I wasted money and time making this. I was really hoping that your updates would have fixed these constant issues but it seems like they haven’t. May I suggest you take this pattern down and do a new one so no one else wastes their time and money. Now I need to find time to take another 1 hour drive to my closest fabric with 4 kids. Thank you.
I’m so sorry to hear that your poncho didn’t turn out. I’ve had literally hundreds of emails from happy mama’s that used my tutorial successfully and send pictures of their little one wearing the poncho. The neck hole does seem to be a common problem, which is why I updated the post reinforcing the fact that it’s so easy to cut the hole too big, and when in doubt, measure your child’s clothing neck holes. Don’t just eye it!
I made a poncho (my own pattern) for my grandson, who also has a humongo head size. Of course I got the circle too large. Easily fixed this by attaching a flap with a buttonhole and added a large decorative button to fit him perfectly. There is always a way to fix our goofs! I wish I had your pattern when I did mine; it would’ve saved me a lot of time.
YES! I love how there’s always a work-around to our mistakes. And often it ends up looking more awesome than our original design!
Or you can order it on line and have it delivered to your door shipping free.
Love this and would like to make one for my 7 year old granddaughter, but I have no idea on how to size up. Measure from neck to wrist, then what? How does that tell me how much material to use? I’m a true beginner…thank you!
If I were you, I would have your granddaughter stand with her hands straight out to the sides, and measure from wrist to wrist. That will be the length and width of the fabric before you cut it in a circle!
Just a question, instead of using fleece, could I purchase a heavy blanket and use that as the fabric?
I absolutely think that would work!
Made this for my little one. Made some slight modifications. Made it reversible. The hole was cut kinda on the big side so to fix that, added some pleats and it worked, and made it fall really cute. I used chenille and fleece so it will be extra warm for Canadian winters.
I love the idea of adding pleats! I’m glad it turned out so cute… and warm! <3
I made this poncho in about 6 hours, handsewn instead of using a machine. There is fix for cutting the hold too big! I made one for my son with a plaid pattern and solid pattern underneath. To fix too large of a neck you have 2 options: snaps or lacing. You can even use a new shoelace and thread it like a corset.For snaps, instead of cutting a V, you cut a straight line and use a snap tool to add two snaps. The fabric will overlap, but it was still retain the cute look of a poncho. For Lacing, you need a grommet tool and grommets with whatever you intend to lace with. You will cut a V, sew the edges and then punch grommets into the hemmed edges. Once the grommets are secure, you will be able to lace the neck tighter by lacing through like a corset..
Hand sewn? You go girl! I do love the idea of snaps or lacing for fixing a too-large head hole. Thanks for the tips!
I haven’t made this yet but am planning on doing so as soon as I can make it to get fabric. Sewing this by hand with a large blanket stitch using embroidery thread would be very cute and easy. You wouldn’t have to turn under any edges or anything! Can’t wait to get this started!
So…. I failed. How do I fix it. My hole is way way too big of an opening I measured one of his shirts and tried finding an item in the house but have no clue what I did…. how do I make it smaller now that it is 100% completed?
Oh no Mindy! Trust me, you are NOT alone in this mistake. A couple of other commenters have suggested adding a snap or button at the neck hole with a fold in the fabric. Or even a drawstring?
You could purchase some knit ribbed material and sew it on to the “too big” neck hole & it would work like a turtle necked sweater. You would make the ribbed knit as wide as you would like the “turtle neck” high.
Was planning on using the covered hook and eyes, thought they would be decorative.
So, I know the article says a too big hole for baby’s head cant be fixed- buttt I have a solution. I just cut mine wayyyyy too big thinking I could remember these directions without having the instructions open. Well a couple of pintuck or pleats at either side of the shoulder and tada…problem solved!
It’s not perfect but you cannot even notice I made a mistake 🙂
I love that idea! Great problem solving 😉 Mine isn’t perfect either, but my girls rocks it! <3
Hi! A friend found your poncho tutorial and showed it to me. The one I am making is very similar. I love the hood part and would Love to try it. A little confused how to size and add the hood and then how to hem up that new circle that is cut out on the bottom layer. I have the hood itself made but I’m stuck 🙁 can you help please!!
I cut the hood a little long so I could try in on my little one and decide exactly where it should be sewn on. I recommend doing that! You can pin the hood to the poncho while your child is wearing it, and then take it off and sew it on! I sewed the hood to the outer linen layer first, and then cut the hole in the fleece layer and turned the edge under and hemmed it as I was sewing it to the hood. Does that make sense?
How can I pin the hood in place while she is wearing it if the bottom hole is not cut yet?
Thank you so much for this pattern. It so simple and easy to modify for whatever look I’m going for. I needed a windbreaker for my daughter and was able to make her a nice one by sewing some vinyl in between the layers. As well as modding the hood so that it had multiple layers that I could stick the vinyl between. Now I don’t have to worry about her saying warm in the wind and rain. I will defiantly be using this pattern as a base to make more ponchos in the future. Thanks again!
Thank you for posting this. Have just made one for a great niece (adapted to be a cape) and now am making a cape for her Mum. My question is about the hood. Did you choose 18 inches as measurement from top of head to shoulder with some spare? I’m not sure what size square to cut for an adult so just wanted to know what your reasoning was. Gorgeous pictures of your little girl! What a cutie!
I would cut the hood larger than you think you need it, and then try it on her and pin it to the cape while she’s wearing it so you know it will be perfect!
Wondering if I can tuck the hood in between the inner and outer layer and hem all three around the small opening and then flip it right side out to make nice clean looking finish?
Also thinking of making the hole and hood a little bit bigger (to grow with) and adding a drawstring to the hood. Thoughts?
Yes yes! You can and should! Please send pics. 🙂
Yes you can totally do that! I was just worried that I wouldn’t be able to keep all 3 layers perfect while I was sewing them (I’m a beginner), and so I did this part in two steps. 🙂
I made one it turned out good. I used fleece to fleece because it gets so cold in Ohio
Yay! I’m glad it turned out! Love that you used a double layer of fleece. So cozy!
I made 3 ponchos inspired by this post. Instead of the linen, I used fleece for both layers so it is reversible. I let the kids pick a fun pattern and I picked a simple pattern so we could choose if we wanted the goofy side or the fun side or each time. That way all I had to sew was the hood/neck and just tied the bottom after turning it right side out. Wish I could post a picture.
That’s SUCH a good idea! And I bet they loved picking out a pattern too. I’d LOVE to see pics! You can email me at beth@realitydaydream.com
So are you saying that you just sewed at the top where the head goes then just did that blanket tie technique on the bottom of both fleece pieces so they would be together?
Did you still sew the hood on the same? Love the reverseable idea!
I love this…do you take orders….you can email me.
Thanks…LD
Hi Linda, unfortunately I’m not making these to sell. Just sharing the instructions. Do you have a friend or family member that sews?? Or you could check Etsy?
I would like to print the directions I don’t see where I am able to do this
Hey Arlene! You can ctrl-P and print this webpage. I hope this helps!
Hey I’m just getting started! So excited! In the instructions you don’t menting hemming the linen hole. In the pictures where you are adding the hood it looks hemmed. I just want to double check.
Thanks!
I’m not sure if I did it the RIGHT way, but I sewed the hood to the already hemmed linen, and THEN cut the circle head-hole in the fleece and hemmed it as I sewed it to the hood/linen that I had sewn together previously. Does that make sense?
When measuring neck to hand to make other sizes you say measure and modify accordingly…what should I change? For example, one I am making had a neck to wrist of 17 inches (23in at finger tips).
I just want to make sure I make it big enough.
Thank You!
If you’re talking about the neck hole, the best advice I can give is to take a shirt from your child’s closet that has a perfect sized neck hole, and use those exact measurements to make your neck hold in the poncho. Just keep in mind that you’re hemming after cutting the hole, so you’ll want to cut the hole smaller for hemming purposes.
Thank you for hooded poncho I love it but it looks inside out I would prefer lining inside and colorful pattern of fleece material outside to see it! I love the poncho idea! I hope I can make it I am not much of a sewer!! Jeanie Loveland. Hope you will share more ideas!
Thank you Jeanie! Yes, the beauty of this design is that you can switch the fabrics around and modify to fit your own preferences! If you make one, be sure to send pictures! <3
like some of the others did , why not same or different pattern of fleece on both sides?
The beauty of this design is that you can customize it however you want! I liked the tailored look of the linen with an accent of color and pattern. That way it will go with most of her clothes without looking obnoxious. But I think it would be cute to do it any way you like!
I made this for a friends 3 year old. She bought 36″ wide fabric so I could only do an oval.. Maybe putting the WOF in the instructions would help those who don’t sew. Thanks.
This is a good point. I wasn’t thinking about how fabric sometime comes in different widths. Thanks for the heads up!
Thanks for the pattern. Too cute!! I’m going to use double sided cuddle with slicker for the outer layer. **Tip: You need a walking foot for your sewing machine… or a Pfaff with IDT (built in walking foot)! Sewing through all those layers would be sew much easier and not as likely to stretch.
This is a good tip! Thank you Lena!
How did it come out with the cuddle fabric?
Love this poncho and would love too make one for my Great Granddaughter,your measurements are 36×36,so I’m wondering what to cut the square at so it finishes at 19″ ! Any help would be much appreciated!!
Sharron Bryant
Hi. I am not a great seamstress, but thought I would give this a try. I am about to take on attaching the hood. You say to pin it to the linen, then stitch it up. When stitching, are you just stitching the hood and linen together and leaving the other piece of fleece out of the mix, or are you supposed to Be catching all three layers, fleece, hood, and linen? Also, Are you once again following the same sew line from having hemmed the linen?
I also have the same question as Dodi!
Sorry for the confusion! When you’re attaching the hood, you’re just sewing it to the outer linen layer over the existing her line. You shouldnt have a hole cut in your fleece yet at this point. You’ll see that the next step after that is to cut the fleece hole, fold over the edge, pin, and hem it as you’re sewing it to the hood and linen layer all at once. If you’re comfortable just doing it all in one step, then go for it! I was just worried I wouldn’t be able to keep all 3 layers straight and have a nice clean line. ????
I used the pattern to make a poncho for my little and it turned out awesome! I’ve gotten so many compliments on it. So thank you for the pattern!
Someone wants me to make some ponchos for her granddaughters and I know I need to size up because one is 5 and one is 7. Do you think I should size up the hood as well?
Yes I would size up the hood a bit. Better yet, if you can, have the 7-year-old try it on before the hood is attached so you can pin it just exactly where you need to sew!
Bethany, I could not figure out to write a comment, so I hope this is okay to post on someone elses post!
I am trying to make this poncho for a 3yr old. I would like it to fit for two years. Can you tell me how to size up a bit, does that mean I need more fabric? You can email me if you would like. I am kind of confused. Favorite part of your instructions, besides your darling little girl, is the trash can and balloon! It made me smile 🙂
Aly
Hey Aly! That’s a valid question… I think I would start with cutting the largest circle layer to be about 4″ bigger in diameter. That way it will be 2″ longer all around. Does that make sense?
Not really. But for starters, i don’t see where the measurements are given for diameter. So, 4 inches longer than how much?Is that the 36″ that we have started with? I need things explained pretty simply 🙂
I just re-read the instructions, so are you meaning I should cut the square 40×40 to start instead of 36×36?
I must have done something wrong while folding. When I opened it up, it was in 2 pieces. Help!
Oh no! Be sure to watch the video in my post that demonstrates step-by-step how to fold and cut the fabric. It’s easy to mess up!
I don’t see a video. We kept looking for it and couldn’t find it.
That’s so weird! I’m so sorry! It disappeared! I just went back into the post and added it back in. So sorry for the inconvenience!
I did one of these for my little girl and made a mistake that thankfully turned out okay lol. I made mine with a dark blue soft denim outer and a cute fleece print. I’m hoping to make another when she grows out of this one. My big girl likes it enough I may try making one for her too. I will send you a picture of the one I’ve made so far. Thanks for the pattern and instruction 🙂
Awww yay! I’m glad it ended up working out! <3 My girl LOVES hers too!
Oh yes absolutely priceless..thanks
I’ve been wanting to make this for one of my granddaughters. I found a large piece of denim in my stash that I’m going to use for the outside. I have a pink plaid fleece for the inside. Washing the denim to soften it up. Hope it works. Can’t wait to get sewing on it. ????
Oooo FUN! I love that you’re using denim for the outer layer! Be sure to send me pics! <3
My suggestion would be to cut the top layer a little shorter so there is not such a large turn up, it would be easier to hem and not so bulky. The hood would look more finished if the top were to be sewn together an then the hem put around it, that way you don’t have unfinished seam edges showing on the top of the hood.Also, I had to cut mine down to fit a 6 mo. old baby. I made one first out of fabric I had and the mom liked it so much she purchased both of them.
What dimension did you make the square and hole?
How easy would it be to put arm sits in the front so my little can play and snack in her car seat without interrupting the whole poncho?
Very easy! You should go for it!
I just made one today for my little girl! I used shiny, princess fabric. I love it! It’s not perfect by any means but I love it. 🙂
Hi Jen
Why did you use linen for the poncho? Warmth? Repel the rain? Just curious
JoAnn
I just liked how it gave the whole thing a more tailored look. And the linen holds its shape and doesn’t stretch out like fleece.
I liked how it gave the poncho a more ‘tailored’ look. And the neutral color makes it look better with whatever my little girl is wearing. I wanted the bright colorful fleece to be the ‘accent’ color! And I’m so glad I did. Love everything about it.
Hi Beth! Thanks for sharing. Do you or does anyone have recommendations or links to make this a little less girly? My 17 month old boy needs to stay warm in his car seat too. :). Thanks!
Hey Jen! I recently made a poncho for my nephew, and it turned out so cute! I just swapped out the butterfly fleece for some fleece with wide blue and greed bold stripes. It changed the whole look and didn’t seem girly at all! You could leave out the part where you cut the slits for fringe if you feel like that part adds to the femininity. Let me know how it goes!
I like the pattern, but not the linen on the outside… I do believe I would make it with the fleece on the outside and perhaps a coordinating heavy flannel on the inside… Linen doesn’t hold up like it should.. and I think it looks a like cheap with it on the outside… the beautiful butterfly material should be seen… and the comfort will still be the same… choosing fabrics that work well together is a very good thing to learn.
disagree… i just finished sewing one for my grandbaby… linen is classic… and it gives the poncho some weight… maybe you just don’t like mushroom color… i used black linen with pretty black/pink/white patterned fleece underneath… super cute
Ooo black linen sounds pretty! I would love to see pics! You can email them to me at beth@realitydaydream.com. I wish there was a way to add pics here in the comments.
That’s ok! Everyone has a different style! I loved the neutral-ness of the linen for the outside so it would look nice with whatever she’s wearing. And the teal butterfly fabric was the perfect accent color and touch of whimsy. But to each their own. I’d love to see pics of yours when you’re done! <3
Do you have the right side of the fleece against the wrong side of linen, or are they wrong sides together?
Thanks, and love your idea/pattern!
Yes exactly! The right side of the fleece goes against the wrong side of the linen.
I must be really dense because I can’t figure out how to sew the hood. The pictures are confusing to me.
I think you sew a hem on each side first. Then fold in half (wrong side out). (Sew across the top, which is a short end). Then turn right side out and you can stitch it into the poncho.
Anyone willing to make me one for my daughter? She wears 12m clothes. I don’t have a sewing machine
Is there a video tutorial for this anywhere?
I must be dense when it comes to the last few steps. I understand putting the hood between the linen and the fleece, but which way does the right side go? Then when I get done pinning the hood to the neckline, I have a lot of fabric left over. I already cut off about 2″. Do I need to take off more so the hemmed edges are even?
So if I understand right I start with a square the length I want the project to be?
Correct!
I am excited to begin one of these for my niece. However, I’m slightly overwhelmed with the measurements. She is 5 with a neck to wrist measurement of 19″ and neck hole of 19.5″ ( was going to use 18″ since that sounded big). Do I add the 38″ (neck to wrist doubled for each side) and the 19″ to get my overall size….56 total inches just sounds extremely big? Thanks so much for your help!
you actually only need 44″. If your neice’s head is 19.5 inches in circumference you only need the diameter (~6″)
Just did one last night for my daughter. Turned out great. I modified it a bit and added a matching hat. I also used fleece for both layers. I did the neck q little too big, so I added a snap button 🙂 thanks for the tutorial 🙂
How did the dual fleece poncho turn out? That’s what I’m thinking of using. Any tips?
A gal did one of these for her daughter, both fleece, in a no-sew pattern. She just tied the ends instead of hemming and fringing. And for the neck she cut slits and wove a strip of fleece for a tie
I have already made multiple ponchos, both dual fleece ( the poncho & hood). Thanks!
Cool YAY! I would love to see pics! I wish there was a way for you to add pics here in the comments. You should email them to me …beth@realitydaydream.com
YES! I love that there are so many ways to modify this design! <3
Please explain how you added a snap button. A picture would be great! I made one for my 1 and a half year old granddaughter and the hole fits over my head! So I know it’s going to slip off her shoulders.
Hey Amy! There is no snap. But if you made the head hole too big, you could always fold it over and put a tick there? Or look up a tutorial for adding a snap or a button on YouTube?
Just finished this! Thank you so much. The tutorial was great. Next time I may make a couple of adjustments. I will likely sew hood, top and bottom fabric all at the same time. this took me about 5 hours total (I went very, very slow so as to not make any mistakes) and cost me about $30 CDN ( i think I paid too much for the linen).
Thank you again!
Could you possibly answer my question below please? I can’t find linen near me. Do you know if cotton or flannel would work? If so should I prewash the fabric?
I used a sweat shirt fabric and it worked great!
I used one fleece and one flannel, it seemed to work fine.
I used fleece and flannel. Turned it great! Except I made to hole too big!
Did you prewash your fabrics? I’m having a hard time finding linen in the stores near me so I have to go with something different. I really don’t want to order online so my options are cotton or flannel. Which would be better to use to make this? Should I prewash both the fleece and the cotton or flannel? Any help would-be greatly appreciated. I’m a beginner just starting out! Thanks!
Hi Katelyn!
I’m no expert but I would say if you can’t find linen then sure you could use a nice cotton fabric. I wouldn’t use the flannel personally because it is too similar to fleece. The cotton is a wee bit stiffer. The nice thing about sewing a lot like cooking you can take the idea and run with to make it your own. 🙂
I didn’t nor do I ever prewar my fabric. I don’t have time or patience to go through all that hassle but again it’s up to you?
Best of luck and happy sewing!
Flannel would work just fine… and it’s soft.. put it on the inside not the outside..would make a nice poncho Always prewash flannel.. it shrinks like crazy, it also tightens up the weave.
I think anytime you use flannel, it should be pre-shrunk.
Agree!
When cut how big is the circle to be? Just messed up $7 worth of fleece cause it is to thick and silky like to cut right
Hi Bev, as I stated in the post, I highly recommend measuring the head opening of the child’s shirt. Every kid has a different size head, and it would be silly for me to give exact measurements for the opening. I will tell you that the hole will look WAY too small when you first cut it, but keep going! I’m sorry about your $7 worth of fabric. I hope the second time works out better. Please send pics when you’re done! beth@realitydaydream.com
It’s not for the head. After the folds.It still looks like a square.Tried to refold and trim it again.Didn’t help.
Do you remember making paper snowflakes as a kid? This is pretty similar. The last step after folding, was to round the bottom and then of course cut the snowflake. Imagining the way I would cut the bottom of the snowflake to make a circle really helped me.
I also cut one out of scrap material, just to be safe.
I think I’m going to make it for my girls with just fleece
Mine was about a 1yd diameter but I felt like it ended up being a bit too long for my little girl so I’m going to make one a bit smaller. For a kid older than 18months though it seems like 1yd diameter would work…
I just made this today for my 11 month old daughter with my mom’s help so I didn’t impale myself sewing haha. I ended up having the problem that the head was too big ( babies – big heads, tiny shoulders) so we pleated the neckline for a better fit. It was a pretty easy fix. Thanks so much for posting this! Only took a few hours for us to figure out and I love it! I’d actually like to make another with a cute color combo.
Hello! I have a few questions involving the cutting of the fleece. For some reason when I cut it, it comes out in two halves not a circle. And then when it does stay together comes out more as a rounded square. Why? Thanks!
Hey Abbie! A couple others were having trouble with this too, so I made a video to demonstrate. I added it to this post so you can view it there. I’m having some trouble with ads on it, so try not to be too annoyed while we’re getting it taken care of. Thanks!
Yes mine looks like a square and and it very hard to cut thru the thick layers and the corners are chopped up.
I cut my linen fabric using the layered/folded method, and then payed it out flat over top of the fleece fabric… then just cut around the circle so I wouldn’t have to deal with so many layers of fleece. Hope this helps!
How do you adjust for larger sizes?
I just made one the other day for my niece’s birthday. It turned out beautifully! I wish I could post a picture. I am planning on making one for my son as well, with the cooler weather coming this will be perfect for the car because I hate always fighting with taking the coat on and off. My niece is turning 3 so I upped the size a little about 6 inches all around and the test run fit pretty well giving her room to grow, I didn’t change the size for the hood though. Thank you so much for this awesome tutorial.
Yayyyyy! Send me a pic at beth@realitydaydream.com
Do you have a printable version? My machine is in another room and would like to not have to run back and forth from the computer to the sewing machine. Great idea. Thanks for sharing.
Would it work if you hit Control-P to print the blog post? I do not have this in a PDF version.
That’s 12 pages, I’ll just go back and forth. Thanks for the reply.
Take pictures of the pages on your phone. I do this with my embroidery.
Yeah it’s frustrating that you can’t upload pics right here to the comment thread. You could either post pics to social media and tag me (@RealityDaydream) or just email them to me! (beth@realitydaydream.com … I can’t wait to see!
I am confused by the hood. It looks like it is a tube of fleece. So does it just cover the ears or does it cover the back of the neck, like a regular hoodie.
The hood is folded in half and sewn on one end, so it should be just like a regular hood. Does that makes sense?
I think I have it now. Thanks
My 18 yr old niece wants one…best way to conver measurements?
You just want to measure from her neck to wrist, and then adjust the radius of your circle accordingly. It’s unlikely that you’ll be able to find fabric wide enough, so you’ll probably have to put two half-circles together. But it will still be awesome! Please send pics!
Ok help on the neck hole, can you tell me what the your circle measured. I don’t have a little one to try it on. thanks
The little plate that we used to trace the circle of the neck hole was 4 3/4″, but it ended up being a bit too small. So maybe go with 5″? That is… if you baby has the exact same size head as mine LOL! When you’re cutting the head hole, it will look WAY too small at first. But don’t let that stop you. You can always go bigger like I did, but you can’t make it smaller once you’ve cut a hold that ends up being too big.
I’m making one for a 15 month old, and the sweater I measured as a guid was 14 inches. So I cute 13 inches, as it stretches easily.
I made one of these today and it came out great! I also made my neck hole just a little big, so I made a little collar to go around the neck after the hood is put on.
Yay I’m so glad it turned out! And good problem-solving! <3
Just to be clear… the 18×18 for the hood comes from the scrap when cutting the circle or I need to buy an additional bit of fabric on top of the 1 yard?
Correct. The hood fabric is in addition to the yard of fleece.
I wouldn’t think you would need to buy extra, because the fleece I bought is 60″ wide.
I made my neck hole WAY too big on my daughters so I thought I’d share a little tip for others who have done the same! I bought some rib knit fabric to match and the measured how big the neck hole was (mine was 22inches) then cut the fabric so that it went from 22 inches into 17 inches (the size of my daughter’s head minus an inch). The fabric I cut looked kind of like the Pizza Hut sign with a rounded bottom. I added 4 inches of 17inch fabric in top so that it covered her neck more and it looks like she’s wearing a turtle neck! It worked perfectly and she loves wearing her cape!
Yay, I’m glad it turned out despite the setback!
If you wanted to make a larger size, how much bigger do you want that initial square (36″)? I would want to measure like Christine is saying below, but how do I apply that to the 36″ square we started with….I do sew, but not usually good at adjusting a pattern.
She is beautiful and the poncho is adorable love it to cute
Thank you! <3
Do you have to use the linen fabric or can you use normal fabric with the fleece?
I’m not sure what ‘normal’ fabric means, but you don’t have to use linen. You could even use two layers of fleece if you really wanted to. I just liked the look and feel of linen for the outer layer.
I live in Canada, and used fleece for both fabrics, turned out great.
I’m a seamstress – I primarily sew costumes. If you sent me the fabric, I’d sew it for you.
I would think to get the appropriate size all you have to do is measure the child from the back of the neck down to where you want the hem of the poncho to sit then add extra for the hem. Behind the knee or just above would be perfect length as in the photo. Not really that complicated.
Yes totally! So easy to modify for different sizes!
This is super cute! I really want to make one for my daughter. That said, she is 11.5 months and wearing a 2T. So should I keep it to the same dimensions, or try a bit bigger?
I think this would be the perfect size for her!
excellent job!!! SOOO CUTE!!!!!!! has Pais & Del suggested they would like one 😉
Lol yes… they were like ‘WHY DOES CYPIE GET ONE AND NOT US?’ I’ll whip some out for them in ALLLLL my free time. 🙂
Can you make another one but have the whole thing in a video?
I have disabilities making it hard to go by pictures, I would really appreciate it if you added a video of it
Also what measurements would I do for a size 18 months?
Also size 3t?
I am bad at math and everything too so details help me allot, thank you!
Taby, so sorry but no video this time 🙁
These dimensions in the tutorial are for sizes 12m – 3T. You could make the 12m one slightly smaller and the 3T one slightly larger to distinguish between the two. The beauty of this concept is that it doesn’t have to be exact!
My granddaughter is 17months old and wears a 3t how would you suggest getting this to fit her?
That sounds about the same exact size and age as Cypress! Lol! I would follow this tutorial with the same dimensions!
Thanks for the great poncho project! How would you adjust for an older child that’s wearing 5t?
I would measure from his/her neck down to wrists and adjust the tutorial accordingly!
Thanks for poncho project! How would I adjust for a child wearing 4-5t?
I would measure the length from your child’s neck to their wrists and adjust the dimensions accordingly!
What size is your daughter? My daughter is is 12-18 month clothes. Any ideas what kind of adjustments I should make for a smaller size?
My daughter wears 2T …sometimes 3T. So maybe just make the rafius of the circle a couple inches shorter? I would cut it out of a scrap piece of fabric to test it first
Laura, the fleece fabric stretches and the linen doesn’t. As someone said, the linen keeps the fleece from getting stretched out of shape — stabilizes the cape. I could see this as a reversible cape using two cute prints. Fleece is also water resistant so it would keep the clothes underneath dry if it’s raining or snowing.
Yes exactly!
Just curious what the reasoning is behind the linen layer? Could you make this out of just one layer of fleece? Is the linen for extra warmth or looks? Very cute!
I was wondering the same, maybe it keeps the “poncho” shape you expect, otherwise it might just stick to the clothing underneath???
The main reason I added the linen layer was because I liked the more ‘taylored look’ and the neutral color would go with anything. And the fleece added a coziness factor as well as an accent color. But the linen also helps the poncho keep it’s shape, since fleece tends to stretch over time.
The main reason I added the linen layer was because I liked the more ‘taylored look’ and the neutral color would go with anything. And the fleece added a coziness factor as well as an accent color. But the linen also helps the poncho keep it’s shape, since fleece tends to stretch over time, and eventually get pilly.
I was thinking of adding a thicker cloth underneath the fleece so the pretty one is on top and I was thinking of the thicker cloth underneath to block out the harsh winds and freezing weather in the winter. Do you think it would be too hard to sew thicker clothing with the fleece?
You could absolutely make this more layers for added warmth!
I was thinking the same thing-the burlap looking fabric was throwing me, because I thought “why in the world would she put the pretty fabric underneath that brown burlap looking stuff.
So cute, and I love the boots!
Thanks Julie! <3
For real I loled at the saucer comment! We call them salad plates!
The balloon was such a good idea and quite amusing. Good job Mama!
Haha right?!?! Lol!
Absolutely adorable!! Are you planning on making these for your twins as well?
I’m seriously considering it! Just need to find the time 🙂
Oh man I need to borrow someones kid to make this for and dress up!!! It is so darn cute!!!!
If you were in Indiana I’d say heck yeah you could make one for my daughter and put her in it xD
Ok I just have to say the picture of Cypress opening the door is pure gold! Such a great picture and a cutie pie of a model too! Excellent job on the ponchos! Thanks for sharing.
Hehe thank you! She IS pretty cute. 🙂