We have mature shade trees all over our acreage. And rest assured, every time a storm blows through, there are downed sticks and branches scattered around the yard. The twins (and now, their new recruit, Cypress – 2) make it their personal goal to gather the branches and distribute them in the vicinity of the firepit in hopes that we’ll strike up a fire in the evening and they’ll get to stay up late.
True story!
But this summer, it’s been HOT. And enjoying a fire isn’t a thing. Not even at 9pm. So naturally, I decided to use those branches for a project!!
 *This post is sponsored by DAP. Thank you for supporting the fabulous brands that make Reality Daydream possible! This post contains affiliate links*
Supplies for Wood Slice Floor Vase
- Branches varying in thickness (from 3/4” to 2” ish)
- Cheapo floor vase (I got this one)
- White spray paint/primer in-one
- DAP RapidFuse quick-drying adhesive
- Rubber band
- Band saw (or reciprocating saw)
I began by slicing those branches into little wooden disks using our band saw. I just eye’d the thickness of each one rather than creating a jig to make them all uniform. I like the organic ‘texture’ of it all. After hearing my friend Brittany’s story about finding critters living in her wood slices when she did her wreath tutorial, I decided to take a page from her book and bake mine in the oven too. JUST TO BE SURE.

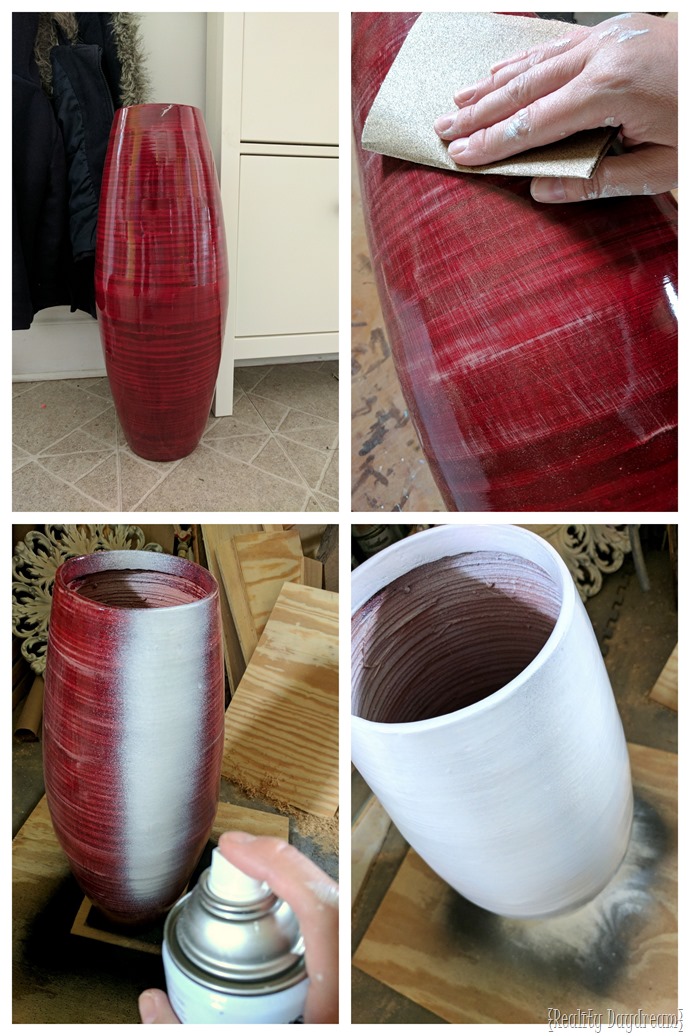
The tall floor vase I got is really light-weight, and it had a glossy sheen that I needed to get rid of. So I sanded it down with 120 grit so that the paint and adhesive would have something to ‘grab onto’. Then I painted ‘er white!

Time for the fun part! Gather up your supplies and slap on some gloves!

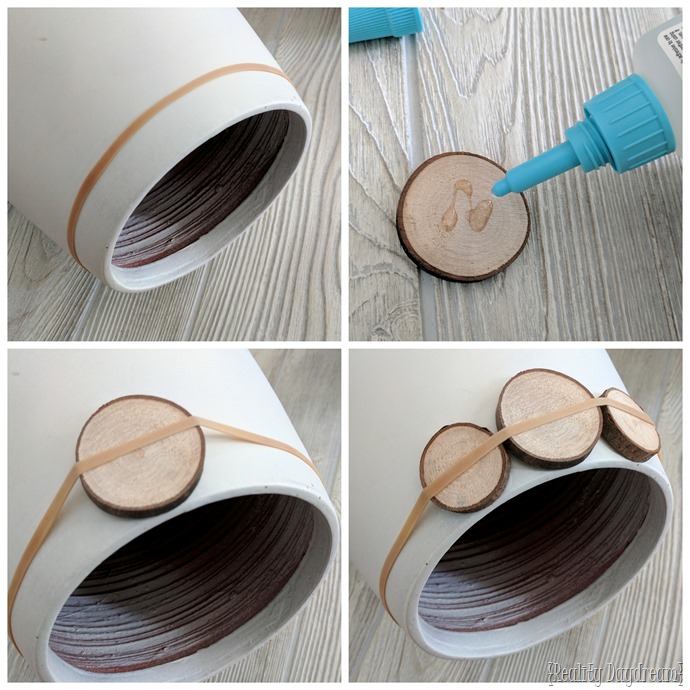
This Rapid Fuse adhesive is SO GREAT. It dries in 30 seconds, and doesn’t take much for a strong hold. So I stretched my rubber band around the top opening of the floor vase, and began dabbing glue on each wood slice, one at a time, and placing them under the rubber band.

I just kept making my way around, making sure I’m varying the sizes as I go.

After finishing the first row, I just ‘scootched’ my rubber band off the wood slices and started a new row!


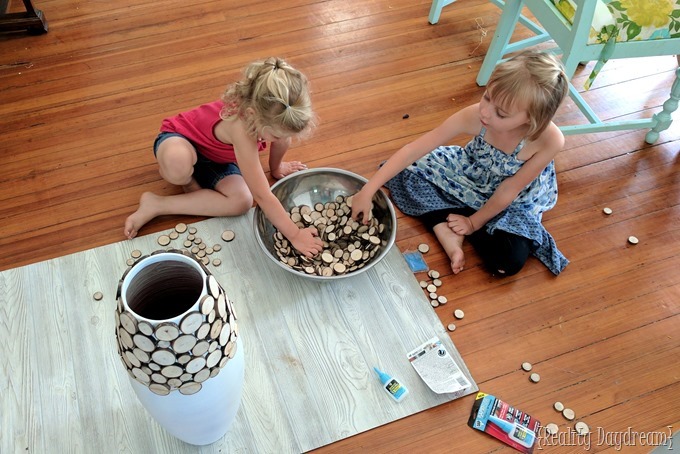
The twins wanted to help, so they handed me wood slices along the way! It was actually really helpful.


In no time at all, we were done! It looked amazing, and the girls were so proud about their contribution.

For a hot second, I considered painting the whole thing white, but I just couldn’t cover up those natural wood slices. I JUST COULDN’T OKAY?

I’ve never had a tall ‘floor vase’ in my possession, so I didn’t even have any of the pretties to put in it. So the girls and I made a little trip to Hobby Lobby, and found an entire isle of different things to put in these floor vases. Wheat and pussywillows and curly wooden-looking things. I think it will be fun to switch things out based on the season. And maybe even get some of those LED lit branches for Christmas! STAY TUNED.

After completing this project, my wheels are spinning with all kids of ideas for how to use these little wooden disks! I’m thinking about using them to make checkers for the girls, or painting them to look like coins for play money, or fridge magnets… or Christmas ornaments! Do you have any ideas to add to the list?!
As always, if this project inspired you to try something similar, PLEEEEEASE send me pics! It always makes my day!!! (beth@realitydaydream.com) And if you don’t already, you can enter your email address here to get notified every time I publish a new post…and be sure to follow us on Instagram and Facebook for lots if pretty inspiration and behind-the-scenes tomfoolery!
~Bethany
~~~~~~~~~~~~~~~~~~~~~~~~~~~~~
PS! If you enjoyed this post, you might also love this post I shared with all kinds of unique ways to incorporate live-edge wood into your décor, no matter your design style!
~~~~~~~~~~~~~~~~~~~~~
Thanks for pinning!


Not exactly related, but on the same note – my Sissy sliced the trunk of her and her now-husband’s first Christmas tree into discs and then used them as the table number markers for their wedding. Also, they saved some for Christmas ornaments.
Oh my gosh, I LOVE THAT! Such a sweet and sentimental idea! Thanks for sharing <3
My goodness your girls are getting big. I love the vase with the wood discs.
Love it. I want to do one now
Bethany,
If you make another one would you consider using the Unicorn Spit and color some of the wood circles? You could them sand the stained ones some so that the wood shows through the color and then glue them to the vase.
Love the blog and read nearly everyday!
Maureen
That would be so pretty! I love that idea! <3
Absolutely gorgeous! I will definitely be trying something similar to this. Thanks for the inspiration!!!
I absolutely love this Beth and I love how easy it is! I would, however, never thought of baking the wood first before putting it on the vase. I would have never thought of bugs!!! That would net have been pleasant! This is getting pinned to my “To Do” list. Thanks for the new project!