• Home
  • About
  • Tutorials
  • Recipes
  • Furniture
  • Contact
    • Contact
    • Infertility
    • Disclosure
    • Privacy Policy
  • Shop
    • Facebook
    • Instagram
    • Pinterest

Reality Daydream

The Dream is Free, The Hustle Sold Separately

  • Home
  • About
  • Tutorials
  • Recipes
  • Furniture
  • Contact
    • Contact
    • Infertility
    • Disclosure
    • Privacy Policy
  • Shop

Colorful Wood Stain Artwork on Furniture

May 26, 2015 by Bethany Sy

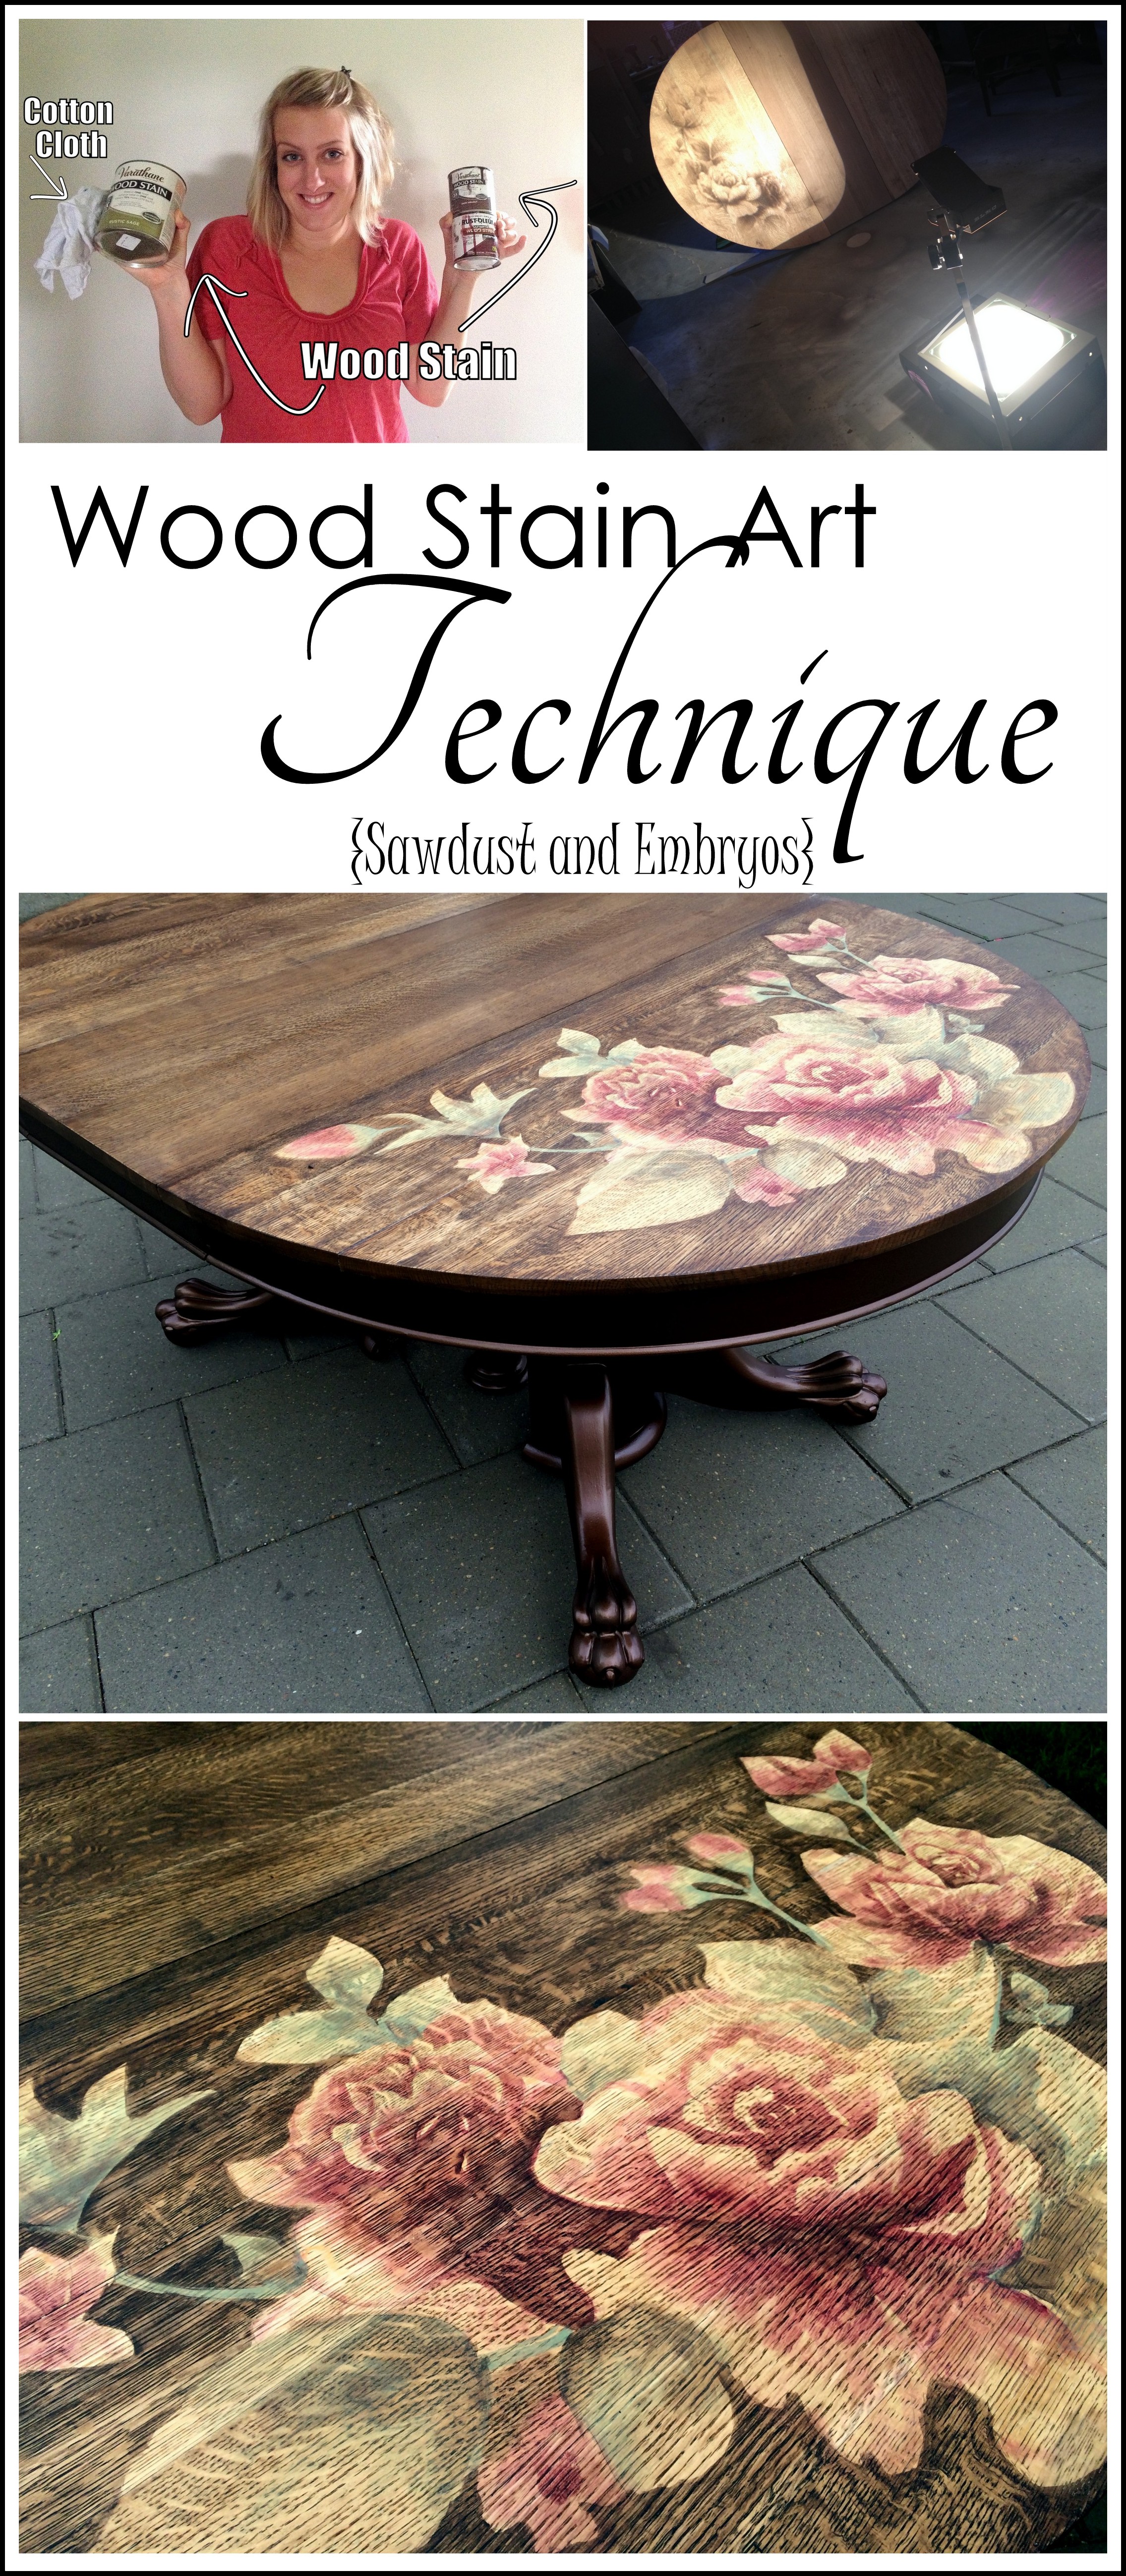
Last week I shared a sneak peek on Instagram of a new decorative staining project I’ve been working on. I’ve been wanting to try staining with various colors, and when RustOleum sent me some of their new stain shades to play with using my Wood Stain Art Technique, it was only a matter of time!

Wood stain shades by RustOleum

We’ve had this really amazing clawfoot table taking up room in our garage for awhile now. The previous owners had cut it down to be a coffee table, and Nick rebuilt it to be a dining table again.

Antique Clawfoot Table restoration

He also built a leaf so the table could extend, and he added a center support pedestal. Those leaves? THEY’RE WOOD.

carved wood leaf pedestal for claw foot table restoration

He likes to challenge himself and leave a personal touch on his pieces… which I admire so much. I’m more of a JUST GET IT DONE type of person. You can feel free to ‘read between the lines’ on that one. Heh.

He wanted me to do a stained design on the top surface as the finishing touch. Doing a floral design made the most sense because of the leafy pedestal. Since there’s a leaf, I decided to do an asymmetrical design with some roses on just one side of the table. That way it looks amazing with AND without the leaf!

I found an inspiration pic I loved, and traced it onto a transparency… modifying it a bit here and there as necessary.

Stained artwork on wooden table top!

And then, you guessed it, I used my overhead projector to blast the image onto the table and trace with a pencil.

How to paint with stain on a wooden table top

I decided to use 3 different shades of stain… RustOleum Dark Walnut, Cabernet, and Sage.

Learn how to use wood stain to make amazing artwork on furniture!

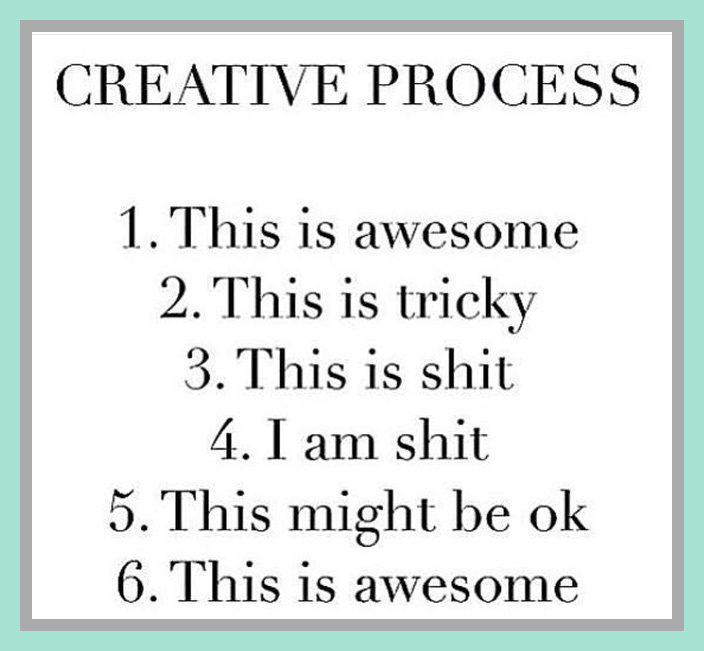
Every single time I do one of these Shading with Wood Stain pieces, I go through the same rotation of emotions. This pretty much sums it up:

Sounds about right! THE CREATIVE PROCESS

The rest is history! You’re going to have to watch the video to see how it turned out! Muahahaha! It’s only 2 minutes long, so your tortured suspense won’t last long.


.
.

If you’re interested in trying this technique, but are a little intimidated, I have a Beginner’s Tutorial HERE, as well as a video demonstration below!

.
.
.
This ‘Shading with stain’ technique is something I’m so proud of! There are TONS of you that have emailed me with pictures of your stained artwork (some examples here!), and it’s SO AWESOME! It’s the best feeling in the world to know that I inspired someone to create something! You guys are amazing!

Sawdust-Embryos_thumb2

If you haven’t already… check out some previous stained pieces I’ve done!

Artwork-using-wood-stain...-its-easier-than-it-looks-Sawdust-and-Embryos Using-raspberry-juice-to-stain-wood-and-make-awesome-artwork-Sawdust-and-Embryos_thumb
Shading-with-Wood-Stain-Technique-by[1] Shading with Stain {Gradual Staining Technique by Sawdust and Embryos}_thumb
End-table-using-Wood-Stained-Artwork-technique-by-Sawdust-and-Embryos_thumb


Thanks for pinning!

Use wood stain to make artwork! CRAZY time-lapse video! {Sawdust and Embryos}

Related:

  • How to Apply Wood Veneer

    If you follow us on the 'gram, you know I've been stripping the finish off…

  • Stripping an Old Stained Desk

    We love the original wood of our library, and wanted to find a desk that…

  • Ocean Resin Art

    Nick and I have dabbled in epoxy here and there, but we've never done anything…

About Bethany Sy

Nick and Bethany Sy are the creative free-spirits behind DIY/Lifestyle blog, Reality Daydream. They recently purchased a historic mansion and have been documenting the ups and downs of renovation and making this home their own... all while sharing tips and tutorials along the way! When they found themselves in the trenches of infertility, they started a journey that would prove to be their most important DIY project ever, and have 3 beautiful girls to show for it. <3

« Daddy’s Birthday Celebration
A Tour of our Homestead! »

Comments

  1. 41

    Landon Edgington says

    August 27, 2020 at 8:24 pm

    Just wow! Your works are amazing. Superb! I wish I could make an artwork like that too. 🙂

    Reply
  2. 42

    lAURIE says

    May 4, 2020 at 10:07 pm

    You are 100% badass. Thank you for sharing your technique. I told my artsy daughter she can do the magnolia for me but that you “make it look so simple, I *almost* feel like I could do it myself.” (Mind you, my first F was in 5th grade art.) I’m a word girl, so reading your stuff is great with all the directions, not to mention proper spelling and full sentence usage. Aces, lady, aces!

    Anyhoo, I am just really in adoration of your technique and the stuff you’ve created and beautified. Thank you for sharing it with the masses and also I’m going to possibly steal (not for profit) your creative process sign; and by “possibly,” I mean I am stealing it so thanks!

    Reply
  3. 43

    Rob says

    May 30, 2019 at 4:55 am

    BIG HUGS – I love your out excusing your audience – you can’t draw but neither can I – lol
    All good things to you

    Reply
  4. 44

    Peggy says

    July 26, 2018 at 1:02 am

    Can you share the stencil you used?

    Reply
    • 45

      Bethany Sy says

      July 26, 2018 at 11:40 am

      Oh man Peggy, it’s been so long I don’t remember where I got this picture. So sorry!

      Reply
  5. 46

    marina G says

    August 30, 2017 at 10:34 pm

    Hello. I love all your work. Have you ever used acrylic paints (colors)? I just got a tiny dresser and going to give it a try since I’ve always love the flowers.

    Reply
    • 47

      Bethany Sy says

      August 31, 2017 at 12:22 am

      I haven’t tried using acrylic paints with this particular technique. But I’m sure it would work! It might just not be as translucent by allowing the woodgrain to show through. If you decide to give it a go, let me know how it turns out! I’d love to see pics!

      Reply
  6. 48

    Sebastian D'Souza says

    May 25, 2017 at 9:14 am

    Hi, Bethany it’s really nice, you are blessed with a great talent and seeing your work has inspired me. God bless you. Wish great success. Thank you. Sebastian D’Souza

    Reply
  7. 49

    Renae Logan says

    April 28, 2017 at 3:47 pm

    Do you sell any of your table art?

    Reply
    • 50

      Bethany Sy says

      April 28, 2017 at 5:19 pm

      Sadly no. I did for the first couple tables I did, and it really stressed me out and took the fun out of my hobby. 🙂

      Reply
  8. 51

    Patti Forester Gwaltney says

    March 19, 2016 at 4:01 am

    love this and sooooo wish you were my neighbor !!!

    Reply
  9. 52

    dbm5510 says

    September 7, 2015 at 12:59 pm

    Hello Beth I just stubbled on your work and you are amazing. I would love to try this I am a decorative painter I have a site on Etsy. http://www.etsy.com/shop/daisycustompainting. It is so much fun. I just wanted to ask you…do you think I would be able to use a paint brush with stains. I don’t think I could do it with rags. I guess I should try it right? Thank you for sharing you wonderful work. Diane

    Reply
  10. 53

    Cody says

    August 26, 2015 at 7:50 am

    ABSOLUTELY THEE COOLEST!!!! I can totally relate to your artistic thought process. Thanks for putting it into words. Do you have a favorite finish coat or sealer?

    Reply
    • 54

      Beth @ Sawdust and Embryos says

      August 26, 2015 at 8:35 am

      Cody… we’ve tried a lot of different sealers, and our favorite is still just your basic Minwax Polyurethane!

      Reply
  11. 55

    Concerned One says

    August 18, 2015 at 9:16 pm

    LOVE this! I just shared it on my facebook page…it is AWESOME! You are awesome! What kind of stain…paint? did you use for coloring the roses and leaves?

    Reply
    • 56

      Beth @ Sawdust and Embryos says

      August 19, 2015 at 5:47 am

      Thank you! I used RustOleum stains for this: Dark Walnut, Cabernet, and Sage were the 3 stain shades.

      Reply
  12. 57

    suzanne says

    June 8, 2015 at 9:56 am

    Just started following you. You got some mad skills girl. Love Love Love

    Reply
  13. 58

    Karen says

    June 3, 2015 at 3:12 pm

    THAT is the most awesome thing I have ever seen! You, my girl, have much talent! Beautiful!

    Reply
  14. 59

    BBW4EVR says

    May 31, 2015 at 1:45 pm

    I want YOU to do this on my claw~foot table ~ same colors ~ same pattern!!!! Seriously ~ if you can’t do it ~ you have to find someone who can do it for me! YOU are amazing!

    Reply
  15. 60

    Julie@followyourheart says

    May 28, 2015 at 4:55 pm

    All you need on your list is #1 because that IS awesome!

    Reply
  16. 61

    Sugar Coated Living says

    May 28, 2015 at 1:54 pm

    I saw that you were telling people on the video on FB that you felt bad people were thinking you free-handed it, when you traced it onto the table first. PLEASE know that I could have traced the same exact image and it would have looked nothing like this at all. You are SO artistically talented. Your shading technique is amazing!

    Reply
    • 62

      Bethany @ Sawdust and Embryos says

      May 30, 2015 at 7:05 am

      Well thank you… 🙂 I appreciate you taking the time to comment!

      Reply
  17. 63

    Rare Finds says

    May 28, 2015 at 10:41 am

    Love Love Love this !!! I’ll have to try this!!! Looks like fun,
    and I know your process mine is the same when ever I design a piece!!

    Reply
  18. 64

    marciearrington says

    May 28, 2015 at 9:57 am

    That is amazing how you created that table top, simply beautiful. You are truly blessed with great talent. I’m so glad to find your blog. Thank You.

    Reply
  19. 65

    domesticashley says

    May 27, 2015 at 10:28 pm

    I am SO impressed, this turned out beautiful! You are seriously talented!

    Also, your creative process sounds a lot like mine 🙂

    Reply
    • 66

      Bethany @ Sawdust and Embryos says

      May 30, 2015 at 7:10 am

      Hehe thanks Ashley! 😉

      Reply
  20. 67

    susie says

    May 27, 2015 at 11:59 pm

    I love this is so many ways! Your ‘creative process’ sounds so familiar it is scary!

    Reply
  21. 68

    Peggy Zortman says

    May 27, 2015 at 10:41 am

    Absolutely awesomely beautiful! Pinned to pine over!

    Reply
  22. 69

    candace caldwell says

    May 26, 2015 at 8:40 pm

    Omgoodness that is beeeaauuuutiful! One of my favorite pieces you’ve done! (And that is seriously saying something cause I love so much of y’alls work )

    Reply
    • 70

      Bethany @ Sawdust and Embryos says

      May 30, 2015 at 7:15 am

      You’re super sweet Candace! Thank you!

      Reply
  23. 71

    Jennifer says

    May 26, 2015 at 4:51 pm

    Are. You. SERIOUS?!?!? That belongs in an art gallery! If you don’t keep it and sell it for less than $2,000, you’re crazy!! You never cease to amaze me with your talent.

    Reply
    • 72

      Bethany @ Sawdust and Embryos says

      May 30, 2015 at 7:17 am

      Haha! Thank you Jennifer! I don’t know if I would go that far 🙂

      Reply
  24. 73

    Karen @ Dogs Don't Eat Pizza says

    May 26, 2015 at 1:23 pm

    That is beautiful! I received some of that colored stain from Rust-Oleum, too – can’t wait to create with it! Thanks for sharing!

    Reply
    • 74

      Bethany @ Sawdust and Embryos says

      May 30, 2015 at 7:17 am

      It’s awesome! You should totally play around with it!

      Reply
  25. 75

    Wendy from OldLakeGeorge.com says

    May 26, 2015 at 11:40 am

    Wow! Wow. I am speechless.

    Reply
  26. 76

    dana dashoop says

    May 26, 2015 at 10:43 am

    LOVE LOVE LOVE~~~~ EXCELLENT JOB GORGEOUSLY DONE (is goregeously a word…Yep, it is now!!!)

    Reply
  27. 77

    Robyn Swensen says

    May 26, 2015 at 9:32 am

    This is so beautiful! You are so talented. I love it.

    Reply
  28. 78

    Lori Bernstein says

    May 26, 2015 at 8:57 am

    This table is beautiful! You are super talented!!

    Reply

Trackbacks

  1. Designing Dawn | Lettering: Reality Daydream says:
    January 8, 2016 at 6:26 pm

    […] If she looks familiar, you may recognize her from her recent amazing videos and tutorials on shading with stain. She is one talented […]

    Reply
  2. Dahlia Stained Artwork on Dining Table - Sawdust and Embryos says:
    June 25, 2015 at 5:24 am

    […] Doing wood stain art is soooo addicting for me. I wouldn’t call it ‘instant’ gratification, but the transformation happens over the course of a couple hours… and it’s so fun to watch it unfold! If you missed my last Stained Art Table time-lapse video, click here! […]

    Reply
  3. First Friday Features - The House of Wood says:
    June 5, 2015 at 3:41 pm

    […] Bethany is a master at wood stain. Watch the video. You’ll be mesmerized. […]

    Reply

Leave a Reply Cancel reply

Your email address will not be published. Required fields are marked *

  • Facebook
  • Instagram
  • Pinterest
  • RSS
  • YouTube
We are Nick and Bethany! Welcome to our blog, Reality Daydream where we share our DIY adventures!

realitydaydream

Still can’t get over these shelves. 😍 These Still can’t get over these shelves. 😍

These Aksel Radius Floating Shelves by @shelfology are the perfect finishing touch to this wall in our kitchen. 🙌

#gifted #shelfology #radshelfie #floatingshelf #akselradius
I needed an instant-gratification project today fo I needed an instant-gratification project today for my well-being, and this little wooden stand was so fun and fast!

Details and links to everything in this pic in Stories!
If ya just need a slab of wood, grab a cutting boa If ya just need a slab of wood, grab a cutting board when you’re at Target or Walmart! They’re made of hard wood!

I used this cutting board to experiment and make some prototypes for a large-scale piece of art I’m doing for our church. It’s got me EXCITED!

Follow along for that project- happening soooon!

@dapproducts @dremel @jet.woodworking
You’ve all seen the video, but here’s some sti You’ve all seen the video, but here’s some still shots of the kitchen wall in all its glory!! 

The Aksel Radius Floating Shelves by @shelfology were the perfect finishing touch! 

Should I do a house tour of our main floor this week?!?! 🙌🌿

#sponsored #floatingshelf #radshelfie
Load More Follow on Instagram
View of our entryway of our historic mansion that we're slowly renovating and making our own.
Click here for lots of art projects using only wood stain on furniture!!
Please feel free to share or pin my posts! You're welcome to use ONE of my images (no collages or pinnables) with a link back to the corresponding post. Please do not edit or crop that single image in any way. Improper use of my photos, ideas or words is a violation of copyright. Thank you!

Categories

Attention: Almost any do-it-yourself project involves risk of some sort. Your tools, materials, and skills will vary, as will the conditions at your project site. Reality Daydream has made every effort to be complete and accurate in the instructions of the plans on this website. Reality Daydream will not assume any responsibility or liability for damages or losses sustained or incurred in the course of your project or in the use of the item you create. Always follow the manufacturer’s operating instructions in the use of tools, check and follow your local building codes, and observe all commonly accepted safety precautions.


Copyright © 2023 · Modern Blogger Pro On Genesis Framework · Customizations by Sweet Theory Designs · Privacy Policy · Log in