Hi Friends! We finished a MAJOR project today… and do you really think we’re going to wait until Monday to share it?
NO!
So welcome to this random Sunday edition of Reality Daydream.
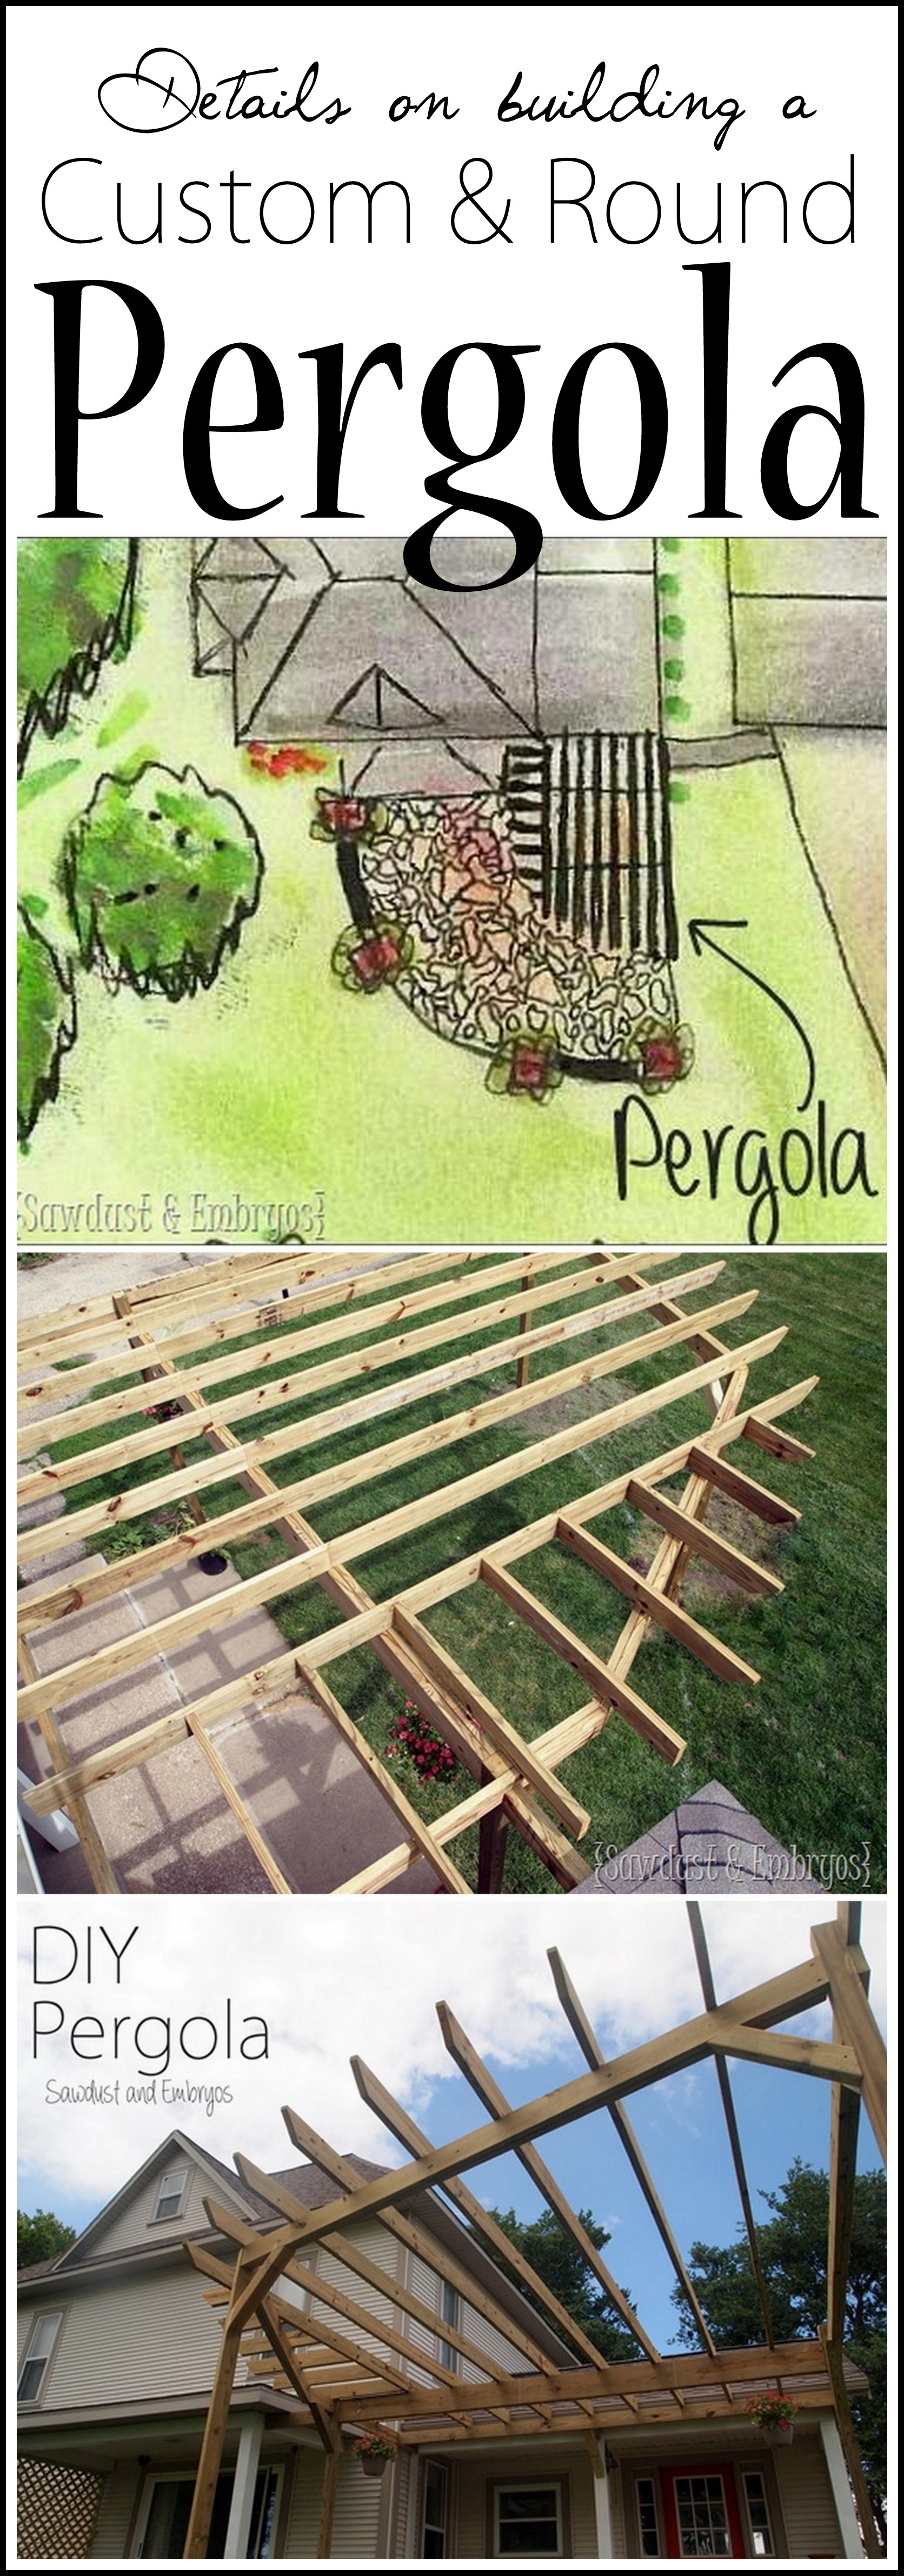
Nick and I have ALL KINDS of lofty plans for our home and land… most of which are just dreams. But I like to dream with my rendering markers, so I drew up a little ‘someday’ aerial image of our property (this is only 2 of the 5 acres).
 |
 |
And this is where I hand things over to Nick (brains AND brawn of this particular operation).
~~~~~~~~~~~~~~~~~~~~~~~~~~~~~~~~~~~~~~~~~
Hey Peeps, Gents, Germs, or whatever the heck you all call ourselves these days! This is Nick and I’m excited to tell you about our latest construction endeavor! About 3 weeks ago, I had a mind to build a wooden thingy off our porch. So I got to it envisioning and designing our very own pergola.

We’ve been doing a lot of focusing in the Interior of our house these past couple years, and while we don’t hate the EXterior, it could definitely use some love.

Before we get too far along in this adventure, I want to share with you my design style. You may have notice from some of my previous projects that I like to add a little curviness to my designs (like the Living Room Arches, and the Butcherblock Counter. If you were to toss Grant Woods, Downton Abbey and Zaha Hadid in a blender, hit puree for 15 min… I would be the slush that comes out…

We began laying out my plan and started calculating cost and materials. With as much information as there is online these days, there shouldn’t be any reason not to have a near complete construction supplies list and calculated cost. I say near complete, because well there are always surprises. First we marked out our dig site with a can of white spray paint. I really like to use curves and circles in my design and can’t say as though I have ever seen a rounded pergola before. We tied a piece of nylon cord to the center post and then started spraying the spray paint where we wanted the radius.
Note: It is important that you ‘call before you dig’ so the utility companies can come out and mark there utilities. You don’t want any unnecessary expenses. They will only mark up to the utilities meter. The rest is considered privately owned. Their phone number is 811.
Next, we used a nylon string and stakes to square up the one side of the pergola. I tied one end to this horizontal stake (making it adjustable).

The other end we’ll be put around a nail and tightened. In order to do that, wrap the string around your finger and rotate your hand around to create ten or so twists in the cord. Place the loop around the nail and pull tight. It is easier to do this if your pushing with one hand and pulling with the other. Than pull the loose string back. Doing this will keep the string taught while you finish laying out you project.

Using Pythagoras theorem a2 + b2 = c2, measure out from the corner in one direction (a2) and mark that spot. Then measure out in the other direction (b2) and mark that spot. Lastly, measure between the two points marked forming a triangle (c2). I would measure out at least 2/3 the length to ensure that things are square. Here is a calculator to help.
Time to BREAK GROUND! Two of the four posts will be installed into our existing concrete patio, but the other two need concrete of their own. We marked where my posts needed to be and started digging. Here in Iowa we have a 3’ frost line and some pretty substantial winds. We need to get my post anchored below that point. Once I got my holes dug deep enough, I got the tubes in place and mixed up some concrete (directions on bag) and filled the tubes up 2-3” above the grass line.

Now that the post locations are laid out, we can drill a 1/2 in hole in our existing concrete at the center of the post locations using a mason drill bit and a hammer drill. Tap the anchor bolt into the hole and mount the 4×4 brackets into place.


Image Source
Beth held the 4×4 into place with a level as I installed the temporary braces and nailed the bracket to the 4×4.

We then put up the beams and cross members. I doubled up 2×6’s for the shorter spans and used these 2 monstrous 2×10’s for the large span, since it would be carrying the bulk of the load. I screwed a board to the 4×4’s below where I wanted to beam to be to help hold things into place while I installed the beams.
")
Some of our beams are required to be at an angle. The best way to measure the angle is by setting the board in place and using a straight edge to mark the angle on the board.
")
Once the angle is found you can use a angle finder to measure and set the angle on your miter saw.

After measuring out and marking our rafters we started installing them. Unfortunately not all of the rafters would not span the entire distance of our pergola so we created a splice point at the center beam.

We toe-nailed each rafter to the beams.
")
After heaving the 16’ 2×6’s up into place, it was time to mark each board to be cut to form the curvy/circular shape of our design. Using the spray-painted grass marker, Beth placed an 18” board out from the spray painted radius on the grass, and I dangled a chalk line until it was exactly at the other end of the 18” board. This gave me an exact point on each pergola slat to mark with a pencil and cut to size.
 |
 |
Around this same time we were tossing around thoughts on what kind of corbels we wanted to use and decided to keep things traditional with a standard bracing. But don’t let the simplicity it fool you! Between the compound angles and bulkiness of the 4×4’s it was quite the task. Luckily we have you covered. We started by screwing a board at a 45* just below the bracings desired height. Then we held the 4×4 in place and marked the angles needed using the 4×4’s and a straight edge as a guide. Finally we set the angle on the circular saw and made the cut. We had to use a hand saw to finish the cut .
 Now you can screw your bracing into place, and put up any finishing touches to add your personality to the pergola!
We’re planning to paint the pergola (and the Trellis’s) white eventually. With treated lumber, it’s recommended to wait a year before painting so the chemicals can completely dry and acclimate.
Here’s the view from the kitchen door!

Try to picture some gorgeous patio stone pavers and a picnic table or patio set. While you’re at it, picture a patio fire pit and built-in stone benches with pillars and flowers overflowing over the top. Don’t back up too much, you might fall into our in-ground hypothetical swimming pool, or trip onto our romantic hypothetical gazebo.

And a view from above so you can see the circular shape!

I’m always looking for reasons to build something fun and expand my knowledge and experience! Please feel free to ask any questions at all.
Here’s your handy Printable Recipe!
~~~~~~~~~~~~~~~~~~~~~~~~~~~~~~~~~~~~~~~~~~~~~~
DIY Custom Pergola
Time Commitment: 30 Man/Woman hrs
Difficulty Level: 8
Our Material List
-
4x4x10’ (qty 5)
-
2x10x16’ (qty 2)
-
2x6x16’ (qty 13)
-
2x6x12’ (qty 6)
-
2x6x8’ (qty 9)
-
8” concrete tubes (qty 2)
-
concrete mix (4 bags)
-
4×4 brackets (qty 4)
-
1/2 x 6” anchor bolts (qty 4)
-
2 3/4” construction or deck screws (5 lbs)
Things I would have done differently:
- Use 4×6’s for freestanding pergolas OR if there is a long span for added durability
- Use fast setting post concrete that does not require mixing (20-40 min cure time)
")
")
SUPER SPECIAL huge thank you to Lowes for loving our work enough to want us on board! AND for providing a gift card to contribute to the cost of this project! All opinions are 100% ours. Be sure to head over and see what the other Lowes Creative Influencers are up to for even more inspiration!

Related:
-

Our very best friends moved away to Tennessee, but we still find reasons to visit…
-

We're always in awe of how spending a little extra time redefining our garden beds…
-

It never fails! Each spring, when the snow melts, we're always itching to get out…
I mixed two colors together from the Modern Masters line… here’s the post where I talk about it more!
https://realitydaydream.com/porch-happenings-and-front-door-paint/
Nick, I need you to come to my house. It’s not that far away. I just need a square pergola. Build out of salvaged porch posts. No big deal compared to this, right?
What a great Pergola, the shape is perfect. Your hard work paid off, GREAT job!
So funny, my dad is in the middle of building their’s. So many pergolas!
Wow, I love this. I love our pergola too and it brings many hours of shade, but we have shade bars up top. You will love how you can landscape around it and you all did a great job.
Great job! Looks great.
I am so jealous! I want a pergola at my house too! However, I don’t think Lowes is interested in being my affiliate. Especially since I don’t have anything to be affiliated with! Great job, love the curve and the pergola adds a great focal point on your home. It will be a beautiful addition when you get all your projects done.
awesomesauce!!!! nick did a great job & congrats on the new affiliation! 🙂
Wow..how does one become an affiliate of LOWES!?!
One has to be asked! We were so honored!
Hi!
What type of wood do you use?
and do you use any kind of treatment against termites attacks?
Thanks
Thiago,
It is rumored that pressure treated lumber resists termites in itself. The best thing that we did to address this issue is mount the posts above ground level. Using the mounting bracket on the 4×4 not only allowed us to anchor them down, but it rasied them up an 1″ off the ground and has holes in the bracket to allow for proper drainage. Keeping you lumber dry is the first step in termite defense.