We’re toooootally guilty of being THAT DIYer that finishes something 95% of the way, and doesn’t bother to do that last little 5% for way too long.
That wouldn’t fly if we had our own TV show. But luckily we’re just a couple humble DIY bloggers, and we can do things in whatever order we want! It’s our house!
Truthfully, after putting SO MUCH hard work into a room, once it’s functional and pretty darn close to being fully awesome, we just need to step away away and give ourselves a break. And there’s nothing wrong with that! We’ll come back to it! Promise! The kitchen cabinets won’t always be without crown molding, and there won’t always be a gap in the drywall around the crown on the ceiling above the fireplace. Pinky swear!
All that to say, we’re tackling the basement family room. The room that’s below the kitchen. You might remember it as THE KITCHEN HOLE.

When we were in the planning phases of the kitchen build, we made a decision to dig a basement below it. Because of the height our kitchen needed to be, we would have at least needed a crawl space. And we didn’t want that. So extending the basement made the most sense. Plus… BONUS FAMILY ROOM!
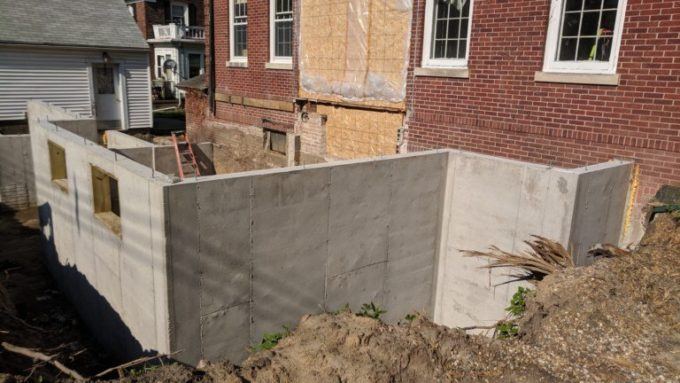
Scroll back up and look at that picture again. ^^ The window on the far right is a doorway going from our kitchen into our living room now. The two windows on the far left are the doorways going from our kitchen to dining room. And the other window… is STILL A WINDOW. Compete with bits of dead vines growing on it, right inside our kitchen. LOL!
Anywho.
The basement!
We thought it was high-time we get the walls insulated since we’re WELL into the dead of winter.

*This post is sponsored by our friends at DAP! Thank you for supporting the fabulous brands that make Reality Daydream possible!
But let’s back up. We did lots of research on closed cell spray foam and found out that with the timing of our project and temperatures we would be spraying, it was going to be the most convenient to spray ourselves with DAP’s Spray Foam Insulation.

This kit covers 600 sq feet @ 1″ of thickness. Since it is Iowa and we wanted a higher R value, we actually sprayed @ 2 inches of foam. It should also be noted that 1 1/2″ provides a vapor barrier, eliminating the need for the plastic sheeting behind the drywall.
The kit comes with most of what you need to get started. The exceptions to this was the respirator and the disposable coveralls we used, both of which can be obtained at your local home improvement store.

We started by threading on the hoses. The red braided hose goes on the red tank and the other goes on the white tank. Thread the fitting on finger tight and then tighten it one flat or 1/6 of a turn.

Apply lubricant on the o-ring. This will help keep the insulation from gluing the spray nozzles on.
Making sure that the spray is locked (Yellow tab), you want to open the valves on both A and B tanks.

Spray into a box that can be discarded until both part A and B are spraying equally.

Attach the yellow nozzle (fan spray pattern) and spray it onto a piece of cardboard. You are doing this to make sure that it is raising like it should. You have about 30 seconds of not spraying before it will start to set up in the nozzle.

Start spraying! We sprayed behind the studs first, then filled in the center section of the stud cavity. The first coat should be sprayed on about 1/4″ thick, which will expand to 1/2″.

The process goes quickly with Touch ‘n Foam! You want to exchange tips often, and occasionally check the flow of the product. If you notice a difference in color or something isn’t setting up firm, stop immediately and check the flow of the product.
We love that this spray foam insulation product is easily portable, and fully disposable. And that it expands and cures quickly. This job was a breeze!

Excess foam and foam that was on the edge of the studs was easily cleaned off with a putty or serrated knife.
Something to keep in mind, while insulating the basement is to make sure you get the rim joists and at the edge of the sill plates.

This is the finished product! Here in Iowa we are required to sheet the spray foam insulation with a minimum of a 1/2″ Sheetrock to maintain flammability requirements.


The sheetrock went up quickly, and we’re so pumped to get some flooring in this room! Stay tuned!
Nick and Bethany
Related:
-

Hey guys, If you've been following along in our Instagram Stories, you know we've been…
-

Hello hello friends! Things have been wild as we've been navigating the holiday season, schedules,…
Bethany,
A couple of things –
1. Did you guys put up the 1/2 inch drywall or did you go with something thicker?
2. With this new house, did you have to replace any of the electrical wiring? I have two (unfortunately) houses and they both are wired so the outlets have the wrong size plugs and I need adapters to run nearly everything. I hate it. One house is over 100 years old and has lath and plater walls like yours and the other was built in the 50’s and is a kit house. It’s walls are not drywall but some kind of heavy pressed cardboard with very little studding. I have researched about replacing the wiring and the electrical boxes but so far that’s all.
Bonus question. I found the exact same floral wall spray that you currently have hanging in the girls bedroom. You painted yours. Do you have a tutorial about it? I would love to see how you did yours. Trying to decide if I want daisies with yellow centers or do I want pink or blue centers instead.
Love the blog and would also like to hear how the homeschooling is going and what arts/crafts the girls are making.
Maureen
I just started watching u 2 and I’m very impressed with what all ur doing. I have 3 rentals and always need to know these things. You did a fabulous job with all the narration and pictures.
Beth and Nick,
It was fun to see your pictures. Spray foam is what will be happening in our basement-living space next week, but that’s not a DIY job for us. We’ll do the flooring and the painting after the drywall is up. Your blogs and your brother Tim (and Carrie) have taught us a lot about doing things on our own. We thought we were pretty handy before, but found out we had a lot to learn yet. In case you haven’t heard, we are moving into generational living with Lynn and family. We get the basement and are working with a contractor to get it all done. Cheers. Kathie
Hi Kathie! Yes I did hear that, so exciting!!
Beth,
It has been an absolute delight watching you two make your dream become a reality. Many thanks for the entertainment. You are both doing a fabulous job.
You’re the sweetest Debbie!
You guys SHOULD have a tv show!
HI Beth and Nick,
So just those two little tanks did all of that..??