I get pretty intimidated to do any type of sewing tutorials, because I know so many of you readers are amazing and seasoned seamstresses. I just have to remind myself that there are others out there that are even more intimidated and inexperienced than I… so if I can give them a confidence boost and a simple project to try? I’m gonna do it!
 Tutorial.... PERFECT sewing project for 'beginners', or anyone that likes cute things {Sawdust and Embryos}")
While I’m proud to be an American, I don’t love decorating my home in ‘americana’ décor. It just isn’t my taste. But since the girls were born so close to the 4th of July, it’s always fun to dress them up all patriotic-like around this time of year. Which made for perfect timing to participate in The Ultimate Red, White and Blue Blogger Collaboration… so fun!

So here’s my contribution to the patriotic inspiration!
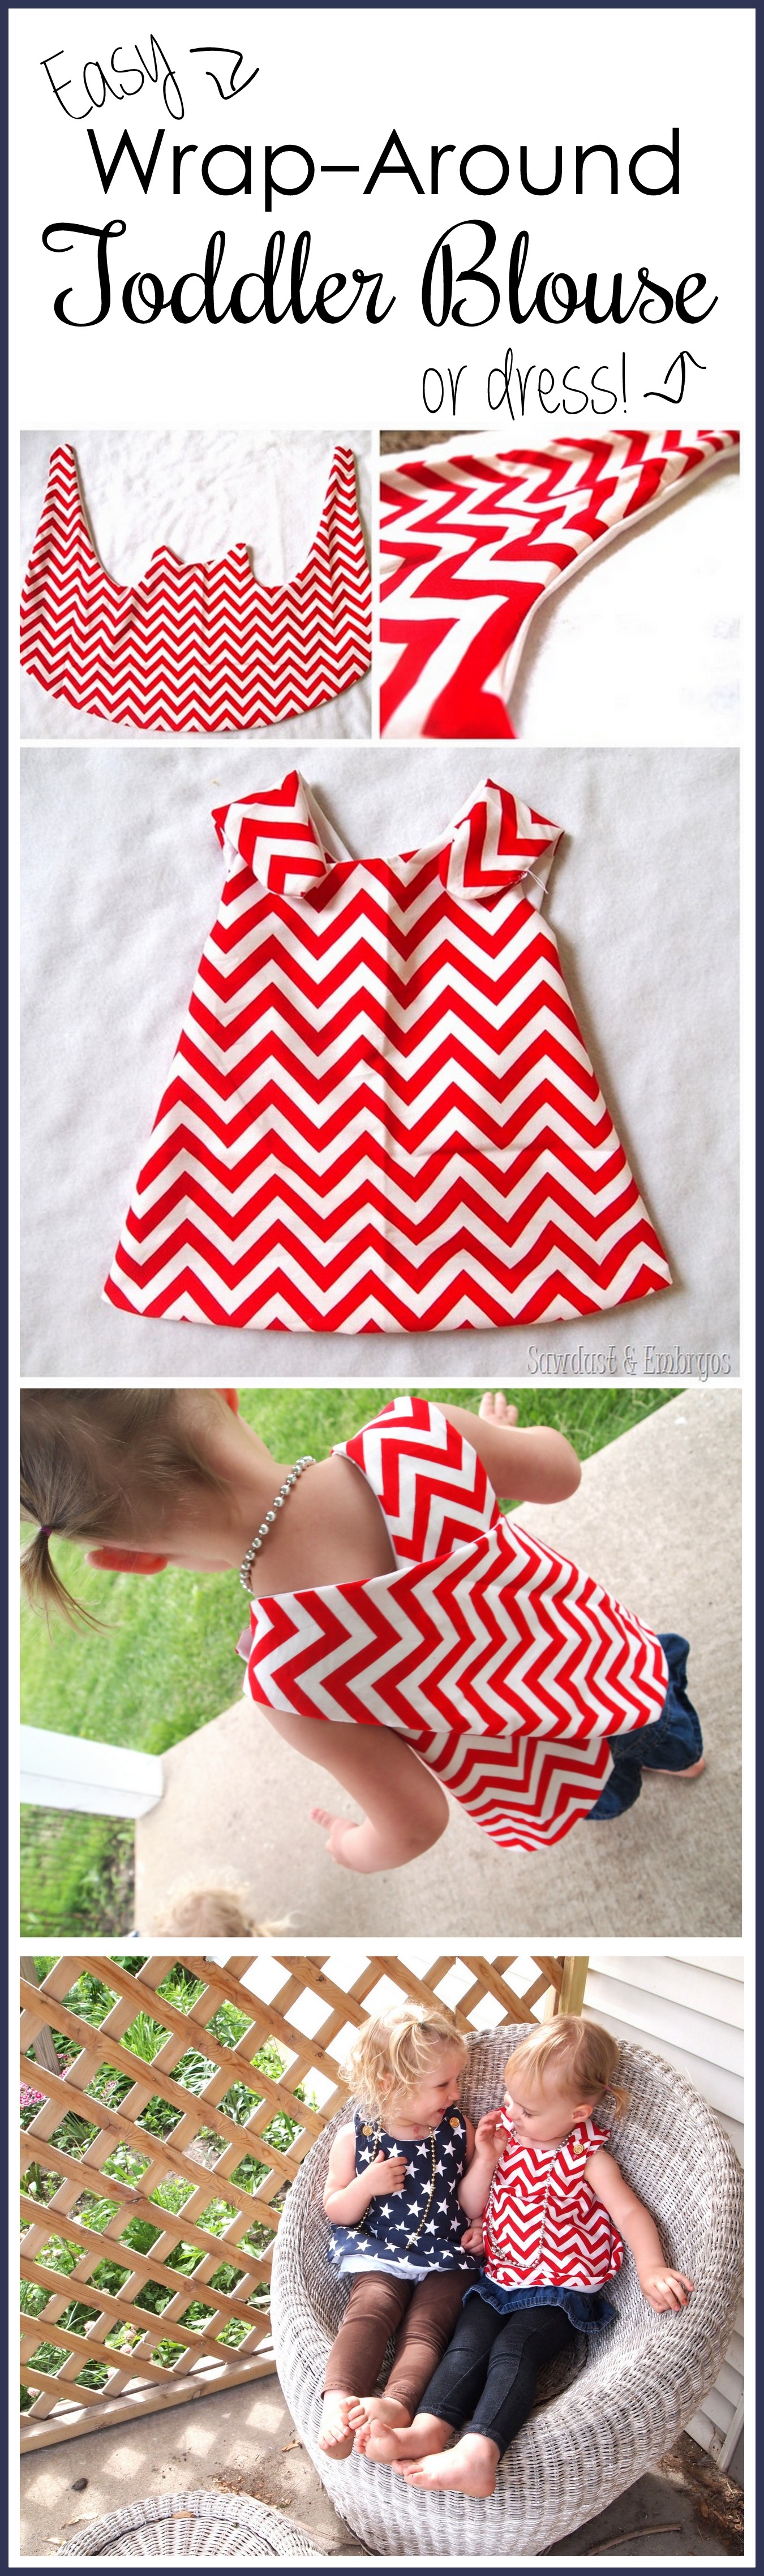
My niece Kendall was wearing the CUTEST little handmade wrap-around shirt (a hand-me-down) last summer while we were camping. It looked simple enough for me to replicate, so my sis-in-law let me borrow it to trace! Here’s the shape.

UPDATE! I figured out how to make a pattern PDF! Here’s the dress pattern and the blouse pattern. Included are sizes 2t up to 5/6!
I traced around with a sharpie, giving myself a little bit of clearance for the seam. Then I cut it out with my fabric scissors.


I did the same onto a white cotton fabric as a liner… which was actually an old white bedsheet.
Then I laid the two facing each other and pinned the edges, and sewed about a half-inch from the edge.


I left a 2” opening so that I could pull it through and make it right-side-out. Is it just me, or does this look like a chevron Batman symbol?

Just criss-cross the two long pieces in back! Simplest design ever. I wish I had thought of it myself!

We used this tutorial to add button holes and buttons. The buttons are just from my vast collection. I lucked out and found 4 that matched! Aren’t my girls just the best little models? Okay OKAY… I bribed them.
 tutorial {Sawdust and Embryos}")
 {Sawdust and Embryos}")
Navy/white star fabric from (here).
I’m pretty proud of myself for pulling this off. It doesn’t hurt that these are wildly easier than they look. If you’re new to sewing or intimidated like myself, I hope this little tutorial gives you the confidence to try this for that ‘little one’ in your life! If you’re an experienced seamstress, thanks for cringing your way through my entire tutorial! Any tips or suggestions that I may have missed?

Be sure to check out all these other Patriotic Tutorials from tons of amazingly creative bloggers! Can you spy mine?
Related:
-

It's been awhile since I've done a sewing project, and as weird as it sounds,…
-

I occasionally talk about our love for our whole grain Pumpkin Oat Muffins (that can…
-

Making a cutting board almost seems like a right of passage into the world of…
I was wondering about how much fabric you used for each?
When I printed the pdf from this pin it prints smaller than it should. YOu guessed it…my granddaughters have great little matching doll clothes for their outfits! Back to the store now that I have the correct size pattern. I’m not upset–just search for the updated pin with more tutorials..that one works!
I am also wondering if you can give me more details on the pattern. I really want to make one for my 3 year old but since I am a novice sewer I need as much help has possible.
Can you give a few more details on the dimensions of the pattern? How thick is the top and bottom of the strap? And how much of a drop for the neck (front)?
I’m sorry this is so confusing. I wish I knew how to make a pattern! I’m going to send you a personal email Rachel.
How about just tracing around one half of the wraparound you made?
That’s actually what I did… folded the fabric in half and traced before cutting. Is that what you’re talking about? I actually just made two more yesterday! My girls love them, and they’re so easy to make!
I made this today, no matter how much i cut it or pin it, it is too low cut, you should REALLY post the pattern you used!!!!
I’m so sorry Joni! I don’t know how to make a pattern PDF, so this was the best I could to. It’s so strange that it’s too low cut.
So cute! How much length would you add for a dress from this pattern ?
I’m itching to make one of these for my 2 Yr old grand daughter. With a diaper cover/bloomers this is a perfect hot summer day outfit!
I am addicted to children’s apparel. This is the best thing I’ve seen. Better break out the old sewing machine!
These are awesome. You know what would be more awesome? What about all that extra fabric? Can you make headbands or little flowers things or belts or something? Sorry, my sewing IQ is zero, otherwise I might suggest something useful,
Ooh, what about a little matching purse. Just add a clip top and string….
Fabulous! Makes me want to try it too!
We included your adorable wrap around blouse in our round up of projects to make with Red, White & Blue fabric! (http://skirtfixation.com/2014/06/red-white-and-blue-roundup/)
Those are so darn cute! I am going to make one of these for my granddaughter, Rowan, for next year. Besides being so darn easy, they are perfect for summer! Thanks for showing us your excellent sewing abilities! Good luck tomorrow – been praying for you all!
These are seriously adorable!! Pinning!
I just wanted to wish you good luck tomorrow… and know that I am thinking about you. Just so you know – it is a lucky day – my best friend’s son was born one year ago tomorrow. She was not able to get pregnant on her own, had no eggs, and couldn’t even carry a baby due to no lining in her uterus. But an egg donor, her husbands sperm, and a surrogate later she was able to have a baby! I know that your story will be just as successful. Although as a mom of 2 year old twins myself, I must admit I am in awe of your bravery to do it again 🙂
Megan, you’re sooooo sweet! 🙂 I’m glad tomorrow is a lucky day… I could use all the good ‘fertile’ vibes I can get! I can’t believe it’s already here. Time flies.
I knew this was you from the double blondes!! Cute!
My mom used to make the exact tops for me, almost 50 yrs ago!! Love your blog, cant believe how big your girls are getting!
Don’t you love how some things stay classic forever?!
A little sewing tip (my mom is a seamstress) if you put the pins going vertically, not horizontally, you can sew right over them!
With that said, those are adorable!!!!!
Ummmmm… that’s GENIUS. Implementing it for my next sewing project for sure!
Love the patriotic theme. My suggestion would be to use a complimentary fabric instead of the white llner. Then the top would be reversible. Of course, one white bedsheet on hand is worth two fabulous fabrics in the store. Also, that stitch all the way around the perimeter of the original top helps keep the edges crisp (especially after washing).
Love the idea of using a complementary fabric so it could be reversible! I think I’ll be making lots of these, so I’m definitely going to do that next time! What do you mean about stitching all the way around ‘the original top’? I should leave my opening somewhere else? Is that what you’re saying?
I think the “original top” she’s referring to is Kendall’s. I think she is saying that it might help it stay “fresh edged” after washing if you sew around the entire perimeter as a final step. That said… these are absolutely adorable and made me so excited to try and make one… that for a few seconds I forgot I only had boys. :D.
I think she means topstitching. After you turn it inside out and iron it flat, you sew 1/8″-1/4″ away from the edge, all the way around the perimeter. It holds the fabric in place and makes it lay flat, which gives it a more finished look, and helps it keep its clean edge and shape through the wash.
Your girls are so cute! I wonder if an adult version of this shirt would work?
This is the first topstitching tutorial that google found: http://www.themotherhuddle.com/topstitching-101-the-what-and-how-of-a-topstitch/ 🙂
Topstitching (on Kendall’s top) is exactly what I meant, thank you. Adult version? Yes, if you can figure out how to do bust darts. I think you might have to incorporate side seams. Could work as a cute maternity top??? Best wishes.