Some of my mommy-friends have small children who climb out of their crib before they’re even a year old. And other less-ambitious children don’t attempt to escape until well into their toddlerhood. My small children have made it to age two, and are still going strong (we’re thanking our lucky stars). But I know that dreaded day is coming, and I often think about that terrifying moment when I wake up to a tiny person 2 inches from my face saying MOMMY?!
What I’m trying to say is that there has been some consideration to matters involving toddler beds and the like. Because when one figures it out… it will take the other 1.3 seconds to figure it out. And at that point, we have to deem the crib/pack-and-play unusable.
Since we want to keep the nursery intact for hopeful/potential future baby(ies), we’ll be moving the sisters to what used to be the guest bedroom… but more on that later. We know we need to get things ready for that moment when toddler beds are abruptly necessary.
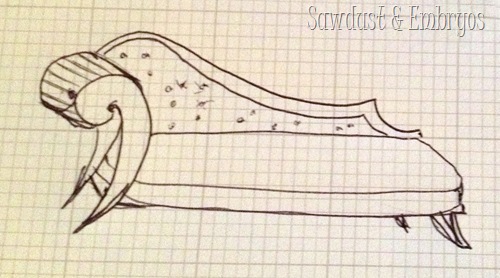
I wanted to build the girls’ toddler beds to be unique and adorable. I know it’s silly to most… since they’ll only be using these beds for a couple years. BUT I WANT TO… KAY? I don’t even remember how I thought of it, but I decided to make them MINI FAINTING COUCHES! Using their existing crib mattress!
I drew several sketches since I’m a visual person, and decided on this one…
Today I’m going to show you PART 1 of the construction of these little fainting couch toddler beds! Nick is helping me build, but he’s giving me creative control and letting me make almost all the decisions! I’m learning tons from him, and gaining lots of carpentry confidence in the process!
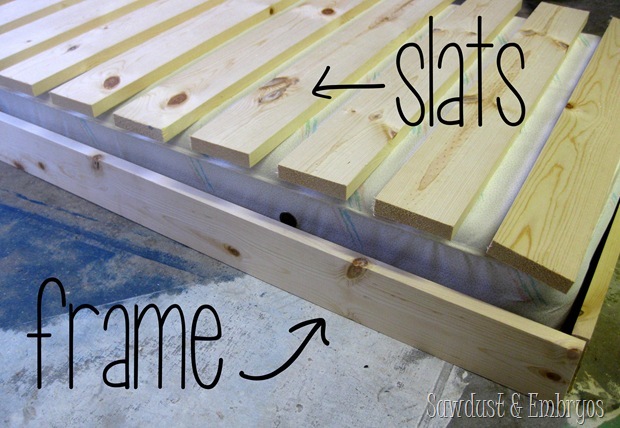
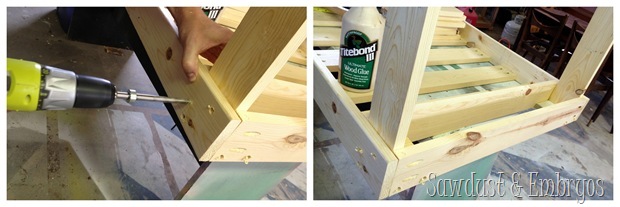
We started by building a basic frame around the dimensions of the mattress (28” x 52”) using 1×4’s, and slats to go across. You better believe I dragged that mattress out to the garage with me! Visual learner… remember?!
The frame ended up being 54” x 29.5” because we wanted to give the mattress a little wiggle room and and extra space for bedding and such. We cut 9 slats to 28” from 1×4’s as well.
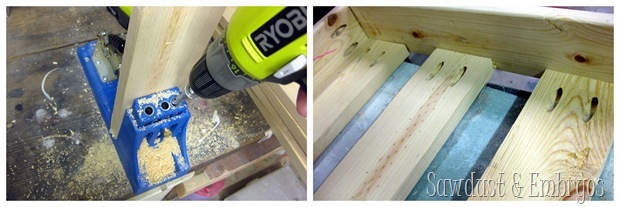
Next, using the Kreg Jig, we drilled pocket-holes for stability and so that the screws wouldn’t catch on things. This thing is FUN to use!
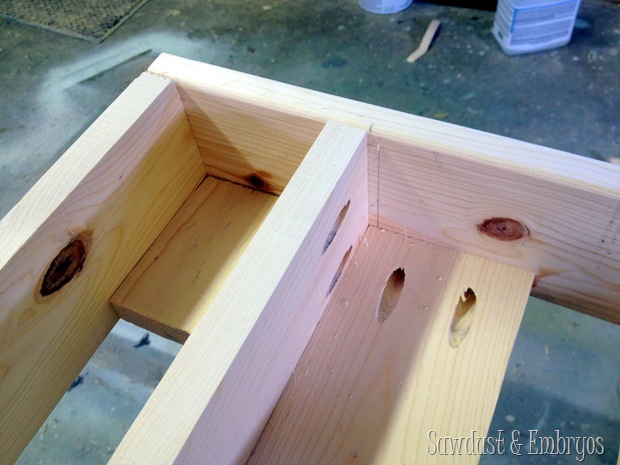
On one end of the bed, we built out a little further (making our actual frame dimensions 58” x 29.5”) to accommodate the ‘arm’ of the fainting couch.
We glued/screwed 1×4’s against the inner edge of this section. These will act as supports for the arms of the fainting couch.
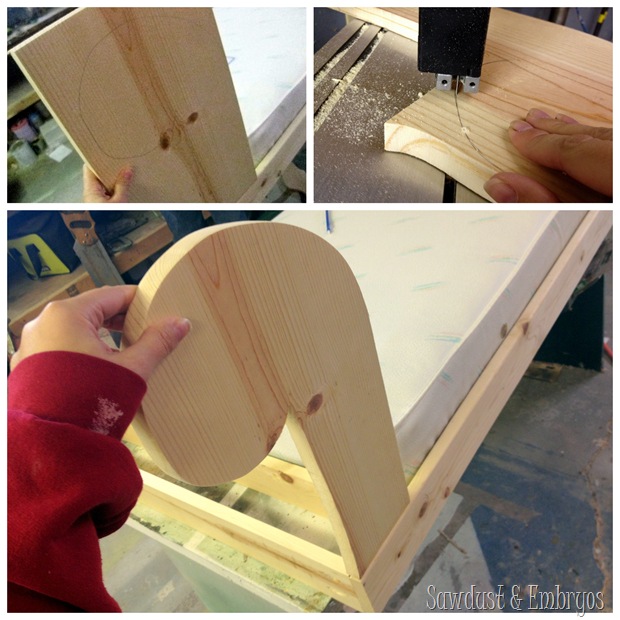
Next, I held up a board and drew a scrolly shape with a pencil, then cut it out using the band saw.
I think this gives you a smidgeon of an idea where we’re going with this, so I deem this a good place to stop for today. I’ll be following up with Part 2 soon! Sorry to leave you hanging! Stay tuned!
UPDATE! Come on over for Part 2 of this project HERE!



You do beautiful work! I’m inspired.
Hi Beth! I’ve been planning on making my kids old toddler mattress into a fainting couch for my daughters room for years now, you can’t know how thrilled I was to find your plans for one!! I’ll send you a pix of mine when it’s done, and, btw, love your blog!
Loved your beds so much we just had to create our own!!!
OH MY GOODNESS… yaaaay! Please please please email me pics! I’m so excited right now!! sawdustandembryos@gmail.com
que maravilla .gracias mil….lo intentaré.
I just happened upon your blog —LOVE what you have done with the twins’ room. I was looking for reupholstery pointers and this came up. Our son is 17 months and I know the day is coming when he will need a “big boy room”. Sigh. But, I am getting excited and inspired daily as to the theme, etc. I want him to have. We too struggled (struggle) with infertility. We adopted last year. Our son is the best thing that has ever happened to us. We may/may not ever get pregnant with a sibling for him, but we have never given up hope of having another child. I look forward to seeing the finished product. We also have a blog about our infertility and adoption journey. http://garyandannac.blogspot.com/p/about-us.html
Anna, thanks for commenting! You have an amazing story, an I enjoyed reading the ‘About Page’ on your blog. Infertility is such a difficult journey. I’m so glad you got your miracle… even if it was non-traditional means. I hope you’re blessed with a happy surprise one of these days!
What A Fun Idea, So Cute!!!
From a Mom of grown up kids I think you will be using these for many years to come. Once the kids have outgrown them you can put them to use in so many ways. The girls can use them as a couch, a place for reading time…. They are wonderful!!!
Great idea Sue! I hope so!!
Wow. I am very impressed. Let me admit that I am proud when I put together a Target bookcase, so what you guys do blows me away!
Amazing idea! Can’t wait to see them. I may have to steal this for my baby’s big girl room. She is 22 months and still in a crib. Yippee. She can get out of the pack and play though so it probably won’t be long for the crib.
Wow, you guys are so creative! Can’t wait to see the finished beds! By the way you commented that some people might think you’re silly for putting that kind of work into a toddler bed, well, I have a friend who’s oldest child slept in her toddler bed (the plain ol kind you can buy at the store–nothing special, or over sized about it!) until she was NINE!! Ok, so Mom and Dad are a wee bit ‘vertically challenged’, but still! You just never know 🙂 And I love the idea of personalizing whatever you have the time, talent and inclination to do…
Vertically challenged… Love it! We’re go-with-the-flow people, so when it’s just not working anymore, we’ll upgrade to bigger beds and won’t shed a tear! 🙂
You do know that after you construct these awesome beds that you will have people begging you to make and sell them!?!? I would have never thought to make a toddler bed. Go you!
HA! They’re quite a bit of work, so I don’t know that that’s a service we’ll be offering. But we’ll probably be selling THESE in a couple years when the girls grow out of ’em! 🙂
Adorable-but that pointy part? Eye-gouger, for sure. I’d just round that part off a bit to be safe…as a mom of grown-up twins, trust me. 🙂
Hehe… good point (pun!). Are you speaking of the pointy part on the curvy ‘back board’ thing? We can definitely make that a little more rounded. We haven’t gotten that far… so good timing! Thanks fellow-twin-mommy! 🙂
Wow – you are so creative. I literally would have never thought of that but the idea is adorable! My daughter’s toddler bed is constructed in exactly the same way but without the fancy scroll thingie. I can’t wait to see what it looks like in the end.
You make me want to hijack all my husbands power tools and build something. We are also close to needing a toddler bed and I would love to build it myself! Thanks for the inspiration!
You should you should! Tell him to consider them ‘OUR’ power tools from now on… HA!
I hope you are going to build something in front so the girls don’t roll out! Or you will have them standing two inches away from your nose after they do fall out!
We’ve got a plan! AND a back-up plan! (baby gate!) 🙂
How come, do you think, your blog link on my blog page is not updating itself since your redesign? Also Eric said he was not seeing the new posts show up in his RSS feed, or whatever that thing is called. Do you think we need to reset something? Could have asked you in person :), but thought maybe you’d like to address in case others were having similar issues???
Thanks! Beds look awesome by the way! 🙂
I’m having the same problem. My Feedly reader won’t show any new posts after the couch reveal…
Yeah, it’s definitely something on our end. I emailed our web designer about it several days ago and haven’t heard back. Super frustrated. I wish I knew how to trouble-shoot these things myself. I hate relying on other people! 🙂
Soo cute! When my girls were little they made a habit of coming into our room in the wee hours for no apparent reason other than they could..we put up a baby gate to our room and told them unless they were on fire or bleeding they could not venture in willy nilly and it worked after two nites then we removed the baby gate…haha they love telling that story now!
I wish that the two (four) of you lived closer, we live about an hour and a half away from you. I could keep both of you busy- tile to be put up, basement craft room floor unique paint job, and much, much more. It would be a win-win for both of us, you two work, and I play with the girls!! 🙂
Your energy and innovations are totally awesome!!
I don’t know if I can wait until you post the second part! I love this idea!
What a fun idea! I think my hubby will build our daughter a bed when it’s that time also. Thankfully she is just over a year and although she’s quite the climber, has not attempted escape…yet. I love the new site design, but ever since it has changed the new posts won’t show up on my reader (feedly). Just wondering if anyone else has had this problem and if there is a possible solution. I tried adding the site again, but it still just shows articles up through Sept. 17th. Thankfully I am a fb fan and so I still have been able to see when you have posted!
Thanks for the heads-up Liz… we’ve been trouble-shooting this issue and hope to get it worked out sooooooon!
I am having the same issue with my blog and feedly.
I have a secret! Our 4 1/2 yo twin girls are still in their cribs. We are currently making over their rooms to include big girl beds–we’re going the princess room look. We had one that started climbing, but blocked her escape route for a little while and then it stopped.
I love it Birgit! I bet you’re a happier mommy for it! I guarantee my twins will be in their cribs as long as they aren’t climbing out and getting hurt (or into trouble). Good for you!!!
What about a rail? they will fall out of bed!
Just wait Mary! There’s a plan in place!
Ooooh how precious! LOVE the inspiration picture. These are going to be so great. So excited to see them!
Can’t wait to see the rest of it! Question about the Kreg Jig…I’m looking to get one and notice that there is one that comes with the clamp and retails for about $130 and another for $100 without the clamp. Is it worth the extra money to get the one with the clamp? Thanks!
Those are going to look awesome!!