Doing wood stain art is soooo addicting for me. I wouldn’t call it ‘instant’ gratification, but the transformation happens over the course of a couple hours… and it’s so fun to watch it unfold! If you missed my last Stained Art Table time-lapse video, click here!

Shortly after posting that video, I was already having the itch to stain again, and Nick and I fell upon this dining table at a yard sale for $10 buckaroos!

I know it appears to be raw wood, but it’s actually a pale yellow LEAD BASE nastiness. But based on some chipping paint on the edge, we could tell it was solid wood. And now that I’m a stripping pro (LOL!), I wasn’t too intimidated by this mess. (stripping tutorial here) We use this stripper (THE BEST!)

I actually stripped it the same day we bought it because I’m paranoid about things like lead-based paint and small children (of which I have 3).
After stripping and sanding the bleep out of it, I started looking for a design to stain onto the top surface. I don’t have an affinity for flowers or anything, but they work so well for this technique because of the soft curves, shadowing, and contrast.
I traced out a dahlia flower from an inspiration photo onto a transparency…
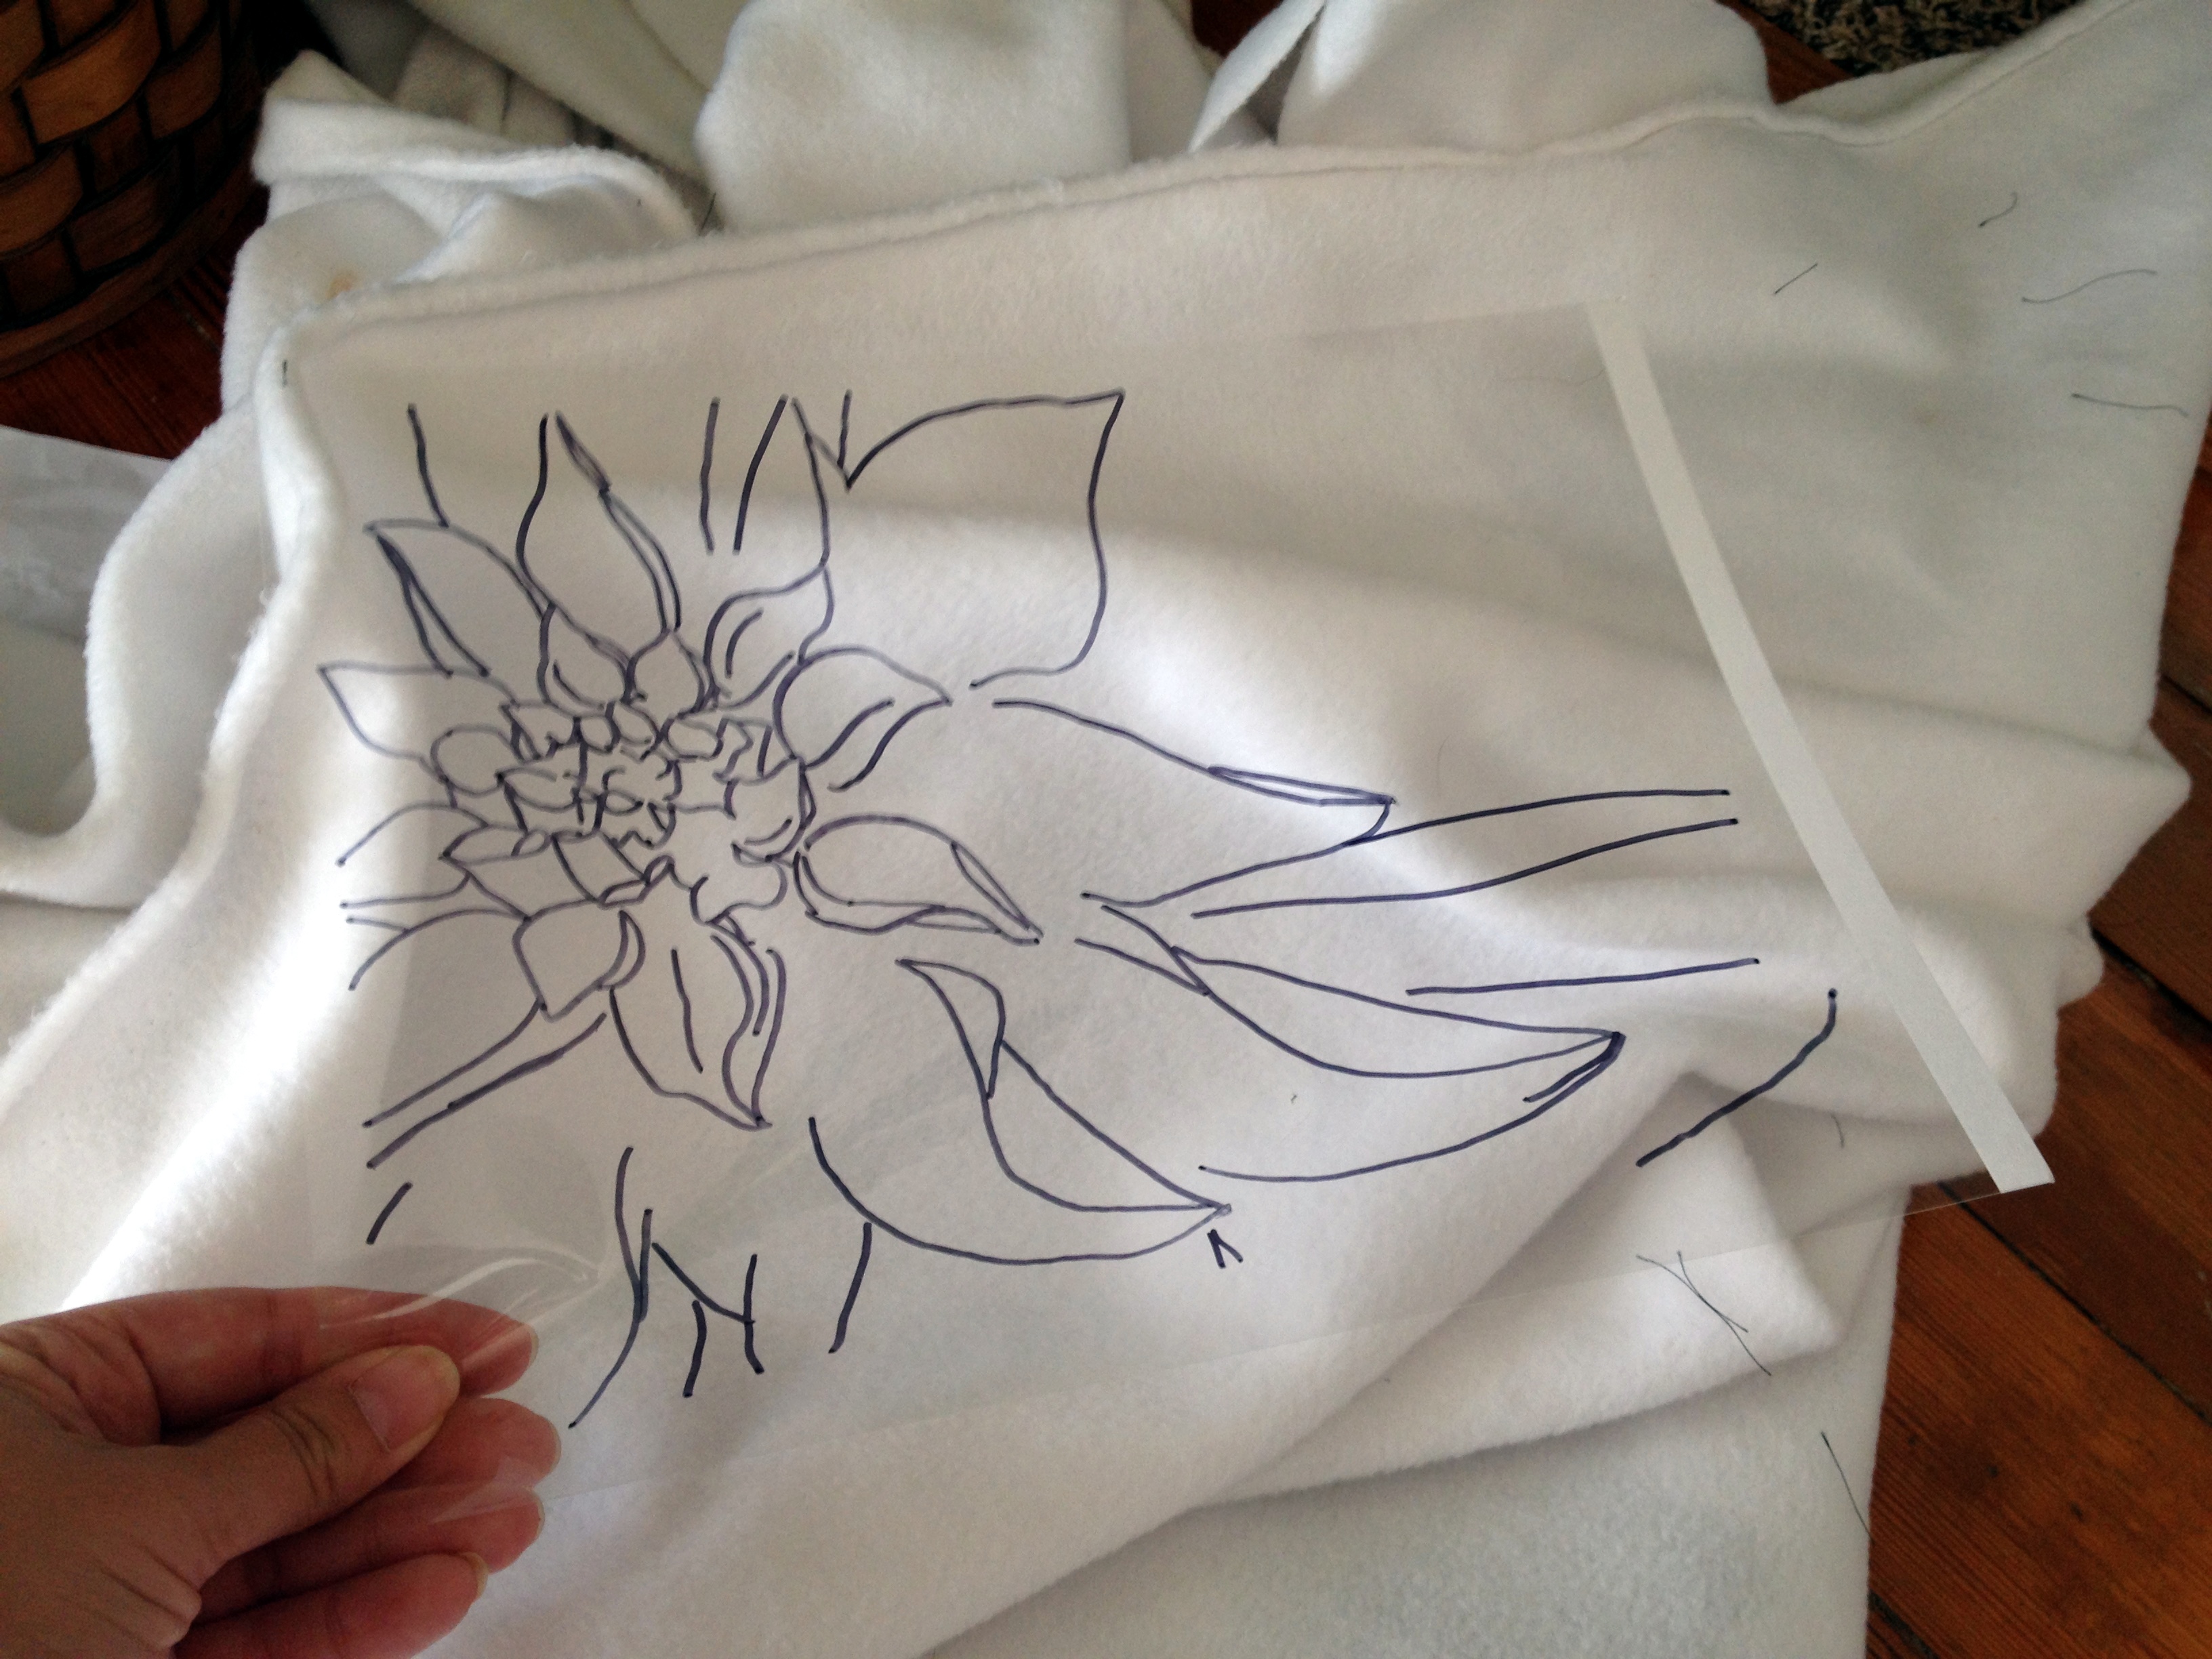
Then, using my overhead projector (we use one similar to this, but you can often borrow these from your local library), I projected the image onto my table top and traced the lines with a pencil.

A company called Unicorn Spit sent me some of their vibrantly colored water-based stains. I loved the idea of accenting a bit with a bright color, but I also wanted the bulk of the artwork to still look like rich wood. So I decided to try using RustOleum’s gel stain which is water-based… and IT SUCKED. Do not use gel stain for this technique! Ever! EVER!!!!

I was pretty distraught about how it was turning out, so I stopped and stripped before it got any worse. I wasn’t sure about stripping stain out of the wood grain, but it worked swimmingly and I was able to start over. (see my stripping tutorial for more specific details. Having this scraper is LIFE CHANGING!)
This time I went with my tried and true oil based RustOleum in Dark Walnut. I wasn’t sure that I could stain with a combo of oil and water based stains, but I decided I would rather leave out the bright colors than have to use ONLY bright colors. And now that I knew stripping stain is doable, there wasn’t any risk.
You’ll have to watch the video to see how it went, but I’ll just give you a little spoiler… IF YOU LET THE OIL BASED STAIN DRY COMPLETELY, YOU CAN TOTALLY STAIN WITH WATER BASED TO SHADE AND ACCENT. (yes I was yelling that. From the rooftops. Because it turned out so awesome)
Be sure to check out my other stained projects by clicking on each image below. And Click here for a simplified tutorial of a more basic flower image that anyone can do!
 |
 |
 |
 |
 |
 |
I know some of these more intricate designs look very difficult, but it’s definitely something you get better at the more you do. I know that others can do this too, because dozens of people have sent me pics of their work after being inspired by my idea.

Amazing right? You should soooo give it a try. There’s nothing to lose if you just grab a scrap piece of wood, a can of stain, and a cotton cloth (or cut up t-shirt!). And if you DO, you know the drill… SEND ME PICS! I can’t wait to see your version!

Thanks for pinning!


*this post contains affiliate links


Related:
-

We've been needing to update our coffee table situation in the living room for awhile…
-

Nick and I have dabbled in epoxy here and there, but we've never done anything…
-

We're in the dog days of summer, and it seems like my kids are always…
Absolutely love it! It’s perfect in every way. The way you accessorized it is just amazing. Faux greenery? Wow, they look so real! Where did you find such perfect ones? The mantel in the background adds a beautiful touch, too. Thanks for sharing!
You’re incredible! I don’t believe I’ve ever read anything like this before. It’s wonderful to come across someone who has some unusual perspectives on this subject.
Seriously, thank you for getting this going. This website is exactly what the internet needs, someone who knows what they’re talking about.
I’ve followed you and employed your techniques for several years. I’ve got a dining table that I’d love to redo. It has a leaf. I’d like to do a design that looks good whether the leaf is in or not. Have you ever done a project like this?
Very nice and creative ideas shared by you.
Thanks a lot for sharing with easy way.
Keep posting great content.
amazing project . you are doing very good work
Hey where do you get your colors for staining your wood?
If you’res wanting oil-based colors, Varathane has a few options. Otherwise, I often use Unicorn Spit for their bright colors when I want a pop of color in my designs. Hope this helps!
What do you suggest for a table that we will be taking the leaf in and out? We will be using the table without the leaf most of the time. Any suggestions how to make it not look funny when I use the leaf?
That’s a tough one. I’ve seen people get really creative and make a floral design that lines up perfectly both with and without the leaf. But that’s too complicated for me. We rarely have our leaf in, so I just stained my table without it. And when we have the leaf in place for guests, we just put down a tablecloth.
I have an old dresser that I was looking for ideas for. I am excited that I found this post. I love the flowers. They end up looking almost “burnt” on. Fantastically done. I am ready to get started practicing for the dresser.
Yay! Exciting! Pleeeeease send me pics when you’re done! beth@realitydaydream.com
great website.
What kind of gloves do you use? I can’t fond any that won’t melt holes in them. Thanks
I use latex gloves, but put on a fresh pair every 20 minutes or so. You’re right! It eats through! 😉
Cant wait to try this , I will be running to the store to get some wood to practice on along with some stain . I have some furniture i want to redo and knew i wanted something different . found this on Pintrest . I have a coffee table that has been in my family for over 50 yrs and this will be perfect for it .
Lavishing products!!! Craftsmen have shown their brilliant skills and traditional art by creating these marvelous wooden dining set.
OMG! Have you ever applied a clear epoxy over your tables? If you did it would make it even better. If that is even possible! The best clear epoxy is made by Stonecoatcountertops.com It is just about indestructible. If you have kids you know you need that in your life. 🙂
Here is a cool pic of a before and after dining room table with epoxy. http://www.bestbartopepoxy.com/content/table_top_epoxy.jpg That is not the epoxy that I am referring to. I don’t know anything about that company. Stone coat countertops has a Youtube channel that shows how durable their finishes are.
Thank you for sharing this. I am going to give it a try. I never thought to do this before. I have just the piece to get started on!
Thank you!
Yes we LOVE using epoxy! It really brings these stained designs to life!
Your comment is awaiting moderation.
I would love to buy one of your tables or have a table I already have done. Where can I buy one? Your work is so unbelievably beautiful. You make an ordinary table into a fantastic piece of art to be cherished and passed on. Please let me know. Thank you so much for sharing your gift!
Hi Laurie, thank you for the compliments! Unfortunately I’m not making these to sell at this time. If anything changes I’ll let ya know! <3
Beth, when I first saw this technique of yours, I promised myself I would try it. Well I finally did. It is a small cabinet and it turned out beautiful. I will send a picture to you via email. I also have just started my own blog, harder than I thought it would be. I hope you don’t mind me mentioning you on my blog since the piece I did is on my blog. I don’t have much in my blog yet but I am getting there. Thanks again for the beautiful tutorials and ideas.
Hmmm…won’t share the picture…bummer
I know 🙁 It’s super frustrating that it won’t let you share images in the comment section. I still want to seeeee though! Email me at beth@realitydaydream.com!!
I have used this technique a couple of times now…and it just keeps getting better….used some acrylic pain with a bunch of gloss medium to give a tiny bit of color this time…I LOVE these chairs and am emotionally attached to them. I bought,
assembled, stained and finished them for our first house…they were our
kids “high chairs”..and they are Violets favorite place to sit and hang
upside down by her claws…They have been used hard over the years and
are showing their age but I didn’t completely sand them down to save
some of the memories imbedded in the “character flaws”. I LOVE how this
turned out!…the second one has some structural issues so it may take
me a while to get up the energy to start it…staining, glossing,and
then 4 coats of paint…and still have to poly it when the stain finally
dries…oh and had to wash paint off the cat once already…
I waited 20 min for the page to load, the ads are forever. Not going to risk starting the video. Not worth it, and I have high speed internet.
That’s so weird! Thank you for letting me know. I’ll be doing some troubleshooting for sure. If you want to watch the video on Facebook instead, here’s the link. There will be no ads there. 🙂
https://www.facebook.com/RealityDaydream/videos/1016117421789237/
I would love to see the tutorial, but there are so many ads covering it and then one that just stopped it that it’s not worth the trouble. Looks like it’s lovely work though
I do a lot of staining but normally don’t do a lot with different shades on the same piece…when I do I don’t get sharp lines – how do you do sharp lines without it bleeding through the grain?
Thanks
Hi Bethany! I love this dinning room table with the teal bottom so much! Do you ever sell pieces? I would really like to buy this from you! Please let me know! 🙂
Going to try this on a huge lazy susan.
Ooo fun! You’ll have to send pics when you’re done!
What a great idea!
These are so beautiful, but I can’t draw a stick person, so way out of my league. I’ll just enjoy your photos!
I just did this technique on a garage sale table. Very fun and easy to do!
Its amazing….I am starting on a SMALL table…IF it turns out, I will post!!
Yay! I can’t wait to seeee! Let me know if you have any specific questions. 🙂
Have you ever refinished furnigure that had a veneer?
I very rarely comment on postings, but this one I could not let go. Your work is absolutely stunning and love the rose design. I have been looking for a new dining room table and this would be beyond perfect. Can you share more information on prices?
Your work is stunning!! I think I found the original creator of your reference image. 😀 I did a reverse google search and found this: http://www.johnnyaustin.com/flower.html. Hope that helps! (And you’ve seriously inspired me. I like to paint roses using soft pastels on pastel paper – I think it would be super fun to try furniture staining! I’ll definitely let you know how it turns out if/when I try it). 🙂
Thank you Ashley! I added the link to my post to give the photographer credit! 🙂
Fantastic! I love seeing people be creative!
I love the work you do and it inspires me. How long did it take beginning to end for the table you show in the video? Thank you for sharing.
This one took me right around 3 hours. 🙂
Fantastic!!!!
AGGGGGGGGGGH…that turcoise base on that table is AWFUL…
I love it, I think it is the perfect choice of color.
hi, i just saw this video on FB and i was wondering…. can i send you a table and you could do this for me if i paid you? any floral design you’d like!? or i could take it to you.. lol really, i’m serious! you’re crazy good!!!
Oh my word! Such a touching story! Off to email you now. 🙂
the blue on the flower is it a oil based stain also?
The blue, black, and white are water based stains from Unicorn Spit.
http://www.unicornspit.com/
Awesome, beautiful creations.. Pinned your site, so that I may find you ,so that I may get a piece done by you .. Keep up the great work…
I would love to buy a pice like this from you lol
Have you ever done one with a tree? I would LOVE to see one?
I’ve played around with the silhouette of a tree on scrap wood, but I haven’t done it on a large scale yet. Soon! And I really want to do a beachy landscape with a sunset too! Some many ideas!!!
Do you have any pictures for little girl or boys room furniture?
Joanne, we don’t have any little boys, but we have lots of posts on our girl’s room transformation: https://realitydaydream.com/category/big-girl-room
And here a couple little girl dresser transformations:
https://realitydaydream.com/2012/03/tutorial-painting-furniture-using.html
https://realitydaydream.com/2013/03/dawn-smaller-dresser-using-vinyl-as.html
https://realitydaydream.com/2011/05/nursery-changing-table.html
https://realitydaydream.com/2010/09/eloise.html
https://realitydaydream.com/2013/03/painted-dresser-for-little-girls-room.html
U R VERY GIFTED AND APPRECIATE U SHARING THAT GIFT WITH US. BEAUTIFUL BEAUTIFUL WORK
You are so sweet! Thank you!
You are amazing you inspired me to try my hand at staining. My first try was all freehand I was very happy with it 🙂 I love to see your work.
I’m so glad you tried this technique! Pleeeease email me a pic! sawdustandembryos@gmail.com
You are sooo talented! Absolute beautiful work. Have you thought of using mineral crystals (malachite, azurite, copper, etc.) as subject matter? How about trees or tree branches? What ever you do, keep creating!
No but you’ve given me some great ideas!
You are one talented young woman!
I love this technique! As I watched, my mind went to so many projects we have done for people in refinishing various pieces and the possibilities. I am very interested to see your technique applied to our product: Stainable Primer. It can be used on any durable surface to create a stainable wood surface without stripping, heavy sanding, or other traditional prep. It will even turn wood, metal, laminate, mdf, melamine plastic, just about any surface into a stainable wood surface, imagine the mixed media possibilities! Give us a call we would love to work on a project with you! Dave @ Montana Living – Direct!
https://www.facebook.com/MontanaLivingDirect/videos/vb.350244448324303/1097781213570619/?type=3&theater
Fascinating! I’m very intrigued by your product! Please email us at sawdustandembryos@gmail.com
This is sooo weird! I got to your blog from Vintage Revivals – As I was looking around I saw the table (which I was on craigslist last week (Cedar Rapids, IA) and saw that EXACT table), looked at your ‘about me’ and realized we must be neighbors! What a small world.
No way that’s crazy! We love finding fellow Iowans! 🙂 Especially since most of our readers are all over the country and WORLD! We live about an hour west of CR… Tama county 🙂
Gorgeous. This is a table you would NEVER put a tablecloth on.
this is just genius! I am in love with your table. I love to restore furniture but have never seen this.. in <3..
this is really a beautiful project! i loved the time lapse video and how you can kinda see the flower, but as the shading is added it just POPS out!! great job!!!
Thanks Ira! You’re super sweet! Thanks for commenting 🙂
So incredible to watch the video! It is really nice of you to share your technique, not that I ever could do something that amazing, but it is inspiring!
You should start with a simple symmetrical flower… and on a scrap piece of wood. You might surprise yourself!
AMAZING. In LOVE. Going to give this a try… eventually… when I have all my other ongoing projects done. So I’ll email you in oh, 4 years 🙂
Oh man… story of my life. No judgments here! We’re in the ‘middle’ of approx 265 projects ATM. 😉
Wow you are seriously talented
Thanks Sacha… but I most certainly couldn’t do this freehand. 🙂
seriously gorgeious!
You ROCK Beth! The only problem is, if I had that table I would never want to put anything on it.
Hehe! I feel that way about the one in my dining room. I don’t even want to put a centerpiece or vase of flowers on it!
Beautiful and you’re very talented!