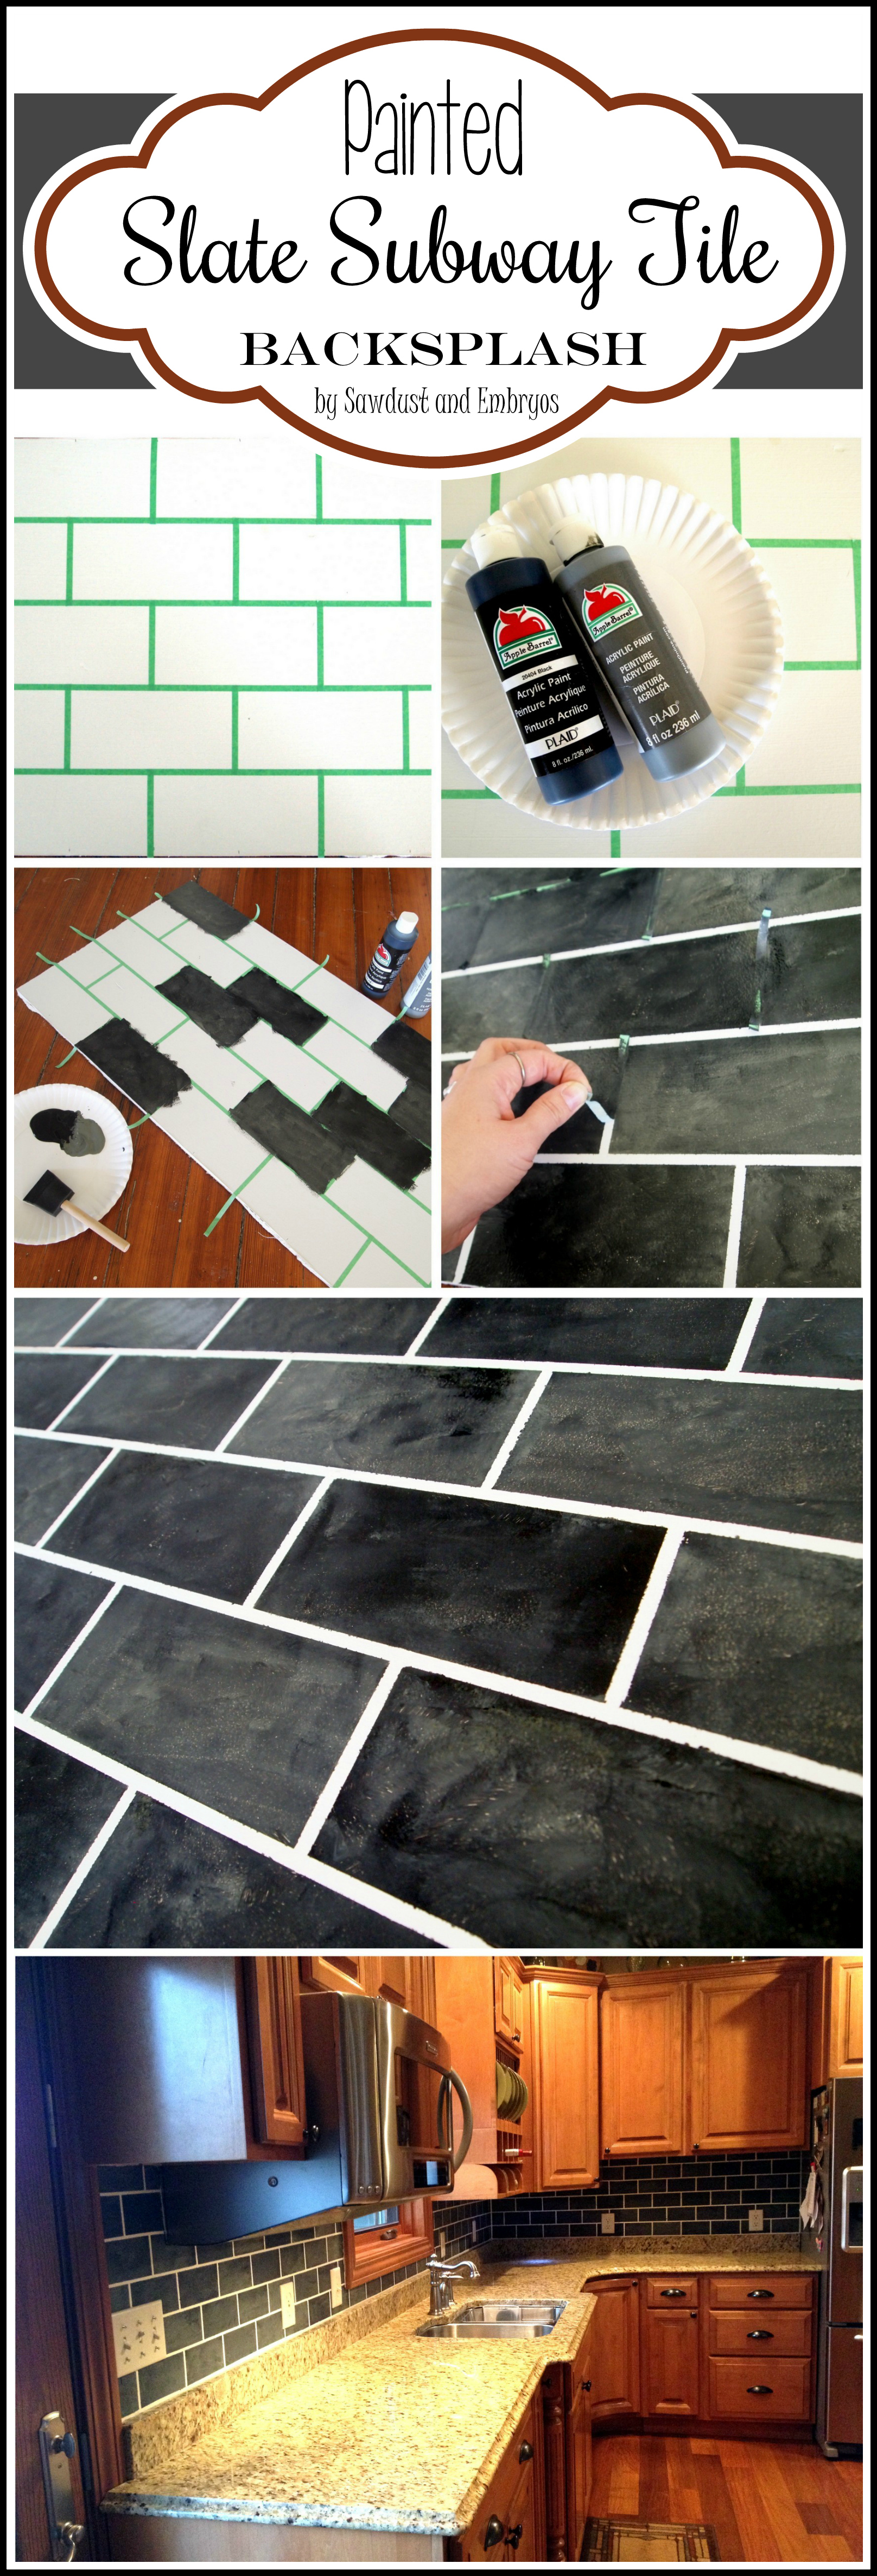
If you follow on Instagram, you know that we did a painted subway tile backsplash recently, and we made this one to look like SLATE! It turned out amazing if I do say so myself.

*this post contains affiliate links*
Trela is a long-time reader of our lil’ blog, and choosing slate for her painted subway tile backsplash was totally her call. I got really excited, because while we’re old pros at the subway pattern… it’s not often that someone asks for slate. I knew it was special when we were done. And you guys agreed… because a TON of you have asked for a tutorial!
Painted Subway Tile Backsplash Tutorial
If I had known in advance, I would have taken pics of our process at Trela’s house… but I didn’t. So naturally I found a slab of scrap drywall in the bowels of our garage, cut it to 16” (standard backsplash height) primed, and painted it white. Just for you.

Subway tiles are 3” tall by 6” wide (we googled it!), but when you’re measuring out your grid, you have to include the width of your 1/4 painters tape. So I put some tape on my ruler so I wouldn’t have to think too much. Thinking always leads to mistakes. Somebody please make me a t-shirt that says that.

For subway tiles, we do the horizontal lines first. So I made a tiny pencil mark every 3 1/4” all the way up both sides. Then I placed my tape horizontally just above my pencil markings.


The way subway tiles are staggered like bricks makes it a little more complicated than your basic grid… but nothing to lose your marbles over. You’re just going to measure out your 3 1/4” AGAIN along the top and bottom this time, then tap up vertical lines to make a perfect grid with perfect squares.

Next, use a razor blade and slice the edge of the tape on every other ‘tile’ in your first column. This looks tedious, but it actually goes quite fast. And you don’t need to push the razor… just lightly score it and tear off the tape on that ‘tile’.


Then on the next column, do the opposite tiles and just continue down the line until it looks like this!

When people email and ask how we ‘get it to look like natural stone’… they’re never happy with my answer: just blotch it on! So, even though I hate the sound of my own monotone voice and the repetitive click of the dryer in the background, this little gem is for you. And you. And you! And you’ll see for yourself. WE JUST BLOTCH IT ON!
For this painted subway tile backsplash (in order to get the ‘slate look’) I used Apple Barrel acrylic craft paint in black (flat) and pewter gray.


Acrylic paint dries pretty fast, so we just start taking tape up almost immediately. If you let it dry too long, it’s less likely to have a crisp line.

Every once in awhile, you’re going to have a situation where the tape pulls off a bit of paint from the ‘grout line’… or there might be some crazy seepage that needs touching up. In these cases, just go back and touch it up after the tape has been removed! Your sponge brush has a flat edge, so it’s easy to keep things straight even without tape.

We recommend rolling on a clear water-based sealer (this is our go-to stuff) on your painted subway tile backsplash a few days later just for added protection. You wouldn’t believe how durable these painted backsplashes ARE! And they’re easier to clean that tile!
Pretty fabulous eh?

Trela’s backsplash just kills me… it looks so fabulous! Of course it doesn’t hurt that she had an amazing kitchen to begin with.


Here’s a pic of her kitchen BEFORE… just so you can see how much a backsplash truly changes the look of a kitchen!

I love it so much, I’m thinking it might be time for me to update my painted backsplash. I just propped up my piece of drywall to see how it looks… Thoughts? We might be due for a new wall color first…!


For the tutorial on the current backsplash in our kitchen, click the image below!

Thanks for pinning!

*this post contains affiliate links
Related:
-

I have a fun and easy building project for you! And while I do end…
-

My kids are getting to the age where they want to tape pictures, cards, notes...…
-

I've been needing to figure out a solution for my overwhelming plant propagation situation for…
Once you’ve used the Minwax clear water-based sealer over the painted tile pattern, what type of prep needs done on the wall if you want to paint over it with a new tile pattern? Can you paint over the sealer with the Apple Barrel paint? Do you sand the sealer?
If the sealer you used has a glossy sheen to it at all, you’ll want to sand with some 220 grit sandpaper just to dull it down. Then paint away with whatever paint you like!
Love it
Question how do you install the painted drywall to the wall it’s self?
Do I screw it to the wall?
We do the painting right onto the wall. We only used a scrap piece of drywall for the purpose of the tutorial.
Hi there! I’m doing DIY updates to my kitchen since we can’t afford to completely redo it for another few years. I’ve been looking into the Peel and Stick metro/subway tile backsplashes, but read that they are not recommended on textured walls. We have that “orange peel” texture from the late ’90s/early 2000s. In my search for another option, I stumbled across your blog. This is seriously awesome!! Do you think that painting white subway tiles with gray grout would turn out okay on textured walls?
Yes it totally works on textured walls!!
I just purchased a subway tile stencil. I felt this would be a sure-fire way to have uniform tiles. BUT, I was thinking about using glossy paint to give it a kitchen-tile look against my eggshell walls. You have said use craft paint. What is the advantage? Also, do you ever mix any other colors but gray and black?
I used craft paint because I wanted the dull ‘matte’ look so it would look more like slate. But you can totally use glossy paint! They make glossy graft paints, which would be the cheapest option. But you could also just use latex wall paint. Good luck!!
Love the demonstration! I have a light tan base coat that I want to be the grout lines and I would like to paint it to look like white subway tile. What color would you use? Just white dabbed on or a mixture? I am going for a traditional white subway tile look. Thanks!
Hey Connie! If you’re wanting your tiles to just look like white ceramic tiles, you could just use a roller and some high gloss white paint! The dabbing and multiple shades is what makes it look like ‘natural stone’, but it sounds like that’s not the look you’re going for?
Hi Bethany, I wanted to know when you make the grid.. I see you are measuring 3 and 1/4 across but what about vertically how much are you measuring across there? becasue you are making 3 x 6 tiles but allowing for 1/4 tape too.. so not sure on that.. thanks.Kim
This is great! I was wanting the opposite effect: gray grout lines and white tiles. Should I paint the wall gray and blotch on white? Thoughts?! Thank you so much!
Yes exactly!
I’m late to the party and was just directed to your blog! I am in love. This is SO what I am going to do with my kitchen. I just need a “pros” advice. my walls are painted a light brown and I want to do a brown tone subway tile. Would the light brown be okay for the “grout”. I want it to really flow color wise but the bricks be darker than the grout.
Hey Becky! YAY I’m so excited that you’re going to tackle this! If you’re existing backsplash is painted a solid brown, I fear that your darker brown tiles won’t stand out much at all. I’m not suggesting that you paint it white as your grout color, but I would paint it a lighter tan color at least. You could do a couple ‘bricks’ in an inconspicuous corner and take the tape off to see what you think before you go to all the work of the whole thing. No matter what you decide, I’d love to see pictures when you’re done! beth@realitydaydream.com
Woooow ! looks great 🙂
please, how Can I stick the drywall on the ceramic?
Thanks In advance 🙂
If you already have a ceramic tile backsplash and want to paint it. I would recommend sanding the whole thing down lightly with 150 grit sandpaper to take the glossy sheen off. Then prime with a good oil-based primer, then paint white (or whatever color you want your ‘grout’). The taping part should be easy at this point, because you’ll be able to see the indentations of where the grout is, so there won’t be any measuring! Good luck! Send pics when you’re done! beth@realitydaydream.com
How did you make sure that the painters tape layout for the grout was level all the way up and down?
Hey Teresa! We made sure the very first strip of tape was level using a laser level, and then the rest we just measure the same distance at the top and bottom from the previous vertical strip of tape. Does that make sense?
I just finished mine, thanks for all your help
Yayyyy! I wanna see pics! Email me at beth@realitydaydream.com
What happens if this gets wet? Does it bubble up?
Nope! It’s just like your plain painted drywall would react to water! And it’s soooo much easier to clean than real grout.
I certainly hope you can reply back. I have been researching this and always coming back to your website to really make sure this is really THAT easy. I am priming and painting my grout color this weekend ( I am going from barn door red all around the kitchen to a beige for the grout color..must prime first. LOL!) I am ready but there ONE thing I cannot get an answer for. Home Depot wanted me to buy this little jar of something for $12 a jar ( it would take at least 4 -5 jars) to seal it. What are you using? Please name drop,product drops, store drop. This is the ONE missing piece to my project.
LOL! I swear, it really is easy! The taping gets a little tedious. But once you’re done with that, it gets fun and it’s all downhill from there. 🙂 We use Minwax PolyCrylic to seal our backsplashes and it’s very durable. You can buy a quart at any home improvement store! And I can guarantee it’s less than $12… and you will use a small fraction of the quart. Bonus! That’s so crazy that they were trying to BS you into buying that!
Thank you so so so much! One more trip to HD and I can be 100% ready! I am so excited to get started.
be sure to send pics when you’re done!!
Did you use the water base or oil base for the polycrlic please?
PolyCrylic is water-based.
i am considering combining your gloss design and subway tile projects and doing subway tile shapes with a gloss coat in our bathroom…. love your ideas.
I just ordered my tape to do this because i cant find it anywhere?!?!?!?! Im so excited to try it!!! Thank you so much for sharing!!!
If you are using latex paint, when do you recommend peeling off the tape during the process? I love your work btw.
OMG I absolutely LOVE this idea. Both you and Trela did an awesome job on your backsplash projects. At 1st I was a non-believer, but now that I have seen the tutorial, I am tempted to give a try myself. Thanks so much for the inspiration!
absolutely love this idea!! What a great idea!!
Oh I LOVVVVE the way this turned out! Most beautiful!
Awesome as always. 🙂 I think this one’s my fav so far!
I love it! Such a great idea. I was wondering if you have ever done painted tile in shapes that arent square in nature? I fell in love with this beautiful aqua Moroccan tile and now that we are buying our first house I tried to find it, and of course they dont sell it anymore. I was thinking I could use my vinyl cutter to make a stencil and use this same technique. I am hesitant to try it, only because I havent done something this massive before.Also, do you have any suggestions for making it look like glass tile?
Thanks!
Leah I’m thinking that you’d have to use a stencil to get any curvy shapes like that, or vinyl like you said. Though that could get pricey. As for glass-like tiles, just use high gloss paint for the tiles with an eggshell finish on the grout below. Does that make sense? It looks a lot like glass!!
Wonderful! thank you for the reply and suggestions!
Absolutely beautiful. 🙂
-andi
I secretly hope that you don’t change your kitchen because the wall color and backsplash combo are so unique and it looks so good! But if you do I know that whatever you come up with will look equally as fab!
Awwww I’m glad you love our kitchen! I still really like it too, but sooner or later I know I’m going to be itching for a change. 🙂
LOVE that “pretend” backsplash for your kitchen! You should absolutely do it!
Ok, you guys, so what she forgot to tell you was this literally took TWO hours — start to so-happy-I-couldn’t-stop-bouncing finish (minus a sealer, which is going on this weekend). We don’t have a huge kitchen, but it’s quite a bit of backsplash, and it was SO fast. My friends asked me how it looks up close — you have to be SUPER close to tell it’s not actually tile (like when I’m washing dishes I can kind of tell — only kind of, but when I’m bleary “must have caffeine” morning eyed I can’t tell at all). My gut told me slate — my husband was super dubious, and now we both wish we had done it years ago.
Trela,
2 hours? Wow! That’s great. Makes it seem do-able without getting worn down.
Trela you are soooooooooo sweet! And I’m so glad your gut told your slate. 🙂
Wow!!!! I have always said I just want my walls white (because in the winter months it helps brighten the room). I am really impressed with how the subway tiles look in the kitchen you did. It really brought out other darks in that kitchen. Look at that counter top in the before and then in the after. The darks pop out all over the place in the after pictures. Good job, Beth!!!
Thanks so much Diane! Your opinion means a lot!
thank you! I was pretty sure I could figure out the “just slap the paint on,” but it was nice to see a video 🙂 I just ordered my 1/4″ masking tape last week 🙂
Wooohoo! Awesome! Be sure to send us pics!
Do you always use craft paint? Do you do more than one coat?
We almost always use craft paint… the only exception is if the homeowner has a can of paint that they’ve used elsewhere in the house and they want us to use it so that it will be an exact match as an accent color. You can mix latex paint and acrylic, just not oil/water based paints. We rarely need to do more than one coat of paint. Sometimes when we’re doing a solid tile, it needs a second coat. Hope this helps!
Thanks so much for the video! I think I have the confidence to do this to my backsplash! And, scoring the tape will save me hours, and save me from brain damage.
Send pics when you’re done!! Good luck!
I love the look of the slate ’tile’, I’m building an outdoor daybed bench, and I might just have to do that along the base of the bench!! As for using the slate in your kitchen, I love it but I’m also totally obsessed with your current backsplash, that would be so hard for me let go of!
Wow, amazing difference, it looks great! Did you coat it with anything after you painted?
Julie! Good question! I need to add that info to the post! We recommend rolling on a clear coat of WATER-BASED sealer a few days after painting your backsplash. It makes it extra durable!!
Beautiful. We have textured walls, so I doubt this would work for us. If you decided to do the subway tile in your kitchen, I would use brown colors to match with your counter tops.
Crystal! You’d be surprised! We do textured backsplashes all the time and they turn out amazing!
They are all awesome…!! I love your kitchen colors but I would never have the patient’s to do that. I’d say leave it as is…