I’ve been really pushing myself to step out of my comfort zone lately (namely with the breakfast bar). I don’t know what came over me… it’s not like it’s even New Years yet. I just resolved to do more on my own without relying on others to do things FOR me. One such thing that would have normally intimidated me is ELECTRICAL ANYTHING. I don’t wire lamps, I don’t wire outlets, I don’t wire light switches. And why would I when there’s a perfectly capable and willing (not to mention SEXY) man-child with the skills to knock out a wiring project in a hot second?
I’LL TELL YOU WHY…
Because our bathroom/laundry room is taking FOR.EVAH to finish. I mean. I can’t even discuss this right now.

So! When the boy-toy is ‘occupied’ with other things and a girl wants to fashion a couple table lamps from scratch to go on the holy credenza, it’s time to roll up the sleeves and figger it out!
Howevvvver, when there’s a chainsaw involved, he may just stop what he’s doing and push you out of his way to feeeel the POWER.

We were on my grannies farm for the day last weekend, and I needed some wood-slabs for my lamps. He cut me ten slabs varying between 1”-2”, and about 6(ish)’’” in diameter.

Next I sanded off the bark-y edges with our oscillating belt sander. You could hand-sand this too… it would just suck and take awhile.

The ‘centers’ of my discs aren’t going to show, so I just primed the outside edge with BIN spray primer. After that was dry, I used a large craft brush to paint just the outside edges using some leftover gold paint from our dining table (the actual name of this color is Modern Masters ‘warm silver’ …but it’s totally gold.


I glued these together with wood glue, being careful to position them a little staggered the way I wanted them. Then once the glue was dry, it was time to drill! We bought this crazy-long 12” 3/8 drill bit for this part. It was only $10. Drill straight down in the center of your stack’o’slabs.

I needed to route a groove for the cord to sit. Using a round-nosed bit, I just lined up my stack so the bit was in the hole, turned on the router, and then pulled it toward myself to create the groove. GROOVY EH?!


Now it’s time for the actual wiring! This business turned out to be FAR simpler than I thought it was going to be! I’m going to include a lot of pictures below, but don’t let that complicate things in your mind! I’m just trying to lay it out as simply as possible so YOU CAN TOTALLY TACKLE THIS YOURSELF!
Here is what you’ll need. A 6’ extension cord, a turn-knob socket, and a threaded tube.

I put the threaded tube into the hole on the top of my lamp base and decided how far to put it in based on how high I wanted the lampshade to sit. I marked it with a sharpie, pulled it back out, and slapped some wood glue on. Then tapped it back into the hole (with a rubber mallet… it’s a tight squeeze!) until it reached the sharpie mark.

Using a wire stripper, clip off the non-plug end of the extension chord and feed the end through the bottom of the lamp, pulling out about 6” or so on the top side.

Split the two sections of the cord, and pull them apart about 2”. Then, using your wire strippers again, slice off the plastic part of the wire… stripping back about a 1/2 inch (we used the 16 gauge hole, but yours may be different depending on the thickness of your wire).

Take apart your socket into 3 pieces like so, and identify the silver and gold screw. Silver is NEUTRAL.

Use a screw driver to loosen the screw slightly. Twist both ends of your exposed wire so the ‘bristles’ are tight together, then bend in half so it can wrap around the screw. You’ll notice that one of your white cords has a ‘ribbed’ texture and the other side doesn’t. The ribbed cord is your neutral, so that one will go on your silver screw. The un-ribbed cord will go on your gold screw. Just screw ‘em on tight! Easy-peasy!

Finally! Pull the cord from the bottom of the lamp until the socket sits snuggly in the bottom gold part that you already threaded on. Then put on the rest of the socket parts!

At this point, you can screw in a bulb and test to make sure it works. Then put on your lampshade! I snagged these at Lowes for $20 bones. Just pop it over your socket, screw in your bulb, and WHAMMO! You did it!

TADA!


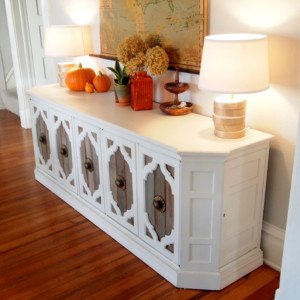
That vintage map was an auction purchase from a couple years ago. We love it but haven’t had a place to put it until recently when we took down our gallery wall to paint. Chances are the gallery wall will go back up sometime soon, but it’s fun having options to change things out.

I hope you guys are inspired to try some new things… even if it’s outside your skillset or comfort zone. It’s soooo fulfilling! This project was so much fun, I’m thinking some other lighting projects are in my future. Who knew it was so easy?!


Disclosure! we’re SUPER HONORED to have been chosen as a “Lowes Creator”, and were provided with a Lowes gift card to help with the cost of supplies… but as always, all ideas, thoughts, opinions AND grammatical errors are 100% our own. Because that’s how we roll yo. This post contains affiliate links
Related:
-

We've been needing to update our coffee table situation in the living room for awhile…
-

If you follow us on the 'gram, you know I've been stripping the finish off…
-

We love the original wood of our library, and wanted to find a desk that…
The lamp looks gorgeous! I’ve been looking for a new inspiration for my next DIY lighting project and I’ve stumbled upon this. Thank you for posting this!
Great job Beth. I think I have some wiring jobs for you the next time I see you. 😉
I would like to add one correction to your photo of the light socket (for safety’s sake).
The Neutral and Common wire designation can refer to the same thing. The wire connecting to the Gold screw should be called the Hot wire in this image.
With lamp cord wire the ribbed wire is the neutral, and the smooth wire is the hot. NEC2008 400.22(f) allows surface marking with ridged, grooves or white stripes on the surface of lamp cord. http://en.wikipedia.org/wiki/Electrical_wiring_in_North_America.
It is good to see you branching out into some new areas.
Gotta be honest. I love the post-sanded wood, and don’t dig the gold. How awesome would it look with just the plain wood!
We were actually thinking the same thing! Espescially after we saw that the wood was spalted. Luckily we have a bunch more slabs and may make some ‘unfinished’ ones for another room in the house. 😉
Love these!!!!
Looks great. I love the color.
Have you done a review of sanders? You use your sander all the time and I am totally looking to buy one!
We haven’t done a specific review on sanders, but it is a part of our Must-Have Tool Guide (link below!). We looooove our orbital sander (brand: Porter and Cable) and use it all the time. We also have a Rigid Oscillating Edge/Belt Sander that we use a lot too… but those are expensive!. Hope this helps! Happy sanding!
https://realitydaydream.com/2014/02/our-must-have-diy-tools-and-products.html
So love it! I recently re wired a floor lamp from the 1920s… I was super nervous too, but it ended up being super easy.
Yay good job! Wiring isn’t so bad after all, huh?!
You are such a bad ass. Great job and thanks for the step by step.
Lol… THANKS Jessica!