I’m a sucker for unique and space-saving organization, so the idea of storing things vertically just makes sense! I’ve been thinking about different ideas for storing games, blocks and toys in our living room that would be inconspicuous yet allow the children to easily access them. And these storage baskets are what we came up with!

After making this, I’m realizing that there are SO MANY APPLICATIONS for storage baskets like these! And truthfully I could really use storage baskets in every room of my house. Laundry supplies, toiletries, craft supplies or fabric, dress-up clothes, pantry goods, diapers and wipes, hats and mittens, ETC! (obviously, I had WAY too much fun staging this baby up in different ways… LOL!)

Want to learn how to make storage baskets for yourself and your family? Read on!
3-Tier Storage Baskets
*This post contains affiliate links*
Supplies
- 2X3X8′ Qty 2
- 1″ Dowel Qty 2
- 1 1/2″ Screw
- Wood glue
- these baskets
Tools
- Table Saw
- Bench Drill Press
- Planer
- Router and table
- Kreg Precision Miter gauge
- Scroll Saw (or band saw)
- Impact Driver
- 23ga pin nailer
- 1″ Forstner Bit
- 1/4″ Forstner Bit
- 3/32 drill bit
- 45 degree chamfer router bit
- 1/4 cove router bit
Hey guys Nick here. Isn’t this basket rack amazing? You can build your own storage baskets with these simple instructions and by simple downloading these plans HERE.

Now that you have them downloaded, let’s get crackin!
We started by preparing all the lumber (Trim it to size, plane it, etc) and cutting it to the correct lengths based on the building plans above. Feel free to modify however you’d like though!
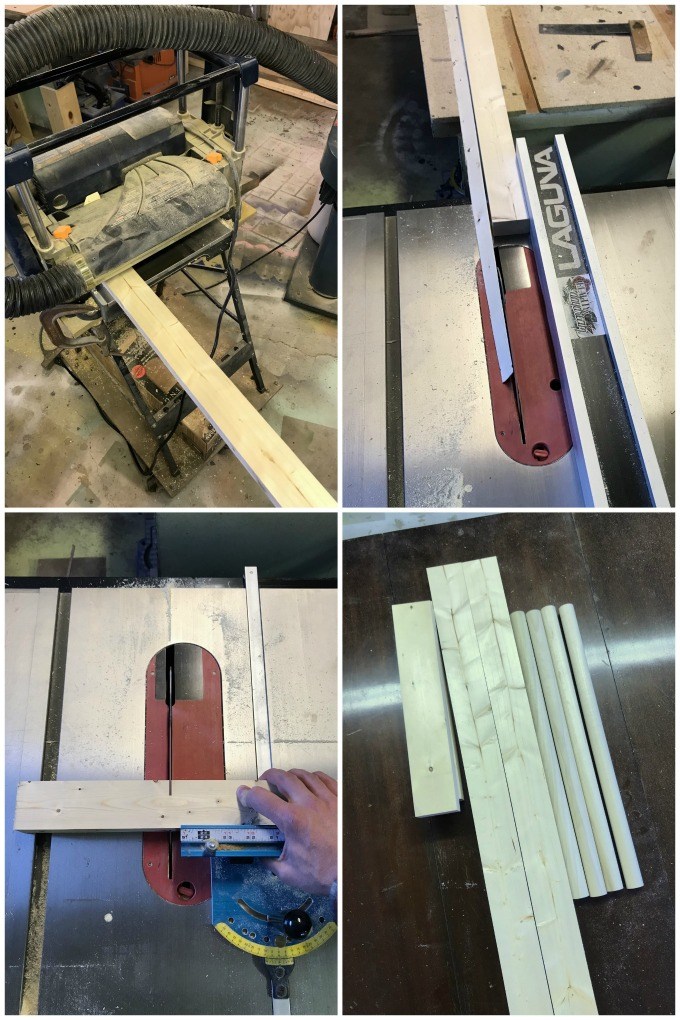
Using the router table and a 45 degree chamfer router bit we chamfer the sides and the top of the leg with a 1/4″ chamfer. Then we moved the fence and put a 1/8″ chamfer on the rectangular feet.

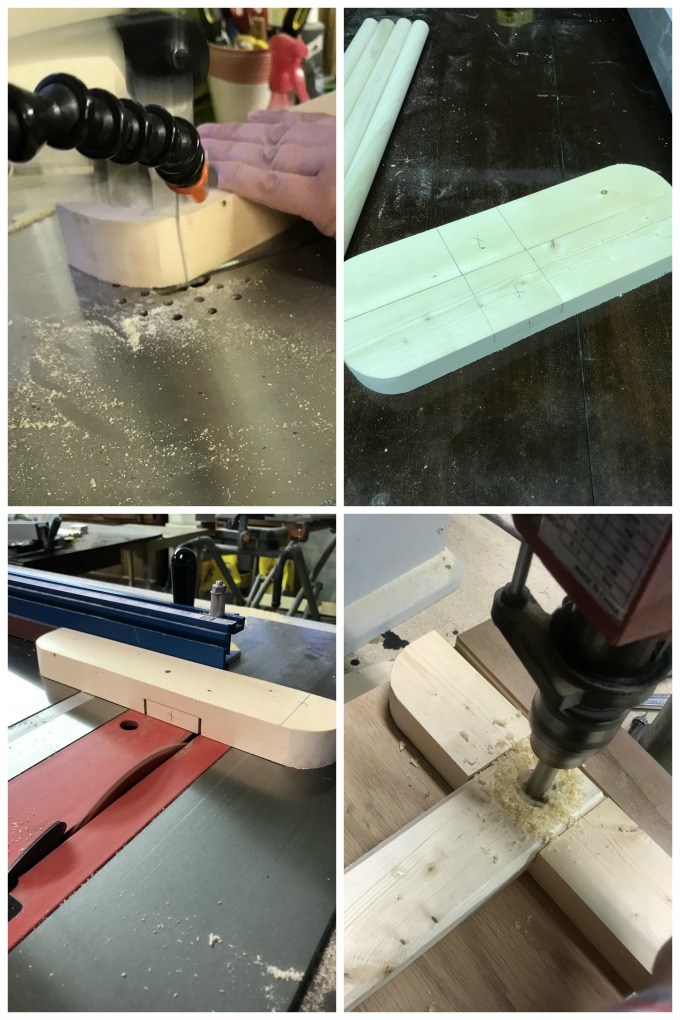
Then we laid out the hole locations for the dowels and drilled them 3/4″ deep using our bench drill press and the 1″ forstner bit. Once we finished using the 1″ forstner bit, we switched over to the 3/32″ drill bit and drilled a pilot hole through the center of the 1″ holes. Then we flipped the leg over and drilled a counter bore with a 1/4″ forstner bit. The counter bore does not need to be very deep, just enough for the head of the screw to sit flush.

While I was drilling the legs, Beth was cutting the feet’s radiuses on the scroll saw. Once Beth finished, we laid out the spacing and cut the cross lap joint, using the table saw and a miter gauge. Then we glued and nailed the feet to the legs using our pin nailer. Because of the cross lap joint we had to re-drill the hole for the 1″ dowel to get the required 3/4″ depth.
We decided to get fancy, and add some trim around the pads of the feet. to do so we took some of our 3/8″ scraps and routed the edge with a 1/4 cove router bit, then cut them to width with our table saw.

Assembly the two legs and the four dowels. Once assembled, we used our 3/32 drill bit to drill a pilot hole through the legs into the dowels. Then we screwed the legs to the dowels using these screws.
 Then we glued and nailed the pads to the feet and trimmed it with the 3/8″ trim we cut above.

And that’s all folks! This is a pretty simple build, and can be modified to fit different shapes and sizes of storage baskets. You can also finish it off with stain or paint!
I love light wood, and it seems to be having a moment right now. So I decided to leave mine the shade of pine, and just seal it with some satin poly.
What would you use your storage baskets for?


If you give this tutorial a go, be sure to share pics with us by tagging us on social media! We’re @RealityDaydream on both Facebook and Instagram!
Go forth and be creative! <3
~Bethany & Nick
Thanks for pinning!

Related:
-

When the twins moved into what used to be the guest bedroom, I knew I…
-

We've been needing to update our coffee table situation in the living room for awhile…
-

Hey guys, If you've been following along in our Instagram Stories, you know we've been…
I’m planning on moving in the next couple years and I wanna keep stuff like this in mind. Very nice!
Damn Nice !!!!