• Home
  • About
  • Tutorials
  • Recipes
  • Furniture
  • Contact
    • Contact
    • Infertility
    • Disclosure
    • Privacy Policy
  • Shop
    • Facebook
    • Instagram
    • Pinterest

Reality Daydream

The Dream is Free, The Hustle Sold Separately

  • Home
  • About
  • Tutorials
  • Recipes
  • Furniture
  • Contact
    • Contact
    • Infertility
    • Disclosure
    • Privacy Policy
  • Shop

Tutorial: Photo Lighting for Staging DIY Furniture

December 3, 2012 by Bethany Sy

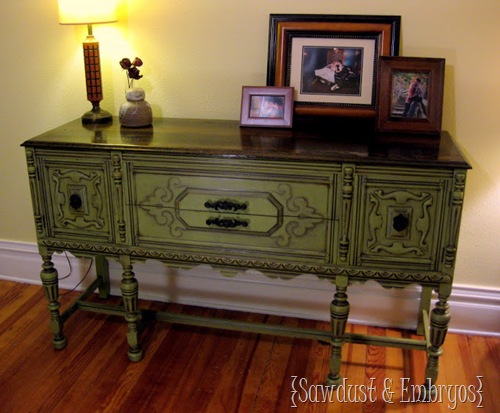
Yesterday I was looking at Pinterest, and noticed that someone had pinned the very first buffet we overhauled, 2.5 years ago. With it being one of our very first furniture transformations, I was sooooo proud of this piece… and honestly I still am!

BUT, I cringe when I look back at my furniture-photographing-skills. YIKES!

Glazed Buffet

There are so many things wrong with this photo. It’s no secret that I’m NOT a photographer… but I do have extensive experience photographing furniture over the years. And I’ve learned a lot. Here are the two most important things I want to address:

1) Use natural light whenever possible. Photographing at night (no matter how many lights you pull out) will never look as good as daytime photos.

2) Let the furniture be the star. At the time, I thought it was really important to accessorize and put pictures and flowers and lamps on my furniture… but through experience I learned that it’s just distracting and looks cluttered. You live and you learn, right?

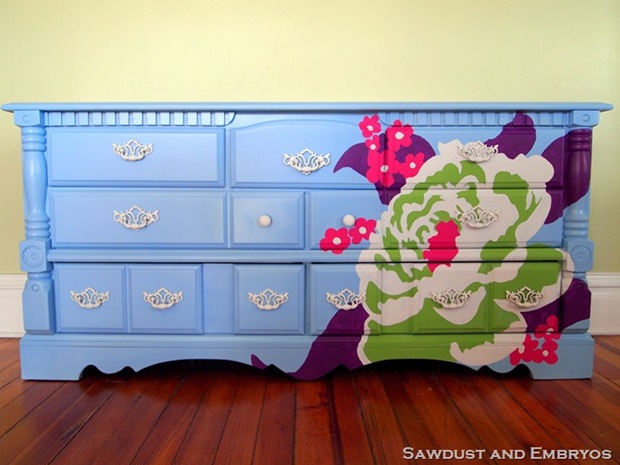
Here is an example of doing things RIGHT!

Photo Lighting Joel Dewberry Painted Dresser

This is my Joel Dewberry hand painted dresser. Can you see how the lighting is bright and pure? It brings out all the best features of the furniture. Now scroll back up and have a gander at the first photo again. It assaults you eyes, huh?

I know I still have lots to learn, and it’s fun trying out new angles and whatnot. If you’re a photographer and want to add anything that I forgot… or even correct me (I know I’m an amateur!), feel free to leave a comment! Let’s discuss!blank-001

Related:

  • DIY fabric-wrapped bulletin boards
    DIY Fabric-Covered Bulletin Tutorial

    My kids are getting to the age where they want to tape pictures, cards, notes...…

  • Centerpiece Tray Tutorial
    Wooden Centerpiece Tray Tutorial

    I have a fun and easy building project for you! And while I do end…

  • Make this propagation station with test tubes!
    Test Tube Propagation Station Tutorial

    I've been needing to figure out a solution for my overwhelming plant propagation situation for…

About Bethany Sy

Nick and Bethany Sy are the creative free-spirits behind DIY/Lifestyle blog, Reality Daydream. They recently purchased a historic mansion and have been documenting the ups and downs of renovation and making this home their own... all while sharing tips and tutorials along the way! When they found themselves in the trenches of infertility, they started a journey that would prove to be their most important DIY project ever, and have 3 beautiful girls to show for it. <3

« DIY: Towel Rack turned Curtain Rod!
Recipe for Homemade Peppermint Patties!! »

Comments

  1. 6

    Capturing Joy with Kristen Duke Photography says

    December 5, 2012 at 5:40 am

    Great tip, and I agree–no matter what you do, a picture will nearly always look best when shown off with the beautiful natural light!

    Reply
  2. 7

    byLGD Glass Jewelry says

    December 4, 2012 at 6:25 pm

    i have a Canon SLR with various lenses that were crazy expensive but honestly you don’t need an expensive camera to have great photos. all of my photos i take of my jewelry are taken with a tiny Sony point-and-shoot but it’s the editing that makes the difference (as well as GOOD lighting) so don’t worry if you don’t have a good, expensive camera. sometimes the little guy gets the job done just as well. 🙂

    love your stuff bethany. i am dying to try the stencil thingy out that you did in your upstairs hallway. totally awesome. 🙂

    Reply
  3. 8

    Aleasha says

    December 3, 2012 at 4:09 pm

    I’ve been struggling with this. My projects look great when they’re finished but I feel like the photos just dont do them justice. I hinted at a new fancy camera but I will try it out in better light next time. I think after working on something all day its just SOOOO hard not to take pictures when you’re done! Even if it is dark out. Patience is a virtue for sure.

    Reply
  4. 9

    Kathleen says

    December 3, 2012 at 4:03 pm

    Yeah, still working on taking photos of room arrangements that I don’t have to drag through Photoshop first to make look even reasonable. Just this week, the camera seems to have given up on focusing clearly. *sigh*
    I love pinning your work, dreaming of the day when I too will take my dresser and turn it into a masterpiece like yours!

    Reply
  5. 10

    Cassidy says

    December 3, 2012 at 3:29 pm

    I LOVE that second dresser. Gorgeous! And because of that dresser, I think I am going to paint my children’s toy cabinet that color of blue. Do you happen to know the color information? Thanks!!

    Reply
    • 11

      Beth @ Sawdust and Embryos says

      December 3, 2012 at 4:10 pm

      The blue base color is Krylon Peek-a-boo!

      Reply

Leave a Reply Cancel reply

Your email address will not be published. Required fields are marked *

Recipe Rating


  • Facebook
  • Instagram
  • Pinterest
  • RSS
  • YouTube
We are Nick and Bethany! Welcome to our blog, Reality Daydream where we share our DIY adventures!
Click here for lots of art projects using only wood stain on furniture!!
Please feel free to share or pin my posts! You're welcome to use ONE of my images (no collages or pinnables) with a link back to the corresponding post. Please do not edit or crop that single image in any way. Improper use of my photos, ideas or words is a violation of copyright. Thank you!

Categories

Attention: Almost any do-it-yourself project involves risk of some sort. Your tools, materials, and skills will vary, as will the conditions at your project site. Reality Daydream has made every effort to be complete and accurate in the instructions of the plans on this website. Reality Daydream will not assume any responsibility or liability for damages or losses sustained or incurred in the course of your project or in the use of the item you create. Always follow the manufacturer’s operating instructions in the use of tools, check and follow your local building codes, and observe all commonly accepted safety precautions.


Copyright © 2025 · Modern Blogger Pro On Genesis Framework · Customizations by Sweet Theory Designs · Privacy Policy · Log in