 *This post is sponsored by Rockler. Thank you for supporting the fabulous brands that make Reality Daydream possible! This post contains affiliate links.*
Supplies for Teardrop-Shaped Bentwood Shelf
Tools to make Teardrop-shaped Bentwood Shelf
-
Table saw (this is the one we have… and LOVE)
-
Scroll saw (this is the one we have… and LOVE)
-
Brad Nailer (this is the one we have… and LOVE)
Materials to make your steam box
Instructions included with Rockler steamer, or you can go rogue and make one of the many ones available online.
-
Lumber for bending
-
Brad Nails
- Plywood
- Scotch tape
- Tracing Paper
Nick here…Hey, Hey! So we have been wanting to incorporate something with steam bending for quite some time. We were a little intimidated, but had seen enough videos and read enough about the process, that we felt pretty confident about giving it a go. First we designed this bentwood shelf, which you don’t have too because we did it for you (YAY!)
Unfortunately, we wanted this to be a 1:1 scale and we impatiently decided not to go to the printing press. That being said we printed them off as a poster and taped those suckers together; one after another, afteeerrrr anothhhherrrr. haha, until we got them all done. Click HERE for to download and print this template / building plans.

Now that you are covered in scotch tape and paper cuts, take your transfer paper and trace the inside edge of the teardrop. Then cut it out, we will use this later for marking the shelves, dado’s and making the pattern.

If you haven’t already, build your steam box. We used (qty 5) 1”x10”x72” and the strips of wood we used to bend are 64” long so I would make your steam box about 70” long.

We cut our strips of wood to be bent 3/16” thick x 1/2” wide x 64” long. After a couple failed attempts, we learned that the top curve was just too tight, so we decided to cut some kerfing to help it bend.

Throw those suckers into the steam box, fill up the steamer and start the process! whoop!
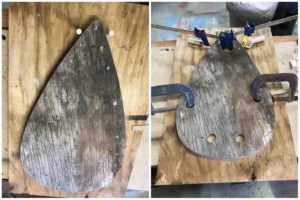
Tick, tock, a watched pot never boils, so let’s get this pattern made… I had some scrap plywood that has been decaying in the backyard for sometime,(I know, the wood gods are steaming(<— see what I did there), that I would let such a thing sit in the element and wither away. Anyway… we grabbed some plywood, (the plywood we used happens to be 5/8” plywood), we traced our pattern on the plywood twice and cut them out, then we screwed the two teardrop shaped pieces of plywood together and sanded the edges in an effort to get rid of any high spots.

We then screwed the bentwood shelf pattern to a backboard, drilled a hole a couple 1/2” hole for dowels on both sides of the small curve, using a spare piece of the wood being steamed as a spacer. Lastly we drilled some holes for our clamps. The size of the hole doesn’t really matter as long as the clamps fit.
We let the boards steam, for a good hour after the steamer got up to temperature.

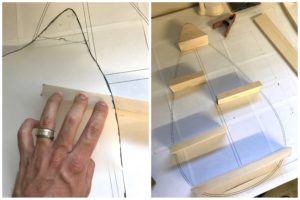
When it’s time to pull those pieces out, you want to go fast but not reckless. First we pulled one of the dowels out of the pattern, then we grabbed a piece out of the steamer, locking one side of the wood between the pattern and the dowel we carefully made the tight bend, supporting the lumber with our hand as we wrapped it around. then we pinned the other side of the tight radius with the other dowel.

We then did the same, bending motion with our hand on the backside of the wood, helping support it as the wood fibers are being stretched and compressed for the rest of the way around the pattern.

We clamped the tail in place, and then repeated the entire process for the second teardrop. We clamped everything into place so we could walk away and let it dry overnight.
While they are drying, let us talk about lumber. We had some scrap birch laying around, so it is what we used. based on our research, air dried wood works 10x better than kiln dried lumber. Some good lumber to use? Birch, Ash, White/Red Oaks, Beech, Elm, and Hickory. Some people have had luck with kiln dried yellow birch. You might be able to use kiln dried pine, but ultimately your best bet is going to be going to a local sawmill and picking up one of the above.
We tried a variety of wood types and cut extra boards, they might not all work.
We left the boards on over night, but you can dive into the shelves while your waiting right? We traced the shelf locations and size onto the transfer paper, the marked those onto the pieces of wood (2 1/4” thick) and cut them out with a band saw. Using an oscillating belt sander to touch them up and get them to their final shape.

Repeat for remaining shelves.
The top and bottom shelf have a dado for the center vertical board, we transferred those locations, using the center board and cut the dado on the table saw.

We cleaned the dado’s up with a 1/4” chisel and pieced everything together, checking for fit.

We took the bentwood shelf pieces off the pattern and splice the overlapping pieces together.

While waiting for the glued splices to dry, we glued and nailed the shelves in place.

After about an hour passed we took the clamps off the bent wood and glued/nailed those suckers into place!

Viola! Now show this sweet shelf off like a boss! JK, I was in my lazyman’s afterwork cloths, no judgments haha.

We sanded ‘er down with 220 grit sandpaper and stained with Minwax Provincial stain. It turned out a little darker than I expected, but I think I actually like it more than what I was envisioning!

Hope you all enjoyed the tutorial for this Bentwood Shelf. It was a fun project that requires very little materials and is a great way to get rid of those scrap pieces off wood laying around your shop!

")

As always, if you give this project a try, tag us on social media (@RealityDaydream on both Facebook and Instagram) or email us pics (beth@realitydaydream.com)… we LOVE seeing your creations! And be sure to sign up here so you get an email notification each time we publish a new tutorial! <3
Go forth and be creative, friends!
Bethany (and Nick!)
~~~~~~~~~~~~~~~~~~~~~~~~
~~~~~~~~~~~~~~~~~~~~
Be sure to check out our master list of DIY Handmade Gift Ideas!

Thanks for pinning!

Related:
-

Our very best friends moved away to Tennessee, but we still find reasons to visit…
-

We've been needing to update our coffee table situation in the living room for awhile…
-

I have a fun and easy building project for you! And while I do end…
Blog entries are unquestionably my source of entertainment and you have astonished me with your writing. Keep doing awesome would like to see more blog entry on the site. I have not been this thrilled by a blog entry for a long while! You have it, whatever that implies in blogging. I like to share these types of blog to my friends who like to read the blogs for gaining good thoughts and informations
Uh – how in the WORLD did I miss this post?! I LOVE this shelf for so many reasons: 1. The amazing craftsmanship 2. The care and attention put into making it 3. The fact that it’s MINE ALL MINE! No seriously, we love this shelf you made and it has a feature spot on one of our walls. You are THE.BEST!
This blows my mind. I never really considered how things like this are made. You two are awesome!
Wow, so beautiful. I really enjoyed looking at all of the photos for the project. I will probably never own all of the power tools you used to make this but as a crafter I can appreciate your wonderful work. Thank you for sharing your talent with us.
I love it!
This is beautiful! Great job!