You know Nick and I are always searching for smart storage solutions. So when we were invited by Jen Woodhouse to participate in a ‘Scrap Wood Challenge’, we thought it would be fun to fill a need that we’ve been considering building for awhile… a Scrap Wood Shoe Cabinet!
But in our case, we’re using scrap melamine that’s leftover from this (also organizational) project.

*This post contains affiliate links.*
Let’s do this!
Scrap Wood Shoe Cabinet
Supplies
- Scrap wood or Melamine
- 1 1/4 pan head course screws
- #8 x 2″ Trim Head Screws
- 3/8 Dowel
- Melamine edge banding (qty 2)
- Titebond Original
Tools
Hey guys, what is going on!!! Nick here, been a while, huh? haha. Beth asked if we could do something about our shoe situation in our closet…. ummm, yes. Of course the kicker was that it needed to be done in less than a week in order to participate in this “scrap wood challenge” with all our blogging friends (see the end of this post to check out all the other scrap wood projects!). So, let’s get to it huh?
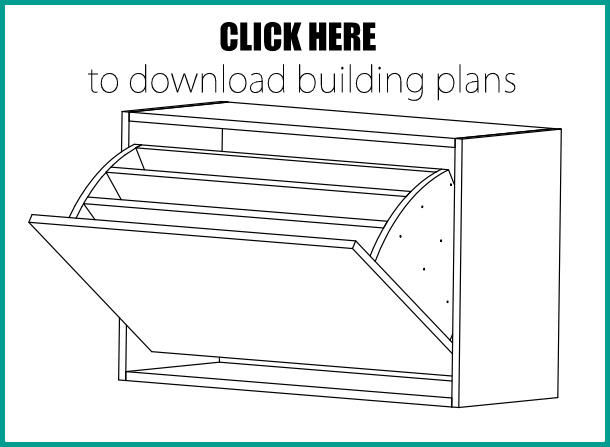
You know the drill, download these plans HERE
We happened to have several scraps of melamine laying around, but if you need to buy a sheet here is how it lays out. (CLICK HERE for the cutlist pdf)
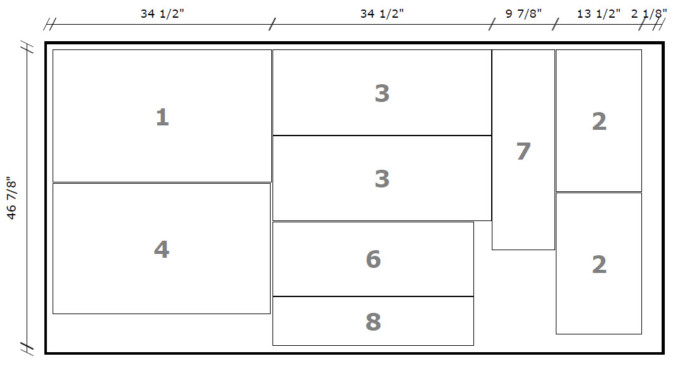
Start by cutting all the sheet stock to size.

Then we cut all the shelves. They are all weird angles, using this Wixey Angle Gauge really helps out, however you could always make the shelves narrower and not fit as cleanly in the shoe shelf.
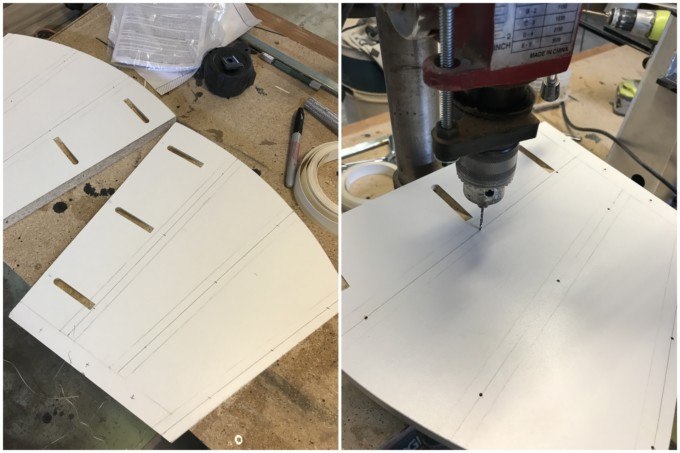
 Once all the stock is cut to size, we cut out a template for the sides. Download and print your template HERE.

I traced it out onto the melamine and cut them out using a bandsaw, then sanded it to its final shape with a oscillating drum sander, finally cut the angle with a angle jig.

Edge Banding
Next, edge band all the required edges using this edge banding and a basic clothing iron.

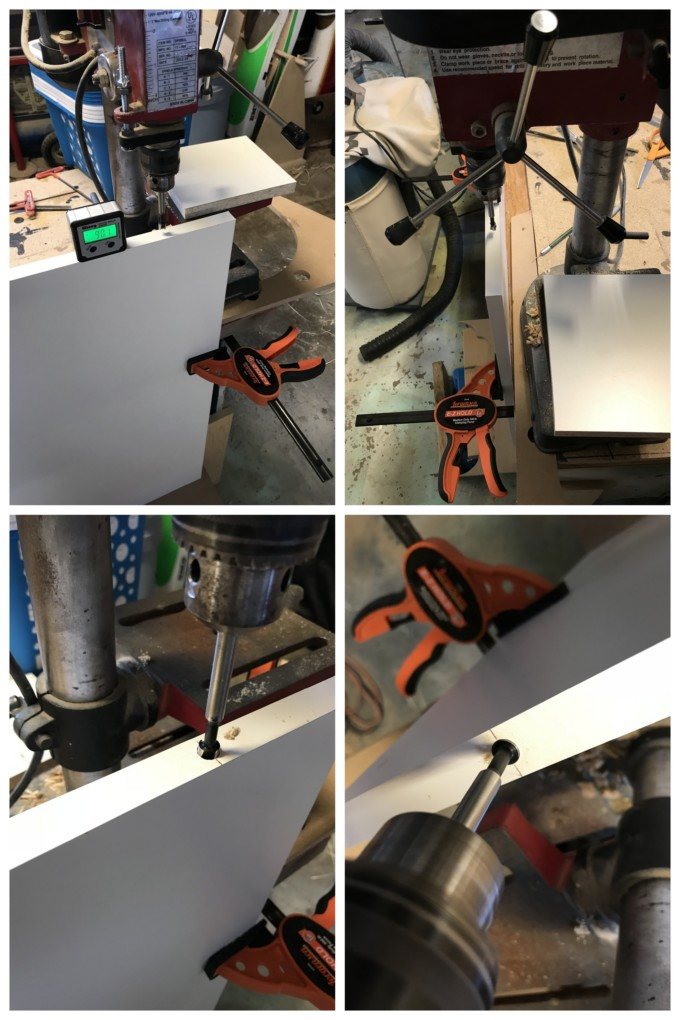
Using this sweet Castle 100, we routed and drilled our pocket holes, ohhh so clean.

With the template, we laid out where the shoe shelf boards will be applied and drill the holes using an 1/8″ drill bit.
While we had the drill out, we drilled the 3/8″ holes for the dowels on the front. Wanting these to be straight and parallel, we clamped the front to our bench, ensuring it was parallel and perpendicular to the drill shaft. We did this with a angle gauge.
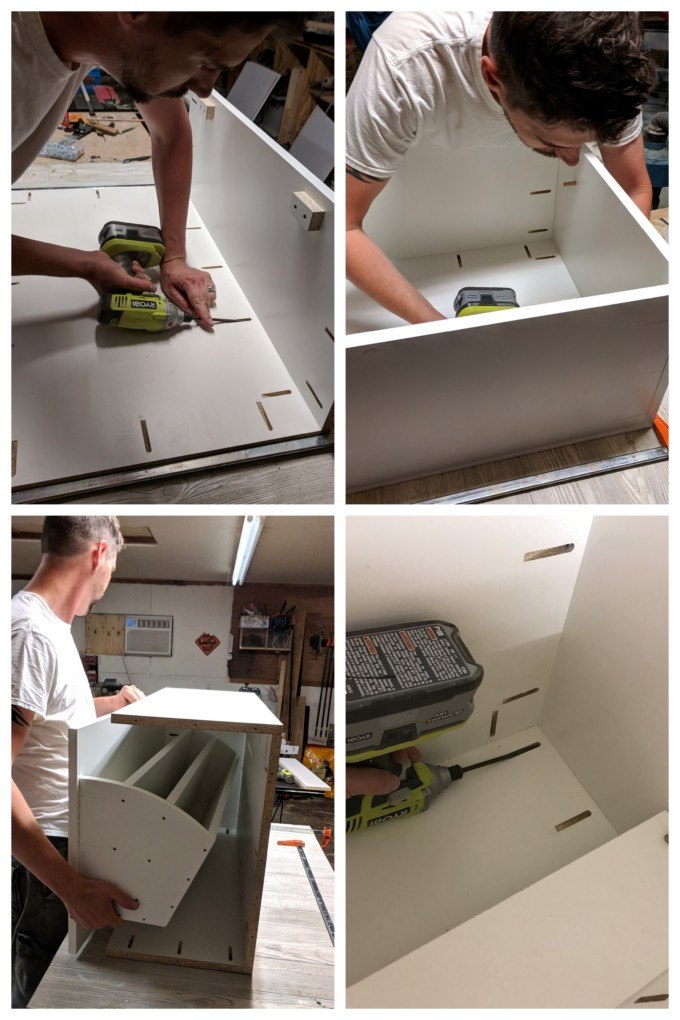
ASSEMBLY
Finally some assembly, BRING ON THE ASSEMBLY!
Clamp the shelf bottom to the shelf sides and then using 1 1/4″ course thread screws attached the sides to the front.

After removing the shelf bottom from the shelf assembly, we attached the shelf bottom to the shelf back and screwed the shelf dividers to the side and bottom using these trim head screws.

Let us set that bad boy off to the side and get to the main carcass, shall we?
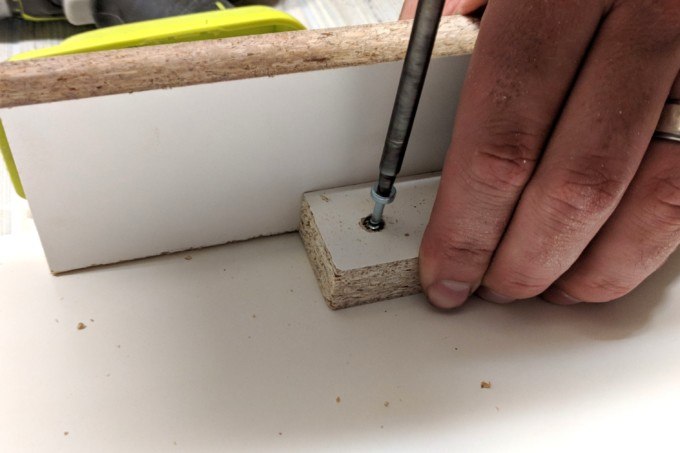
Grab that 3/8″ forstner bit and drill holes for the dowels in the shoe cabinet sides. The only glue on this project is for the dowels, here you go dowels, drink it up. Yum. We used Titebond original and don’t actually recommend you ingest it, it’s for wood, NOT humans. 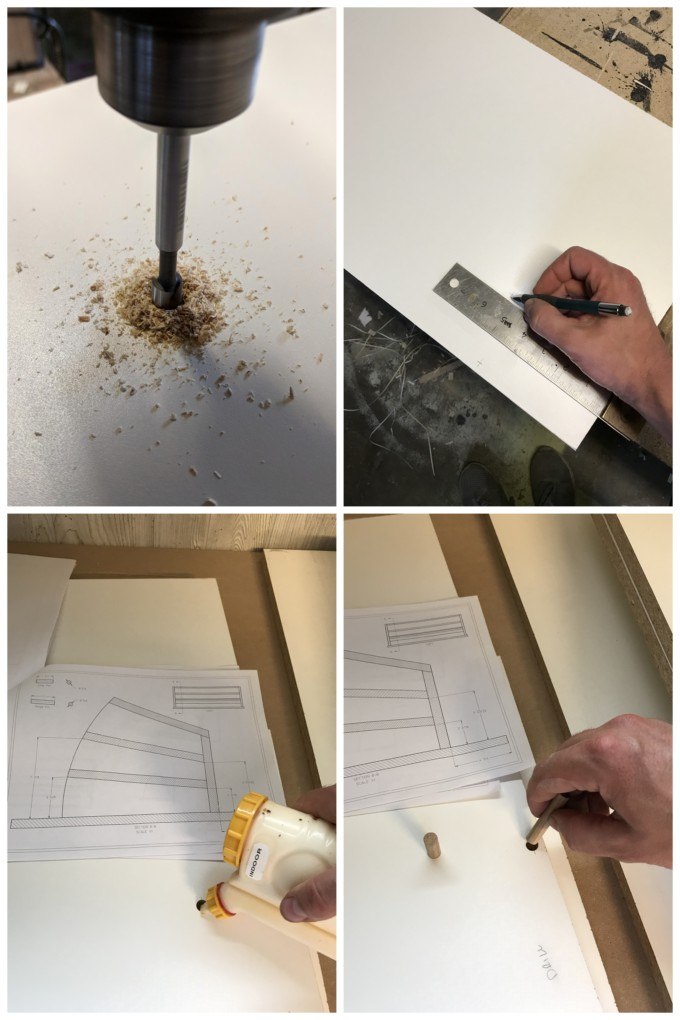
Add a couple small pieces 1 1/2″ x 2 1/2″ pieces of Melamine to the bottom of the shoe cabinet carcass top to act as a stop for the cabinet door. We drilled a couple holes in each piece with a 1/8″ drill bit and counterbored with a 1/4″ drill bit. Using a scrap as a spacer we screwed the stops 3/4″ from the front of the shoe cabinet carcass top .
It’s time to assemble the carcass! You can see here that we essentially screwed everything together. However, what you don’t see is how bad I struggled to get some of the pocket holes screwed. Don’t be a Nick, assemble one of the sides to the top (pocket holes on the bottom). Lay it face down and slide the shelf onto the dowel/hinge, then clamp the back on (pocket holes on the outside). Then screw the bottom on (pocket holes on the bottom). Lastly, screw on the back.
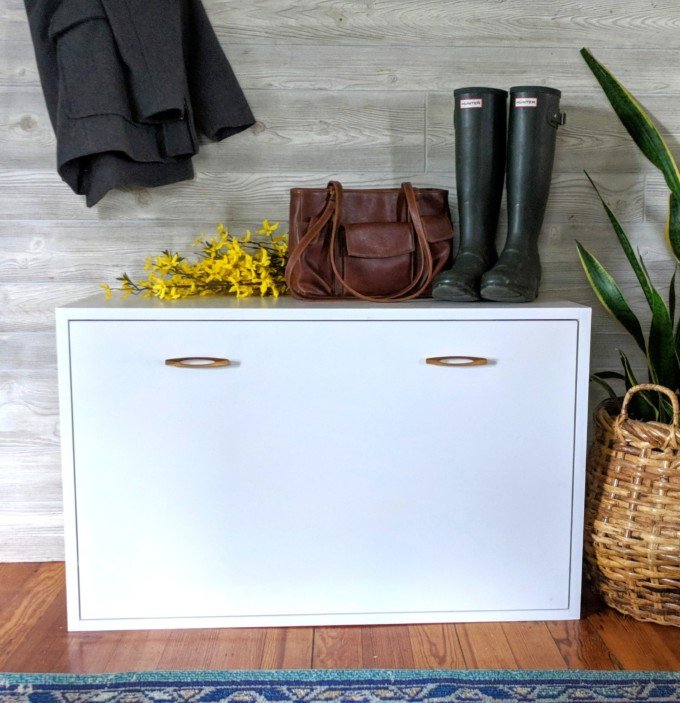
 Finally, add your hardware of choice! Boom, done!

You’re Done
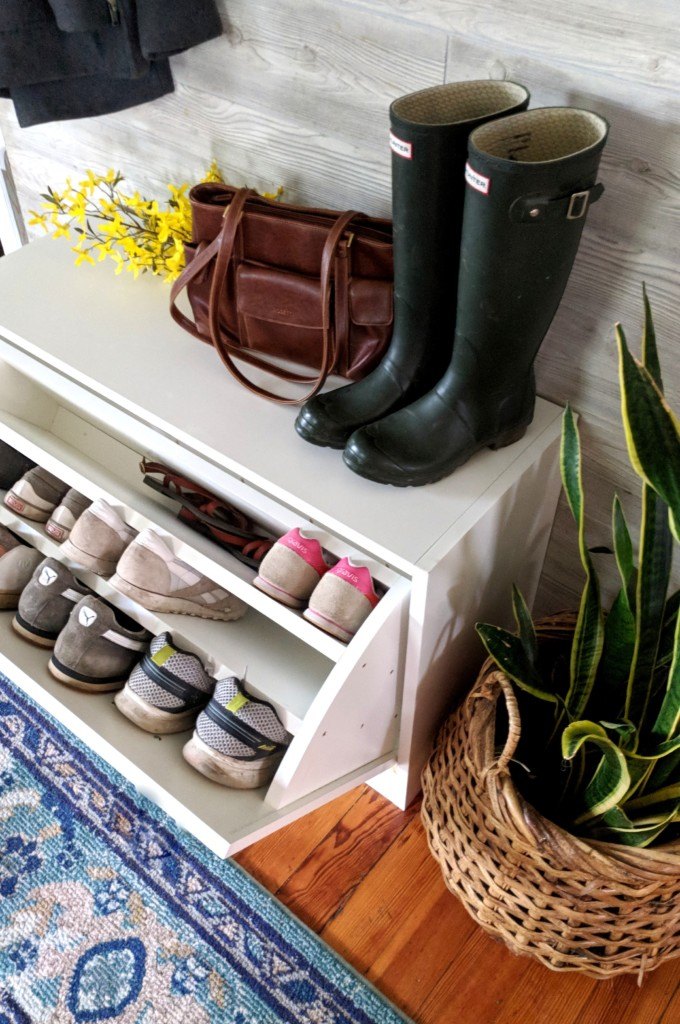
Stand up and admire your battle tank of a shoe storage solution!
Shoutout to our friend Miki that let us borrow her Hunter boots for our photoshoot! 😉

This will be such a lifesaver for corralling our shoes, and will give us more floor space in our closet now that our shoes have a place to call home.
The truth is, this scrap wood shoe cabinet turned out AMAZING. And it’s making us want to whip one out for the kiddos too! Wouldn’t a mini shoe cabinet be adorable?
So I know that a scrap wood shoe cabinet is a stretch since A) it’s not scrap wood, it’s ‘melamine’, and B) it’s a pretty decent size build for being built with scrap wood. But we’re calling it a WIN anyways!
Check out these other awesome Scrap Wood projects from our buildy blogger friends!
- The House of Wood – DIY Bunk Buddy
- 3×3 Custom – Scrap Wood Trivets
- Ugly Duckling House – Mini Garden Deck
- The Created Home – Animal Coin Banks
- Her Toolbelt – 3D Pixel Art
- The Kim Six Fix – Outdoor Drink Stakes
- DIY Huntress – Scrap Wood Coasters
- Mr. Build It & Mrs. Style It – Bent Plywood Headphone Stand
- At Charlotte’s House – Buffalo Check Tray
- Sawdust 2 Stitches – Scrap Wood Wall Decor
- Bower Power – Pallet Baseball Hat Rack
- Pneumatic Addict – Table with Epoxy Resin
- Anika’s DIY Life – DIY Spice Rack
- 100 Things 2 Do – DIY Can Crusher
- Hazel + Gold Designs – Patio Table Drink Holder
- Reality Daydream – Scrap Wood Shoe Cabinet
- House Becoming Home – Modern DIY Clock
- Chatfield Court – Wooden Garden Obelisk

Related:
-

If you follow us on the 'gram, you know I've been stripping the finish off…
-

We love the original wood of our library, and wanted to find a desk that…
-

We've been needing to update our coffee table situation in the living room for awhile…
Hi, please help me, were can I get this download in mm
Regards
Willie
The cut list is completely missing the shelf back—it only has the carcass back.
This is such a smart solution for shoe storage! I have been looking for something to get ours more organized. I may have to try & recreate this. We are having our cabinets refinished this week so maybe once that project is complete haha!
I love the design and results. Great Idea for shoes storage and save space in my home hallway. Thanks for this Idea.
thank you for your plans and fotos. I would built this rack as well. My only question is: how works the hinge? what hinge do you take?
I love this!! I might make one of these for my bedroom! 🙂 I have some extra wood in my home and found online an article that offers cool ways to use your scrape pieces of wood – https://housetipster.com/housetips/9126/10-surprising-uses-for-sawdust
I was shocked that it could be used for gardening. Great job on the shoe cabinet.
Umm….your scrap wood makes my project look like crapwood. Just sayin. 🙂
xo – kb
I seriously need like 8 of these to handle the amount of shoes my boyfriend and I just throw EVERYwhere.