• Home
  • About
  • Tutorials
  • Recipes
  • Furniture
  • Contact
    • Contact
    • Infertility
    • Disclosure
    • Privacy Policy
  • Shop
    • Facebook
    • Instagram
    • Pinterest

Reality Daydream

The Dream is Free, The Hustle Sold Separately

  • Home
  • About
  • Tutorials
  • Recipes
  • Furniture
  • Contact
    • Contact
    • Infertility
    • Disclosure
    • Privacy Policy
  • Shop

Tips and Tricks on Staining a Pergola!

September 7, 2016 by Bethany Sy

*This post was sponsored by Wagner. Thank you for supporting the partners that make Reality Daydream possible! This post contains affiliate links*

When we bought our house 7 years ago, there wasn’t much in the way of landscaping… let alone a deck or patio area. It took us a few years to make it a priority, but we finally built our rounded pergola and installed the patio.

Enjoy this short progression of photos that represents dozens of hours of hard labor, sweaty breakdowns, and actual gnashing of teeth.

Progression of building a pergola and adding a patio

We spend SO MUCH TIME out on this patio, and we didn’t even notice how much the unfinished wood of the pergola had gotten so worn and dull over the last couple years.

How to stain and seal a pergola... the easy way!

But the idea of staining a pergola (let alone SEALING) was daunting.

SO. many. boards.

I was picturing myself brushing it on, one stoke at a time… resulting in me laying in the middle of the patio in a pool of defeated tears and wood stain. But after doing some researching, we realized that we could SPRAY the product on with a paint gun type thing. I was still hesitant and DREADING it. But our friends at Wagner sent us one of their spray guns to use (the Flexio 590) for this project, and that thing works like a dream.
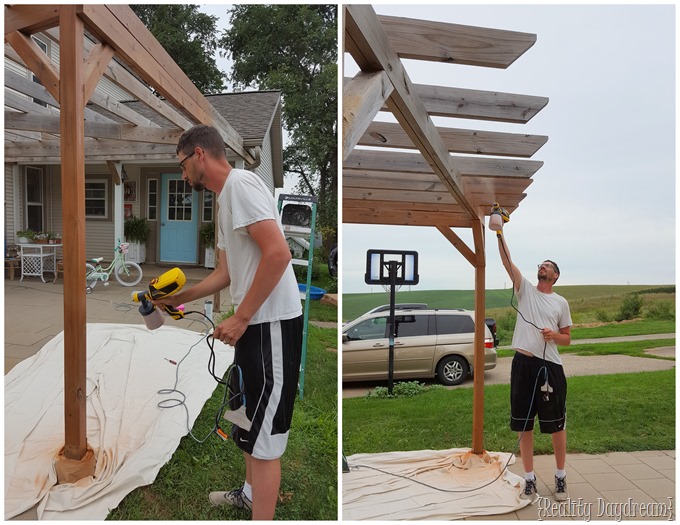
Using a sprayer makes staining the pergola a breeze!

Of course it doesn’t hurt that the hubs is 6’8” tall either. LOLOL! He did the first coat, and I did the second… and my coat took twice as long because I had to get down and move the ladder every 30 seconds. But it went on so smooth, I wasn’t complaining! This paint gun is so easy to operate… AND easy to clean! And we loved that we didn’t need to drag our giant air compressor out onto the patio for staining a pergola.

Progress is being made on staining the pergola.

We used Thompson’s Water Seal stain/sealer in ‘Woodland Cedar’, and we love the rich cedar color. It makes the wood seem so much more vibrant and alive! And much less like it’s going to crumble.

The absolute WORST part of this project was taping/papering off the house to protect it from overspray. Isn’t the taping and prep work always the worst?

Preparing your pergola or deck for stain and sealant!

However, it was easier than we thought it would be, because Nick discovered this brilliant little tool that actually dispenses the painters tape and paper together. Basically a life-changing product for all DIYers.

After applying both coats of stain, and removing the paper, we stood back to appreciate the full effect of our newly refinished pergola!

Tips and tricks for staining and sealing your pergola or deck!

Our backyard looks wonderful after staining the pergola!

I mean, check out the difference in this convenient before/after collage I made.

Staining and sealing your pergola makes SUCH a big difference! And it's not as much work as you might think.

Yeah yeah, I know that wasn’t a fair before and after pic because one was on a cloudy day, and one was on a sunny day. But you get the point right? Plus, I can’t control the weather sooo….

Our curb appeal just went from zero to sixty in no time! And it makes for MUCH better pictures when I’m photographing our little fam enjoying a fall day.

Staining a pergola can make a gigantic difference in the look of your yard!

On a totally different topic, I’d like to show you what our girls spent our 3-day weekend doing.

Sy girls

Wait for it…

Sidewalk hearts

SO MANY HEARTS.

Sidewalk Chalk Hearts on the Patio

I have a feeling when it rains, we’re going to have lots of tears in this house. I’ve been dropping hints about it in hopes of preparing them for the trauma in advance.

UPDATE… exactly 5 minutes after I typed that, it started raining. The girls looked out the window and said, ‘It’s raining! I guess we’ll have to draw all our hearts again later. Do you think it’s raining in Mexico?’ LOLOL …I can’t make this stuff up.

What did YOU do this past Labor Day weekend? Do you get out and go boating? (we got a little canoeing in!) Or did you do some house or yard projects?

~Bethany

Related:

  • Garden Bed Redefining

    We're always in awe of how spending a little extra time redefining our garden beds…

  • Outdoor Spring Cleaning

    It never fails! Each spring, when the snow melts, we're always itching to get out…

  • Filling Sidewalk Cracks with Caulk

    Hello there! Nick here! Earlier this spring, Beth and I needed to leave town for…

About Bethany Sy

Nick and Bethany Sy are the creative free-spirits behind DIY/Lifestyle blog, Reality Daydream. They recently purchased a historic mansion and have been documenting the ups and downs of renovation and making this home their own... all while sharing tips and tutorials along the way! When they found themselves in the trenches of infertility, they started a journey that would prove to be their most important DIY project ever, and have 3 beautiful girls to show for it. <3

« Make This: Cross Base Succulent Terrariums
Annual Fam Camping 2016 »

Comments

  1. 5

    Nick says

    August 20, 2020 at 7:37 pm

    Did you back brush after you sprayed?

    Reply
    • 6

      Bethany Sy says

      August 25, 2020 at 4:19 pm

      Nope!

      Reply
  2. 7

    Mike says

    November 17, 2019 at 3:33 am

    I am LITERALLY looking to do this EXACT thing to our pergola and patio. I did all of the patio and about half of the pergola by brush. UGH! Naturally, I quit as the summer go to hot and my desire waned. So I’m looking forward to getting that sprayer. Would you say the stain was absorbed well by the wood? Supposedly brushes make for better absorption by the wood…

    Reply
    • 8

      Bethany Sy says

      November 20, 2019 at 7:20 pm

      The stain looked great for about 2 years, but then it started looking pretty blotchy. Might try another product next time.

      Reply
  3. 9

    Lisa Render says

    June 24, 2017 at 5:14 pm

    We have a pergola almost exactly like yours and we need to do something soon before it turns grey. Ours isn’t against our house so that might be a little less prep work. But I’m wondering if you had to powerwash or do any prep work to the wood before staining? Your project looks great! Thanks for the inspiration!

    Reply
  4. 10

    dana dashoop says

    September 14, 2016 at 6:36 pm

    I can’t believe the transformation for what the sun does to the boards- & how easy Nick made it look… wowza! loving the new stain color!!! oooooo concrete stain to match? 😉

    Reply

Leave a Reply Cancel reply

Your email address will not be published. Required fields are marked *

  • Facebook
  • Instagram
  • Pinterest
  • RSS
  • YouTube
We are Nick and Bethany! Welcome to our blog, Reality Daydream where we share our DIY adventures!

realitydaydream

Still can’t get over these shelves. 😍 These Still can’t get over these shelves. 😍

These Aksel Radius Floating Shelves by @shelfology are the perfect finishing touch to this wall in our kitchen. 🙌

#gifted #shelfology #radshelfie #floatingshelf #akselradius
I needed an instant-gratification project today fo I needed an instant-gratification project today for my well-being, and this little wooden stand was so fun and fast!

Details and links to everything in this pic in Stories!
If ya just need a slab of wood, grab a cutting boa If ya just need a slab of wood, grab a cutting board when you’re at Target or Walmart! They’re made of hard wood!

I used this cutting board to experiment and make some prototypes for a large-scale piece of art I’m doing for our church. It’s got me EXCITED!

Follow along for that project- happening soooon!

@dapproducts @dremel @jet.woodworking
You’ve all seen the video, but here’s some sti You’ve all seen the video, but here’s some still shots of the kitchen wall in all its glory!! 

The Aksel Radius Floating Shelves by @shelfology were the perfect finishing touch! 

Should I do a house tour of our main floor this week?!?! 🙌🌿

#sponsored #floatingshelf #radshelfie
Load More Follow on Instagram
View of our entryway of our historic mansion that we're slowly renovating and making our own.
Click here for lots of art projects using only wood stain on furniture!!
Please feel free to share or pin my posts! You're welcome to use ONE of my images (no collages or pinnables) with a link back to the corresponding post. Please do not edit or crop that single image in any way. Improper use of my photos, ideas or words is a violation of copyright. Thank you!

Categories

Attention: Almost any do-it-yourself project involves risk of some sort. Your tools, materials, and skills will vary, as will the conditions at your project site. Reality Daydream has made every effort to be complete and accurate in the instructions of the plans on this website. Reality Daydream will not assume any responsibility or liability for damages or losses sustained or incurred in the course of your project or in the use of the item you create. Always follow the manufacturer’s operating instructions in the use of tools, check and follow your local building codes, and observe all commonly accepted safety precautions.


Copyright © 2023 · Modern Blogger Pro On Genesis Framework · Customizations by Sweet Theory Designs · Privacy Policy · Log in