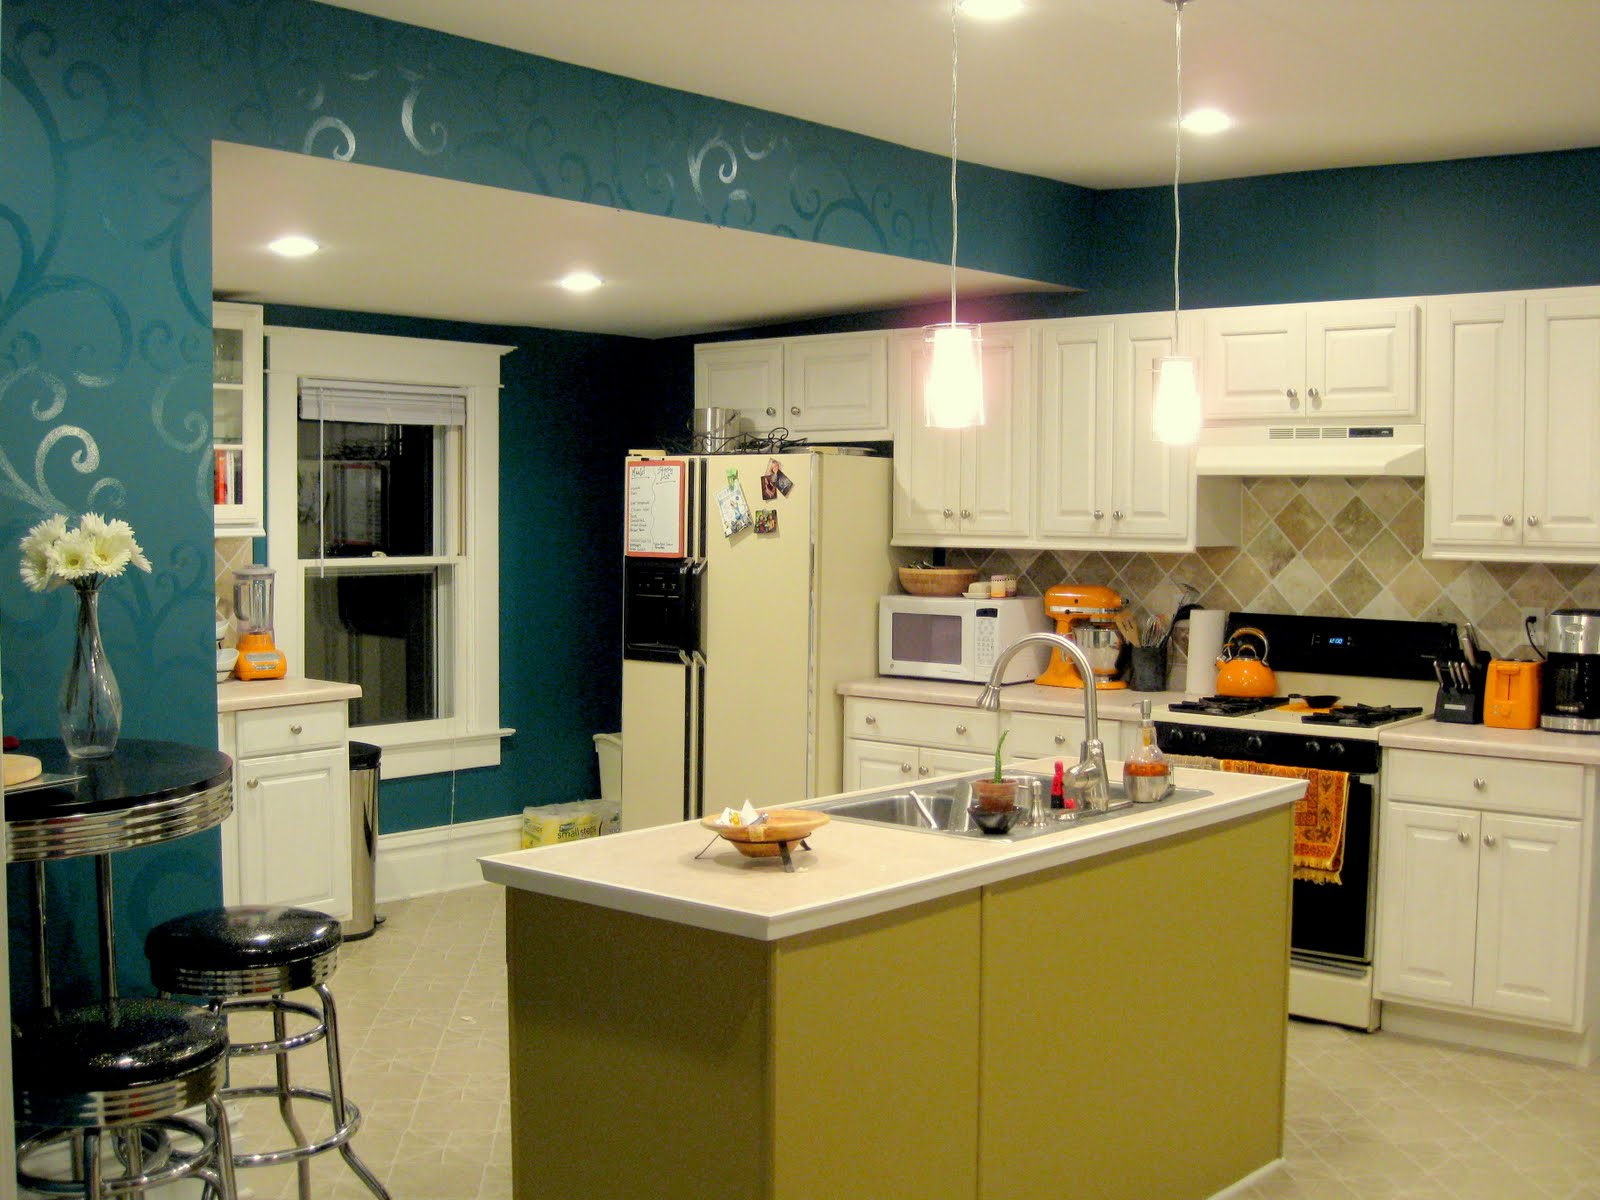
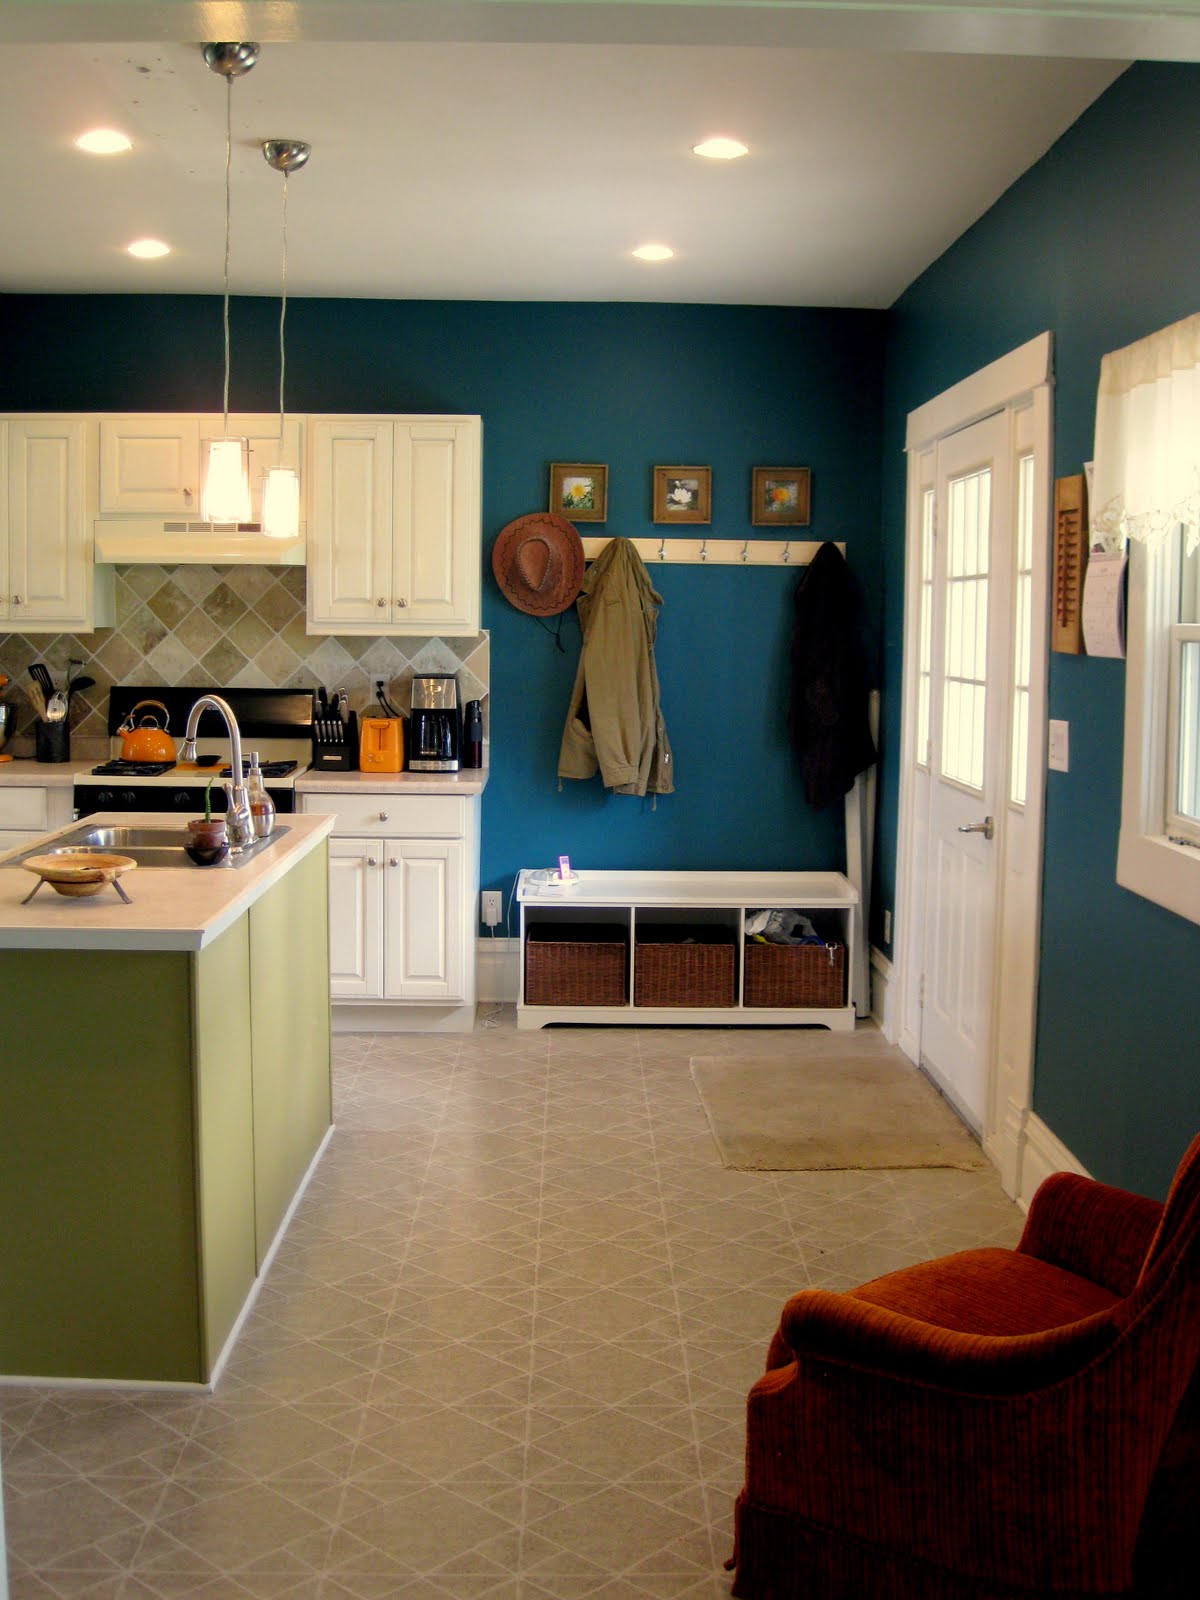
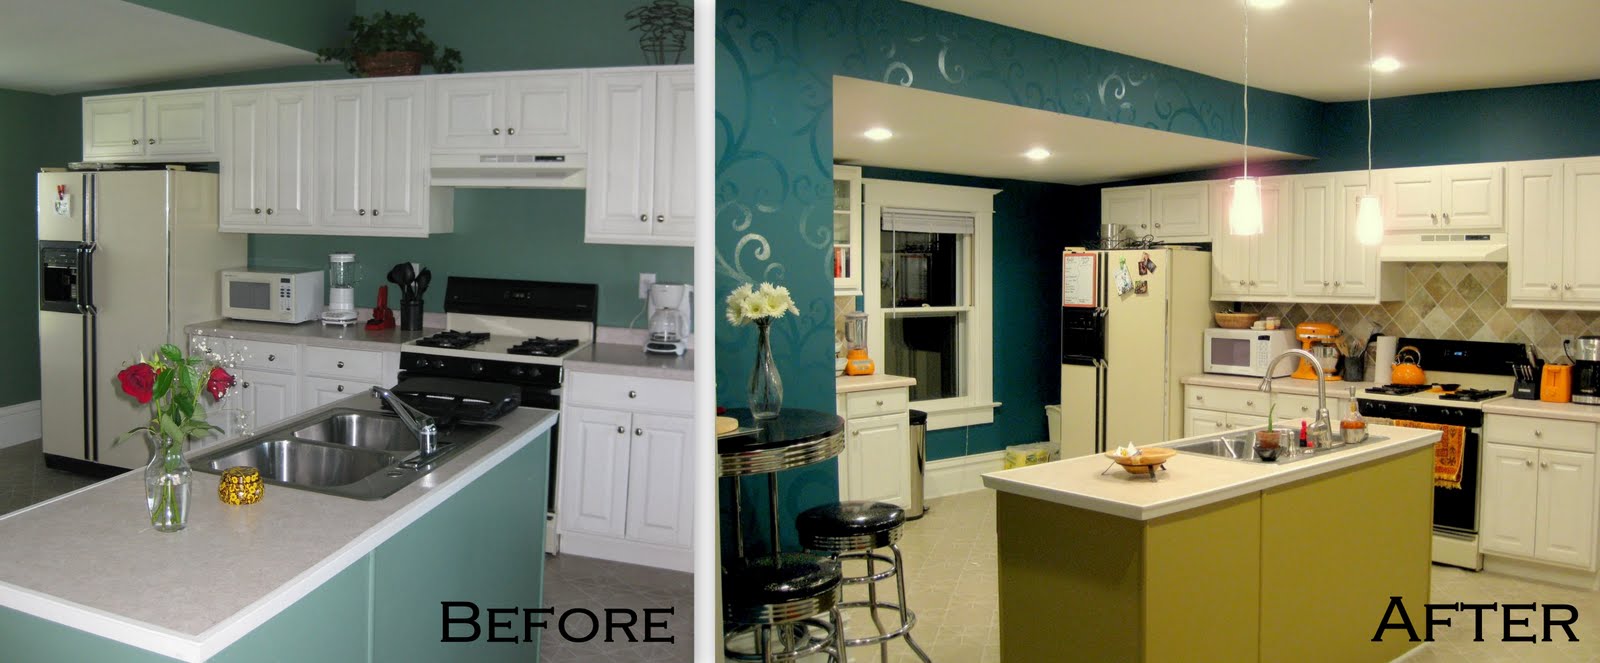
The daunting lighting situation was finally resolved and cleaned up, and I had a glimmer of an idea to paint something special on this one wall! I toyed around with lots of different ideas. But in the end, I decided on this subtle swirly pattern. I chose flat paint for this one wall, and bought the same color (Pittsburgh Paints in Deep Emerald) in high gloss… I’m sure you could use a clear urethane and get the same effect. I just love the way it turned out. And it was super easy… took an afternoon to complete.

I photocopied a swirly pattern (stock photo) onto a transparency, and using an overhead projector, blasted the image up onto the wall and traced it with a pencil! If you try this, be sure to use a pencil that’s close in color to the wall paint. Otherwise you’ll find yourself having to do several coats just to cover up your blasted pencil lines. Does it sound like I learned that the hard way? Well your right. Below is a copy of the swirly image I used! Feel free to copy!


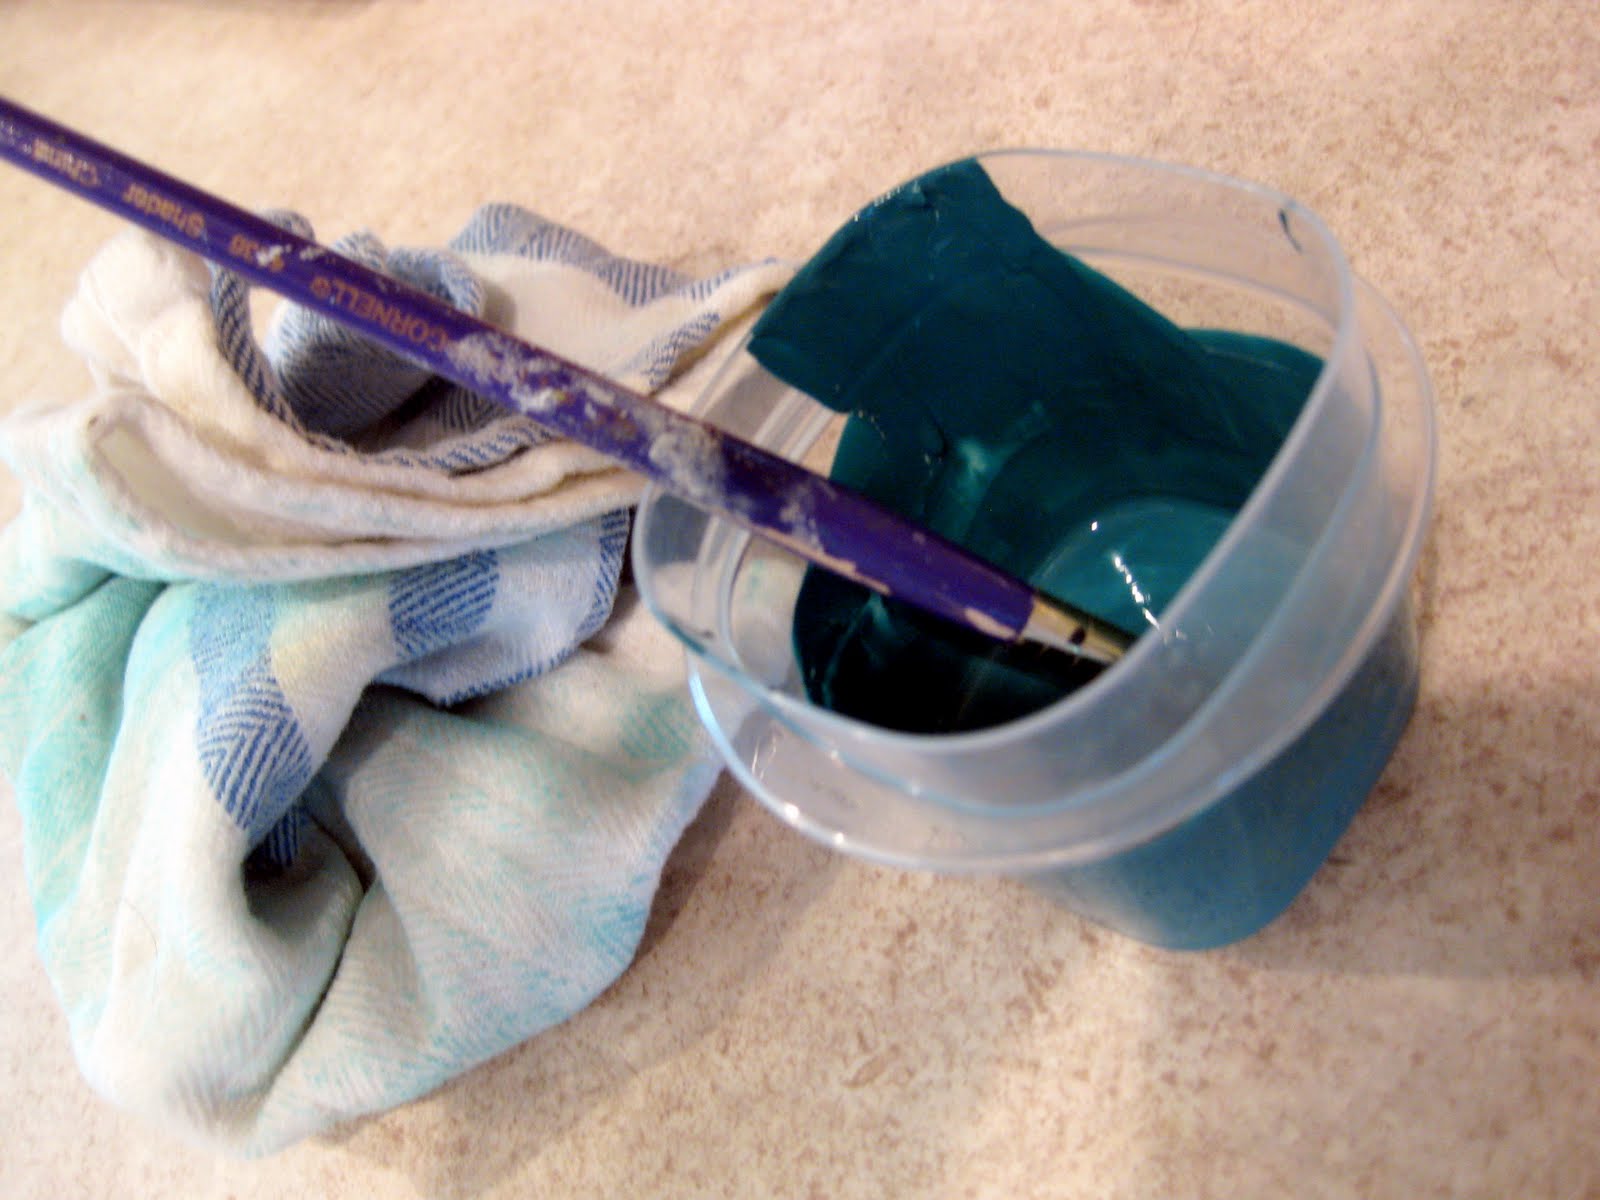
And I only used this much paint for the whole project. Too bad they don’t sell paint by the tablespoon!
If you decide to try out a tone-on-tone pattern project, be sure to send us pics! We love to see what other creative minds come up with!


You can click on these pics to see the ‘before and after’ larger!

Related:
-

Got a hole in your wall that you wish wasn't there? We do! When we…
We have a client of ours that asked us to repaint her living room for her and I personally don’t have much experience painting kitchens. Came across this post and it helped a lot! P.S. Really like the emerald color you used!
This has been my dream to do on some wall for at least 5 years. Today i started in it my office. As it has been my dream wall it will be the wall my dream board wall will be on, and the wall that I face while riding my indoor bike. It may have gotten covered in your world but that is the beauty of pinterest…it lasts forever. Thank you for the inspiration.
You are SO SWEET!!
First of, I,would kill for your kitchen. My little galley kitchen might be okay for a man who uses a microwave most of the time (my husband before we were married) but not me. But, soon that will be changed. Knocking out a wall and getting a better floor plan. Not much bigger but more strange and counter space yippee! And yor wall, well it’s just gorgeous. So glad I found your blog. It’s full of wonderful ideas. Passing it to my sister.
Knocking out a wall is a lot of work, but I know it will be so worth it for you! Go girl!
YOU ROCK , ENJOYED YOUR SITE , BIT I’M NOT ARTISTIC AT ALL !
Where do you find an overhead projector?? Borrow one?
I had the same question. My freehand would be a disaster. 😉
love it!
q: where are the flowers hanging from?
The flower thing is just hanging on the wall by a couple of tiny nails! You can see how a transformed that dated flower decor here: https://realitydaydream.com/2010/06/floral-decorative-thingy.html
Congratulations, I am Brazilian and I know his work first. I was in love.
Parabéns, sou brasileira e estou conhecendo seu trabalho pela primeira vez. Fiquei apaixonada.
This is WOW!!! But how do you think it would do over “orange peel” texture on a wall?
Yes, just keep it ‘in the lines’ and it will be great!!
This is one of my first pins on pinterest, and I can’t wait to try it on my wall! I have a question though – the picture of the swirl stock art doesn’t show up in the article – it says the link is broken. Not sure if that is just me (I can see the other pictures). Would it be possible to check the link or send me the file? I love the swirls and have been searching for something similar but can’t find anything!
Thanks!!
Lauren, I’m going to email you that image now! Let me know if/when you get it. 🙂
What a great idea! I was going to use a pale metallic (Modern Masters in oyster) over bright white to stencil damask patterns on all four walls, but now I think I’ll alternate walls (oyster, glossy white, oyster, glossy white) for the tone on tone. Or no.. Maybe I can alternate wall colours instead to create several layers of interest. Thanks so much for the inspiration! 🙂
I loved it a lot, the kitchen is looking superb after the greenish color paint used on the side walls and it all ends to a charming look.
certapro painters
This is actually a fantastic blogs! More of these details are superb -it is nice to see one that current.
We close on our second hose on Friday. I want to sign papers and head to the house and start painting I’m sooo excited!!
Ooo Congrats Bethany! Send us some pics if you end up using some of our techniques! 🙂
Hi Beth,
I’ll add my love, along with everyone else. But I am curious as to the paint color of the island? That green is amazing. Will you share?
Thanks,
Livlife
Hi Heather,
You did a beautiful job on your swirls. Simple and sophisticated with a touch of whimsy. I just thought I would share a photo one of our customers sent us that uses flat, semi gloss and glossy paint to get a similar effect. She chose our Bamboo Silhouette wall mural. We provided the pattern and transfer paper and she provided the paint and effort. It really did turn out beautiful. She won 1st Place in our Photo Contest! And you can see why. Check it out: http://elephantsonthewall.com/contest-winners/summer-2012
I LOVE this look. I was planning to try it in my bedroom/bathroom, and I’m so glad to find a great how-to. 🙂
I’m wondering what you did when you got to the corners? Did you wrap the design around the corners or start them again on the next wall? I’d love any hints you can give me. I’ll try to check back to see if you reply, or if it would work for you, I’d LOVE if you could email me at auntierah@hotmail.com
Thanks so much!!
Hi Heather! On the corners, we put a ‘grout line’ using 1/4″ tape, and then start a new tile on the other side of the corner. We try to think of how it would be installed if it were real tile!
I love everything you’ve done to your house. You truly have a lovely and cozy home. I wish I have your creativity too!
Awww, you’re so sweet! 🙂
HI BETH!! I saw this on Pinterest and much to my surprise it was my favorite BETH ever! I love your painted walls! Love ya, Jill
Thank you for the inspiration! Did in my dining room and it looks awesome!
by far the most creative and coolest post
i have seen today! green and blue also happen to be my fave colors!
Thank you for this wonderful post. The blog about the upholstery tacks is so helpful. I have always wanted to use some of those but I always ended up with bent tacks. I had no idea about the use of cardboard. Again thank you for this useful post.
where did you find the orange appliances and accents?
They are Kitchen Aid brand… we registered for them for our wedding! LOVE ORANGE!
What paint finish did you use on the surrounding walls that aren’t stenciled?
Hey Beth, I found your blog because someone had pinned this project on Pinterest. I love this project and the color scheme, I like teal and green a lot and we have it everywhere in our home, too. You have a beautiful home and two sweet daughters, too. I read how much effort it took you to conceive and I am so happy for you.
Jule {inside9B}
would this work if I have an eggshell finish on the wall and then use the gloss anyone?
thanks
I’m sure it would work, but it wouldn’t pop out as much because it would be quite as contrasted as the flat paint. It also depends on what color you use. We did this once before on a beige wall (with glossy beige design) and it didn’t show up nearly as much.
Hope this helps! Send us pics when you’re done! 🙂
Amazing. VERY VERY BEAUTIFUL.
THANKS FOR SHARING.
I just did this to my office, I used the same pattern you did. Except I did this on all of the walls, I LOVE IT! Thanks so much for this awesome idea. I get so many compliments on it, thanks so much!
Cozinha perfeita em tudo! Adoro a cor.
Parabéns. Beijos
I saw this and decided to give it a try. I used a circle pattern to match my room. It looks amazing! Thanks so much
Do you think its possible to get the same effect using a polyurethane clear and a stencil?
FAB U LOUS!!! Wonderful job. I will DEF be stealing this idea (I even love the color!) I also think the suggestion in one of the comments to use chalk is ingenious. I have to say though… The amount of people asking you how you got the design on the wall boggles the heck out of me. WHY would you take the time to comment but you can’t take the time to READ THE ARTICLE?!?! GAH! Thank You so very much for sharing this. You may have just cured my boring Master Bedroom Walls!!
Wow Melissa! That turned out AWESOME! Your did a great job! I’m so glad we could inspire you… and thanks for linking back to our blog! 🙂
Hi, just wanted to let you know that I used your template design, and painted my bedroom accent wall with your idea. I also linked your post up to my post. Thanks for letting me use your template!! I love my new wall!!
Melissa
redflycreations.blogspot.com
I have GOT to get an overhead projector 🙂
Good job!! 🙂
I found this while I was perusing tone-on-tone ideas about a year ago & pinned it to my Pinterest board. And it has been ‘liked’ and repinned nearly 1,000x since! Literally my most popular Pin ever. Just wanted to say that you are onto something here, bc I can’t believe how popular it is!
http://pinterest.com/pin/90072061266921306/
Wow…what an amazing idea!! So simple yet elegant. Love this! I am going to do something like this on my big wall in the living/dining room!! Thank you! Thank you!
Please tell us the paint color!
I love your site. You have a great gift. You also gave me a great idea for the curtains I plan to put up in my living room. I just need to dig out my sewing machine now. 🙂
daaaaaang this is BEAUTIFUL! I love love LOVE this idea. I did a spot light of this on my blog, http://ninered.blogspot.com/2012/02/spotlight-subtle-swirl-wall-pattern.html, and sent credit & links back to you here for all to see. Thanks so much for sharing, I want to do this in my house someday!
Love the bold colors! Working with a similar palette in our house!
I’m SOOO inspired! Going to try this in our master bathroom! Thanks for the info and pictures!
Can you post the name of paint color? I have been wanting this paint color
When tracing on a wall like this – use chalk. When the paint is dry you just use a damp paper towel to get rid of the lines. No extra work to cover pencil lines.
Great idea!! Thanks for sharing!!
Fantastic! You should feel so accomplished and proud!
That’s beautiful! You can usually get smaller samples of paint that’s usually a few ounces, instead of the whole gallon, for either free or just a couple dollars.
A M A Z I N G!!!!
That’s impressive and simple!
I just did this in my Dining room and I must say it is amazing. Thank you!!!
Your room looks beautiful! I did large diamonds in my dining room several years ago. I spent a lot of time taping off the pattern, and was surprised to find out that not all paint colors could be mixed in high gloss, so by default I ended up buying CLEAR high gloss polyurathane and it worked great.
never mind I found where you posted it-Thanks
Did you name/brand of the paint color?
I saw a photo of your walls on pinterest and had to come see your blog for myself! I have been raving about this to any one that’ll listen and have decided I’m going to do some glossy swirls on flat paint as well (but in brown). Hoping mine turns out just as fantastic as yours! 🙂
Just curious if you tried this & how it turned out :]
I love the color u choose…i love stuff like that but sometimes im worried it won’t turn out the way i invision it…thats cool though..u dont always have to stay in the lines. Stuff still turns out cool
Looks beautiful! I have a wall I am contemplating it with. I decided to paint it as an accent but it is kind of blah…
ekk! I love it!
do you have any suggestions on how to do it without the light projector, i dont have one but i would really like to do this.
Saw this on Printerest. Great look, can be done with non-yellowing polyurethane too (gloss or semigloss, a gloss level up from wall paint) no color to match. I did this with stamping on a wall.
Just saw this on pinterest. LOVE IT!!!
I see all the chrome in your kitchen and had just been on liquidstainlesssteel.com and thought you might like to know you can paint all your appliances stainless. Your house looks fabulous!!
hey! I read your blog all the time and i was looking throug pinterest and recognized your handy work! hopefully it will generate lots of traffic to your blog!
Beautiful! What a great idea!
So I’d heard Nick at work talk about the stuff you guys had done, but hadn’t seen pictures. I am IMPRESSED. Both the tile and your kitchen jobs are awesome.
Oh, and Nicole is dying to get you over to our house to save us from the 1970’s.
I love your kitchen/paint. Great idea. I will be linking you to my blog danggoodfinds.com tomorrow. Grab a button from my side bar if you want. Good luck with the babies! I am excited for you.
What a GREAT idea! I love it! Saw this on Pinterest and I’m going to FB/Tweet it.
Anna
http://www.askannamoseley.com
That paint is the coolest idea ever. And ditto lulu on how I found you
Love it! I’m a new follower and I found you on Pinterest! 🙂
I think the painting of gloss on flat is brilliant. Looks so nice, subtle and lovely. Thanks for sharing!
I love the swirls as well….are you for hire to do that as well?? 😀
I just came over from a comment you posted on YHL, and well I’m a little late, but your kitchen is GORGEOUS! The swirls are my favorite part! I just did my bedroom with flat/gloss stripes and now I’m trying to refrain from using that technique all over the house!
I just came over from a comment you posted on YHL, and well I’m a little late, but your kitchen is GORGEOUS! The swirls are my favorite part! I just did my bedroom with flat/gloss stripes and now I’m trying to refrain from using that technique all over the house!
This is beautiful!! I love the vibrant color scheme.
I have to show this to my husband! We both complain about the lighting in our old farmhouse kitchen all the time. And since he’s an electrician, I would think he can do it….
YES! This is what I want! Thank you soooooo much for posting the idea on my blog! This is so perfect, I can’t wait to go buy the paint and get started! This is exactly the type of thing I was trying to think up, but my interior design challenged brain was having troubles getting there. Seriously, can you tell how excited I am!!!
I LOVE the swirls. How exactly did you do that? Did you use a stencil, etc.? I would love to do that in my office/yoga room…
Hi – just visiting from Remodelaholic…I LOVE LOVE LOVE your paint job! The color is awesome, too! Love it!
Did you freehand those swirls? AMAZING and totally FAB!
It’s gorgeous. I love the paint color and the scroll work. It looks like you free-handed that. Or did you use a pattern? I’ve done diamonds using a flat and high-gloss of the same color. I LOVE that effect.
I found your blog on better after. Wow how amazing, painting backsplash! Ok that is the blue I want though for my accent wall, the main color you have, please please tell me what it is! cassiesgarner@yahoo.com Thank you!!! Love your kitchen, I wish my husband would let me do that!
Absolutely FABULOUS!!!!
Amazing work!!! (stopping by from “Better After”
I’m in love witht he swirls you painted on the walls! Did you use a pattern or did you free hand?
It’s freaking awesome. I love that teal color so much! (The contrast with the orange chair is great too.)
It loox amazing girl! I LOVE it!!!
L-O-V-E I-T!!!!! We recently added can lights to our 70’s home. Changed the look and the feel completely. Your walls are fabulous!
Beth, it is AMAZING! Can I take pics of my rooms and you can just tell me what to paint them!?! PLEASE. 🙂
So cute! I love how the lighting makes the kitchen looks so much brighter! Love it!
I love it!!!!!